环境
Qemu: 2.8.0
开发板: vexpress-ca9
概述
如果要玩物联网,至少应该让开发板实现联网,让qemu支持联网在之前的博文中已经有介绍了,但是如果只能在自己的局域网内玩耍就太没意思了,下面就实现用开发板ping百度, 可以参考tq2440的根文件系统。
正文
一、下面是我的路由器配置
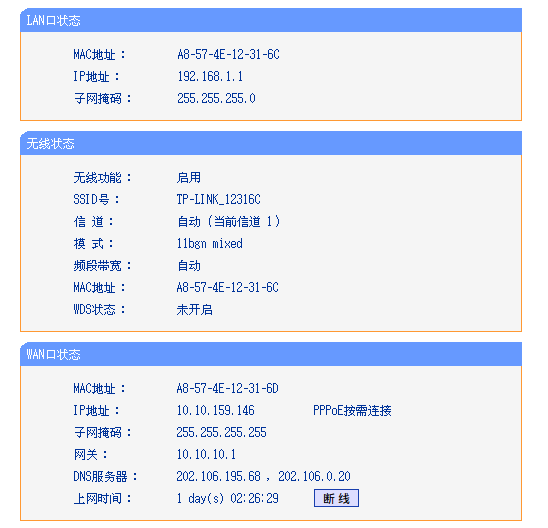
WAN口的状态不用关心,只关心LAN口就可以了:
网段: 192.168.1.0
网关: 192.168.1.1
子网掩码: 255.255.255.0
我的PC通过网线连接到路由器上面,路由器开启了DHCP服务, 也可以认为Qemu虚拟出来的开发板也直连到路由器上面了。
二、要实现ping www.baidu.com就涉及到域名解析
这里我们直接拷贝PC的resov.conf文件:
1 { pengdonglin@pengdonglin-dell /home/pengdonglin }
2 $cat /run/resolvconf/resolv.conf
3 # Dynamic resolv.conf(5) file for glibc resolver(3) generated by resolvconf(8)
4 #     DO NOT EDIT THIS FILE BY HAND -- YOUR CHANGES WILL BE OVERWRITTEN
5 nameserver 202.106.195.68
6 nameserver 202.106.0.20
我们在开发板的/etc下创建resolv.conf,内容如下:
1 [root@vexpress ~]# cat /etc/resolv.conf
2 nameserver 202.106.195.68
3 nameserver 202.106.0.20
三、在开发板的/etc下面创建net.conf文件
1 [root@vexpress ~]# cat /etc/net.conf
2 IPADDR=192.168.1.3
3 NETMASK=255.255.255.0
4 GATEWAY=192.168.1.1
5 MAC=52:54:00:12:34:56
四、创建/etc/hosts文件
1 [root@vexpress ~]# cat /etc/hosts
2 localhost               127.0.0.1
五、编写网络设置脚本net_set
 1 #!/bin/sh
 2
 3 source /etc/nettype.conf
 4 source /etc/net.conf
 5
 6 ifconfig eth0 down
 7 ifconfig eth0 hw ether $MAC
 8 echo ifconfig eth0 hw ether $MAC >/dev/console
 9
10 ifconfig eth0 $IPADDR netmask $NETMASK up
11 echo ifconfig eth0 $IPADDR netmask $NETMASK up >/dev/console
12
13 route add default gw $GATEWAY
14 echo add default gw $GATEWAY >/dev/console
六、修改开机脚本/etc/init.d/rcS
 1 #!/bin/sh
 2
 3 PATH=/sbin:/bin:/usr/sbin:/usr/bin
 4 runlevel=S
 5 prevlevel=N
 6 umask 022
 7 export PATH runlevel prevlevel
 8 mount -a
 9 mkdir -p /dev/pts
10 mount -t devpts devpts /dev/pts
11 echo /sbin/mdev > /proc/sys/kernel/hotplug
12 mdev -s
13 mkdir -p /var/lock
14
15 mount -t ext4 /dev/mmcblk0p2 /root
16
17 modules_dir=/lib/modules/`uname -r`
18
19 if [ ! -d ${modules_dir} ];then
20     mkdir -p ${modules_dir}
21 fi
22
23 if [ ! -d /d ]; then
24     ln -sf /sys/kernel/debug /d
25 fi
26
27 ifconfig lo 127.0.0.1
28 net_set
29
30 /bin/hostname -F /etc/sysconfig/HOSTNAME
31 if [ -e /usr/sbin/telnetd ]; then
32     telnetd&
33 fi
七、测试
 1 [    7.248250] smsc911x 4e000000.ethernet eth0: MAC Address: 52:54:00:12:34:56
 2 ifconfig eth0 hw ether 52:54:00:12:34:56
 3 [    7.367408] Generic PHY 4e000000.etherne:01: attached PHY driver [Generic PHY] (mii_bus:phy_addr=4e000000.etherne:01, irq=-1)
 4 [    7.394043] smsc911x 4e000000.ethernet eth0: SMSC911x/921x identified at 0xf1390000, IRQ: 31
 5 ifconfig eth0 192.168.1.3 netmask 255.255.255.0 up
 6 add default gw 192.168.1.1
 7 Please press Enter to activate this console.
 8 [root@vexpress ]#
 9 [root@vexpress ]# route -n
10 Kernel IP routing table
11 Destination     Gateway         Genmask         Flags Metric Ref    Use Iface
12 0.0.0.0         192.168.1.1     0.0.0.0         UG    0      0        0 eth0
13 192.168.1.0     0.0.0.0         255.255.255.0   U     0      0        0 eth0
14 [root@vexpress ]#
15 [root@vexpress ]# ping www.baidu.com
16 PING www.baidu.com (61.135.169.121): 56 data bytes
17 64 bytes from 61.135.169.121: seq=0 ttl=56 time=6.315 ms
18 64 bytes from 61.135.169.121: seq=1 ttl=56 time=4.089 ms
19 64 bytes from 61.135.169.121: seq=2 ttl=56 time=4.387 ms
20 64 bytes from 61.135.169.121: seq=3 ttl=56 time=4.112 ms
21 ^C
22 --- www.baidu.com ping statistics ---
23 4 packets transmitted, 4 packets received, 0% packet loss
24 round-trip min/avg/max = 4.089/4.725/6.315 ms
25 [root@vexpress ]#
可以通过route -n或者route -e查看当前的路由表。
完。