使用ClientCredentials流程保护API
这个示例展示了使用IdentityServer中保护APIs的最基本的场景。
在这个场景中我们会定义一个API和一个想要访问它的客户端。客户端会在IdentityServer上面请求一个token,然后使用这个token来访问API。
定义API
在你的系统中,Scopes定义了你想要保护的资源,例如APIs。
因为我们在这个示例中要使用的是内存中的配置,所以你需要做的就是创建一个ApiResource类型的对象,并且设置恰当的属性。
在工程中添加一个Config.cs文件,写入以下代码:
 public class Config
    {
        public static IEnumerable<ApiResource> GetApiResources()
        {
            return new List<ApiResource>
            {
                new ApiResource("api1", "my first api")
            };
        }
    }
定义客户端
下一步是定义一个可以访问这个API的客户端。
在这个场景中,客户端与API的交互过程中没有用户的参与,并且会使用client secret这个东西在IdentityServer上进行认证。在Config.cs文件中添加如下代码:
public static IEnumerable<Client> GetClients()
        {
            return new List<Client>()
            {
                new Client()
                {
                    ClientId = "firstClient",
                    ClientSecrets = {new Secret("secret".Sha256())},
                    AllowedScopes = {"api1"},
                    AllowedGrantTypes = { GrantType.ClientCredentials }
                }
            };
        }
配置IdentityServer
为了让IdentityServer使用你定义好的Scopes(目前只有API)和客户端,你需要在ConfigureService方法中进行一些配置。下面的代码进行了相关的配置,你的ConfigureServices最终看起来像下面这样:
  public void ConfigureServices(IServiceCollection services)
        {
            services.AddIdentityServer().AddDeveloperSigningCredential()
                //配置资源
                .AddInMemoryApiResources(Config.GetApiResources())
                //配置客户端
                .AddInMemoryClients(Config.GetClients());
        }
配置好之后你就可以运行了,应用启动之后你可以在浏览器页面上面输入http://localhost:5000/.well-known/openid-configuration(请注意你的端口号),你可以看到如下的内容,这个就是发现文档,discovery document。这个文档会被客户端和API使用,用来下载必要的配置信息。
{
    "issuer": "http://localhost:5000",
    "jwks_uri": "http://localhost:5000/.well-known/openid-configuration/jwks",
    "authorization_endpoint": "http://localhost:5000/connect/authorize",
    "token_endpoint": "http://localhost:5000/connect/token",
    "userinfo_endpoint": "http://localhost:5000/connect/userinfo",
    "end_session_endpoint": "http://localhost:5000/connect/endsession",
    "check_session_iframe": "http://localhost:5000/connect/checksession",
    "revocation_endpoint": "http://localhost:5000/connect/revocation",
    "introspection_endpoint": "http://localhost:5000/connect/introspect",
    "frontchannel_logout_supported": true,
    "frontchannel_logout_session_supported": true,
    "backchannel_logout_supported": true,
    "backchannel_logout_session_supported": true,
    "scopes_supported": ["api1", "offline_access"],
    "claims_supported": [],
    "grant_types_supported": ["authorization_code", "client_credentials", "refresh_token", "implicit"],
    "response_types_supported": ["code", "token", "id_token", "id_token token", "code id_token", "code token", "code id_token token"],
    "response_modes_supported": ["form_post", "query", "fragment"],
    "token_endpoint_auth_methods_supported": ["client_secret_basic", "client_secret_post"],
    "subject_types_supported": ["public"],
    "id_token_signing_alg_values_supported": ["RS256"],
    "code_challenge_methods_supported": ["plain", "S256"]
}
添加一个API
下一步,在解决方案中添加一个API。
你可以使用asp.net core web api模板,然后像上面说的那样配置你的API的一些信息,比如使用console作为宿主而不是iis,还要配置好你的应用的端口,最好是将应用的端口固定。你可以在Program类中使用UseUrls扩展方法来进行配置:
 public static IWebHostBuilder CreateWebHostBuilder(string[] args) =>
            WebHost.CreateDefaultBuilder(args).UseUrls("https://localhost:8001;http://localhost:5001")
                .UseStartup<Startup>();
注意UseUrls扩展方法中的配置。在这里由于我使用的是.net core 2.1的运行环境,在asp.net core2.1中默认开启了HTTPs,HTTP上面的请求都会被转发到HTTPs上面。
然后是launchSettings.json的配置:
{
  "$schema": "http://json.schemastore.org/launchsettings.json",
  "profiles": {
    "Api": {
      "commandName": "Project",
      "launchBrowser": true,
      "launchUrl": "api/values",
      "applicationUrl": "https://localhost:8001;http://localhost:5001",
      "environmentVariables": {
        "ASPNETCORE_ENVIRONMENT": "Development"
      }
    }
  }
}
和Identityserver上的配置一样,我删除了关于IIS的配置。
此外你需要在Program中进行配置:
  public static IWebHostBuilder CreateWebHostBuilder(string[] args) =>
            WebHost.CreateDefaultBuilder(args).UseUrls("http://localhost:5001;https://localhost:8001")
                .UseStartup<Startup>();
注意UseUrls扩展方法。
现在解决方案下面有两个工程了:
在API项目上面增加一个Controller:
[Route("identity")]
[Authorize]
public class IdentityController : ControllerBase
{
    [HttpGet]
    public IActionResult Get()
    {
        return new JsonResult(from c in User.Claims select new { c.Type, c.Value });
    }
}
稍后会使用这个Controller来测试授权请求,同时将claims identity通过api来可视化。
配置
最后一步是将认证服务配置到DI系统中,并将认证中间件添加到管道上面,这些操作将会:
- 校验传入的token以确保他们来自一个受信任的颁发者(一个受信任的IdentityServer)。
- 校验传入的token,确保客户端拥有该API的使用权(或者说拥有这个scope)。
将IdentityServer4.AccessTokenValidation 这个nuget包添加到你的项目中。你可以在程序包管理器上面输入:
install-package identityserver4.accesstokenvalidation来进行安装,记住将默认项目(在程序包管理器上)选择为API项目。
然后更新Startup类,像下面这样:
public class Startup
{
    public void ConfigureServices(IServiceCollection services)
    {
        services.AddMvcCore()
            .AddAuthorization()
            .AddJsonFormatters();

        services.AddAuthentication("Bearer")
            .AddIdentityServerAuthentication(options =>
            {
                options.Authority = "http://localhost:5000";
                options.RequireHttpsMetadata = false;

                options.ApiName = "api1";
            });
    }

    public void Configure(IApplicationBuilder app)
    {
        app.UseAuthentication();

        app.UseMvc();
    }
}
AddAuthentication 方法将认证服务添加到DI系统中并且将“Bearer”配置成默认的方案(scheme)。AddIdentityServerAuthentication扩展方法 添加了AddAuthentication扩展方法中指定的方案所对应的handler(IdentityServer access token validation handler)。所以这里涉及到一个问题,如果你将AddAuthentication方法中的参数指定为一个随便的字符串,那么你的程序是会出错的,比如说AddAuthentication("shit")。我测试了一下,报了这个错误:System.InvalidOperationException: No authenticationScheme was specified, and there was no DefaultChallengeScheme found.
这就是关于API的东西了,现在它被IdentityServer保护着。
创建客户端
最后是写一个客户端,用来请求access token,然后携带这个acecss token来访问api。我们要创建一个console应用来干这个事儿。
IdentityServer上面的token端点实现了OAuth2.0的相关协议,并且你可以使用原生的HTTP来访问它(比如使用postman)。但是,我们有一个nuget包叫做IdentityModel,这个包封装了相关的协议,使用上也更方便。
在你的解决方案中创建一个console控制台应用程序,然后在程序包管理器中输入install-package identitymodel,这将会安装IdentityModel。或者你可以在nuget控制台通过搜索IdentityModel来安装:

IdentityModel包含了一个可以使用发现文档(就是那个http://localhost:5000/.well-known/openid-configuration的URL指向的一个json文档)的客户端库,在这种方式下你只需要知道基础地址就好(比如http://localhost:5000这个地址,而不用记住http://localhost:5000/.well-known/openid-configuration)。实际的端点地址已经在IdentityModel里面配置好了。
// discover endpoints from metadata
var disco = await DiscoveryClient.GetAsync("http://localhost:5000");
if (disco.IsError)
{
    Console.WriteLine(disco.Error);
    return;
}
接下来你可以使用TokenClient 类来请求token了。为了初始化它你需要往它的构造函数中传递进去一个token端点地址,客户端id(在identityserver中配置好的)和secret(同样在identityserver中配置好的)。
下一步你可以使用RequestClientCredentialsAsync 方法来获取一个token:
// request token
var tokenClient = new TokenClient(disco.TokenEndpoint, "client", "secret");
var tokenResponse = await tokenClient.RequestClientCredentialsAsync("api1");

if (tokenResponse.IsError)
{
    Console.WriteLine(tokenResponse.Error);
    return;
}

Console.WriteLine(tokenResponse.Json);
可以在jwt.io这个网站上面粘贴获取到的access token来查看详细的信息。
最后要做的就是调用这个API。
通常情况下你要使用HTTP的Authorization头来发送Access token到API。这个是通过SetBearerToken扩展方法来完成的:
// call api
var client = new HttpClient();
client.SetBearerToken(tokenResponse.AccessToken);

var response = await client.GetAsync("http://localhost:5001/identity");
if (!response.IsSuccessStatusCode)
{
    Console.WriteLine(response.StatusCode);
}
else
{
    var content = await response.Content.ReadAsStringAsync();
    Console.WriteLine(JArray.Parse(content));
}
之后的输出结果像是下面这样:
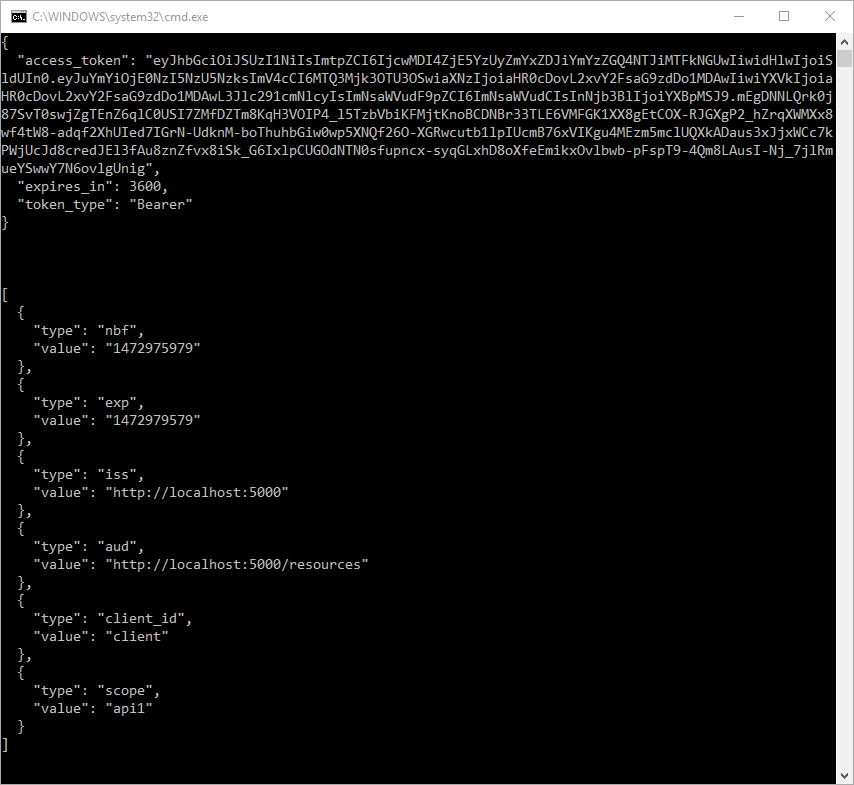
默认情况下access token会包含关于scope的claim,还有其他像上面图片上所显示的。