一、切UIView的某个角为圆角
如果需要将UIView的4个角全部都为圆角,做法相当简单,只需设置其Layer的cornerRadius属性即可(项目需要使用QuartzCore框架)。而若要指定某几个角(小于4)为圆角而别的不变时,怎么做呢?
其实很简单,使用UIBezierPath,设置CAShapeLayer,给UIView设置遮罩效果即可。
// 图标左上、左下切圆角
UIBezierPath *phoneIconPath = [UIBezierPath bezierPathWithRoundedRect:self.phoneBGView.bounds byRoundingCorners:UIRectCornerTopLeft | UIRectCornerBottomLeft cornerRadii:CGSizeMake(5, 5)];

CAShapeLayer *phoneIconLayer = [[CAShapeLayer alloc] init];

phoneIconLayer.frame = self.phoneBGView.bounds;
phoneIconLayer.path = phoneIconPath.CGPath;

self.phoneBGView.layer.mask = phoneIconLayer;
// 上面代码很简单,这里列下枚举值,根据即可添加即可
typedef NS_OPTIONS(NSUInteger, UIRectCorner) {
    UIRectCornerTopLeft     = 1 << 0,
    UIRectCornerTopRight    = 1 << 1,
    UIRectCornerBottomLeft  = 1 << 2,
    UIRectCornerBottomRight = 1 << 3,
    UIRectCornerAllCorners  = ~0UL
};
二、改变UIView的透明度
1、如果一个View上有子控件,这个View的alpha改变时,子控件的透明度也会随着改变;
2、如果这个View是UITextField,它的alpha改变时,它的placeHolder的颜色和textColor都会随着改变;
要求:改变View透明度,怎么使其他保持原样?
解答:这个时候,不要再改变alpha了,会影响其他控件的,只需要设置背景色的透明度即可。
// 通过改变背景色的透明度,不会影响其他控件及属性
self.pswTF.backgroundColor = [UIColor colorWithWhite:1 alpha:0.3];
3、怎么改变UITextField的placeHolder的颜色呢?
太简单了,通过运行时及KVC改变:
// 文本框更换placeHolder颜色
[self.userNameTF setValue:[UIColor grayColor] forKeyPath:@"_placeholderLabel.textColor"];
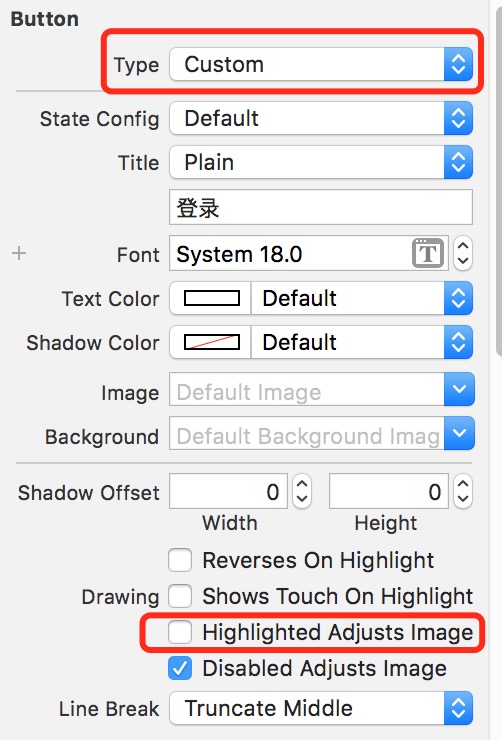
三、按钮点击的时候,会有高亮效果,怎么取消呢?
看下面的图,太简单了,这里就不再上代码了。
1、Button的Type改为Custom;
2、不要勾选Highlighted Adjusts Image。
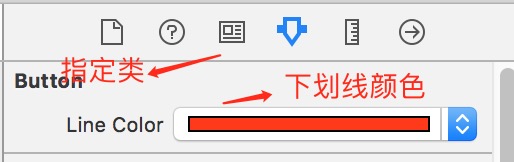
四、怎么给按钮的文字下面添加下划线呢?
思路:自定义控件,在Button的子控件titleLabel下面划线。然后StoryBoard中设置Button的Class为自定义类,添加画线颜色即可。
#import <UIKit/UIKit.h>

IB_DESIGNABLE
@interface KTButton : UIButton

// 文字下面的下划线颜色
@property(nonatomic,strong) IBInspectable UIColor *lineColor;

@end
#import "KTButton.h"

@implementation KTButton

- (id)initWithFrame:(CGRect)frame
{
    self = [super initWithFrame:frame];
    if (self) {

    }
    return self;
}

-(void)setColor:(UIColor *)color{
    _lineColor = [color copy];
    [self setNeedsDisplay];
}


- (void) drawRect:(CGRect)rect {
    CGRect textRect = self.titleLabel.frame;
    CGContextRef contextRef = UIGraphicsGetCurrentContext();

    CGFloat descender = self.titleLabel.font.descender;
    if([_lineColor isKindOfClass:[UIColor class]]){
        CGContextSetStrokeColorWithColor(contextRef, _lineColor.CGColor);
    }

    CGContextMoveToPoint(contextRef, textRect.origin.x, textRect.origin.y + textRect.size.height + descender + 1 + 2);
    CGContextAddLineToPoint(contextRef, textRect.origin.x + textRect.size.width, textRect.origin.y + textRect.size.height + descender + 1 + 2);

    CGContextClosePath(contextRef);
    CGContextDrawPath(contextRef, kCGPathStroke);
}

@end