作者|Juan Cruz Martinez
编译|Flin
来源|towardsdatascience

今天,我们将学习如何检测图像中的人脸并提取面部特征,如眼睛、鼻子、嘴巴等。我们可以将这些信息作为一个预处理步骤来完成,例如捕捉照片中人物的人脸(手动或通过机器学习),创建效果来“增强”我们的图像(类似于Snapchat等应用程序中的效果),对人脸进行情感分析等等。
过去,我们已经讨论过如何使用OpenCV来检测图像中的形状,但是今天我们将通过引入DLib和从图像中提取面部特征来将其提升到一个新的水平。
Dlib是一个高级的机器学习库,它是为解决复杂的现实世界问题而创建的。这个库是用C++编程语言创建的,它与C/C++、Python和java一起工作。
- Dlib:http://dlib.net/
值得注意的是,本教程可能需要对OpenCV库有一定的了解,例如如何处理图像、打开相机、图像处理和一些小技巧。
它是如何工作的?
我们的脸有几个可以识别的特征,比如眼睛、嘴巴、鼻子等等。当我们使用DLib算法检测这些特征时,我们实际上得到了每个特征的点的映射。
该映射由67个点(称为地标点)组成,可识别以下特征:
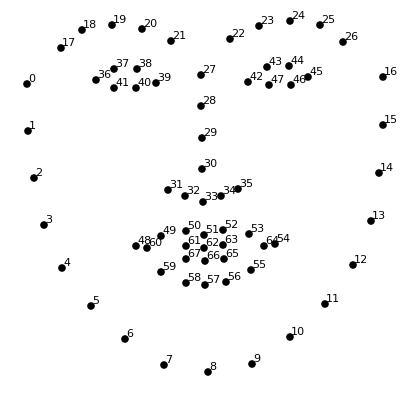
- 颚点= 0–16
- 右眉点= 17–21
- 左眉点= 22–26
- 鼻点= 27–35
- 右眼点= 36–41
- 左眼点= 42–47
- 口角= 48–60
- 嘴唇分数= 61–67
现在让我们来了解如何提取特征。
安装要求
与往常一样,本文将用代码演示示例,并将逐步指导你实现一个完整的人脸特征识别示例。但是在开始之前,你需要启动一个新的Python项目并安装3个不同的库:
- opencv python
- dlib
如果像我一样使用pipenv,可以使用以下命令安装所有这些文件:
pipenv install opencv-python, dlib
如果你使用的是Mac和某些版本的Linux,则在安装dlib时可能会遇到一些问题,如果在安装过程中遇到编译错误,请确保检查使用的CMake库版本。在Mac中,确保你有可用的CMake,并且可以使用正确的版本运行:
brew install cmake
对于其他操作系统,请在线检查以获得特定支持。
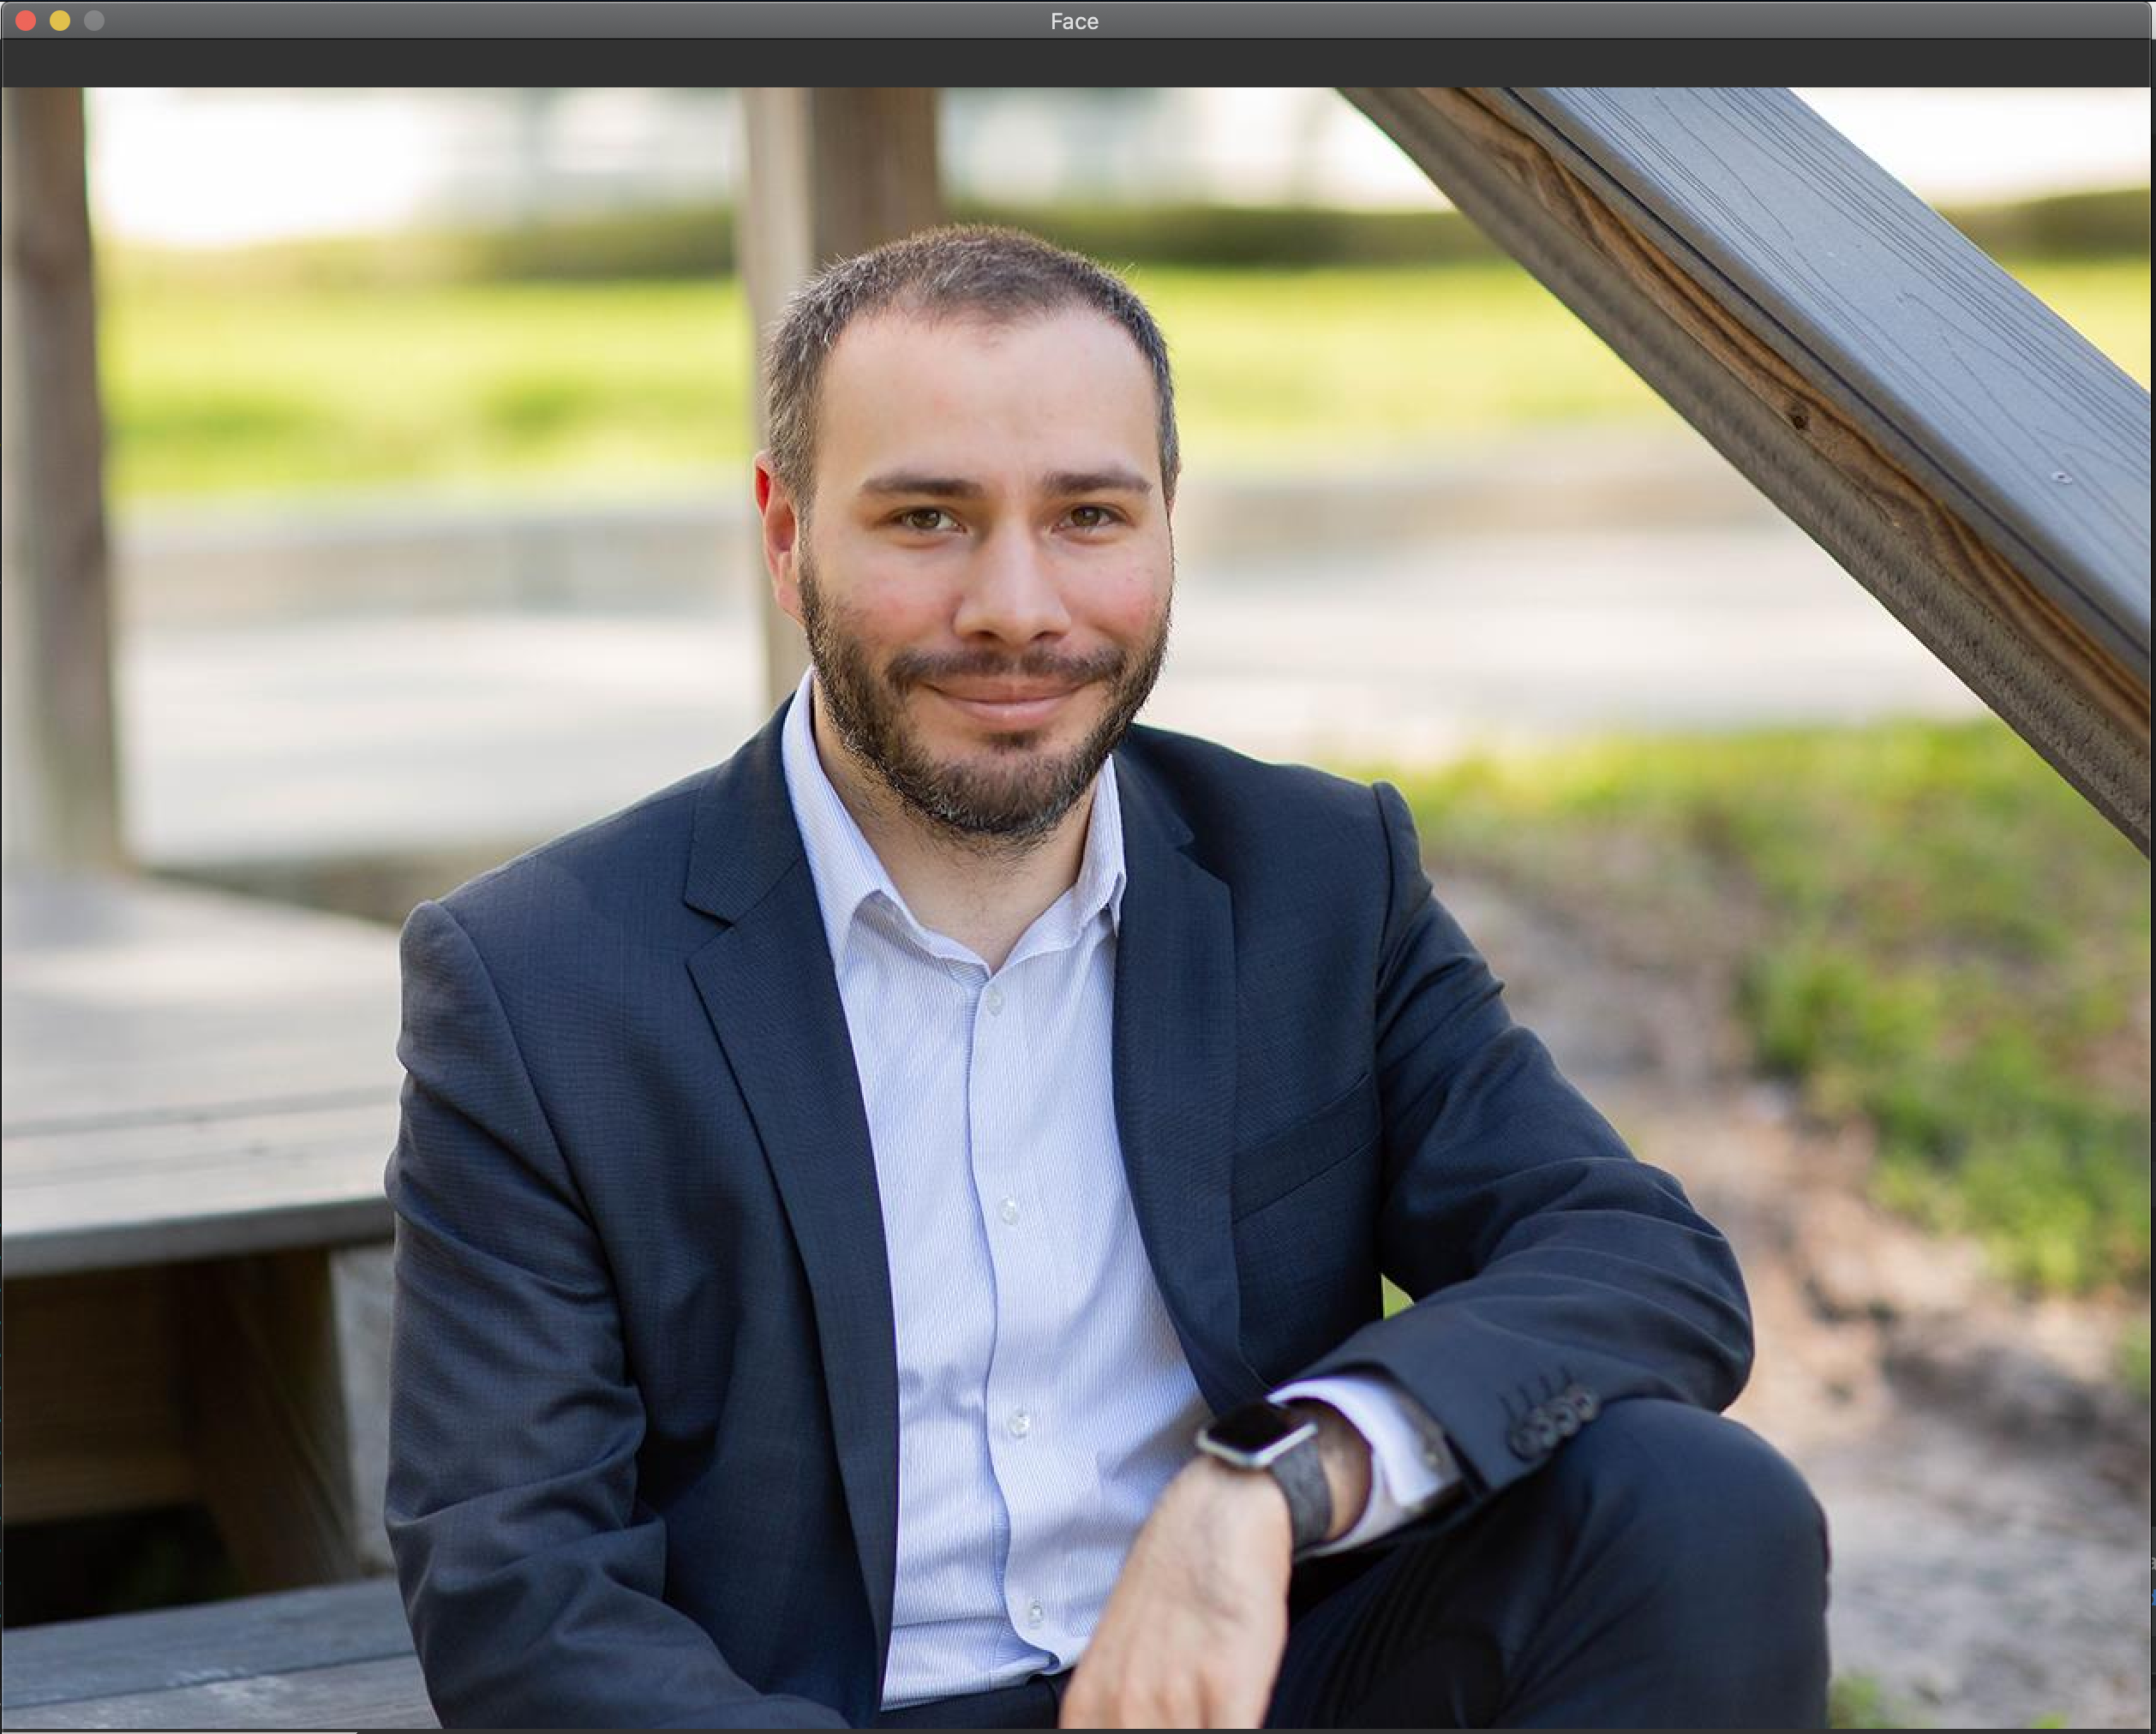
步骤1:载入并显示图片
我们将从小处着手并以代码为基础,直到有一个可以正常工作的示例为止。
通常,我喜欢使用绘图来渲染图像,但是由于我们在稍后的文章中准备了一些很酷的东西,因此我们将做一些不同的事情,并且将创建一个窗口来展示我们的工作结果。
让我们一起看看代码吧!
import cv2
# read the image
img = cv2.imread("face.jpg")
# show the image
cv2.imshow(winname="Face", mat=img)
# Wait for a key press to exit
cv2.waitKey(delay=0)
# Close all windows
cv2.destroyAllWindows()
很简单,对吧?我们只是用imread加载图像,然后告诉OpenCV在winname中显示图像,这将打开窗口并给它一个标题。
之后,我们需要暂停执行,因为当脚本停止时,窗口会被破坏,所以我们使用cv2.waitKey来保持窗口,直到按下某个键,然后销毁窗口并退出脚本。
如果使用代码并在代码目录中添加了一个名为face.jpg的图像,你应该得到如下内容:
原始图像:
步骤2:人脸识别
到目前为止,我们还没有对图像做任何处理,只是把它呈现在一个窗口中,非常无聊,但是现在我们将开始编码好的内容,我们将从识别图像中哪里有一张脸开始。
为此,我们将使用名为get_frontial_face_detector()的Dlib函数,非常直观。但是有一个警告,这个函数只适用于灰度图像,所以我们必须首先使用OpenCV。
get_frontial_face_detector()将返回一个检测器,该检测器是一个我们可以用来检索人脸信息的函数。每个面都是一个对象,其中包含可以找到图像的点。
但我们最好在代码上看看:
import cv2
import dlib
# Load the detector
detector = dlib.get_frontal_face_detector()
# read the image
img = cv2.imread("face.jpg")
# Convert image into grayscale
gray = cv2.cvtColor(src=img, code=cv2.COLOR_BGR2GRAY)
# Use detector to find landmarks
faces = detector(gray)
for face in faces:
    x1 = face.left() # left point
    y1 = face.top() # top point
    x2 = face.right() # right point
    y2 = face.bottom() # bottom point
    # Draw a rectangle
    cv2.rectangle(img=img, pt1=(x1, y1), pt2=(x2, y2), color=(0, 255, 0), thickness=4)
# show the image
cv2.imshow(winname="Face", mat=img)
# Wait for a key press to exit
cv2.waitKey(delay=0)
# Close all windows
cv2.destroyAllWindows()
上面的代码将从图像中检索所有面部,并在每个面部上渲染一个矩形,从而产生如下图像:
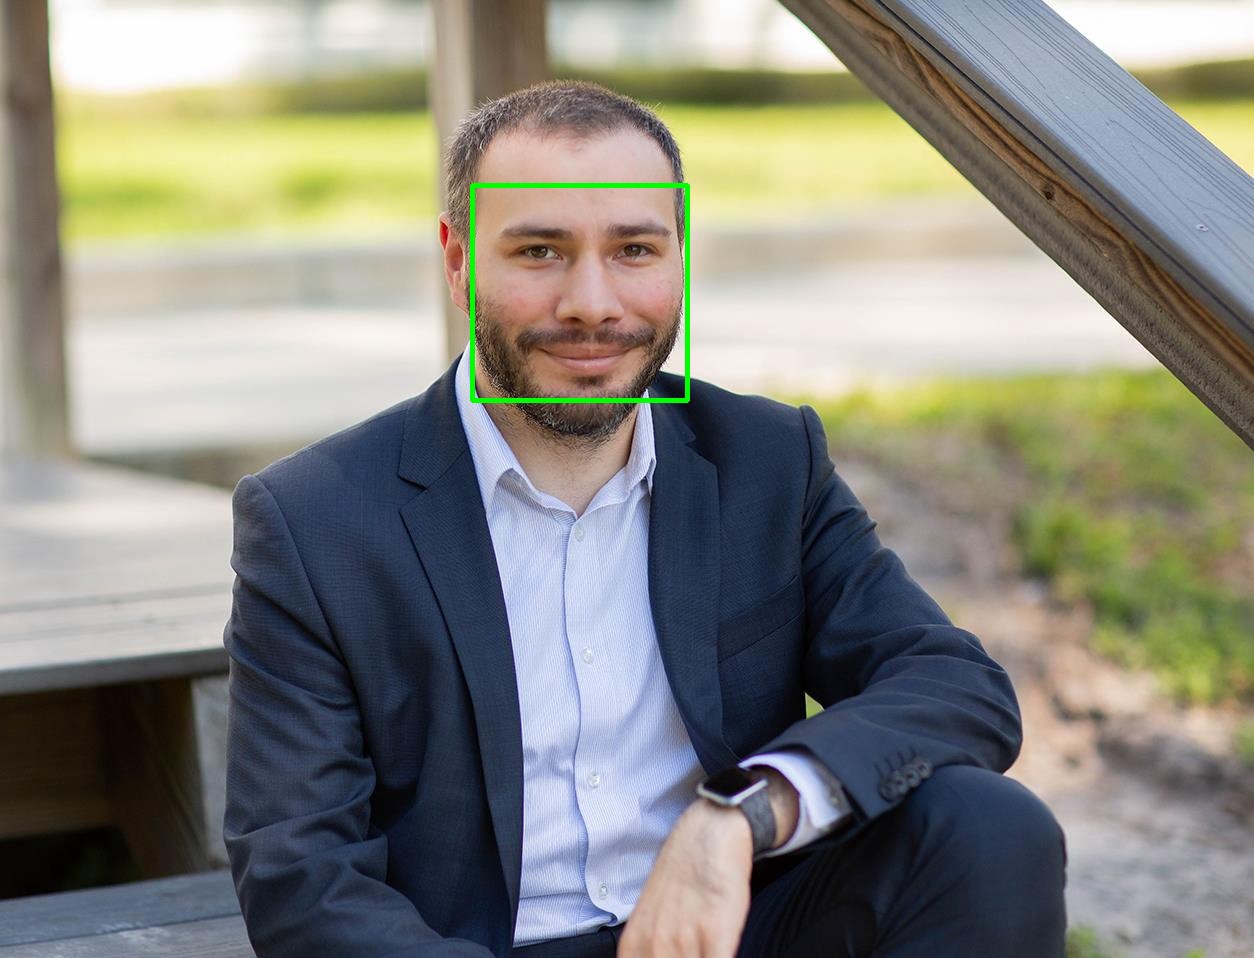
到目前为止,我们在发现人脸方面做得很好,但是我们仍然需要一些工作来提取所有特征(地标)。接下来让我们开始吧。
步骤3:识别人脸特征
你喜欢魔术吗?到目前为止,DLib的工作方式相当神奇,只需几行代码我们就可以实现很多,而现在我们遇到了一个全新的问题,它还会继续这么简单吗?
回答是肯定的!原来DLib提供了一个名为shape_predictor()的函数,它将为我们提供所有的魔法,但是需要一个预先训练的模型才能工作。
有几种模型可以与shape_predictor一起工作,我正在使用的模型可以在这里下载,也可以尝试其他模型。
让我们看看新代码现在是什么样子
import cv2
import dlib
# Load the detector
detector = dlib.get_frontal_face_detector()
# Load the predictor
predictor = dlib.shape_predictor("shape_predictor_68_face_landmarks.dat")
# read the image
img = cv2.imread("face.jpg")
# Convert image into grayscale
gray = cv2.cvtColor(src=img, code=cv2.COLOR_BGR2GRAY)
# Use detector to find landmarks
faces = detector(gray)
for face in faces:
    x1 = face.left() # left point
    y1 = face.top() # top point
    x2 = face.right() # right point
    y2 = face.bottom() # bottom point
    # Look for the landmarks
    landmarks = predictor(image=gray, box=face)
    x = landmarks.part(27).x
    y = landmarks.part(27).y
    # Draw a circle
    cv2.circle(img=img, center=(x, y), radius=5, color=(0, 255, 0), thickness=-1)
# show the image
cv2.imshow(winname="Face", mat=img)
# Wait for a key press to exit
cv2.waitKey(delay=0)
# Close all windows
cv2.destroyAllWindows()
像以前一样,我们总是在同一个代码上构建代码,现在使用我们的预测函数为每个人脸找到地标。现在我还在做一些奇怪的事情,比如27号在那里做什么?
landmarks = predictor(image=gray, box=face)
x = landmarks.part(27).x
y = landmarks.part(27).y
我们的预测函数将返回一个包含所有68个点的对象,根据我们之前看到的图片,如果你注意到的话,会发现点27正好在眼睛之间,所以如果所有的计算正确,你应该看到一个绿点在眼睛之间,如下图所示:

我们已经很接近了,现在让我们渲染所有的点,而不是只渲染一个:
import cv2
import numpy as np
import dlib
# Load the detector
detector = dlib.get_frontal_face_detector()
# Load the predictor
predictor = dlib.shape_predictor("shape_predictor_68_face_landmarks.dat")
# read the image
img = cv2.imread("face.jpg")
# Convert image into grayscale
gray = cv2.cvtColor(src=img, code=cv2.COLOR_BGR2GRAY)
# Use detector to find landmarks
faces = detector(gray)
for face in faces:
    x1 = face.left() # left point
    y1 = face.top() # top point
    x2 = face.right() # right point
    y2 = face.bottom() # bottom point
    # Create landmark object
    landmarks = predictor(image=gray, box=face)
    # Loop through all the points
    for n in range(0, 68):
        x = landmarks.part(n).x
        y = landmarks.part(n).y
        # Draw a circle
        cv2.circle(img=img, center=(x, y), radius=3, color=(0, 255, 0), thickness=-1)
# show the image
cv2.imshow(winname="Face", mat=img)
# Delay between every fram
cv2.waitKey(delay=0)
# Close all windows
cv2.destroyAllWindows()

但是如果你对所有的点都不感兴趣呢?实际上,你可以调整你的范围间隔来获得上面术语表中指定的任何特征,就像我在这里做的那样:

太棒了,但我们能做点更酷的事吗?
步骤4:实时检测
是的,你没看错!这可能就是你想要的效果!下一步是连接我们的网络摄像头,从你的视频流中进行实时地标识别。
你可以通过使用相机遍历视频帧或使用视频文件来对面部进行实时面部地标检测。
如果要使用自己的摄像机,请参考以下代码,如果使用的是视频文件,请确保将数字0更改为视频路径。
如果要结束窗口,请按键盘上的ESC键:
import cv2
import dlib

# Load the detector
detector = dlib.get_frontal_face_detector()

# Load the predictor
predictor = dlib.shape_predictor("shape_predictor_68_face_landmarks.dat")

# read the image
cap = cv2.VideoCapture(0)

while True:
    _, frame = cap.read()
    # Convert image into grayscale
    gray = cv2.cvtColor(src=frame, code=cv2.COLOR_BGR2GRAY)

    # Use detector to find landmarks
    faces = detector(gray)

    for face in faces:
        x1 = face.left()  # left point
        y1 = face.top()  # top point
        x2 = face.right()  # right point
        y2 = face.bottom()  # bottom point

        # Create landmark object
        landmarks = predictor(image=gray, box=face)

        # Loop through all the points
        for n in range(0, 68):
            x = landmarks.part(n).x
            y = landmarks.part(n).y

            # Draw a circle
            cv2.circle(img=frame, center=(x, y), radius=3, color=(0, 255, 0), thickness=-1)

    # show the image
    cv2.imshow(winname="Face", mat=frame)

    # Exit when escape is pressed
    if cv2.waitKey(delay=1) == 27:
        break

# When everything done, release the video capture and video write objects
cap.release()

# Close all windows
cv2.destroyAllWindows()
最后的结果是:

在弱光条件下,尽管上面的图像中有一些错误,但其结果也相当准确,如果照明效果好的话结果会更加准确。
结论
OpenCV和DLib是两个功能非常强大的库,它们简化了ML和计算机视觉的工作,今天我们只是触及了最基本的东西,还有很多东西需要从中学习。
非常感谢你的阅读!
原文链接:https://towardsdatascience.com/detecting-face-features-with-python-30385aee4a8e
欢迎关注磐创AI博客站:
http://panchuang.net/
sklearn机器学习中文官方文档:
http://sklearn123.com/
欢迎关注磐创博客资源汇总站:
http://docs.panchuang.net/