来源:https://www.cnblogs.com/xwupiaomiao/p/12088066.html
一、Juniper SRX接口类型
gr:GRE隧道接口
ip:IP-over-IP接口
fe:快速以太网接口
ge:千兆以太网接口
ae:聚合以太网接口
as:聚合SONET/SDH接口
Fxp0:带外管理口。独立于HA,且管理口配置不会进行同步
Fxp1:控制层面心跳口。不同型号接口不一样,不做配置。
Fab:数据面心跳接口(control-link)。模块类型1GE或10GE
Reth:转发数据接口(data-link),每个SRX分一个接口捆绑成一个reth
二、配置HA步骤
1、删除两台设备的配置:
delete all
2、配置设备用户密码:
set system root-authentication plain-text-password
3、设置主机名:
set system host-name SRX-A
4、连接control-link接口,设置主备机配置
set chassis cluster cluster-id 1 node 0 reboot
set chassis cluster cluster-id 1 node 1 reboot
5、重启查看HA状态
show chassis cluster status
6、指定数据传输端口,并连接数据传输接口
set interface fab0 fabric-options member-interface ge-0/0/0
set interface fab1 fabric-options member-interface ge-1/0/0
三、Juniper SRX650 HA配置示例
1、定义cluster-id和node,同一个集群cluster-id必须相同,取值范围为0-15,0代表禁用集群,node取值范围为0-1,0代表主设备
root@SRX-A> set chassis cluster cluster-id 1 node 0 reboot
root@SRX-B> set chassis cluster cluster-id 1 node 1 reboot
2、为集群设备配置主机名和管理IP
root@SRX-A# set groups node0 system host-name SRX-A
root@SRX-A# set groups node0 interfaces fxp0 unit 0 family inet address 10.1.1.1/24
root@SRX-A# set groups node1 system host-name SRX-B
root@SRX-A# set groups node1 interfaces fxp0 unit 0 family inet address 10.1.1.2/24
root@SRX-A# set apply-groups "${node}" #把以上的配置应用到每个独立的节点上
root@SRX-A# commit
3、定义数据面板控制口并关联到端口
set interfaces fab0 fabric-options member-interfaces ge-0/0/1
set interfaces fab1 fabric-options member-interfaces ge-3/0/1
4、设置冗余组的对不同节点的优先级,优先级范围1-254,值越大优先级越高,一般定义2个冗余组,redundancy-group 0用于控制引擎,redundancy-group 1用于数据引擎
set chassis cluster redundancy-group 0 node 0 priority 100
set chassis cluster redundancy-group 0 node 1 priority 1
set chassis cluster redundancy-group 1 node 0 priority 100
set chassis cluster redundancy-group 1 node 1 priority 1
5、在数据冗余口配置接口监控,不建议在redundancy-group 0上配置接口监控,当监控到接口故障后优先级降255,实现数据口冗余自动切换
set chassis cluster redundancy-group 1 interface-monitor ge-0/0/3 weight 255
set chassis cluster redundancy-group 1 interface-monitor ge-0/0/4 weight 255
set chassis cluster redundancy-group 1 interface-monitor ge-0/0/5 weight 255
set chassis cluster redundancy-group 1 interface-monitor ge-3/0/3 weight 255
set chassis cluster redundancy-group 1 interface-monitor ge-3/0/4 weight 255
set chassis cluster redundancy-group 1 interface-monitor ge-3/0/5 weight 255
6、定义集群最多支持多少个冗余组接口(redundancy-group),必须不低于当前配置的冗余口数目,否则将有超过数量的冗余口不能正常工作,超过冗余组冗余接口的路由信息都不生效
set chassis cluster reth-count 3
7、把物理端口加入到冗余接口reth0,并把接口reth0加入数据冗余组redundancy-group 1
set interfaces ge-0/0/3 gigether-options redundant-parent reth0
set interfaces ge-3/0/3 gigether-options redundant-parent reth0
set interfaces reth0 redundant-ether-iptions redundancy-group 1
8、为冗余逻辑接口配置IP地址
set interfaces reth0 unit 0 family inet address 202.106.115.6/30
9、把物理端口加入到冗余接口reth1 并把接口reth1加入到数据冗余组reedundancy-group 1
set interfaces ge-0/0/4 gigether-options redundant-parent reth1
set interfaces ge-3/0/4 gigether-options redundant-parent reth1
set interfaces reth1 redundant-ether-iptions redundancy-group 1
10、为冗余接口reth配置IP地址
set interfaces reth1 unit 0 family inet address 192.168.1.1/24
11、把物理端口加入到冗余接口reth2,并把reth2接口加入数据冗余组redundancy-group 1
set interfaces ge-0/0/5 gigether-options redundant-parent reth2
set interfaces ge-3/0/5 gigether-options redundant-parent reth2
set interfaces reth2 redundant-ether-iptions redundancy-group 1
12、为冗余逻辑接口reth2配置IP地址
set interfaces reth2 unit 0 family inet address 172.16.1.1/24
13、把集群的逻辑接口关联到ZONE
set security zones security-zone trust interfaces reth0.0
set security zones security-zone untrust interfaces reth1.0
set security zones security-zone DMZ interfaces reth2.0
14、juniper SRX cluster手动切换
控制层面切换主备
request chassis cluster failover reset redundancy-group 0
request chassis cluster failover reset redundancy-group 0 node 0
数据层面切换主备
request chassis cluster failover reset redundancy-group 1
request chassis cluster failover redundancy-group 1 node 0 force
查看cluster状态
show chassis cluster status
15、如果需要恢复到远程的独立使用状态
#首先关闭集群后重启
set chassis cluster disable reboot
#使用load factory-default恢复至出厂设置
load factory-default
set system root-authentication plain-text-password
commit
16、juniper SRX记录会话日志配置(不建议所有日志都开启会话日志记录)
set groups node0 system syslog file traffic-log any any #开启会话日志记录,日志文件traffic-log
set groups node0 system syslog file traffic-log match RT_FLOW_SESSION #只把包含RT_FLOW_SESSION字段的日志记录到traffic-log文件
策略中要开启session-init或session-close couunt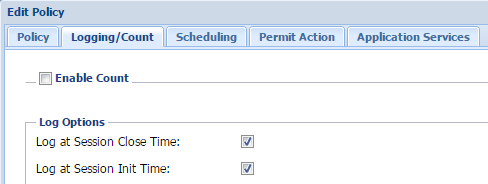
show log traffic-log #查看会话日志
参考链接:
http://blog.sina.com.cn/s/blog_8d795a0f0102w7h0.html
https://blog.csdn.net/qq_22193519/article/details/83343307
https://www.juniper.net/documentation/en_US/junos/information-products/pathway-pages/security/security-chassis-cluster.html
https://www.cnblogs.com/id404/p/11947081.html #juniper syslog日志记录
https://apps.juniper.net/syslog-explorer/#view=explore #juniper syslog字段详解