spring简单介绍:https://www.cnblogs.com/package-java/p/10368672.html
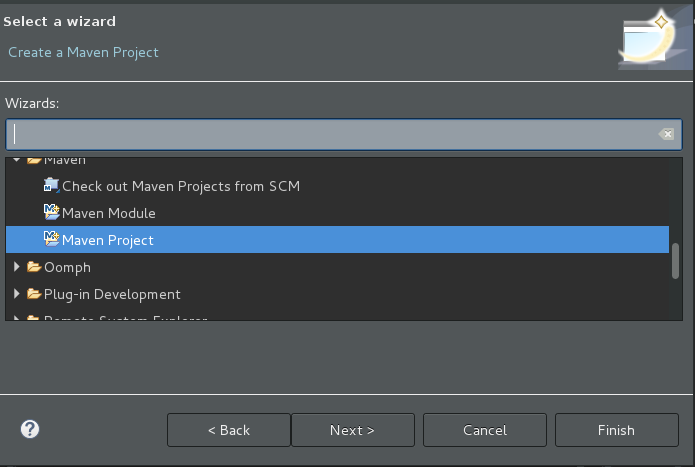
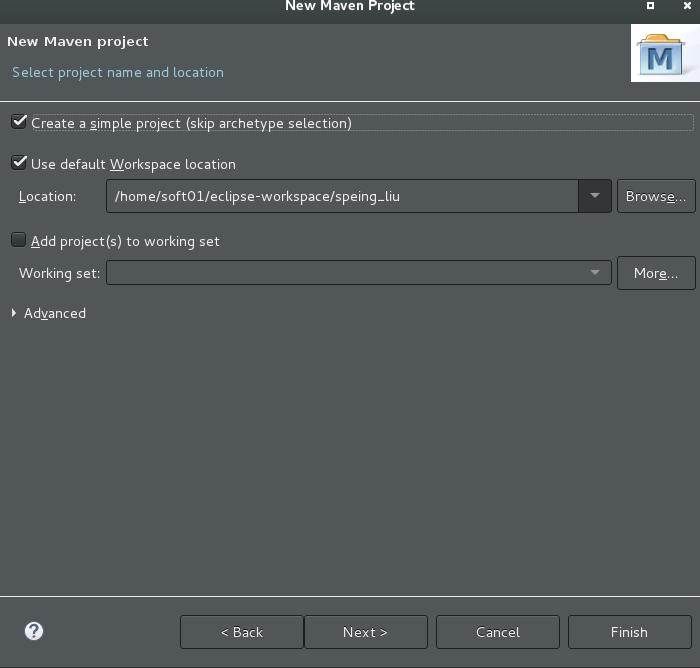
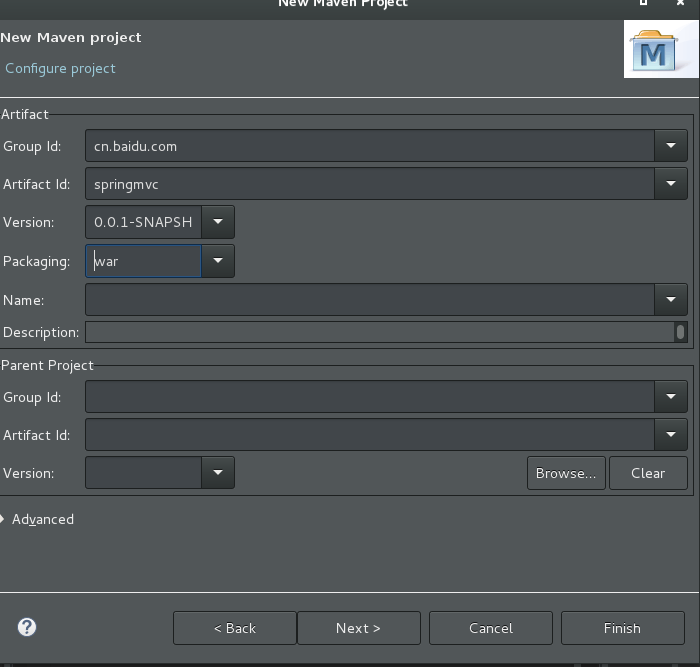
1、创建一个Maven Project项目
点击下一步
点击下一步
2、创建好项目之后可以看到pom.xml报错,接下来添加Tomcat运行环境,然后,生成`web.xml`文件
3、添加依赖
<project xmlns="http://maven.apache.org/POM/4.0.0" xmlns:xsi="http://www.w3.org/2001/XMLSchema-instance"
    xsi:schemaLocation="http://maven.apache.org/POM/4.0.0 http://maven.apache.org/xsd/maven-4.0.0.xsd">
    <modelVersion>4.0.0</modelVersion>
    <groupId>cn.tedu.spring</groupId>
    <artifactId>speing_liu</artifactId>
    <version>0.0.1-SNAPSHOT</version>
    <packaging>war</packaging>
    <dependencies>
    <!-- springmvc的依赖 -->
        <dependency>
            <groupId>org.springframework</groupId>
            <artifactId>spring-webmvc</artifactId>
            <version>4.3.9.RELEASE</version>
        </dependency>
    <!--     测试的依赖 -->
        <dependency>
            <groupId>junit</groupId>
            <artifactId>junit</artifactId>
            <version>4.12</version>
        </dependency>
    </dependencies>
</project>
4、在web.xml文件中进行配置
由于希望SpringMVC框架能接收到相关的请求,所以,首先应该对`DispatcherServlet`进行配置:
关于DispatcherServlet的包名,可以在任意Java类中声明DispatcherServlet变量,由Eclipse完成导包,则在import语句中就有了该类的包名。
以上配置中,`<url-pattern>`中配置的是`*.do`,表示SpringMVC框架将接收所有以`.do`作为资源名后缀的请求,而并不处理例如`.html`、`.jpg`等请求,如果希望接收并处理所有请求,可以使用`/*`或其它使用了通配符的配置。
为了使得Spring的运行环境是正常的,应该保证在项目部署到Tomcat的第一时间就加载Spring的配置,要实现这样的效果,可以使得:`DispatcherServlet`是默认启动的(配置`<load-on-startup>`节点),并且,它启动时加载Spring的配置文件(`DispatcherServlet`的父类`FrameworkServlet`中有`contextConfigLocation`属性,表示初始化时加载哪个配置文件)!
<?xml version="1.0" encoding="UTF-8"?>
<web-app xmlns:xsi="http://www.w3.org/2001/XMLSchema-instance"
    xmlns="http://java.sun.com/xml/ns/javaee"
    xsi:schemaLocation="http://java.sun.com/xml/ns/javaee http://java.sun.com/xml/ns/javaee/web-app_2_5.xsd"
    version="2.5">
    <display-name>SPRINGMVC-01-HELLO</display-name>
    <servlet>
 <!-- 配置SpringMVC DispatcherServlet(前端控制器) -->
        <servlet-name>SpringMVC</servlet-name>
        <servlet-class>org.springframework.web.servlet.DispatcherServlet</servlet-class>
        <init-param>
<!-- 指定Spring MVC启动所需加载的配置文件 -->
            <param-name>contextConfigLocation</param-name>
            <param-value>classpath:spring.xml</param-value>
        </init-param>
        <load-on-startup>1</load-on-startup>
    </servlet>

    <servlet-mapping>
        <servlet-name>SpringMVC</servlet-name>
        <url-pattern>*.do</url-pattern>
    </servlet-mapping>

</web-app>
至此,项目的运行效果为:启动时,会直接初始化`DispatcherServlet`,并且在初始化时,还会自动加载`spring.xml`配置文件。
如果需要检查配置是否成功,可以:使得某个类被Spring管理,且在构造方法中添加输出语句!如果启动项目时可以看到输出语句,则成功!
5、src/min/resources下创建spring.xml文件,添加组件扫描
<?xml version="1.0" encoding="UTF-8"?>
<beans xmlns="http://www.springframework.org/schema/beans"
    xmlns:xsi="http://www.w3.org/2001/XMLSchema-instance"
    xmlns:context="http://www.springframework.org/schema/context"
    xmlns:jdbc="http://www.springframework.org/schema/jdbc"
    xmlns:jee="http://www.springframework.org/schema/jee"
    xmlns:tx="http://www.springframework.org/schema/tx"
    xmlns:aop="http://www.springframework.org/schema/aop"
    xmlns:mvc="http://www.springframework.org/schema/mvc"
    xmlns:util="http://www.springframework.org/schema/util"
    xmlns:jpa="http://www.springframework.org/schema/data/jpa"
    xsi:schemaLocation="
        http://www.springframework.org/schema/beans http://www.springframework.org/schema/beans/spring-beans-3.2.xsd
        http://www.springframework.org/schema/context http://www.springframework.org/schema/context/spring-context-3.2.xsd
        http://www.springframework.org/schema/jdbc http://www.springframework.org/schema/jdbc/spring-jdbc-3.2.xsd
        http://www.springframework.org/schema/jee http://www.springframework.org/schema/jee/spring-jee-3.2.xsd
        http://www.springframework.org/schema/tx http://www.springframework.org/schema/tx/spring-tx-3.2.xsd
        http://www.springframework.org/schema/data/jpa http://www.springframework.org/schema/data/jpa/spring-jpa-1.3.xsd
        http://www.springframework.org/schema/aop http://www.springframework.org/schema/aop/spring-aop-3.2.xsd
        http://www.springframework.org/schema/mvc http://www.springframework.org/schema/mvc/spring-mvc-3.2.xsd
        http://www.springframework.org/schema/util http://www.springframework.org/schema/util/spring-util-3.2.xsd">
    <!-- 组件扫描 -->
    <!-- base-package:根包 -->
    <context:component-scan
        base-package="cn.tedu.spring.controller" />


</beans>
6、接收并处理请求
在实际开发中,并不会使用专门的配置文件去记录请求路径与处理请求的控制器的映射关系,即:不配置`HandlerMapping`(当然,这并不影响SpringMVC的工作流程,只是从代码上不这样体现而已)。
可以直接创建控制器类,例如`cn.tedu.spring.HelloController`,需要该类在组件扫描范围之内,且应该添加`@Controller`注解,然后,在类中自定义处理请求的方法。
关于处理请求的方法,访问权限应该是`public`,返回值类型暂时使用`String`,方法的名称可以自行定义,参数暂时留空,即不添加任何参数,然后,在方法之前添加`@RequestMapping("路径")`配置请求路径:
@Controller
    public class HelloController {

        // 处理请求的方法
        // 权限:public
        // 返回值:String(暂定)
        // 方法名:自定义
        // 参数列表:无(暂定)
        @RequestMapping("hello.do")
        public String showHello() {
            System.out.println("HelloController.showHello()");
            return null;
        }

    }
至此,`hello.do`的请求已经可以被以上自定义的`showHello()`方法处理,在浏览器输出`http://localhost:8080/SPRINGMVC-01-HELLO/hello.do`后,虽然在浏览器中无法正确的显示内容,但是,在Eclipse控制台可以观察到`showHello()`方法已经被正确的调用。
7、在spring.xml中配置视图解析器
处理完请求后,方法返回的`String`类型数据表示的就是视图名,例如返回`"helloworld"`,接下来,框架会根据视图名找到视图解析器,从而确定最终的视图组件,典型的视图解析器是`InternalResourceViewResolver`:
<?xml version="1.0" encoding="UTF-8"?>
<beans xmlns="http://www.springframework.org/schema/beans"
    xmlns:xsi="http://www.w3.org/2001/XMLSchema-instance"
    xmlns:context="http://www.springframework.org/schema/context"
    xmlns:jdbc="http://www.springframework.org/schema/jdbc"
    xmlns:jee="http://www.springframework.org/schema/jee"
    xmlns:tx="http://www.springframework.org/schema/tx"
    xmlns:aop="http://www.springframework.org/schema/aop"
    xmlns:mvc="http://www.springframework.org/schema/mvc"
    xmlns:util="http://www.springframework.org/schema/util"
    xmlns:jpa="http://www.springframework.org/schema/data/jpa"
    xsi:schemaLocation="
        http://www.springframework.org/schema/beans http://www.springframework.org/schema/beans/spring-beans-3.2.xsd
        http://www.springframework.org/schema/context http://www.springframework.org/schema/context/spring-context-3.2.xsd
        http://www.springframework.org/schema/jdbc http://www.springframework.org/schema/jdbc/spring-jdbc-3.2.xsd
        http://www.springframework.org/schema/jee http://www.springframework.org/schema/jee/spring-jee-3.2.xsd
        http://www.springframework.org/schema/tx http://www.springframework.org/schema/tx/spring-tx-3.2.xsd
        http://www.springframework.org/schema/data/jpa http://www.springframework.org/schema/data/jpa/spring-jpa-1.3.xsd
        http://www.springframework.org/schema/aop http://www.springframework.org/schema/aop/spring-aop-3.2.xsd
        http://www.springframework.org/schema/mvc http://www.springframework.org/schema/mvc/spring-mvc-3.2.xsd
        http://www.springframework.org/schema/util http://www.springframework.org/schema/util/spring-util-3.2.xsd">
    <!-- 组件扫描 -->
    <!-- base-package:根包 -->
    <context:component-scan
        base-package="cn.tedu.spring.controller" />
<!-- ViewResolver:视图解析器 -->
    <bean class="org.springframework.web.servlet.view.InternalResourceViewResolver">
        <!-- 前缀 -->
        <property name="prefix"
            value="/WEB-INF/" />
        <!-- 后缀 -->
        <property name="suffix"
            value=".jsp" />
    </bean>
</beans>
`InternalResourceViewResolver`的工作模式是:将**前缀 + 控制器方法返回的视图名 + 后缀**拼接起来,以项目的`webapp`为根目标,找到对应的页面文件
结合此前方法返回的字符串值为`"helloworld"`,则视图解析器会找到`webapp/WEB-INF/helloworld.jsp`文件作为最终显示的视图组件!所以,创建对应的jsp文件,然后重新部署项目运行,即可看到最终运行效果。
将第6步的返回值改成helloworld:
@Controller
    public class HelloController {

        // 处理请求的方法
        // 权限:public
        // 返回值:String(暂定)
        // 方法名:自定义
        // 参数列表:无(暂定)
        @RequestMapping("hello.do")
        public String showHello() {
            System.out.println("HelloController.showHello()");
            return "helloworld";
        }

    }
8、创建jsp文件
添加Tomcat运行环境,不然jsp会报错,参考:https://blog.csdn.net/testcs_dn/article/details/36455669
也可以看看这个:https://www.cnblogs.com/yadongliang/p/6484779.html
相关文献:https://elf8848.iteye.com/blog/875830