世界是普遍联系的,任何事物和个体都直接或间接相互依赖,在时空长河中共同发展。在面向对象的世界中,更是如此,类与类之间的依赖,关联关系,模块(亦或是分层架构中的层)之间的耦合关系,都是我们在软件开发实践中,时刻在处理着的联系。
在软件开发中,我们一直尝试弱化这种联系,以便让软件程序更健壮,更灵活,便于维护和升级。从面向过程遍程中提倡方法的分离(过程分离),到面向对象开发中的减少类依赖,层间低耦合,层内高类聚,无一不体现了这一点。正因为在面向对象的世界中,我们更容易处理类(对象),模块(或层)之间的关系,所以面向对象开发才成为了更受欢迎的开发方式。
为了处理代码中的依赖关系,依赖注入框架应运而生。在Java的世界中,开源的依赖注入框架更是不胜枚举,如PicoContainer ,google-guice,Butterfly Container 。。。。。而正如上一篇文章中提到的,Dagger2是第一个使用生成代码的方式实现依赖注入的框架,它完全依赖Java的注解处理和编译时检查来分析和验证依赖,在代码执行效率上拥有无可比拟的优势,而大部分的依赖注入框架都有依赖XML、运行期验证依赖或者影响应用启动速度的问题,所以它依然是我们今天要介绍的主角。
关于Dagger2,已在上一篇文章中详细介绍,在Android开发中,我们可以使用ButterKnife来进行控件注入(但是在子module中使用会有问题),使用Dagger2来进行依赖注入。下面我们来看看在Android开发中,如何使用Dagger2来处理依赖关系。
原理
使用依赖注入是为了降低类之间的依赖关系,从而达到被依赖的类(被依赖者)可以相对独立的变化而不影响其使用者(依赖者),同时在开发和测试过程中,也方便使用mocking object替代原有的被依赖类型,适应不同的开发环境和测试。如何处理好关系,关键在于划分二字,我们通常所说的责任、功能的划分,层、模块、类、方法的划分,都是为了更好的处理各种各样的关系。在Dagger2的使用中,我们依然需要良好划分它的各个组件以便更好的使用它。
下图是Android中推荐的组件级别划分,不熟悉Component,Provide和Module的小伙伴请看上一篇文章。
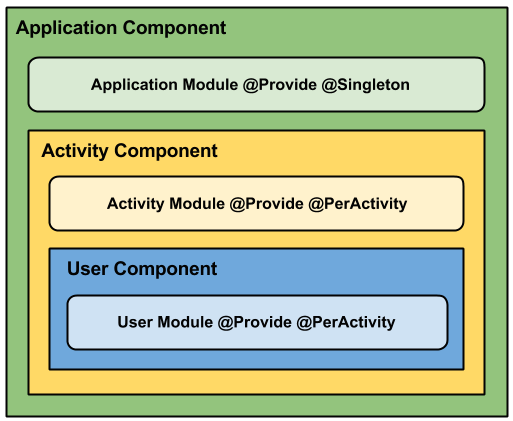
Application component/module
Application component/module一般提供和应用相同生命周期的依赖,所以通常和@Singleton关联,并暴露必要的依赖以便component dependency使用(通常application component会最为父组件或者component dependency中的dependency)。
Activity component/module
Activity component/module一般提供和Activity相同生命周期的依赖,通常和@PerActivity关联,并且一般是SubComponent或者component dependency。使用Activity component有以下几个好处:
可在Activity中注入字段(暴露inject方法在Activity中调用)。
在Activity基类中注入和使用单例对象
全局对象图不用涉及只在Activity中用到的依赖。
User component/module
User component/module用于提供User相关的依赖,一般也和@PerActivity关联,通常会扩展Activity Component,用于注入Fragment。
通常我们会建立一个包含很多接口的主Component,如果希望有多个不需要一直保留在内存中的components(例如绑定到Activity、Fragment甚至用户会话期的components),我们可以创建Dependent component。使用Dependent components需要注意这些方面:
1.两个Dependent components不能共享相同的Scope。
2.虽然Dagger2有创建Scope实例的能力,你依然有责任根据场景创建和删除(实例)应用。
3.创建Dependent components的时候,父component需要明确暴露下游组件需要的依赖对象。
Dependent components和SubComponents的差别在于:
- SubComponent需要在子组件声明工厂方法提供实例或Builder。Dependent components只需要传入父Component的实例即可正常初始化。
- SubComponent可以访问父Component的所有依赖,而Dependent components只能访问父Component声明提供的依赖。
注意
Dagger2区别于其他诸如框架的主要优势在于它严格依靠生成代码实现(而非反射),这意味着它可以适用于Android。当然,在Android应用中使用Dagger的时候仍然有一些需要考虑的地方。
因为Android应用采用Java语言来开发,从风格来说会非常不同。这种典型的区别是为了适应移动平台独特的表现考虑。
但是与其他的Java代码相反的是,很多模式在Android上都不适用,甚至《高效Java开发》中的大部分建议都被认为不适合Android。
为了同时达到代码惯用(符合语言习惯)和轻便的目标,Dagger依靠ProGuard来处理编译的字节码,这允许Dagger生成在Server和Android上看起来都很自然的代码(当使用不同的工具链来生成在这两个环境中都能高效执行的代码时)。更多的是,Dagger有明确的目标来确保生成的代码和ProGuard的优化兼容一致。
当然不是所有的问题都能以这种方式定位,但是它确实是提供Android特定兼容的主要机制。
Dagger假设Android开发者会使用ProGuard。
Talk is cheap,Show you the code
Setup
我们以AndroidStudio作为IDE,以下简称AS。AS 默认不会把Dagger2生成的代码视作合法的classes,我们可以通过添加android-apt插件将这些文件加入到IDE的class path。我们可以在Project的build.gradle中添加工程依赖:
dependencies {
     // other classpath definitions here
     classpath 'com.neenbedankt.gradle.plugins:android-apt:1.8'
 }
然后在用到Dagger2的Module中(如app)应用apt插件:
// add after applying plugin: 'com.android.application'
apply plugin: 'com.neenbedankt.android-apt'
同时添加如下Module依赖:
dependencies {
    // apt command comes from the android-apt plugin
    apt 'com.google.dagger:dagger-compiler:2.2'
    compile 'com.google.dagger:dagger:2.2'
    provided 'javax.annotation:jsr250-api:1.0'
}
Provided关键词引用的依赖只会在编译时需要,apt关键词是android-apt插件提供的,用于注解处理。
Coding
下面是一个简单的关于宠物的Demo,仅用于说明Dagger2的使用。
一般情况下,在Dagger2中,我们直接使用到的是Component,所以我们首先想到的是创建Component,按照上文的建议和一般的开发习惯,我们会先创建Application级别的Component,用于提供全局的服务或资源。
public interface AppComponent {

    /**
     * Provide your application level handler instance.
     *
     * @return
     */
    Handler getHandler();

    /**
     * Provide your global http requester instance.
     *
     * @return
     */
    IHttpRequester getHttpRequester();

    /**
     * Provide your global storage service.
     *
     * @return
     */
    IStorage getStorage();

}
我们声明了AppComponent,大家可以发现它是一个接口文件,我们在里面我们提供了全局的Handler、HttpRequester和Storage服务,当然在实际工程中你可以提供更多的服务。
既然声明了接口,那必然需要有它的实现,但是Dagger2会为我们做这件事,我们需要做的是使用Module来为Component接口声明的方法提供实际的依赖。
/**
 * Created by Irwin on 2016/5/16.
 */
@Module
public class AppModule {

    @Provides
    @Singleton
    public static Handler provideHandler() {
        return new Handler();
    }

    @Provides
    @Singleton
    public static IHttpRequester provideHttpProvider() {
        return new DefaultHttpRequester();
    }

    @Provides
    @Singleton
    public static IStorage provideStorage() {
        return new SqliteStorage();
    }

}
我们实现一个AppModule来为AppComponent提供依赖,其中提供了实际的Handler,HttpRequester和Storage。因为都是全局单例,所有都使用了Singleon关键字和static关键字。然后我们需要通过注解把AppComponent和AppModule关联起来,如下:
/**
 * Created by Irwin on 2016/5/16.
 */
@Component(modules = AppModule.class)
@Singleton
public interface AppComponent {

          ......

}
完成后我们可以编译代码,如果没有出错,可以在Build目录下找到Dagger2为我们生成的Component接口的实现代码。
接下来,我们在Application中初始化Component:
public class MyApplication extends Application {
    private AppComponent mAppComponent;
    private String TAG = "ApplicationInfo";

    @Override
    public void onCreate() {
        super.onCreate();
        mAppComponent = DaggerAppComponent.create();
    }

    public AppComponent getAppComponent() {
        return mAppComponent;
    }


}
为了增加趣味性,我们这个Demo是简单展示宠物的,所以接下来我们添加一个宠物类。
/**
 * Created by Irwin on 2016/5/16.
 */
public interface IPet {

    public int getPortrait();

    public String getType();

    public String getName();

    public String getStatus();

    public void enjoy(TextView view);
}
/**
 * Created by Irwin on 2016/5/16.
 */
public abstract class AbsPet implements IPet {

    private int mIndex = -1;

    private String mStatus;

    private int mPortrait;

    @Inject
    Handler mHandler;

    @Inject
    List<String> mStatusList;

    @Inject
    protected String mName;

    @Inject
    @Descript("Yell")
    protected String mYell;

    public AbsPet(int portrait) {
        mPortrait = portrait;
    }

    @Override
    public String getName() {
        return mName;
    }

    @Override
    public int getPortrait() {
        return mPortrait;
    }

    public Handler getHandler() {
        return mHandler;
    }

    public List<String> getStatusList() {
        return mStatusList;
    }

    @Override
    public String getStatus() {
        if (mStatus == null) {
            mStatus = mYell;
        }
        return mStatus;
    }

    @Override
    public void enjoy(final TextView view) {
        if (mIndex == -1) {
            view.setText(mYell);
        }
        Random random = new Random(System.currentTimeMillis());
        int seconds = random.nextInt(5);
        if (seconds < 1) {
            seconds = 1;
        }
        getHandler().postDelayed(new Runnable() {
            @Override
            public void run() {
                boolean hasNext = nextStatus();
                if (hasNext) {
                    enjoy(view);
                }
                view.setText(getStatus() + (hasNext ? " Ing" : " ..."));
            }
        }, seconds * 1000);
    }

    public boolean nextStatus() {
        if (++mIndex < getStatusList().size()) {
            mStatus = getStatusList().get(mIndex);
            return true;
        }
        mIndex = -1;
        return false;
    }

}
然后分别实现两只宠物,Dog和Cat,这是我们具体要依赖的对象,下面是Dog的代码。
public class Dog extends AbsPet {
    private String mType;

    @Inject
    public Dog(int portrait) {
        super(portrait);
        this.mType = "汪星人";
    }

    @Override
    public String getType() {
        return mType;
    }

}
注意构造函数上的@Inject注解,它表明Dagger2可以自动new 这个类的实例。
接下来,我们添加一个Activity来显示宠物,
public class MainActivity extends AppCompatActivity {

    private static final String TAG = "Info";
    private GifImageView mPetView;
    private TextView mTV_Info;
    private TextView mTV_Status;

    @Inject
    IPet mPet;

    ......

}
如代码中所示,我们将mPet字段添加@Inject注解,通过依赖注入的方式提供值。
需要注入字段的类也需要有一个Component来实现注入,所以我们为此Activity添加一个Component,在此之前我们先添加一个Module来为Component提供依赖,下面是提供Dog依赖的Module
@Module(includes = DogStatusModule.class)
public class DogModule {

    @Provides
    @Activity
    public IPet provideDog(Dog dog) {
        return dog;
    }

    @Provides
    public List<String> provideStatus(Set<String> set) {
        return new ArrayList<>(set);
    }

    @Provides
    public String provideName() {
        return "二汪";
    }

    @Provides
    public int providePortrait() {
        return R.drawable.dog2;
    }

    @Provides
    @Descript("Yell")
    public String provideYell()
    {
        return "汪汪";
    }


}
其中我们为DogModule提供了它所需要的状态Module DogStatusModule。
接下来添加Activity的Component并关联DogModule,
@Component(dependencies = AppComponent.class, modules = DogModule.class)
@Activity
public interface PetActivityComponent {

    public void inject(MainActivity activity);

    public IPet getPet();

}
完成并编译后,可以在Build目录下找到Dagger2为我们生成的Component接口的实现代码。接下来我们就可以在Activity中简单的使用:
public class MainActivity extends AppCompatActivity {

    private static final String TAG = "Info";
    private GifImageView mPetView;
    private TextView mTV_Info;
    private TextView mTV_Status;

    @Inject
    IPet mPet;

    @Override
    protected void onCreate(Bundle savedInstanceState) {
        super.onCreate(savedInstanceState);
        setContentView(R.layout.activity_main);
        Toolbar toolbar = (Toolbar) findViewById(R.id.toolbar);
        setSupportActionBar(toolbar);
        mPetView = (GifImageView) findViewById(R.id.IMV_Pet);
        mTV_Info = (TextView) findViewById(R.id.TV_Info);
        mTV_Status = (TextView) findViewById(R.id.TV_Status);

        PetActivityComponent component = DaggerPetActivityComponent.builder()
                .appComponent(((MyApplication) getApplicationContext()).getAppComponent())
                .build();
        //You must call inject first so that Dagger2 will inject fields for you, otherwise you'll get NullPointer exceptions.
        component.inject(this);

        FloatingActionButton fab = (FloatingActionButton) findViewById(R.id.fab);
        fab.setOnClickListener(new View.OnClickListener() {
            @Override
            public void onClick(View view) {
                playWith(mPet);
                getHttpRequester().request(0, "http://www.baidu.com", "search=dagger2", new IResultHandler<String>() {
                    @Override
                    public void onSuccess(String o) {
                        Log.i(TAG, "Response: " + o);
                    }

                    @Override
                    public void onFail(Throwable error) {

                    }
                });
            }
        });
        bindPet(mPet);
    }

    public void bindPet(IPet pet) {
        mPetView.setImageResource(pet.getPortrait());
        mTV_Info.setText(getString(R.string.PetInfo, mPet.getType(), mPet.getName()));
        mTV_Status.setText(pet.getStatus());
    }

    public void playWith(IPet pet) {
        pet.enjoy(mTV_Status);
    }

    public IHttpRequester getHttpRequester() {
        return ((MyApplication) getApplicationContext()).getAppComponent().getHttpRequester();
    }

    public IStorage getStorage() {
        return ((MyApplication) getApplicationContext()).getAppComponent().getStorage();
    }

}
在调用Component的Inject后,Dagger2就为mPet字段注入了值,然后我们就可以放心的使用mPet字段了,同时,我们还可以使用AppComponent中提供的所有服务或资源,如
((MyApplication) getApplicationContext()).getAppComponent().getHttpRequester().request(...);
至此,代码编写完成。当然,我们还添加了一些额外的代码,如HttpRequester,不同的Storage实现,CatModule,全局都是通过Dagger2使用这些实现,所以你可以随意改变自己的实现或者替换依赖,而不影响上层代码的使用,可以使你的开发和测试变得更简单哦!
运行工程,就可以看到效果了,
此时,如果我们希望使用依赖对象的不同实现,简单的替换Component依赖的Module,或者直接修改Module中相应提供依赖的地方即可。下面我们将Activity中的关联的DogModule替换为CatModule
@Component(dependencies = AppComponent.class, modules = CatModule.class)
@Activity
public interface PetActivityComponent {

   ...

}
替换后效果:
在实际的开发环境中,你可以随意替换不同的存储,网络请求实现来满足不同的场景和需求,是不是很方便:D
总结
一、 使用Dagger需要引入Dagger和Dagger compiler,在IDEA和Eclipse中可能需要打开Annotation processor。在AndroidStudio中需要引入android-apt plugin(see https://bitbucket.org/hvisser/android-apt,用于将Dagger2生成的代码加入classpath)
Android-apt插件帮你把annotation processors和AndroidStudio结合起来使用,它主要有两个功能:
1.允许配置编译时的annotation作为依赖,但是不会把这些东西包括到最终的Apk或Library中。
2.设置源码路径以便注解处理生成的代码可以被AndroidStudio识别。
二、 类构造函数加上@Inject生成实例,类字段加上@Inject可注入字段,注入字段依靠@Inject的构造函数或者@Provides方法。
注:
- Dagger2不能注入final字段和static字段,以及不可访问的字段(Private)。
- Dagger2无法注入多个类型相同的字段,但是可以通过加上qualifier识别依赖。
- Dagger2创建实例是在生成的T_Factory中进行的,而注入字段是通过T_MembersInjector中完成的,所以直接调用new T()不会注入字段。对于已有的非Dagger注入的对象,可以在Component中添加inject(T)(方法名可以随意)方法,调用这个方法就可以注入需要的字段。
三、 @Provides方法可以有自己的依赖,返回不同的类(也可以是基本类型)。
四、 用一个接口(或抽象类)来提供Component,这个接口里面应该声明没有参数但返回需要类型的方法,接口上需要加上@Component,并通过module参数引入需要的module。Dagger会按照约定生成一个Component实现。
五、 Component的使用方式有两种:一种是使用builder并传入需要的module;另一种是直接调用它的create()方法(适用于它的module中全是@Provides的静态方法时或有无参构造函数时)。
Component像连接@Module和@Inject的桥梁,将所有的东西联系起来。
Component实现主要是通过生成的builder来实例化。使用它的builder()方法来获取一个builder实例。如果一个嵌套的@Component.Builder类型已经存在,builder()方法会返回它的一个生成实现;如果嵌套的@Component.Builder不存在,返回的builder会提供设置每一个需要的modules和component依赖的方法(方法名是以小驼峰命名法命名的module和component类型名)。没有可见默认构造函数的module和component依赖必须明确设置,但是有默认或无参构造函数的可被component访问的module可以省略。下面是使用component builder的例子:(From:http://google.github.io/dagger/api/latest/dagger/Component.html)
public static void main(String[] args) {

     OtherComponent otherComponent = ...;

     MyComponent component = DaggerMyComponent.builder()

         // required because component dependencies must be set

         .otherComponent(otherComponent)

         // required because FlagsModule has constructor parameters

         .flagsModule(new FlagsModule(args))

         // may be elided because a no-args constructor is visible

         .myApplicationModule(new MyApplicationModule())

         .build();

   }
在component只有无参(构造函数)modules,没有component依赖的情况下,component实现也会有一个工厂方法create(),SomeComponent.create()和SomeComponent.builder().build()是等同的。
六、 Module是一个用来满足稍复杂依赖(在@Inject无法满足的时候)的类,以@Module声明,在它里面可以声明@Provides的方法(Provides方法优先于@Inject构造函数),@Provides方法提供Component里面的绑定需要的依赖(通过返回类型指定,所以无法注入多个类型相同的字段),这些依赖可以类实例,也可以是基本类型。Module还可以通过include引入其他的module。
七、 Scope
@Singleton
@Singleton用来标记单例,但是是在component的生命周期而非应用的生命周期中的单例。
如果T被注解为单例(在T的类声明或在provideT上加@Singleton,同时在Component上加@Singleton),引入T的component中的TProvider会使用如下方式生成(其他的Scope也应如此):
TProvider= ScopedProvider.create(CoffeeMaker_Factory.create(…));
如果T未被标记为单例,TProvider会这样生成:
TProvider=T_Factory.create(…);
@Scope
用@Scope注解组件就可以加上范围限定。在这种情况下,组件实现会保存对所有加上范围限定的类实例的引用以便重用。有Scope的带有@Provides方法的模块只能被拥有相同范围限定的组件引用。
每一个Component都可以用Scope注解来添加Scope。Component实现确保每个实例中每个Scope绑定只有一个规定。如果Component声明了一个Scope,它就只能包括Unscope或者该Scope的绑定。例如:
@Singleton @Component interface MyApplicationComponent { // this component can only inject types using unscoped or @Singleton bindings }为了让Scope表现正确,何时初始化component实例是调用者的责任。比如说,一个单例组件,在一个应用中只应该被实例化一次,而一个RequestScoped的组件应该请求一次,实例化一次。因为组件是自维护(Self-contained)的实现,退出一个scope跟丢掉对component实例的所有引用一样简单。
父子组件的Scope应该是一种包含关系,父组件的Scope包括的子组件Scope的范围。
八、 Lazy injection
Lazy injection会等到第一次调用Lazy<T>.get()的时候创建T的实例并缓存。
九、 Provider
Provider<T>提供可以返回不同实例的功能,每一次调用Provider<T>.get()都会调用绑定逻辑,生成新的实例。
十、 Qualifier
Qualifier用于单靠类型无法识别依赖的时候(即多个依赖(可注入字段)类型相同时),使用Qualifier注解,Dagger会同时通过类型和qualifier来识别依赖。
十一、 MultiBindings
多重绑定可以把多个对象绑定到一个Set或Map,通过@Provides(type=SET|MAP)方法提供对象到集合中,对于Map 的Key,分为两种方式:一种是在运行时知道Key的情况,需要通过注解来指定Key(支持复杂的Mapkey);一种是在运行时才知道Key的情况,这时可以通过提供Set<Map.Entry>,然后组装成Map。
十二、 子组件
使用子组件可以把应用的对象图划分成子图,可以压缩应用的各个部分,或者在一个组件上使用多个范围限定。组件提供子组件有两种方式,一种是在组件中提供工厂方法来返回子组件或子组件的Builder;第二种是注入子组件的builder。
父子组件会共享相同的Module实例,父组件已经引用的Module类,子组件不需要再传入(包括工厂方法和Builder方法)。
十三、 Producer实现异步注入
Producers引入了新的注解@ProducerModule, @Produces, 和@ProductionComponent,分别对应@Module,@Provides, 和 @Component。我们把@ProducerModule注解的类视为producer modules,@Produces注解的方法视为producer methods,@ProductionComponent注解的接口视为producer graphs(类似于modules, provider methods, 和object graphs)。
和原始Dagger最关键的不同在于producer方法会返回ListenableFuture<T>,并且后面的producer会依赖于这个未封装的T,当future可用的时候,框架会计划执行后续的方法。
通过绑定@Production Executor来指定一个线程池,每一个Producer 的方法都会在这个线程池中被计划执行。