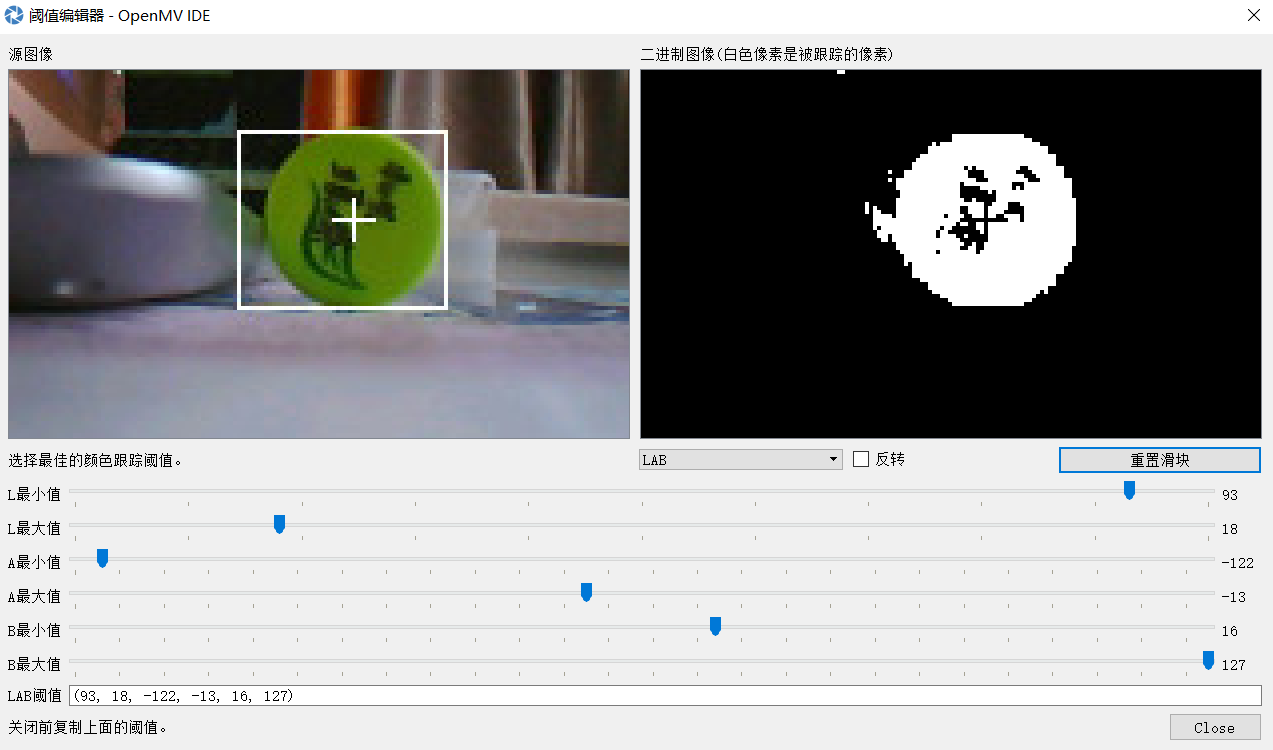
本次测量的物体为:一个绿色小瓶盖
首先得通过阈值编译器得到这个绿色小瓶盖得阈值:
代码如下:
import sensor, image, time #导入模块
# For color tracking to work really well you should ideally be in a very, very,
# very, controlled enviroment where the lighting is constant...
red_threshold = (100, 0, 127, 13, -104, 85) #红色阈值
green_threshold = (93, 18, -122, -13, 16, 127) #黄色阈值
blue_threshold = (0,15,0,40,-80,-20) #蓝色阈值
# You may need to tweak the above settings for tracking green things...
# Select an area in the Framebuffer to copy the color settings.
sensor.reset() # Initialize the camera sensor.
sensor.set_pixformat(sensor.RGB565) # use RGB565.
sensor.set_framesize(sensor.QQVGA) # use QQVGA for speed.
sensor.skip_frames(10) # Let new settings take affect.
sensor.set_auto_whitebal(False) # 关闭白平衡,以防颜色干扰
clock = time.clock() # Tracks FPS.
#注意:每次更换物体,需要重新测量K1、K2、K3
K1=540 #需要自己计算,K1=距离(12cm已知)*直径像素Lm(45)
K2=3/46 #需要自己计算,K2=实际大小(宽3cm已知)/宽像素b[2](46)
K3=3/42 #需要自己计算,K3=实际大小(高3cm已知)/高像素b[3](42)
while(True):
clock.tick() # Track elapsed milliseconds between snapshots().
img = sensor.snapshot() # Take a picture and return the image.
blobs = img.find_blobs([green_threshold])
if len(blobs) == 1:
# Draw a rect around the blob.
b = blobs[0]
img.draw_rectangle(b[0:4]) # rect,矩形框
img.draw_cross(b[5], b[6]) # cx, cy,物体坐标,画十字
Lm = (b[2]+b[3])/2 #b[2]为宽,b[3]为长,计算得到Lm——直径像素
print("直径像素是:",Lm) #输出直径像素,来计算K1
print("宽像素是:",b[2]) #输出宽度的像素,来计算K2
print("高像素是:",b[3]) #输出长度的像素,来计算K3
distance = K1/Lm #求距离的公式
width = K2*b[2]
height = K3*b[3]
print("距离是:",distance) #测距
print("宽是:%f,长是:%f"%(width,height)) #测量物体大小
测量结果如下:
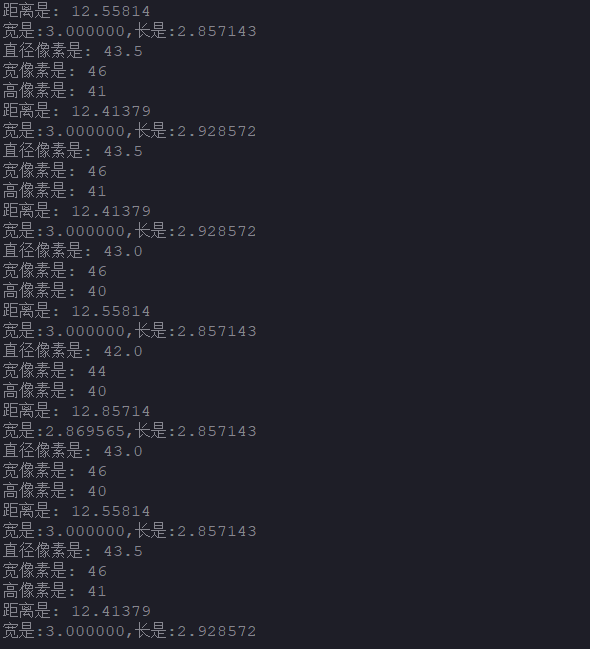
该测量值与实际值有一定的误差,但是误差不大!
注意:每次更换物体,需要重新测量K1、K2、K3
正是步行者,一步步登峰!