【本文版权归微信公众号"代码艺术"(ID:onblog)所有,若是转载请务必保留本段原创声明,违者必究。若是文章有不足之处,欢迎关注微信公众号私信与我进行交流!】
1.基本类型
基本类型参数不可为空
正例:http://localhost:8080/demo/he?id=2
反例:http://localhost:8080/demo/he?id=(报400错误)
注意:String不是基本类型,具体参考>Java数据类型
@RestController //定义控制器返回字符串
public class HelloController {

    @RequestMapping(value = "/hello", method = RequestMethod.GET)
    public String printHello(int id) {
        return "Response:"+id;
    }

    //添加@RequestParam(required=false)参数可为空
    @RequestMapping(value = "/hello", method = RequestMethod.GET)
    public String printHello(@RequestParam(required=false)int id) {
        return "Response:"+id;
    }

}
2.包装类和数组的处理
@RestController
public class HelloController {

    // http://localhost:8080/demo/hello?id=1
    @RequestMapping(value = "/hello", method = RequestMethod.GET)
    public String printHello(Integer id) {
        return "Response:"+id;
    }

    // http://localhost:8080/demo/hi?name=Tom&name=Jim
    @RequestMapping(value = "/hi", method = RequestMethod.GET)
    public String printHello(String[] name) {
        return "Response:"+anme;
    }

}
3.简单对象&多层级对象&同属性对象
//简单对象
//http://127.0.0.1:8080/Spring/hi?age=10&name=Tom
@RequestMapping(value="/hi", method = RequestMethod.GET)
@ResponseBody
public String object(Student student){
    return student.toString();
}

//多层级对象
//http://127.0.0.1:8080/Spring/hi2?age=10&name=Tom&student.age=18
@RequestMapping(value="/hi2", method = RequestMethod.GET)
@ResponseBody
public String object2(Admin admin){
    return admin.toString();
}

//同属性的多对象
//http://127.0.0.1:8080/Spring/hi3?name=Tom&student.age=18
@RequestMapping(value="/hi3", method = RequestMethod.GET)
@ResponseBody
public String object3(Student student, Admin admin){
    return student.toString()+admin.toString();
}

//同属性的多对象赋值 需指定对象的前缀
@InitBinder("student")
public void initStudent(WebDataBinder binder){
    binder.setFieldDefaultPrefix("student.");
}

//同属性的多对象赋值 需指定对象的前缀
@InitBinder("admin")
public void initStudent2(WebDataBinder binder){
    binder.setFieldDefaultPrefix("admin.");
}
4.List&Set&Map
public class ListFrom {
    private List<Student> users ;

    // getter setter...

    @Override
    public String toString() {
        return "ListFrom [users=" + users + "]";
    }

}
public class MapFrom {
    private Map<String, Student> users ;

    // getter setter...

    @Override
    public String toString() {
        return "MapFrom [users=" + users + "]";
    }

}
@RestController
public class DataController {

    //List对象
    //http://127.0.0.1:8080/Spring/list?users[0].age=10&users[1].name=Tom
    @RequestMapping(value="/list", method = RequestMethod.GET, produces={"text/html;charset=UTF-8"})    //支持中文
    public String object2(ListFrom s){
        return s.toString();
    }

    //Map对象
    //http://127.0.0.1:8080/Spring/map?users["X"].age=10&users["Y"].name=Tom
    @RequestMapping(value="/map", method = RequestMethod.GET)
    public String object3(MapFrom s){
        return s.toString();
    }
}
5.Json或Xml 数据参数
【本文版权归微信公众号"代码艺术"(ID:onblog)所有,若是转载请务必保留本段原创声明,违者必究。若是文章有不足之处,欢迎关注微信公众号私信与我进行交流!】
@RequestBody 注解
//发送json数据到该url即可实现数据绑定
@RequestMapping(value="/json", method = RequestMethod.POST)
public String object3(@RequestBody Student s){
    return s.toString();
}
对于xml数据,需要在实体类中添加注释
@XmlRootElement(name = "admin")
public class Admin {
private String name;
private Integer age;

    @XmlElement(name = "name")
public String getName() {
return name;
    }
public void setName(String name) {
this.name = name;
    }

    @XmlElement(name = "age")
public Integer getAge() {
return age;
    }
public void setAge(Integer age) {
this.age = age;
    }
}
然后
//发送xml数据到该url即可实现数据绑定
@RequestMapping(value="/xml", method = RequestMethod.POST)
public String object3(@RequestBody Admin s){
    return s.toString();
}
6. PropertyEditor、Formatter、Converter
局部配置
//PropertyEditor
//http://127.0.0.1:8080/Spring_iMooc/date1?date1=2018-01-01
@RequestMapping(value="/date1", method = RequestMethod.GET)
public String date1(Date date1){
    return date1.toString();
}
@InitBinder("date1")
public void initDate1(WebDataBinder binder){
    binder.registerCustomEditor(Date.class, new CustomDateEditor(new SimpleDateFormat("yyyy-MM-dd"), true));
}
全局配置
1)自定义Formatter 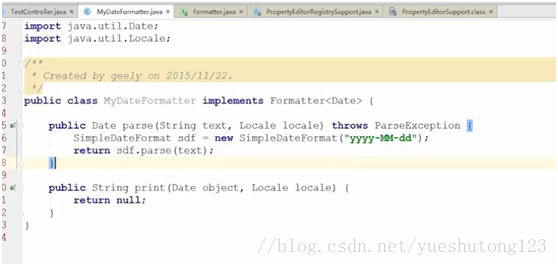
2)注入 
3)使用 
也可以使用自定义Converter
1)自定义 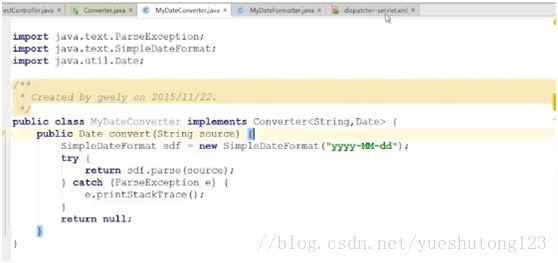
2)配置 
3)使用
7.RESTful扩展
简单来说,就是把参数移到URL上,比如下面。
https://docs.spring.io/spring-boot/docs/1.5.10.RELEASE/reference/pdf/spring-boot-reference.pdf
使用方法
@RequestMapping("/subject/{name}")
public String demo(@PathVariable("name") String name){
  return name;
}
路径URL也支持通配符匹配
| 通配符 | 描述 |
| ? | 匹配任何单字符 |
| * | 匹配0或者任意数量的字符 |
| ** | 匹配0或者更多的目录 |
版权声明
【本文版权归微信公众号"代码艺术"(ID:onblog)所有,若是转载请务必保留本段原创声明,违者必究。若是文章有不足之处,欢迎关注微信公众号私信与我进行交流!】
