第五节 使用GridLayout
如果读者只打算学习一种layout,那就是GridLayout。GridLayout封装了读者想要学习的绝大多数能力,适用于从简单到复杂的应用。就像它的名字暗示的那样,GridLayout在网格中徘布控件。通过复合控件在GridLayout中嵌套使用GridLayout,读者可以构建复杂的layout。GridLayout有两个构造函数,列在表4-3中。
表4-3: GridLayout的构造函数
|
构造函数 |
说明 |
|
public GridLayout() |
Constructs a default GridLayout. |
|
public GridLayout(int numColumns, boolean makeColumnsEqualWidth) |
Constructs a GridLayout with numColumns columns. If makeColumnsEqualWidth is true, all columns will have the same width. |
GridLayout有六个数据成员(data member),列在表4-4中。也许最重要的是numColumns,它控制着layout的结构。这个成员变量掌握着layout使用的列数;控件从左到右排列,每列一个,一行排满后折到下一行。
表4-4 GridLayout的成员变量
|
属性 |
说明 |
|
int horizontalSpacing |
The amount of horizontal space, in pixels, between adjacent cells. |
|
boolean makeColumnsEqualWidth |
If true, forces all columns to be the same width. |
|
int marginHeight |
The size of the margin, in pixels, along the top and bottom edges of the layout. |
|
int marginWidth |
The size of the margin, in pixels, along the left and right edges of the layout. |
|
int numColumns |
The number of columns for the layout. |
|
int verticalSpacing |
The amount of vertical space, in pixels, between adjacent cells. |
读者还可以把GridData赋给控件而实现对GridLayout的微调。GridData对象,这是读者不该重用的控件,因为它告诉layout如何调整与GridData关联的控件。它有两个构造函数,请参见表4-5。
表4-5 GridData的构造函数
|
构造函数 |
说明 |
|
public GridData() |
Constructs a default GridData. |
|
public GridData(int style) |
Constructs a GridData, setting member data values according to the values specified in style. |
像其它的layout data类一样,GridData有公有的成员控制它自己的状态。它也提供了可以传递给构造函数的很多常量,通常把这些常量结合起来以获得特定的效果。读者可以把多个常量用位与串起来。表4-6列出了成员变量;表4-7列出可用的常量以及它们的效果。
表4-6: GridData的成员
|
属性 |
说明 |
|
boolean grabExcessHorizontalSpace |
If true, instructs the cell to fill the excess horizontal space in the layout. The default is false. |
|
boolean grabExcessVerticalSpace |
If true, instructs the cell to fill the excess vertical space in the layout. The default is false. |
|
int heightHint |
The minimum height, in pixels, for the row. The default is SWT.DEFAULT. |
|
int horizontalAlignment |
The horizontal alignment for the cell; possible values are BEGINNING, CENTER, END, and FILL, for left justified, centered, right justified, and justified, respectively. The default is BEGINNING, which will also be used if an invalid value is set. |
|
int horizontalIndent |
The size of the horizontal indent, in pixels, on the left of the cell. The default is zero. |
|
int horizontalSpan |
The number of columns the cell should occupy. The default is one. |
|
int verticalAlignment |
The vertical alignment for the cell; possible values are BEGINNING, CENTER, END, and FILL, for top justified, centered, bottom justified, and justified, respectively. The default is CENTER, although BEGINNING will be used if an invalid value is set. |
|
int verticalSpan |
The number of rows the cell should occupy. The default is one. |
|
int widthHint |
The minimum width, in pixels, for the column. The default is SWT.DEFAULT. |
表4-7 GridData的常量
|
常量(constant) |
说明 |
|
BEGINNING |
Not used for style; alignment constant that left aligns when specifying horizontal alignment and top aligns when specifying vertical alignment. |
|
CENTER |
Not used for style; alignment constant that centers the control in the cell, whether horizontally or vertically. |
|
END |
Not used for style; alignment constant that right aligns when specifying horizontal alignment and bottom aligns when specifying vertical alignment. |
|
FILL |
Not used for style; alignment constant that fully justifies the control in the cell, whether horizontally or vertically. |
|
FILL_BOTH |
Sets both horizontalAlignment and verticalAlignment to FILL. Sets both grabExcessHorizontalSpace and grabExcessVerticalSpace to true. |
|
FILL_HORIZONTAL |
Sets horizontalAlignment to FILL and grabExcessHorizontalSpace to true. |
|
FILL_VERTICAL |
Sets verticalAlignment to FILL and grabExcessVerticalSpace to true. |
|
GRAB_HORIZONTAL |
Sets grabExcessHorizontalSpace to true. |
|
GRAB_VERTICAL |
Sets grabExcessVerticalSpace to true. |
|
HORIZONTAL_ALIGN_BEGINNING |
Sets horizontalAlignment to BEGINNING. |
|
HORIZONTAL_ALIGN_CENTER |
Sets horizontalAlignment to CENTER. |
|
HORIZONTAL_ALIGN_END |
Sets horizontalAlignment to END. |
|
HORIZONTAL_ALIGN_FILL |
Sets horizontalAlignment to FILL. |
|
VERTICAL_ALIGN_BEGINNING |
Sets verticalAlignment to BEGINNING. |
|
VERTICAL_ALIGN_CENTER |
Sets verticalAlignment to CENTER. |
|
VERTICAL_ALIGN_END |
Sets verticalAlignment to END. |
|
VERTICAL_ALIGN_FILL |
Sets verticalAlignment to FILL. |
使用复合的常量(combinations of constants)时要小心,因为SWT没有对冲突的值作检测。
创建一个2×2的网格,读者可以使用下面的代码:
|
GridLayout layout = new GridLayout(); layout.numColumns = 2; shell.setLayout(layout); new Button(shell, SWT.PUSH).setText("one"); new Button(shell, SWT.PUSH).setText("two"); new Button(shell, SWT.PUSH).setText("three"); new Button(shell, SWT.PUSH).setText("four"); |
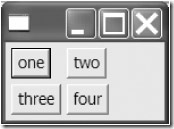
这段代码创建如图4-6所示的窗体。注意这些按钮有不同的宽度,取决于它们的文字的长度。读者可能会想,添加一行代码把makeColumnsEqualWidth的值设为true,可以让全部按钮有相同的宽度:
|
layout.makeColumnsEqualWidth = true; |
图4-6 一个2×2的GridLayout
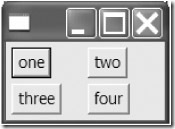
但是,编译并运行这段代码,读者会发现并不是前面所想的情况(见图4-7)。成员变量makeColumnEqualWidth并不影响一列中的控件的大小,而是强制所有的列使用相同的宽度。可以用GridData实现这个想法。
图4-7 一个列宽相同的2×2的GridLayout
其实,读者是想让按钮填充水平和垂直的全部空间。读者可以创建一个GridData对象,把它的样式(stytle)设为FILL_BOTH。
|
GridData data = new GridData(GridData.FILL_BOTH); |
这行代码把水平对齐和垂直对齐(horizontalAlignment and verticalAlignment )都设置为填充(FILL),并把占据水平空间和占据垂直空间(grabExcessHorizontalSpace and grabExcessVerticalSpace)设为true。因为读者想让所有的按钮都有相同的样式,所以可能会重用GridData对象而减少创建对象:
|
Button one = new Button(shell, SWT.PUSH); one.setText("one"); one.setLayoutData(data);
Button two = new Button(shell, SWT.PUSH); two.setText("two"); two.setLayoutData(data);
Button three = new Button(shell, SWT.PUSH); three.setText("three"); three.setLayoutData(data);
Button four = new Button(shell, SWT.PUSH); four.setText("four"); four.setLayoutData(data); |
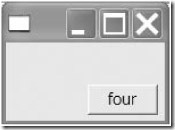
但是,当读者编译并运行这段代码,会发现一些按钮不见了(如图4-8)。
图4-8 尝试重用GridData对象
现在,读者该想到GridData不能被重用,而且一个GridData只能属于一个控件。下面是更正的代码。
|
package examples.ch4;
import org.eclipse.swt.widgets.*; import org.eclipse.swt.layout.GridData; import org.eclipse.swt.layout.GridLayout; import org.eclipse.swt.SWT;
public class GridLayout2x2 { public static void main(String[] args) { Display display = new Display(); Shell shell = new Shell(display); GridLayout layout = new GridLayout(); layout.numColumns = 2; layout.makeColumnsEqualWidth = true; shell.setLayout(layout);
GridData data = new GridData(GridData.FILL_BOTH); Button one = new Button(shell, SWT.PUSH); one.setText("one"); one.setLayoutData(data);
data = new GridData(GridData.FILL_BOTH); Button two = new Button(shell, SWT.PUSH); two.setText("two"); two.setLayoutData(data);
data = new GridData(GridData.FILL_BOTH); Button three = new Button(shell, SWT.PUSH); three.setText("three"); three.setLayoutData(data);
data = new GridData(GridData.FILL_BOTH); Button four = new Button(shell, SWT.PUSH); four.setText("four"); four.setLayoutData(data);
shell.pack(); shell.open(); while (!shell.isDisposed()) { if (!display.readAndDispatch()) { display.sleep(); } } display.dispose(); } } |
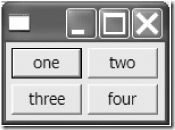
编译并运行这个类可以生产如图4-9所示的窗体。
图4-9 按钮水平和垂直填充的GridLayout
现在读者已经理解了GridLayout的基础知识,可以在GridLayout中嵌套使用GridLayout来创造更复杂的layout。比如,为了创建图4-10中所示的layout,读者可能会写出类似清单4-3的代码。
图4-10 复杂的GridLayout
清单4-3: GridLayoutComplex.java
|
package examples.ch4;
import org.eclipse.swt.widgets.*; import org.eclipse.swt.layout.GridData; import org.eclipse.swt.layout.GridLayout; import org.eclipse.swt.SWT;
public class GridLayoutComplex { public static void main(String[] args) { Display display = new Display(); Shell shell = new Shell(display); GridLayout layout = new GridLayout(); layout.numColumns = 3; layout.makeColumnsEqualWidth = true; shell.setLayout(layout);
// Create the big button in the upper left GridData data = new GridData(GridData.FILL_BOTH); data.widthHint = 200; Button one = new Button(shell, SWT.PUSH); one.setText("one"); one.setLayoutData(data);
// Create a composite to hold the three buttons in the upper right Composite composite = new Composite(shell, SWT.NONE); data = new GridData(GridData.FILL_BOTH); data.horizontalSpan = 2; composite.setLayoutData(data); layout = new GridLayout(); layout.numColumns = 1; layout.marginHeight = 15; composite.setLayout(layout);
// Create button "two" data = new GridData(GridData.FILL_BOTH); Button two = new Button(composite, SWT.PUSH); two.setText("two"); two.setLayoutData(data);
// Create button "three" data = new GridData(GridData.HORIZONTAL_ALIGN_CENTER); Button three = new Button(composite, SWT.PUSH); three.setText("three"); three.setLayoutData(data);
// Create button "four" data = new GridData(GridData.HORIZONTAL_ALIGN_BEGINNING); Button four = new Button(composite, SWT.PUSH); four.setText("four"); four.setLayoutData(data);
// Create the long button across the bottom data = new GridData(); data.horizontalAlignment = GridData.FILL; data.grabExcessHorizontalSpace = true; data.horizontalSpan = 3; data.heightHint = 150; Button five = new Button(shell, SWT.PUSH); five.setText("five"); five.setLayoutData(data);
shell.pack(); shell.open(); while (!shell.isDisposed()) { if (!display.readAndDispatch()) { display.sleep(); } } display.dispose(); } } |
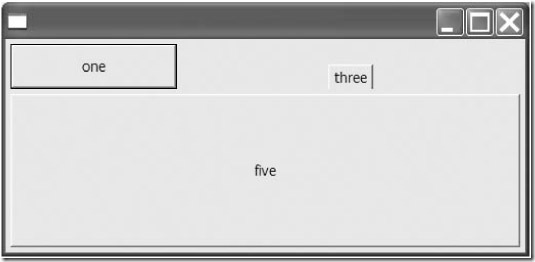
读者可能觉得我们讲解过的layout已经有足够的布局能力,从而想跳过本章的其余部分。是的,读者可以用所学的layout实现极其复杂的layout,只要让窗体保持固定大小,没有任何问题。但是,试着改变刚才创建的哪个复杂的grid layout,看看会发生什么――一些按钮消失了(见图4-11)。
图4-11 改变大小后的复杂的grid layout
如果读者想在窗体改变大小时对控件如何响应有更多的控制,就需要用到FormLayout,这是我们下节讨论的话题。
