在Nginx官方模块提供的模块中,没有对负载均衡后端节点的健康检查模块,但可以使用第三方模块nginx_upstream_check_module来检测后方服务的健康状态 upstream_check_module项目地址
1.安装依赖包
[root@lb02 ~]# yum install -y gcc glibc gcc-c++ prce-devel openssl-devel pcre-devel patch
2.下载nginx源码包以及nginx_upstream_check模块第三方模块
[root@lb02 ~]# wget http://nginx.org/download/nginx-1.14.2.tar.gz
[root@lb02 ~]# wget https://github.com/yaoweibin/nginx_upstream_check_module/archive/master.zip
3.解压nginx源码包以及第三方模块
[root@lb02 ~]# tar xf nginx-1.14.2.tar.gz
[root@lb02 ~]# unzip master.zip
4.进入nginx目录,打补丁(nginx的版本是1.14补丁就选择1.14的,p1代表在nginx目录,p0是不在nginx目录)
[root@lb02 ~]# cd nginx-1.14.2/
[root@lb02 nginx-1.14.2]# patch -p1 <../nginx_upstream_check_module-master/check_1.14.0+.patch
5.编译Nginx,需要添加upstream_check第三方模块
[root@lb02 nginx-1.14.2]# ./configure --prefix=/etc/nginx --sbin-path=/usr/sbin/nginx --modules-path=/usr/lib64/nginx/modules --conf-path=/etc/nginx/nginx.conf --error-log-path=/var/log/nginx/error.log --http-log-path=/var/log/nginx/access.log --pid-path=/var/run/nginx.pid --lock-path=/var/run/nginx.lock --http-client-body-temp-path=/var/cache/nginx/client_temp --http-proxy-temp-path=/var/cache/nginx/proxy_temp --http-fastcgi-temp-path=/var/cache/nginx/fastcgi_temp --http-uwsgi-temp-path=/var/cache/nginx/uwsgi_temp --http-scgi-temp-path=/var/cache/nginx/scgi_temp --user=nginx --group=nginx --with-compat --with-file-aio --with-threads --with-http_addition_module --with-http_auth_request_module --with-http_dav_module --with-http_flv_module --with-http_gunzip_module --with-http_gzip_static_module --with-http_mp4_module --with-http_random_index_module --with-http_realip_module --with-http_secure_link_module --with-http_slice_module --with-http_ssl_module --with-http_stub_status_module --with-http_sub_module --with-http_v2_module --with-mail --with-mail_ssl_module --with-stream --with-stream_realip_module --with-stream_ssl_module --with-stream_ssl_preread_module --add-module=/root/nginx_upstream_check_module-master --with-cc-opt='-O2 -g -pipe -Wall -Wp,-D_FORTIFY_SOURCE=2 -fexceptions -fstack-protector-strong --param=ssp-buffer-size=4 -grecord-gcc-switches -m64 -mtune=generic -fPIC' --with-ld-opt='-Wl,-z,relro -Wl,-z,now -pie'

[root@lb02 nginx-1.14.2]# make && make install
6.配置nginx负载均衡,同时打开upstream健康检查功能
[root@lb02 conf.d]# cat proxy.blog.bgx.com.conf
upstream blog.bgx.com {
  	server 172.16.1.7:80;
  	server 172.16.1.8:80;
	check interval=5000 rise=2 fall=3 timeout=1000 type=tcp;
	#interval检测间隔时间,单位为毫秒
	#rsie表示请求2次正常,标记此后端的状态为up
	#fall表示请求3次失败,标记此后端的状态为down
	#type  类型为tcp
	#timeout为超时时间,单位为毫秒
}

server {
	listen 80;
	server_name blog.oldxu.com;

	location / {
		proxy_pass http://blog.oldxu.com;
		proxy_set_header Host $http_host;
		proxy_set_header X-Real-IP $remote_addr;
		proxy_set_header X-Forwarded-For $proxy_add_x_forwarded_for;
	}
	location /upstream_status {
		check_status;     #开启upstream状态页面
	}
}
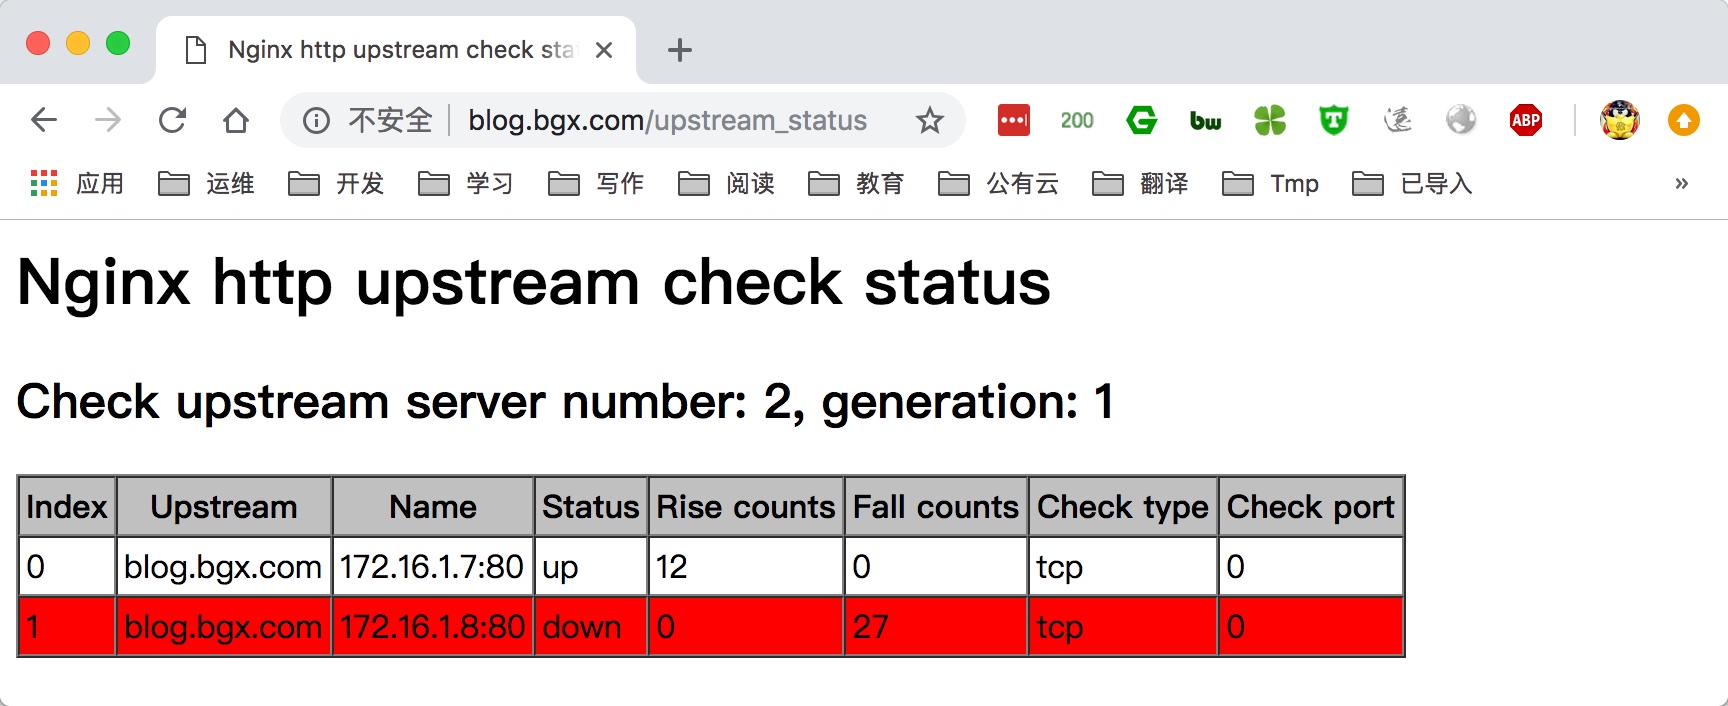
7.通过访问域名/upstream_status则能打开状态页面

8.尝试关闭一台后端的webserver,再次打开检查见面