MySQL 5.5(5.6)后版本,需要使用cmake(Cross make , https://cmake.org/ )编译
我的环境如下:
VMWare虚拟机,CentOS 5.5 x86_64(内核:2.6.18-194.el5),SecureCRT客户端
第一步:安装开发环境
[root@ocean ~]# yum groupinstall "Development Libraries" -y
第二步:准备cmake源码包/MySQL源码包
[root@ocean ~]# mkdir /app/soft -p
[root@ocean ~]# cd /app/soft
[root@ocean soft]# rz
[root@ocean soft]# ls
cmake-3.3.2.tar.gz mysql-5.6.26.tar.gz
现在看到的 cmake-3.3.2.tar.gz 是 cmake 源码压缩包,可以在 https://cmake.org/download 下载到。
mysql-5.6.26.tar.gz 下载地址为:http://dev.mysql.com/get/Downloads/MySQL-5.6/mysql-5.6.26.tar.gz
个人建议cmake,下载2.8版本的,地址:http://www.cmake.org/files/v2.8/cmake-2.8.10.2.tar.gz
解压源码包
[root@ocean soft]# tar xf cmake-3.3.2.tar.gz
[root@ocean soft]# ls
cmake-3.3.2.tar.gz mysql-5.6.26.tar.gz
cmake-3.3.2 mysql-5.6.26
第三步:编译并安装cmake
[root@ocean soft]# cd cmake-3.3.2
[root@ocean cmake-3.3.2]# ls
Auxiliary CMakeLogo.gif CTestConfig.cmake Modules
bootstrap cmake_uninstall.cmake.in CTestCustom.cmake.in README.rst
CMakeCPack.cmake CompileFlags.cmake DartConfig.cmake Source
CMakeCPackOptions.cmake.in configure doxygen.config Templates
CMakeGraphVizOptions.cmake CONTRIBUTING.rst Help Tests
CMakeLists.txt Copyright.txt Licenses Utilities
[root@ocean cmake-3.3.2]#
[root@ocean cmake-3.3.2]# ./configure
当然除了使用源码编译安装外,还可以 yum install cmake -y 方式进行安装。
这一步,我折腾了很久。最后实在没办法,卸载3.3版本的cmake,重新安装2.8版本,终于各种奇葩的问题就没了、
第四步:创建MySQL数据库目录
我新加了一个SISC接口的磁盘来作为mysql的数据盘用的、
[root@ocean ~]# fdisk /dev/sdb
The number of cylinders for this disk is set to 2610.
There is nothing wrong with that, but this is larger than 1024,
and could in certain setups cause problems with:
1) software that runs at boot time (e.g., old versions of LILO)
2) booting and partitioning software from other OSs
(e.g., DOS FDISK, OS/2 FDISK)
Command (m for help): n
Command action
e extended
p primary partition (1-4)
p
Partition number (1-4): 2
First cylinder (1826-2610, default 1826):
Using default value 1826
Last cylinder or +size or +sizeM or +sizeK (1826-2610, default 2610): +20G
Command (m for help): w
[root@ocean ~]# mke2fs -j /dev/sdb2
[root@ocean ~]# mkdir /mydata/ # 创建sdb2的挂在目录
[root@ocean ~]# vim /etc/fstab # 磁盘自动挂载
/dev/VolGroup00/LogVol00 / ext3 defaults 1 1
LABEL=/boot /boot ext3 defaults 1 2
tmpfs /dev/shm tmpfs defaults 0 0
devpts /dev/pts devpts gid=5,mode=620 0 0
sysfs /sys sysfs defaults 0 0
proc /proc proc defaults 0 0
/dev/VolGroup00/LogVol01 swap swap defaults 0 0
/dev/sdb2 /mydata ext3 defaults 0 0
[root@ocean ~]# mount -a
[root@ocean ~]# mkdir /mydata/data -p
小提示:在SecureCRT在fdisk命令如果输错参数,退格无法删除输入字符,请使用ctrl+退格
第五步:创建MySQL用户,组,属组授权
[root@ocean soft]# groupadd -r mysql
[root@ocean soft]# useradd -r -g mysql -s /sbin/nologin mysql
[root@ocean soft]# chown -R mysql.mysql /mydata/data
第六步:编译MySQL(cmake . -LH , make && make install)
[root@ocean soft]# cmake . -LH
[root@ocean soft]# cmake . -DDATA_DIR=/mydata/data # 设置mysql数据库存放目录为第四步创建的目录,有其它参数可以在这里设置
关于cmake,可以参考下这里:http://www.ttlsa.com/mysql/configure-to-cmake/
[root@ocean soft]# make && make install
第七步:配置MySQL(mysql安装目录属组/MySQL初始化脚本)
[root@ocean soft]# cd /usr/local/mysql
[root@ocean mysql]# chown -R :mysql /usr/local/mysql # 将mysql安装目录的属组设置为mysql
[root@ocean mysql]# scripts/mysql_install_db --user=mysql --datadir=/mydata/data
Installing MySQL system tables...
OK
...........其它信息忽略了...............
第八步:配置MySQL(编辑配置文件,mysqld服务开机自启)
[root@ocean mysql]# cp support-files/my-default.cnf /etc/my.cnf
[root@ocean mysql]# cp support-files/mysql.server /etc/init.d/mysqld
[root@ocean mysql]# chkconfig --add mysqld # 添加到开机自启服务列表
[root@ocean mysql]# chkconfig --list mysqld
mysqld 0:off 1:off 2:on 3:on 4:on 5:on 6:off
[root@ocean mysql]# service mysqld start
Starting MySQL.... [OK] # 不容易啊,安装完成了,o(∩_∩)o ~~
第九步:登录MySQL
[root@ocean mysql]# ls
bin data include lib my.cnf README share support-files
COPYING docs INSTALL-BINARY man mysql-test scripts sql-bench
[root@ocean mysql]# mysql # 我已经把 /usr/local/mysql/bin 加入了PATH,但输入 mysql 登录时候得到下面的错误
mysql: error while loading shared libraries: libmysqlclient.so.15: cannot open shared object file: No such file or directory
[root@ocean mysql]# bin/mysql # 换种方式,直接用 bin/mysql ,注意哦。全路径其实是 /usr/local/mysql/bin/mysql
Welcome to the MySQL monitor. Commands end with ; or g.
Your MySQL connection id is 8
Server version: 5.6.26 Source distribution
Copyright (c) 2000, 2015, Oracle and/or its affiliates. All rights reserved.
Oracle is a registered trademark of Oracle Corporation and/or its
affiliates. Other names may be trademarks of their respective
owners.
Type 'help;' or 'h' for help. Type 'c' to clear the current input statement.
mysql>
mysql> show databases;
+--------------------+
| Database |
+--------------------+
| information_schema |
| mysql |
| performance_schema |
| test |
+--------------------+
4 rows in set (0.00 sec)
第十步:简单的安全设置(删除匿名用户,修改密码)
mysql> drop user ''@localhost; // localhost 为主机名。或者可以直接修改修改掉所有用户的密码
mysql> update mysql.user set password=password('123@456') where user='root'; // 修改密码
mysql> flush privileges; // 刷新、重新加载权限
mysql> quit;
Bye
[root@oceanmysql]# bin/mysql
ERROR 1045 (28000): Access denied for user 'root'@'localhost' (using password: NO)
[root@oceanmysql]# bin/mysql -u root -p
Enter password:
Welcome to the MySQL monitor. Commands end with ; or g.
Your MySQL connection id is 11
Server version: 5.6.26 Source distribution
Copyright (c) 2000, 2015, Oracle and/or its affiliates. All rights reserved.
Oracle is a registered trademark of Oracle Corporation and/or its
affiliates. Other names may be trademarks of their respective
owners.
Type 'help;' or 'h' for help. Type 'c' to clear the current input statement.
mysql>
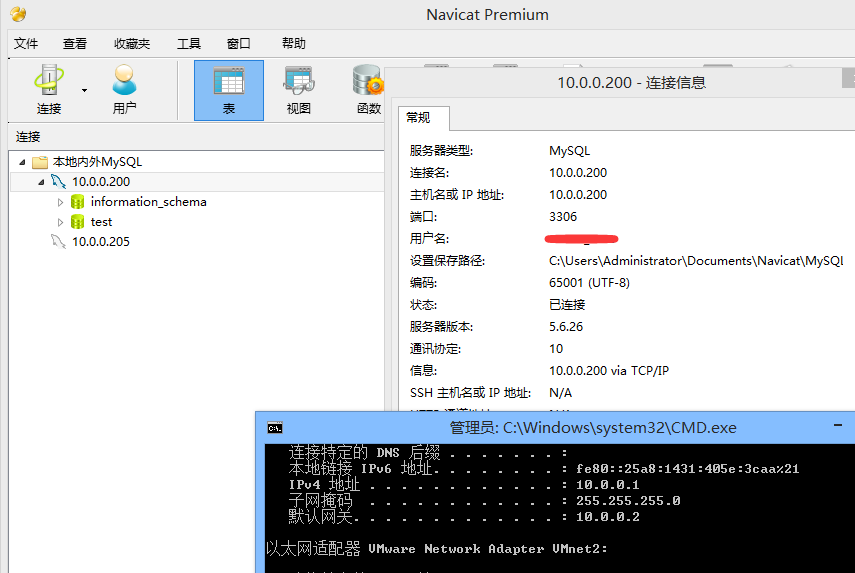
新加一个允许【客户端IP地址为:10.0.0.1;用户名:ocean;密码:123456的mysql用户】
mysql> insert into mysql.user(
mysql> host,user,password,ssl_cipher,x509_issuer,x509_subject )
mysql> values('10.0.0.1','ocean',password('123456'),'','','') ;
参数资料:http://blog.chinaunix.net/uid-20577907-id-3082601.html
注意了哦(ssl_cipher,x509_issuer,x509_subject,这三个字段。我在写入mysql.user表时候提示没有默认值,才加了这三个字段,一般只需要host,user,password 就可以了、)
来一张10.0.0.1客户端通过Navicat连接到数据的截图。
第十一步:本地不输入密码连接到MySQL(在用户家目录下,编辑一个 .my.cnf)
[root@ocean ~]# vi .my.cnf
[client]
user=root
host=localhost
password=123@456
[root@hevin ~]# /usr/local/mysql/bin/mysql
Welcome to the MySQL monitor. Commands end with ; or g.
Your MySQL connection id is 17
Server version: 5.6.26 Source distribution
Copyright (c) 2000, 2015, Oracle and/or its affiliates. All rights reserved.
Oracle is a registered trademark of Oracle Corporation and/or its
affiliates. Other names may be trademarks of their respective
owners.
Type 'help;' or 'h' for help. Type 'c' to clear the current input statement.
mysql>
-----------------------------------------------------------------------------------------------------
啊哈,笔记终于完成了咯。
温馨提示、再提供了一个对 剪贴板图片轻松保存的 小工具。有兴趣的园友试试看。
轻松保存您剪贴板中的截图到任意目录。【支持ctrl+v快捷】,不妨看看,或许你用到了呢?~
http://www.cnblogs.com/oceanho/p/4714204.html