一:SpringMVC是什么
SpringMVC只是Spring的一个子框架,作用学过Struts2的应该很好理解,他们都是MVC的框架。学他就是用来代替Struts2的,那么为什么不用Struts2而选择SpringMVC呢!那就必须说说它相比与struts2的部分优点:
(2)整合:大部分企业都会使用Spring,而SpringMVC就是Spring的一个子框架,当然方便些。
(3)实现机制:Struts2是基于filter过滤器的,而SpringMVC是基于servlet,以前认为filter是servlet的一种特殊,但是servelet明显比filter快。而且struts2是多例的,而SpringMVC则是单利的
(4)参数封装上:
Struts基于属性进行封装。
Springmvc基于方法封装。颗粒更细
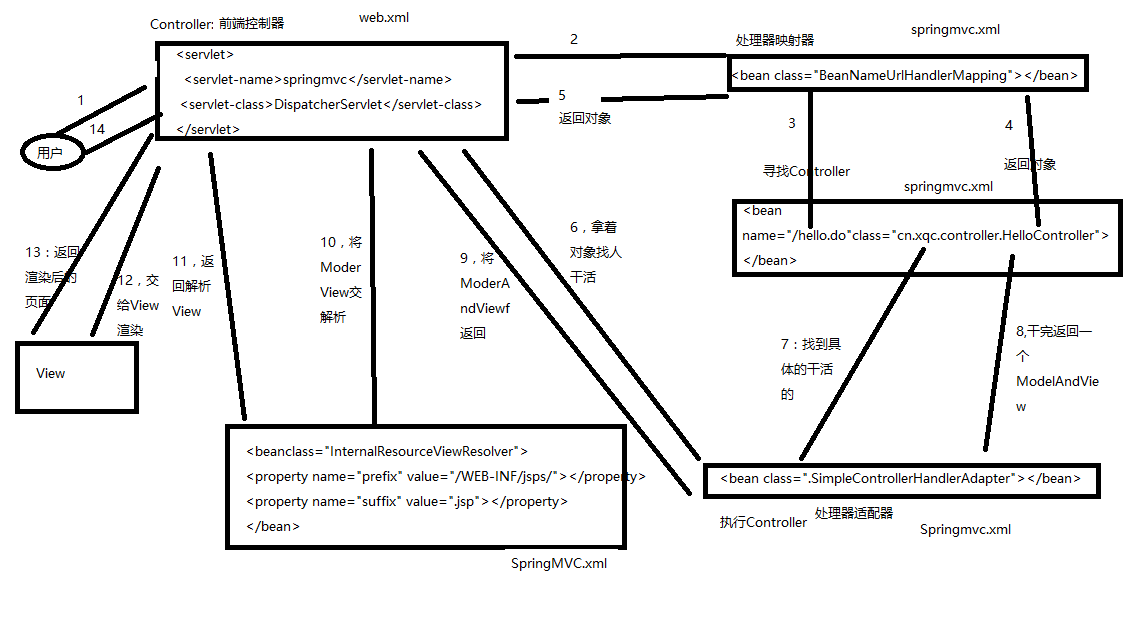
二:SpringMVC的执行流程
理论处理流程

(1)用户发送请求至前端控制器DispatcherServlet;
(2) DispatcherServlet收到请求后,调用HandlerMapping处理器映射器,请求获取Handle;
(3)处理器映射器根据请求url找到具体的处理器,生成处理器对象及处理器拦截器(如果有则生成)一并返回给DispatcherServlet;
(4)DispatcherServlet 调用 HandlerAdapter处理器适配器;
(5)HandlerAdapter 经过适配调用 具体处理器(Handler,也叫后端控制器);
(6)Handler执行完成返回ModelAndView;
(7)HandlerAdapter将Handler执行结果ModelAndView返回给DispatcherServlet;
(8)DispatcherServlet将ModelAndView传给ViewResolver视图解析器进行解析;
(9)ViewResolver解析后返回具体View;
(10)DispatcherServlet对View进行渲染视图(即将模型数据填充至视图中)
(11)DispatcherServlet响应用户。
实现处理流程
1)在Web.xml中配置前端控制器
2)在SpringMVC的配置文件(springMVC.xml)中配置处理器映射器
3)在SpringMVC的配置文件(Springmvc.xml)中配置处理器适配器(处理器映射器有三种,无论采取哪种都可以)
4)创建自定义Controller
5)配置自定义Controller的bean在Springmvc中
6)配置视图解析器
三:注解开发
注解原理:
注解本质是一个继承了Annotation的特殊接口,其具体实现类是Java运行时生成的动态代理类。我们通过反射获取注解时,返回的是Java运行时生成的动态代理对象。通过代理对象调用自定义注解的方法,会最终调用AnnotationInvocationHandler的invoke方法。该方法会从memberValues这个Map中索引出对应的值。而memberValues的来源是Java常量池
1:Spring注解开发使用流程
在SpringMVC中进行配置,让其可以找到,当然我们也可以使用注解进行开发
添加扫描注解
<context:component-scan base-package="com.xqc"></context:component-scan>
配置注解的处理器映射器
1 <!-- 配置注解处理器映射器
2           功能:寻找执行类Controller
3  -->
4 <bean class="org.springframework.web.servlet.mvc.method.annotation.RequestMappingHandlerMapping">
5 </bean>
配置注解的处理器适配器
1 <!-- 配置注解处理器适配器
2     功能:调用controller方法,执行controller
3 -->
4 <bean class="org.springframework.web.servlet.mvc.method.annotation.RequestMappingHandlerAdapter">
5 </bean>
视图解析器
<!-- 配置sprigmvc视图解析器:解析逻辑试图
    后台返回逻辑试图:index
    视图解析器解析出真正物理视图:前缀+逻辑试图+后缀====/WEB-INF/jsps/index.jsp
-->
<bean class="org.springframework.web.servlet.view.InternalResourceViewResolver">
    <property name="prefix" value="/WEB-INF/jsps/"></property>
    <property name="suffix" value=".jsp"></property>
</bean>
4)自定义Controller类
@Controller 相当于在Springmvc.xml配置bean
@RequestMapping 参数封装
2:SpringMVC中常用的注解及其作用
@RequestMapping :请求和方法映射
@RequestBody : 接受客户端传入的JSON数据
@ResponseBody: 返回客户端JSON数据
@Controller : 标识控制层
@Service :标识业务层
@Repository : 标识数据层
@Component :把Bean添加到Spring容器中
@Autowired:按照类型自动注入
@Resource:自定义注入,可以根据类型注入,也可以根据名字注入
@PathVariable:RESTful风格时使用
@Param : 表单参数和方法形参不一样时使用
四:SpringMVC整合Spring ,Mybatis
1:创建工程
2:jar包准备,使用Maven则pom.xml准备
3:配置web.xml文件
3.1)加载SpringMVC配置文件
 1 <filter>
 2   <filter-name>characterEncoding</filter-name>
 3   <filter-class>org.springframework.web.filter.CharacterEncodingFilter</filter-class>
 4   <init-param>
 5     <param-name>encoding</param-name>
 6     <param-value>UTF-8</param-value>
 7   </init-param>
 8 </filter>
 9 <filter-mapping>
10   <filter-name>characterEncoding</filter-name>
11   <url-pattern>/*</url-pattern>
12 </filter-mapping>
13 <servlet>
14   <servlet-name>springmvc</servlet-name>
15   <servlet-class>org.springframework.web.servlet.DispatcherServlet</servlet-class>
16   <!-- 默认加载方式
17          默认加载必须规范:
18          * 文件命名:servlet-name-servlet.xml====springmvc-servlet.xml
19          * 路径规范:必须在WEB-INF目录下面
20    -->
21   <init-param>
22    <param-name>contextConfigLocation</param-name>
23    <param-value>classpath:springmvc.xml</param-value>
24   </init-param>
25  </servlet>
26 <servlet-mapping>
27   <servlet-name>springmvc</servlet-name>
28   <url-pattern>*.do</url-pattern>
29 </servlet-mapping>
3.2)加载spring配置文件
1 <!-- 加载spring配置文件 -->
2 <listener>
3   <listener-class>org.springframework.web.context.ContextLoaderListener</listener-class>
4 </listener>
5 <context-param>
6   <param-name>contextConfigLocation</param-name>
7   <param-value>classpath:beans.xml</param-value>
8 </context-param>
4:配置Springmvc.xml文件


<?xml version="1.0" encoding="UTF-8"?>
<beans xmlns="http://www.springframework.org/schema/beans"
    xmlns:xsi="http://www.w3.org/2001/XMLSchema-instance" xmlns:mvc="http://www.springframework.org/schema/mvc"
    xmlns:context="http://www.springframework.org/schema/context"
    xmlns:aop="http://www.springframework.org/schema/aop" xmlns:tx="http://www.springframework.org/schema/tx"
    xsi:schemaLocation="http://www.springframework.org/schema/beans
        http://www.springframework.org/schema/beans/spring-beans-3.2.xsd
        http://www.springframework.org/schema/mvc
        http://www.springframework.org/schema/mvc/spring-mvc-3.2.xsd
        http://www.springframework.org/schema/context
        http://www.springframework.org/schema/context/spring-context-3.2.xsd
        http://www.springframework.org/schema/aop
        http://www.springframework.org/schema/aop/spring-aop-3.2.xsd
        http://www.springframework.org/schema/tx
        http://www.springframework.org/schema/tx/spring-tx-3.2.xsd">
<!--注解开发,开启扫描-->
    <context:component-scan base-package="cn.itcast"></context:component-scan>

    <!-- annotation-driven:默认创建了多个对象:RequestMappingHandlerMapping,RequestMappingHandlerAdapter
        也就提供对json格式支持
     -->
    <mvc:annotation-driven/>


    <!-- 配置sprigmvc视图解析器:解析逻辑试图 后台返回逻辑试图:index 视图解析器解析出真正物理视图:前缀+逻辑试图+后缀====/WEB-INF/jsps/index.jsp -->
    <bean
        class="org.springframework.web.servlet.view.InternalResourceViewResolver">
        <property name="prefix" value="/WEB-INF/jsps/"></property>
        <property name="suffix" value=".jsp"></property>
    </bean>
</beans>
5:配置beans.xml文件
<?xml version="1.0" encoding="UTF-8"?>
<beans xmlns="http://www.springframework.org/schema/beans"
    xmlns:xsi="http://www.w3.org/2001/XMLSchema-instance" xmlns:mvc="http://www.springframework.org/schema/mvc"
    xmlns:context="http://www.springframework.org/schema/context"
    xmlns:aop="http://www.springframework.org/schema/aop" xmlns:tx="http://www.springframework.org/schema/tx"
    xsi:schemaLocation="http://www.springframework.org/schema/beans
        http://www.springframework.org/schema/beans/spring-beans-3.2.xsd
        http://www.springframework.org/schema/mvc
        http://www.springframework.org/schema/mvc/spring-mvc-3.2.xsd
        http://www.springframework.org/schema/context
        http://www.springframework.org/schema/context/spring-context-3.2.xsd
        http://www.springframework.org/schema/aop
        http://www.springframework.org/schema/aop/spring-aop-3.2.xsd
        http://www.springframework.org/schema/tx
        http://www.springframework.org/schema/tx/spring-tx-3.2.xsd">
<!--Spring注解开发,开启扫描-->
        <context:component-scan base-package="com.xqc"></context:component-scan>

    <!-- 第一步:配置数据源 -->
    <context:property-placeholder location="classpath:jdbc.properties" />
    <bean id="dataSource" class="com.mchange.v2.c3p0.ComboPooledDataSource">
        <property name="jdbcUrl" value="${jdbc.url}"></property>
        <property name="driverClass" value="${jdbc.driver}"></property>
        <property name="user" value="${jdbc.username}"></property>
        <property name="password" value="${jdbc.password}"></property>

    </bean>

    <!-- 第二步:创建sqlSessionFactory。生产sqlSession -->
    <bean id="sqlSessionFactory" class="org.mybatis.spring.SqlSessionFactoryBean">
    <property name="dataSource" ref="dataSource"></property>
    <property name="configLocation" value="classpath:sqlMapConfig.xml"></property>
    </bean>
    <!-- 配置mybatis接口代理开发

        * 接口类名和映射文件必须同名
        * 接口类和映射文件必须在同一个目录下
        *  映射文件namespace名字必须是接口的全类路径名
        * 接口的方法名必须和映射Statement的id一致
     -->
     <bean class="org.mybatis.spring.mapper.MapperScannerConfigurer">
     <property name="basePackage" value="com.xqc.dao"></property>
     <property name="sqlSessionFactoryBeanName" value="sqlSessionFactory"></property>
     </bean>


    <!-- 第三步:事务 -->
    <bean id="transactionManager" class="org.springframework.jdbc.datasource.DataSourceTransactionManager">
    <property name="dataSource" ref="dataSource"></property>
    </bean>

    <!-- 配置通知 ,管理事务的策略-->
    <tx:advice id="txAdvice" transaction-manager="transactionManager">
    <tx:attributes>
    <tx:method name="save*" propagation="REQUIRED" />
    <tx:method name="update*" propagation="REQUIRED" />
    <tx:method name="delete*" propagation="REQUIRED" />
    <tx:method name="insert*" propagation="REQUIRED" />
    <tx:method name="*" propagation="REQUIRED" />
    </tx:attributes>

    </tx:advice>

    <!-- 配置拦截service ,切面-->
    <aop:config>
    <aop:advisor advice-ref="txAdvice" pointcut="execution(* com.xqc.service.*.*(..))"/>
    </aop:config>

</beans>
6:配置 jdbc.properties 文件
1 jdbc.url = jdbc:mysql:///mybatismoder
2 jdbc.driver = com.mysql.jdbc.Driver
3 jdbc.username= root
4 jdbc.password= 1234
7:配置Mybatis配置文件 sqlMapConfig.xml
<?xml version="1.0" encoding="UTF-8"?>
<!DOCTYPE configuration
PUBLIC "-//mybatis.org//DTD Config 3.0//EN"
"http://mybatis.org/dtd/mybatis-3-config.dtd">
<configuration>

</configuration>
8:创建包结构,编写代码即可。
四:SpringMVC常见问题
1:SpringMVC里的拦截器是怎么写的?
一种是实现HandlerInterceptor接口,
另外一种是继承适配器类,接着在接口方法当中,实现处理逻辑;
然后在SpringMvc的配置文件中配置拦截器即可:
4、如果想在拦截的方法里面得到从前台传入的参数,怎么得到?
答:直接在形参里面声明这个参数就可以,但必须名字和传过来的参数一样。
5、SpringMvc用什么对象从后台向前台传递数据的?
答:通过ModelMap对象,可以在这个对象里面调用put方法,把对象加到里面,前台就可以通过el表达式拿到。