Samba的功能
Samba的安装
Samba服务的启动、停止、重启
Samba服务的配置
Samba服务的主配置文件
samba服务器配置实例
Samba客户端设置
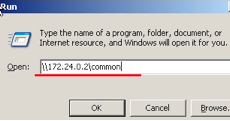
windows客户端
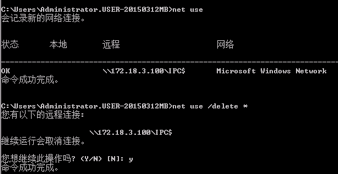
Linux客户端
课后作业
【本节内容】
1. 掌握samba的功能: samba是一个网络服务器,用于Linux和Windows之间共享文件。
2. 掌握samba服务的启动、停止、重启
service smb start|stop|restart
3. 掌握samba的主配置文件为:/etc/samba/smb.conf
4. 掌握配置samba服务
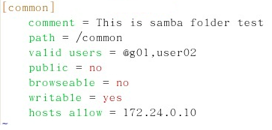
comment = ...... 设置共享注译
path = 设置共享目录的物理路径
valid users = @组名,用户名 设置允许哪些合法组或用户访问
public = yes|no 设置共享资源是否能给游客帐号访问
browseable = yes|no 设置该共享为隐藏共享
writable = yes|no 设置是否允许客户端写入数据
hosts allow = 设置允许访问该共享的合法网段或IP
samba安全认证掌握两种:share (匿名访问)user:用户名密码
添加smb用户和设置密码:smbpasswd –a 用户
Useradd u
5. 掌握windows客户端的访问方式
6.掌握Linux客户端的访问方式

7.课后作业(用时50分钟)
1) Linux服务器上安装Samba服务软件
2) 对Samba的主配置文件进行资源共享设置
3) 在Samba服务器上设置用户登录账号
4) 分别在Linux和Windows客户端进行连接测试
Install samba
一、系统环境
[root@samba ~]# cat /etc/redhat-release
CentOS release 6.7 (Final)
[root@samba ~]# uname -a
Linux samba 2.6.32-573.el6.x86_64 #1 SMP Thu Jul 23 15:44:03 UTC 2015 x86_64 x86_64 x86_64 GNU/Linux
[root@samba ~]# uname -m
x86_64
二、准备环境
1、更改主机名称
hostname samba
sed -i 's#HOSTNAME=template.com#HOSTNAME=samba#g' /etc/sysconfig/network
退出SecureCRT,重新登录
2、关闭iptables 和selinux
关闭iptables
/etc/init.d/iptables stop
关闭开机自启动
chkconfig iptables off
查看iptables状态
[root@samba ~]# chkconfig --list|grep iptables
iptables 0:关闭 1:关闭 2:关闭 3:关闭 4:关闭 5:关闭 6:关闭
#关闭SELINUX
临时生效命令
Setenforce 0
永久生效命令
[root@study ~]# vi /etc/sysconfig/selinux
SELINUX=disabled
保留yum软件包
[root@samba ~]# grep keepcache /etc/yum.conf
keepcache=1
二、部署samba服务
1、安装samba
[root@samba ~]# yum install samba -y
2、创建目录并写入文件测试
[root@samba ~]# mkdir /company
[root@samba ~]# cd /company/
[root@samba company]# touch {a..z}.txt
[root@samba company]# ll
总用量 0
-rw-r--r-- 1 root root 0 11月 19 10:46 a.txt
-rw-r--r-- 1 root root 0 11月 19 10:46 b.txt
-rw-r--r-- 1 root root 0 11月 19 10:46 c.txt
-rw-r--r-- 1 root root 0 11月 19 10:46 d.txt
-rw-r--r-- 1 root root 0 11月 19 10:46 e.txt
-rw-r--r-- 1 root root 0 11月 19 10:46 f.txt
-rw-r--r-- 1 root root 0 11月 19 10:46 g.txt
部分省略.....
3、配置samba
#说明
Samba服务器的安全级别分为5种,分别是user、share、server、domain和ads。在设置不同的级别时,samba服务器还会使用口令服务器和加密口令。
1、user -----客户端访问服务器时需要输入用户名和密码,通过验证后,才能使用服务器的共享资源。此级别使用加密的方式传送密码。
2、share -----客户端连接服务器时不需要输入用户名和密码
3、server -----客户端在访问时同样需要输入用户名和密码,但是,密码验证需要密码验证服务器来负责。
4、domain -----采用域控制器对用户进行身份验证
5、ads -----若samba服务器加入到Windows活动目录中,则使用ads安全级别,ads安全级别也必须指定口令服务器
[root@samba ~]# cd /etc/samba/
[root@samba samba]# ll
总用量 20
-rw-r--r-- 1 root root 20 8月 24 02:58 lmhosts
-rw-r--r-- 1 root root 9778 8月 24 02:58 smb.conf
-rw-r--r-- 1 root root 97 8月 24 02:58 smbusers
#备份配置文件
[root@samba samba]# cp smb.conf smb.conf.backup.2016-11-19
#编辑配置文件
[root@samba ~]# vi smb.conf
93 # ----------------------- Standalone Server Options ------------------------
94 #
95 # Scurity can be set to user, share(deprecated) or server(deprecated)
96 #
97 # Backend to store user information in. New installations should
98 # use either tdbsam or ldapsam. smbpasswd is available for backwards
99 # compatibility. tdbsam requires no further configuration.
100
101 security = share #修改这里为share
102 passdb backend = tdbsam
在结尾添加这几行代码
#Set default shared directories;
[company]
comment=share file
path=/company
public=yes
writable=yes
printable = no
write list = +staff
[root@samba ~]# /etc/init.d/smb restart
关闭 SMB 服务:[确定]
启动 SMB 服务:[确定]
#直接访问samba
\192.168.1.103company
#权限:只读,不能写和执行
#在windows上面访问

#对文件夹进行授权:写权限
[root@samba ~]# chmod a+w /company/
[root@samba ~]# ll -d /company/
drwxr-xrwx 2 root root 4096 11月 19 10:46 /company/
或
只设置里面某个文件有写权限
[root@samba ~]# cd /company/
[root@samba company]# chmod o+w a.txt
#在windows中给a.txt写入内容:
11111
#在linux中查看
[root@samba company]# cat a.txt
11111
###################################################################
配置需要用户名和密码才能访问
[root@samba ~]# cd /etc/samba/
[root@samba samba]# ll
总用量 32
-rw-r--r-- 1 root root 20 8月 24 02:58 lmhosts
-rw-r--r-- 1 root root 9925 11月 19 11:29 smb.conf
-rw-r--r-- 1 root root 9925 11月 19 11:31 smb.conf.share.backup
-rw-r--r-- 1 root root 97 8月 24 02:58 smbusers
#配置smb.conf
[root@samba samba]# vi smb.conf
# ----------------------- Standalone Server Options ------------------------
#
# Scurity can be set to user, share(deprecated) or server(deprecated)
#
# Backend to store user information in. New installations should
# use either tdbsam or ldapsam. smbpasswd is available for backwards
# compatibility. tdbsam requires no further configuration.
security = user
passdb backend = tdbsam
#Set default user directories;
[company]
comment=share file
path=/company #如果没有这个目录,请按上面的方法创建并授权o+w权限
public=yes
writable=yes
printable = no
write list = +staff
#创建用户和密码
[root@samba samba]# useradd nulige
[root@samba samba]# smbpasswd -a nulige
New SMB password:
Retype new SMB password:
Added user nulige.
#重启服务
[root@samba samba]# /etc/init.d/smb restart
关闭 SMB 服务:[确定]
启动 SMB 服务:[确定]
#在windows中访问

#解决安全问题
[root@samba samba]# ll -d /home/nulige
drwx------ 2 nulige nulige 4096 11月 19 11:56 /home/nulige
[root@samba samba]# id nulige
uid=500(nulige) gid=500(nulige) 组=500(nulige)
#用户可以登录操作系统
[root@samba samba]# tail -1 /etc/passwd
nulige:x:500:500::/home/nulige:/bin/bash
#做默认共享,我们把他修改为,不能登录操作系统
[root@samba samba]# tail -1 /etc/passwd
nulige:x:500:500::/home/nulige:/sbin/nologin
Centos7.2
1、系统环境:
[root@hotdoor samba]# cat /etc/redhat-release
CentOS Linux release 7.2.1511 (Core)

[root@hotdoor samba]# uname -a
Linux hotdoor.com 3.10.0-327.el7.x86_64 #1 SMP Thu Nov 19 22:10:57 UTC 2015 x86_64 x86_64 x86_64 GNU/Linux
2、添加新用户
groupadd nulige
useradd -s /sbin/nologin -g nulige -M nulige
smbpasswd -a nulige
#输入新密码两遍
[root@hotdoor data]# mkdir -p company

[root@hotdoor company]# chown nobody:nobody /data/company/
[root@hotdoor company]# chown nulige:nulige /data/company/
3、安装samba
[root@hotdoor tools]# yum install samba -y
[root@hotdoor company]# cd /etc/samba/ [root@hotdoor samba]# cp smb.conf smb.conf.bak
4、配置共享目录
[root@hotdoor samba]# vi /etc/samba/smb.conf
[global]
        workgroup = WORKGROUP
        server string = Ted Samba Server %v
        netbios name = TedSamba
        security = user
        map to guest = Bad User
        passdb backend = tdbsam

[nulige] #文件夹名称
        comment = project development directory
        path = /data/company
        valid users = nulige  #用户名
        write list = nulige
        printable = no
        create mask = 0644
        directory mask = 0755
5、启动服务
[root@hotdoor company]# systemctl start smb
[root@hotdoor company]# systemctl enable smb
Created symlink from /etc/systemd/system/multi-user.target.wants/smb.service to /usr/lib/systemd/system/smb.service.
6、查看服务
[root@hotdoor company]# ss -lntup|grep smb
tcp LISTEN 0 50 *:139 *:* users:(("smbd",pid=15336,fd=38))
tcp LISTEN 0 50 *:445 *:* users:(("smbd",pid=15336,fd=37))
tcp LISTEN 0 50 :::139 :::* users:(("smbd",pid=15336,fd=36))
tcp LISTEN 0 50 :::445 :::* users:(("smbd",pid=15336,fd=35))
7、windows访问
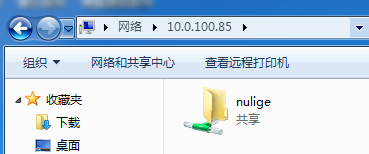
输入用户名和密码。
参考:http://www.cnblogs.com/nidey/p/6195483.html