一、Flume简介
-
- Flume提供一个分布式的,可靠的,对大数据量的日志进行高效收集、聚集、移动的服务,Flume只能在Unix环境下运行。
-
- Flume基于流式架构,容错性强,也很灵活简单。
-
- Flume、Kafka用来实时进行数据收集,Spark、Flink用来实时处理数据,impala用来实时查询。
二、Flume角色

1、Source
用于采集数据,Source是产生数据流的地方,同时Source会将产生的数据流传输到Channel,这个有点类似于Java IO部分的Channel。
2、Channel
用于桥接Sources和Sinks,类似于一个队列。
3、Sink
从Channel收集数据,将数据写到目标源(可以是下一个Source,也可以是HDFS或者HBase)。
4、Event
传输单元,Flume数据传输的基本单元,以事件的形式将数据从源头送至目的地。
三、Flume传输过程
source监控某个文件或数据流,数据源产生新的数据,拿到该数据后,将数据封装在一个Event中,并put到channel后commit提交,channel队列先进先出,sink去channel队列中拉取数据,然后写入到HDFS中。
四、Flume部署及使用
1、文件配置
- 查询JAVA_HOME: echo $JAVA_HOME
显示/opt/module/jdk1.8.0_144 /opt/module/jdk1.8.0_144
- 安装Flume
[itstar@bigdata113 software]$ tar -zxvf apache-flume1.8.0-bin.tar.gz -C /opt/module/
- 改名:
[itstar@bigdata113 conf]$ mv flume-env.sh.template flume-env.sh
- flume-env.sh涉及修改项:
export JAVA_HOME=/opt/module/jdk1.8.0_144
2、案例
2.1、案例一:监控端口数据
目标:Flume监控一端Console,另一端Console发送消息,使被监控端实时显示。
分步实现:
-
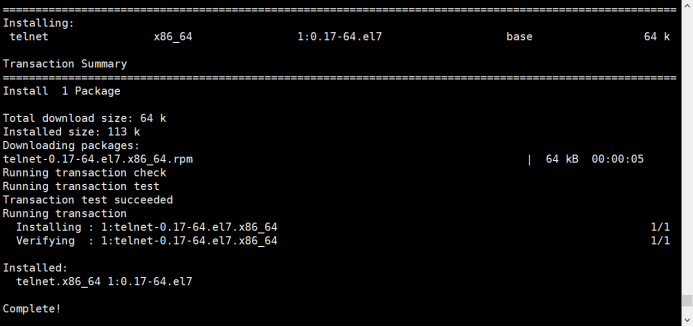
- 安装telnet工具【联网状态】
yum -y install telnet
【安装完成】
-
- 创建Flume Agent配置文件flume-telnet.conf
#1.定义Agent ===> a1
a1.sources = r1
a1.sinks = k1
a1.channels = c1

#2.定义source
a1.sources.r1.type = netcat
a1.sources.r1.bind = bigdata112
a1.sources.r1.port = 44445

#3.定义sink
a1.sinks.k1.type = logger

#4.定义channel
a1.channels.c1.type = memory
a1.channels.c1.capacity = 1000
a1.channels.c1.transactionCapacity = 100

#5.双向链接
a1.sources.r1.channels = c1
a1.sinks.k1.channel = c1
-
- 判断44445端口是否被占用
netstat -tunlp | grep 44445
-
- 启动flume配置文件
/opt/module/flume1.8.0/bin/flume-ng agent
--conf /opt/module/flume1.8.0/conf/
--name a1
--conf-file /opt/module/flume1.8.0/jobconf/flume-telnet.conf
-Dflume.root.logger==INFO,console
-
- 使用telnet工具向本机的44444端口发送内容
telnet bigdata112 44445
2.2、案例二:实时读取本地文件到HDFS
-
- 创建flume-hdfs.conf文件
# 1.定义agent的名字a2
a2.sources = r2
a2.sinks = k2
a2.channels = c2

#2.定义Source
a2.sources.r2.type = exec
a2.sources.r2.command = tail -F /opt/Andy
a2.sources.r2.shell = /bin/bash -c

#3.定义sink
a2.sinks.k2.type = hdfs
a2.sinks.k2.hdfs.path = hdfs://bigdata111:9000/flume/%H
#上传文件的前缀
a2.sinks.k2.hdfs.filePrefix = Andy-
#是否按照时间滚动文件夹
a2.sinks.k2.hdfs.round = true
#多少时间单位创建一个新的文件夹
a2.sinks.k2.hdfs.roundValue = 1
#重新定义时间单位
a2.sinks.k2.hdfs.roundUnit = hour
#是否使用本地时间戳
a2.sinks.k2.hdfs.useLocalTimeStamp = true
#积攒多少个Event才flush到HDFS一次
a2.sinks.k2.hdfs.batchSize = 1000
#设置文件类型,可支持压缩
a2.sinks.k2.hdfs.fileType = DataStream
#多久生成一个新的文件
a2.sinks.k2.hdfs.rollInterval = 600
#设置每个文件的滚动大小
a2.sinks.k2.hdfs.rollSize = 134217700
#文件的滚动与Event数量无关
a2.sinks.k2.hdfs.rollCount = 0
#最小副本数
a2.sinks.k2.hdfs.minBlockReplicas = 1

# 4.定义Channel
a2.channels.c2.type = memory
a2.channels.c2.capacity = 1000
a2.channels.c2.transactionCapacity = 100

# 5.链接
a2.sources.r2.channels = c2
a2.sinks.k2.channel = c2
-
- 执行监控配置
/opt/module/flume1.8.0/bin/flume-ng agent
--conf /opt/module/flume1.8.0/conf/
--name a2
--conf-file /opt/module/flume1.8.0/jobconf/flume-hdfs.conf
2.3、案例三:实时读取目录文件到HDFS
目标:使用flume监听整个目录的文件
-
- 创建配置文件flume-dir.conf
#1.定义Agent a3
a3.sources = r3
a3.sinks = k3
a3.channels = c3

# 2.定义Source
a3.sources.r3.type = spooldir
a3.sources.r3.spoolDir = /opt/module/flume1.8.0/upload
a3.sources.r3.fileSuffix = .COMPLETED
a3.sources.r3.fileHeader = true
#忽略所有以.tmp结尾的文件,不上传
a3.sources.r3.ignorePattern = ([^ ]*.tmp)

# 3.Sink
a3.sinks.k3.type = hdfs
a3.sinks.k3.hdfs.path = hdfs://bigdata111:9000/flume/%H
#上传文件的前缀
a3.sinks.k3.hdfs.filePrefix = upload-
#是否按照时间滚动文件夹
a3.sinks.k3.hdfs.round = true
#多少时间单位创建一个新的文件夹
a3.sinks.k3.hdfs.roundValue = 1
#重新定义时间单位
a3.sinks.k3.hdfs.roundUnit = hour
#是否使用本地时间戳
a3.sinks.k3.hdfs.useLocalTimeStamp = true
#积攒多少个Event才flush到HDFS一次
a3.sinks.k3.hdfs.batchSize = 100
#设置文件类型,可支持压缩
a3.sinks.k3.hdfs.fileType = DataStream
#多久生成一个新的文件
a3.sinks.k3.hdfs.rollInterval = 600
#设置每个文件的滚动大小大概是128M
a3.sinks.k3.hdfs.rollSize = 134217728
#文件的滚动与Event数量无关
a3.sinks.k3.hdfs.rollCount = 0
#最小副本数
a3.sinks.k3.hdfs.minBlockReplicas = 1

#4.定义Channel
a3.channels.c3.type = memory
a3.channels.c3.capacity = 1000
a3.channels.c3.transactionCapacity = 100

#5.链接
a3.sources.r3.channels = c3
a3.sinks.k3.channel = c3
-
- 执行测试:执行如下脚本后,请向upload文件夹中添加文件试试
/opt/module/flume1.8.0/bin/flume-ng agent
--conf /opt/module/flume1.8.0/conf/
--name a3
--conf-file /opt/module/flume1.8.0/jobconf/flume-dir.conf
尖叫提示: 在使用Spooling Directory Source时
1) 不要在监控目录中创建并持续修改文件
2) 上传完成的文件会以.COMPLETED结尾
3) 被监控文件夹每500毫秒扫描一次文件变动
2.4、案例四:Flume与Flume之间数据传递:单Flume多Channel、Sink
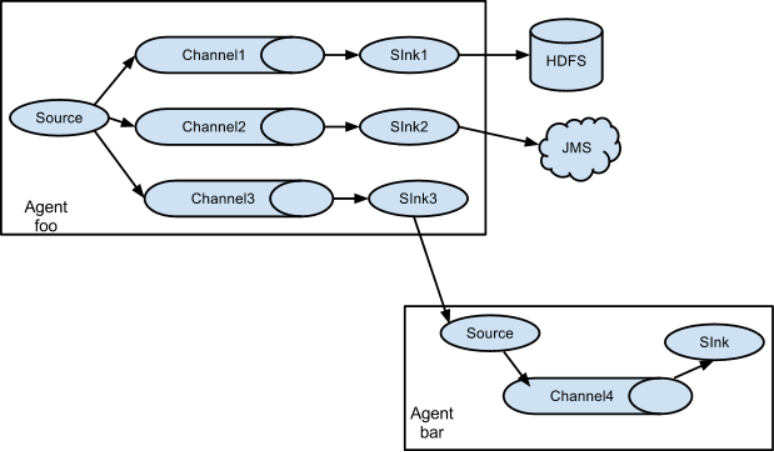
目标:使用flume1监控文件变动,flume1将变动内容传递给flume-2,flume-2负责存储到HDFS。同时flume1将变动内容传递给flume-3,flume-3负责输出到local
-
- 创建flume1.conf,用于监控某文件的变动,同时产生两个channel和两个sink分别输送给flume-2和flume3:
# Name the components on this agent
a1.sources = r1
a1.sinks = k1 k2
a1.channels = c1 c2
# 将数据流复制给多个channel
a1.sources.r1.selector.type = replicating

# Describe/configure the source
a1.sources.r1.type = exec
a1.sources.r1.command = tail -F /opt/Andy
a1.sources.r1.shell = /bin/bash -c

# Describe the sink
a1.sinks.k1.type = avro
a1.sinks.k1.hostname = bigdata111
a1.sinks.k1.port = 4141

a1.sinks.k2.type = avro
a1.sinks.k2.hostname = bigdata111
a1.sinks.k2.port = 4142

# Describe the channel
a1.channels.c1.type = memory
a1.channels.c1.capacity = 1000
a1.channels.c1.transactionCapacity = 100

a1.channels.c2.type = memory
a1.channels.c2.capacity = 1000
a1.channels.c2.transactionCapacity = 100

# Bind the source and sink to the channel
a1.sources.r1.channels = c1 c2
a1.sinks.k1.channel = c1
a1.sinks.k2.channel = c2
-
- 创建flume-2.conf,用于接收flume1的event,同时产生1个channel和1个sink,将数据输送给hdfs:
# Name the components on this agent
a2.sources = r1
a2.sinks = k1
a2.channels = c1

# Describe/configure the source
a2.sources.r1.type = avro
a2.sources.r1.bind = bigdata111
a2.sources.r1.port = 4141

# Describe the sink
a2.sinks.k1.type = hdfs
a2.sinks.k1.hdfs.path = hdfs://bigdata111:9000/flume2/%H
#上传文件的前缀
a2.sinks.k1.hdfs.filePrefix = flume2-
#是否按照时间滚动文件夹
a2.sinks.k1.hdfs.round = true
#多少时间单位创建一个新的文件夹
a2.sinks.k1.hdfs.roundValue = 1
#重新定义时间单位
a2.sinks.k1.hdfs.roundUnit = hour
#是否使用本地时间戳
a2.sinks.k1.hdfs.useLocalTimeStamp = true
#积攒多少个Event才flush到HDFS一次
a2.sinks.k1.hdfs.batchSize = 100
#设置文件类型,可支持压缩
a2.sinks.k1.hdfs.fileType = DataStream
#多久生成一个新的文件
a2.sinks.k1.hdfs.rollInterval = 600
#设置每个文件的滚动大小大概是128M
a2.sinks.k1.hdfs.rollSize = 134217700
#文件的滚动与Event数量无关
a2.sinks.k1.hdfs.rollCount = 0
#最小副本数
a2.sinks.k1.hdfs.minBlockReplicas = 1


# Describe the channel
a2.channels.c1.type = memory
a2.channels.c1.capacity = 1000
a2.channels.c1.transactionCapacity = 100

# Bind the source and sink to the channel
a2.sources.r1.channels = c1
a2.sinks.k1.channel = c1
-
- 创建flume-3.conf,用于接收flume1的event,同时产生1个channel和1个sink,将数据输送给本地目录:
# Name the components on this agent
a3.sources = r1
a3.sinks = k1
a3.channels = c1

# Describe/configure the source
a3.sources.r1.type = avro
a3.sources.r1.bind = bigdata111
a3.sources.r1.port = 4142

# Describe the sink
a3.sinks.k1.type = file_roll
#备注:此处的文件夹需要先创建好
a3.sinks.k1.sink.directory = /opt/flume3

# Describe the channel
a3.channels.c1.type = memory
a3.channels.c1.capacity = 1000
a3.channels.c1.transactionCapacity = 100

# Bind the source and sink to the channel
a3.sources.r1.channels = c1
a3.sinks.k1.channel = c1
尖叫提示:输出的本地目录必须是已经存在的目录,如果该目录不存在,并不会创建新的目录。
-
- 执行测试:分别开启对应flume-job(依次启动flume1,flume-2,flume-3),同时产生文件变动并观察结果:
$ bin/flume-ng agent --conf conf/ --name a1 --conf-file jobconf/flume1.conf

$ bin/flume-ng agent --conf conf/ --name a2 --conf-file jobconf/flume2.conf

$ bin/flume-ng agent --conf conf/ --name a3 --conf-file jobconf/flume3.conf
2.5、案例五:Flume与Flume之间数据传递,多Flume汇总数据到单Flume
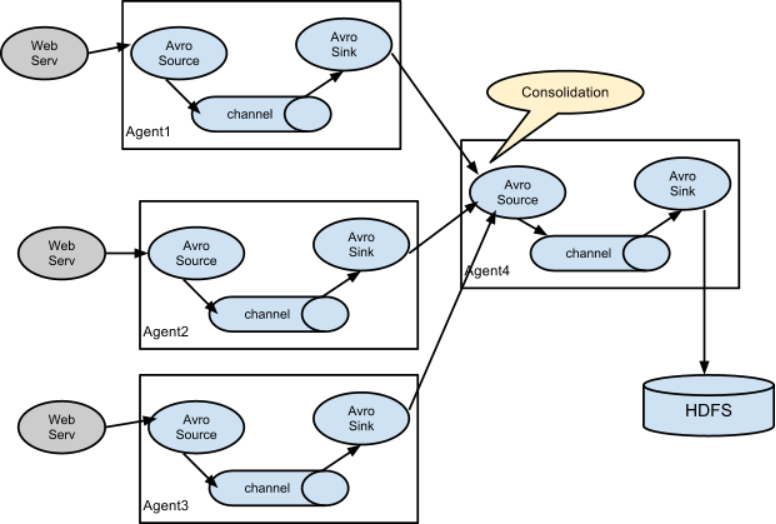
目标:flume11监控文件hive.log,flume-22监控某一个端口的数据流,flume11与flume-22将数据发送给flume-33,flume33将最终数据写入到HDFS。
-
- 创建flume11.conf,用于监控hive.log文件,同时sink数据到flume-33:
# Name the components on this agent
a1.sources = r1
a1.sinks = k1
a1.channels = c1

# Describe/configure the source
a1.sources.r1.type = exec
a1.sources.r1.command = tail -F /opt/Andy
a1.sources.r1.shell = /bin/bash -c

# Describe the sink
a1.sinks.k1.type = avro
a1.sinks.k1.hostname = bigdata111
a1.sinks.k1.port = 4141

# Describe the channel
a1.channels.c1.type = memory
a1.channels.c1.capacity = 1000
a1.channels.c1.transactionCapacity = 100

# Bind the source and sink to the channel
a1.sources.r1.channels = c1
a1.sinks.k1.channel = c1
-
- 创建flume-22.conf,用于监控端口44444数据流,同时sink数据到flume-33:
# Name the components on this agent
a2.sources = r1
a2.sinks = k1
a2.channels = c1

# Describe/configure the source
a2.sources.r1.type = netcat
a2.sources.r1.bind = bigdata111
a2.sources.r1.port = 44444

# Describe the sink
a2.sinks.k1.type = avro
a2.sinks.k1.hostname = bigdata111
a2.sinks.k1.port = 4141

# Use a channel which buffers events in memory
a2.channels.c1.type = memory
a2.channels.c1.capacity = 1000
a2.channels.c1.transactionCapacity = 100

# Bind the source and sink to the channel
a2.sources.r1.channels = c1
a2.sinks.k1.channel = c1
-
- 创建flume-33.conf,用于接收flume11与flume-22发送过来的数据流,最终合并后sink到HDFS:
# Name the components on this agent
a3.sources = r1
a3.sinks = k1
a3.channels = c1

# Describe/configure the source
a3.sources.r1.type = avro
a3.sources.r1.bind = bigdata111
a3.sources.r1.port = 4141

# Describe the sink
a3.sinks.k1.type = hdfs
a3.sinks.k1.hdfs.path = hdfs://bigdata111:9000/flume3/%H
#上传文件的前缀
a3.sinks.k1.hdfs.filePrefix = flume3-
#是否按照时间滚动文件夹
a3.sinks.k1.hdfs.round = true
#多少时间单位创建一个新的文件夹
a3.sinks.k1.hdfs.roundValue = 1
#重新定义时间单位
a3.sinks.k1.hdfs.roundUnit = hour
#是否使用本地时间戳
a3.sinks.k1.hdfs.useLocalTimeStamp = true
#积攒多少个Event才flush到HDFS一次
a3.sinks.k1.hdfs.batchSize = 100
#设置文件类型,可支持压缩
a3.sinks.k1.hdfs.fileType = DataStream
#多久生成一个新的文件
a3.sinks.k1.hdfs.rollInterval = 600
#设置每个文件的滚动大小大概是128M
a3.sinks.k1.hdfs.rollSize = 134217700
#文件的滚动与Event数量无关
a3.sinks.k1.hdfs.rollCount = 0
#最小冗余数
a3.sinks.k1.hdfs.minBlockReplicas = 1

# Describe the channel
a3.channels.c1.type = memory
a3.channels.c1.capacity = 1000
a3.channels.c1.transactionCapacity = 100

# Bind the source and sink to the channel
a3.sources.r1.channels = c1
a3.sinks.k1.channel = c1
-
- 执行测试:分别开启对应flume-job(依次启动flume-33,flume-22,flume11),同时产生文件变动并观察结果:
$ bin/flume-ng agent --conf conf/ --name a3 --conf-file jobconf/flume33.conf
$ bin/flume-ng agent --conf conf/ --name a2 --conf-file jobconf/flume22.conf
$ bin/flume-ng agent --conf conf/ --name a1 --conf-file jobconf/flume11.conf
- 数据发送
a)telnet bigdata111 44444    打开后发送5555555
在/opt/Andy 中追加666666
2.6、案例五:Flume自定义拦截器
- 时间戳拦截器,Timestamp.conf
#定义agent名, source、channel、sink的名称
a4.sources = r1
a4.channels = c1
a4.sinks = k1

#具体定义source
a4.sources.r1.type = spooldir
a4.sources.r1.spoolDir = /opt/module/flume-1.8.0/upload

#具体定义channel
a4.channels.c1.type = memory
a4.channels.c1.capacity = 10000
a4.channels.c1.transactionCapacity = 100

#定义拦截器,为文件最后添加时间戳
a4.sources.r1.interceptors = i1
a4.sources.r1.interceptors.i1.type = org.apache.flume.interceptor.TimestampInterceptor$Builder

#具体定义sink
a4.sinks.k1.type = hdfs
a4.sinks.k1.hdfs.path = hdfs://bigdata111:9000/flume-interceptors/%H
a4.sinks.k1.hdfs.filePrefix = events-
a4.sinks.k1.hdfs.fileType = DataStream

#不按照条数生成文件
a4.sinks.k1.hdfs.rollCount = 0
#HDFS上的文件达到128M时生成一个文件
a4.sinks.k1.hdfs.rollSize = 134217728
#HDFS上的文件达到60秒生成一个文件
a4.sinks.k1.hdfs.rollInterval = 60

#组装source、channel、sink
a4.sources.r1.channels = c1
a4.sinks.k1.channel = c1
启动命令
/opt/module/flume-1.8.0/bin/flume-ng agent -n a4
-f /opt/module/flume-1.8.0/jobconf/flume-interceptors.conf
-c /opt/module/flume-1.8.0/conf
-Dflume.root.logger=INFO,console
- 主机名拦截器,Host.conf
a1.sources= r1
a1.sinks = k1
a1.channels = c1

a1.sources.r1.type = exec
a1.sources.r1.channels = c1
a1.sources.r1.command = tail -F /opt/Andy
a1.sources.r1.interceptors = i1
a1.sources.r1.interceptors.i1.type = host

#参数为true时用IP192.168.1.111,参数为false时用主机名,默认为true
a1.sources.r1.interceptors.i1.useIP = false
a1.sources.r1.interceptors.i1.hostHeader = agentHost

a1.sinks.k1.type=hdfs
a1.sinks.k1.channel = c1
a1.sinks.k1.hdfs.path = hdfs://bigdata111:9000/flumehost/%H
a1.sinks.k1.hdfs.filePrefix = Andy_%{agentHost}
#往生成的文件加后缀名.log
a1.sinks.k1.hdfs.fileSuffix = .log
a1.sinks.k1.hdfs.fileType = DataStream
a1.sinks.k1.hdfs.writeFormat = Text
a1.sinks.k1.hdfs.rollInterval = 10
a1.sinks.k1.hdfs.useLocalTimeStamp = true

a1.channels.c1.type = memory
a1.channels.c1.capacity = 1000
a1.channels.c1.transactionCapacity = 100

a1.sources.r1.channels = c1
a1.sinks.k1.channel = c1
启动命令:
bin/flume-ng agent -c conf/ -f jobconf/host.conf -n a1 -Dflume.root.logger=INFO,console
- UUID拦截器,uuid.conf
a1.sources = r1
a1.sinks = k1
a1.channels = c1

a1.sources.r1.type = exec
a1.sources.r1.channels = c1
a1.sources.r1.command = tail -F /opt/Andy
a1.sources.r1.interceptors = i1
#type的参数不能写成uuid,得写具体,否则找不到类
a1.sources.r1.interceptors.i1.type = org.apache.flume.sink.solr.morphline.UUIDInterceptor$Builder
#如果UUID头已经存在,它应该保存
a1.sources.r1.interceptors.i1.preserveExisting = true
a1.sources.r1.interceptors.i1.prefix = UUID_

a1.sinks.k1.type = logger

a1.channels.c1.type = memory
a1.channels.c1.capacity = 1000
a1.channels.c1.transactionCapacity = 100

a1.sources.r1.channels = c1
a1.sinks.k1.channel = c1
# bin/flume-ng agent -c conf/ -f jobconf/uuid.conf -n a1 -Dflume.root.logger==INFO,console
- 查询替换拦截器,search.conf
a1.sources = r1
a1.sinks = k1
a1.channels = c1

a1.sources.r1.type = exec
a1.sources.r1.channels = c1
a1.sources.r1.command = tail -F /opt/Andy
a1.sources.r1.interceptors = i1
a1.sources.r1.interceptors.i1.type = search_replace
a1.sources.r1.interceptors.i1.searchPattern = [0-9]+
a1.sources.r1.interceptors.i1.replaceString = itstar
a1.sources.r1.interceptors.i1.charset = UTF-8

a1.sinks.k1.type = logger

a1.channels.c1.type = memory
a1.channels.c1.capacity = 1000
a1.channels.c1.transactionCapacity = 100

a1.sources.r1.channels = c1
a1.sinks.k1.channel = c1
# bin/flume-ng agent -c conf/ -f jobconf/search.conf -n a1 -Dflume.root.logger=INFO,console
- 正则过滤拦截器,filter.conf
a1.sources = r1
a1.sinks = k1
a1.channels = c1

a1.sources.r1.type = exec
a1.sources.r1.channels = c1
a1.sources.r1.command = tail -F /opt/Andy
a1.sources.r1.interceptors = i1
a1.sources.r1.interceptors.i1.type = regex_filter
a1.sources.r1.interceptors.i1.regex = ^A.*
#如果excludeEvents设为false,表示过滤掉不是以A开头的events。如果excludeEvents设为true,则表示过滤掉以A开头的events。
a1.sources.r1.interceptors.i1.excludeEvents = true

a1.sinks.k1.type = logger

a1.channels.c1.type = memory
a1.channels.c1.capacity = 1000
a1.channels.c1.transactionCapacity = 100

a1.sources.r1.channels = c1
a1.sinks.k1.channel = c1
# bin/flume-ng agent -c conf/ -f jobconf/filter.conf -n a1 -Dflume.root.logger=INFO,console
- 正则抽取拦截器,extractor.conf
a1.sources = r1
a1.sinks = k1
a1.channels = c1

a1.sources.r1.type = exec
a1.sources.r1.channels = c1
a1.sources.r1.command = tail -F /opt/Andy
a1.sources.r1.interceptors = i1
a1.sources.r1.interceptors.i1.type = regex_extractor
a1.sources.r1.interceptors.i1.regex = hostname is (.*?) ip is (.*)
a1.sources.r1.interceptors.i1.serializers = s1 s2
a1.sources.r1.interceptors.i1.serializers.s1.name = cookieid
a1.sources.r1.interceptors.i1.serializers.s2.name = ip

a1.sinks.k1.type = logger

a1.channels.c1.type = memory
a1.channels.c1.capacity = 1000
a1.channels.c1.transactionCapacity = 100

a1.sources.r1.channels = c1
a1.sinks.k1.channel = c1
# bin/flume-ng agent -c conf/ -f jobconf/extractor.conf -n a1 -Dflume.root.logger=INFO,console