
Photo by Tobi from Pexels
前言:这篇文章接着上一篇 CI/CD探索与实践 (Gitlab+Kubernetes) 记录这段时间的学习与心得。
在上文中,简单的完成了一个社区的流水线演示,但我平时在工作中使用的持续集成工具是Jenkins,公司的Gitlab版本很低,不是很好用。所以在学习的过程中就参考了前文流水线的思想,使用Jenkins实现了一下。至于为什么要使用Docker Swarm,其实是因为之前还有Skywalking没有演示,我的笔记本内存不够开着Kubernetes再开Skywalking了 (T_T)
本文的关注点是CI/CD的实践过程,示例为最简单的构建流程。如果有任何表述不当的地方欢迎评论交流。
1. Jenkins 介绍
由于前面的文章已经介绍过了持续集成和持续部署的概念,所以现在简单的介绍一下Jenkins

Jenkins是使用Java语言开发,最流行的开源免费 CI&CD 软件,用于自动化各种任务,包括构建、测试和部署软件。支持各种运行方式,可通过系统包、Docker 或者通过一个独立的 Java 程序。其前身是 Oracle的 Hudson项目,现在我们依旧经常能在Jenkins的堆栈中看到的Hudson。
大家有兴趣可以观看YTB上一个Jenkins官方发布的Jenkins介绍视频:Jenkins is the Way to build, test, and deploy 。
Jenkins的灵魂:Pipeline
Jenkins 流水线 (或简单的带有大写"P"的"Pipeline") 是一套插件,它支持实现和集成 continuous delivery pipelines 到Jenkins。
对Jenkins 流水线的定义被写在一个文本文件中 (成为 Jenkinsfile),该文件可以被提交到项目的源代码的控制仓库。 [2] 这是"流水线即代码"的基础; 将CD 流水线作为应用程序的一部分,像其他代码一样进行版本化和审查。 创建 Jenkinsfile并提交它到源代码控制中提供了一些即时的好处:
- 自动地为所有分支创建流水线构建过程并拉取请求。
- 在流水线上代码复查/迭代 (以及剩余的源代码)。
- 对流水线进行审计跟踪。
- 该流水线的真正的源代码 [3], 可以被项目的多个成员查看和编辑。
2. 流水线介绍
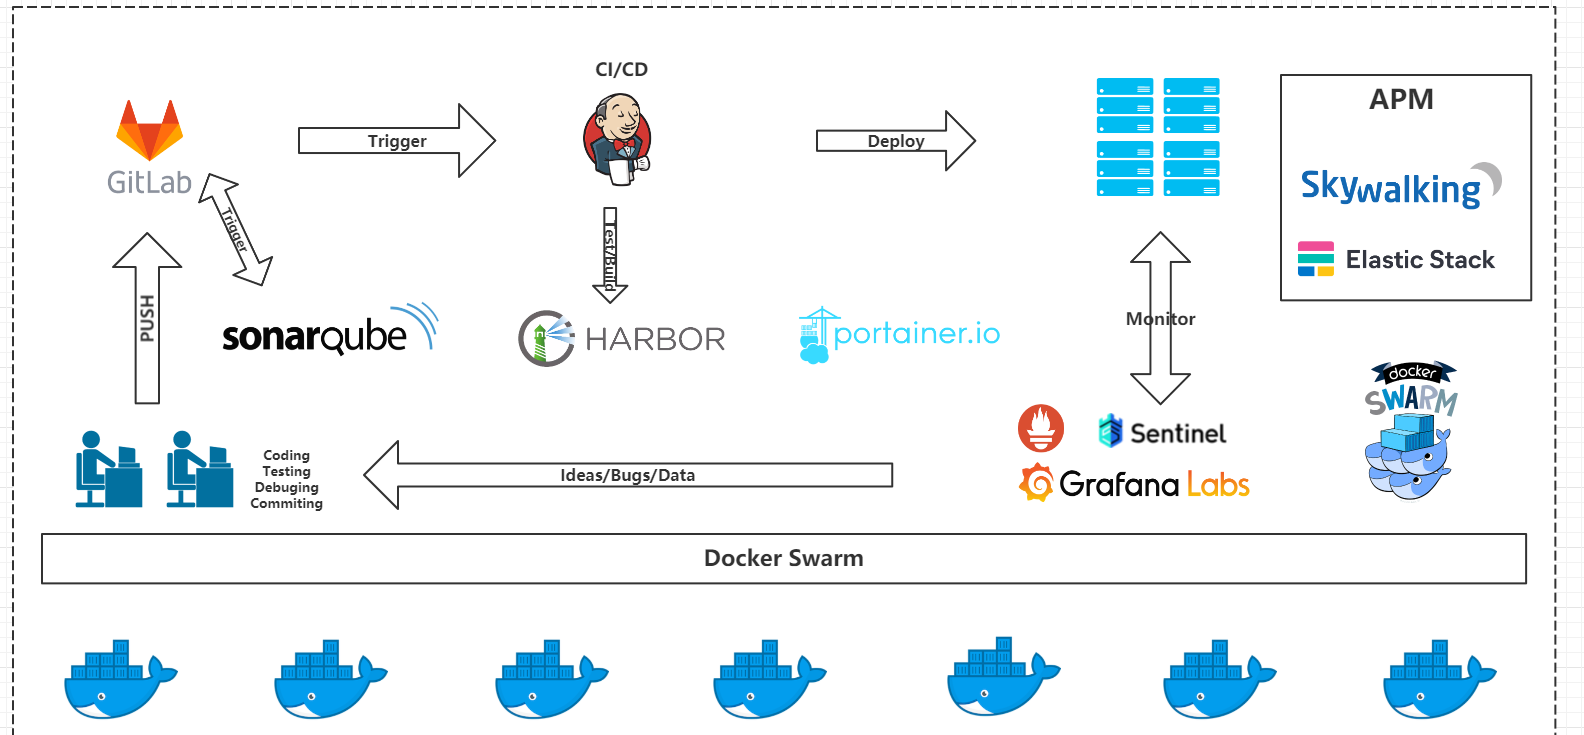
本篇实践的内容是参考前一条流水线的思想,使用Jenkins实现完成的,以下为实践中用到的内容:
- Docker Swarm:Docker多节点容器编排。机器资源成本、学习成本基本为0。因为需要节省内存所以替换一下K8S。理解CI/CD思想就好 ~
- Spring Boot 2.3.0
- Gitlab :代码版本库
- Jenkins:持续集成工具
- Maven:编译工具
- Sonar:代码质控
- Jacoco:单测覆盖度
- Skywalking:链路追踪系统
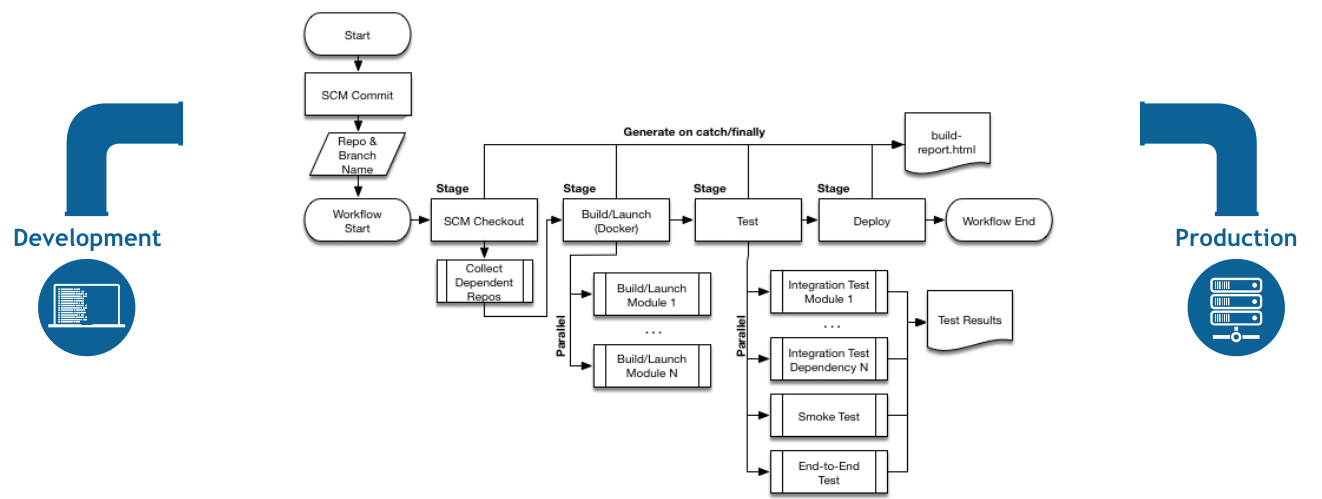
工作流与上一篇文章相同。Docker官方的 CI/CD最佳实践 如下图所示:
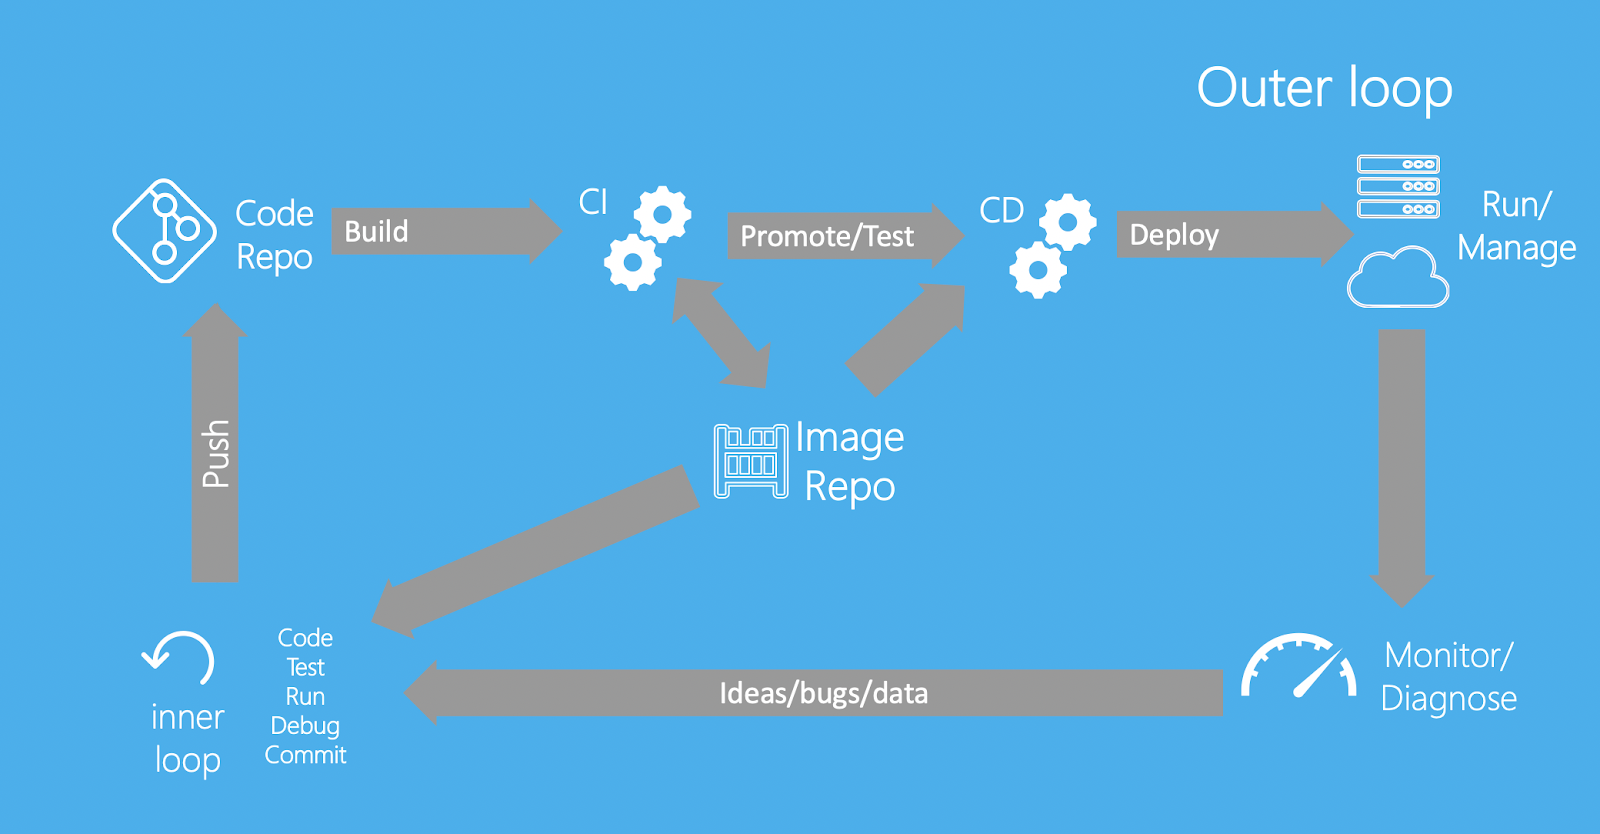
按照图示替换一下对应的应用实现:
3. 环境准备
3.1 硬件条件
32G+内存 (支撑 4核8G虚拟机 × 3 )
注:把Kubernetes换成了Docker Swarm节省了一部分内存,但是Gitlab、Harbor、Skywalking都比较吃内存。
3.2 流水线环境
3.2.1 代码
由于加入了Skywalking的演示环节,所以这里需要多个应用
-
Project-Producer
启动时从Redis中获得一个唯一ID作为接口返回标识

Producer存在一个优雅下线的配置(配合Dockerfile捕捉SIGTERM完成优雅下线):
spring:
  application:
    name: ProduceApplication
  redis:
    host: 192.168.31.200
    port: 6379
  data:
    redis:
      repositories:
        enabled: true

server:
  port: 8010
  shutdown: graceful
-
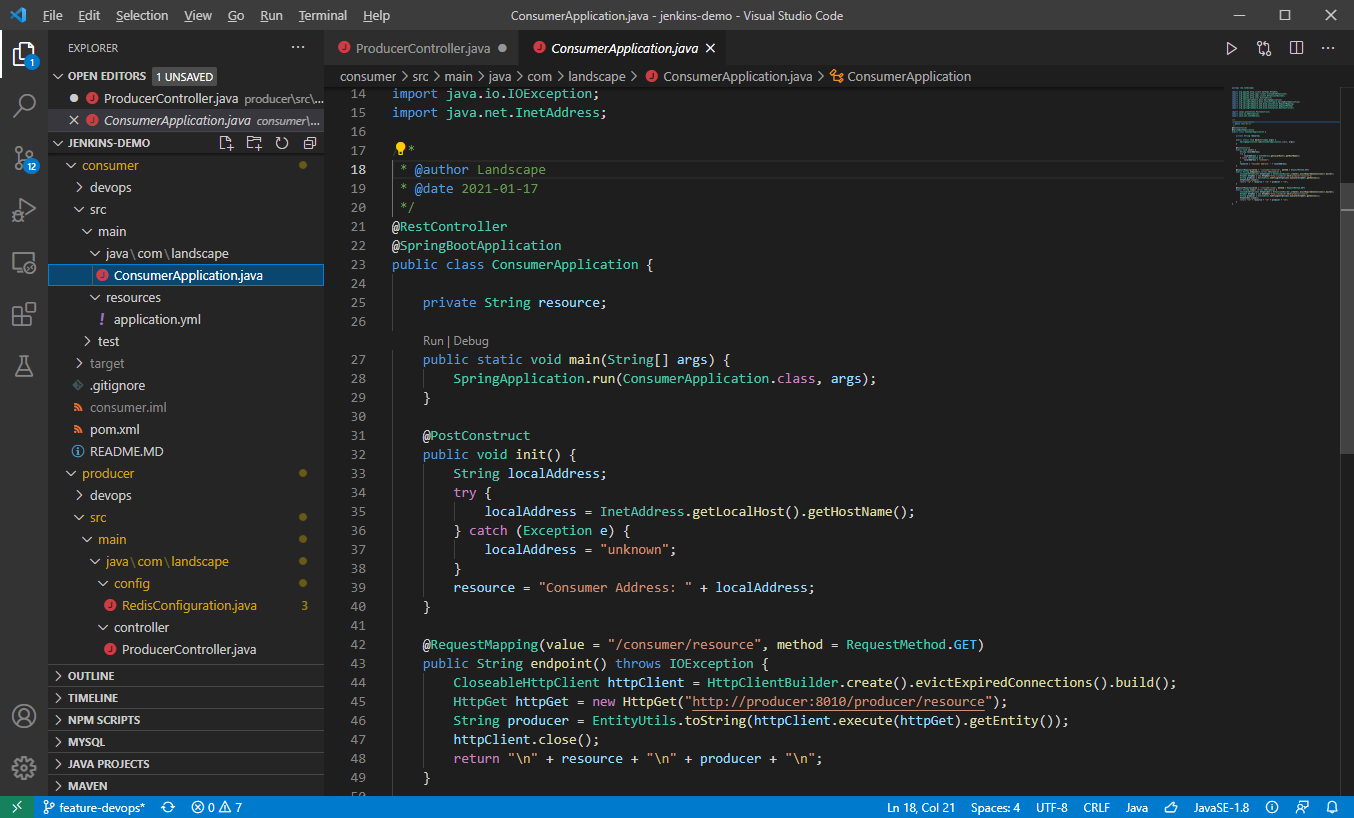
Project-Consumer
更加简单的一个Demo,每次调用resource接口会先调用Producer获得结果加上自身hostname一起返回
3.2.2 Docker
[landscape@centos ~]$ docker version
Client: Docker Engine - Community
 Version:           20.10.2
 API version:       1.41
 Go version:        go1.13.15
 Git commit:        2291f61
 Built:             Mon Dec 28 16:17:48 2020
 OS/Arch:           linux/amd64
 Context:           default
 Experimental:      true

Server: Docker Engine - Community
 Engine:
  Version:          20.10.2
  API version:      1.41 (minimum version 1.12)
  Go version:       go1.13.15
  Git commit:       8891c58
  Built:            Mon Dec 28 16:16:13 2020
  OS/Arch:          linux/amd64
  Experimental:     false
 containerd:
  Version:          1.4.3
  GitCommit:        269548fa27e0089a8b8278fc4fc781d7f65a939b
 runc:
  Version:          1.0.0-rc92
  GitCommit:        ff819c7e9184c13b7c2607fe6c30ae19403a7aff
 docker-init:
  Version:          0.19.0
  GitCommit:        de40ad0
3.3.3 Docker Swarm
[landscape@centos ~]$ docker info
Client:
 Context:    default
 Debug Mode: false
 Plugins:
  app: Docker App (Docker Inc., v0.9.1-beta3)
  buildx: Build with BuildKit (Docker Inc., v0.5.1-docker)

Server:
......
 Swarm: active
  NodeID: nfctjdvu0d1i8ptgz2ilri52d
  Is Manager: true
  ClusterID: 81zaq32bokwbntfparn6kxn0r
  Managers: 1
  Nodes: 11
  Default Address Pool: 10.0.0.0/8
  SubnetSize: 24
  Data Path Port: 4789
  Orchestration:
   Task History Retention Limit: 5
  Raft:
   Snapshot Interval: 10000
   Number of Old Snapshots to Retain: 0
   Heartbeat Tick: 1
   Election Tick: 10
  Dispatcher:
   Heartbeat Period: 5 seconds
  CA Configuration:
   Expiry Duration: 3 months
   Force Rotate: 0
  Autolock Managers: false
......
[landscape@centos ~]$ docker node ls
ID                            HOSTNAME                STATUS    AVAILABILITY   MANAGER STATUS   ENGINE VERSION
nfctjdvu0d1i8ptgz2ilri52d *   centos.7.1              Ready     Active         Leader           20.10.2
6fbuvij7vor5fbvisf61hyir2     centos.7.2              Ready     Active                          20.10.2
o0p2y43ecbgwr1lzeep2hqghy     centos.7.2              Down      Active                          20.10.2
lonfukl03a075bwnq4h5kbdzl     centos.7.3              Ready     Active                          20.10.2
ttbimoijlg7rswzyrvu5p4om0     centos.7.3              Down      Active                          20.10.2
9c7zerxl6cgmhlq0ywfiatf2u     localhost.localdomain   Down      Active                          20.10.2
o9g79todgpbuwmcff77hwzv8c     localhost.localdomain   Down      Active                          20.10.2
x5qamqy4nvsep27x0g9mchk66     localhost.localdomain   Down      Active                          20.10.2
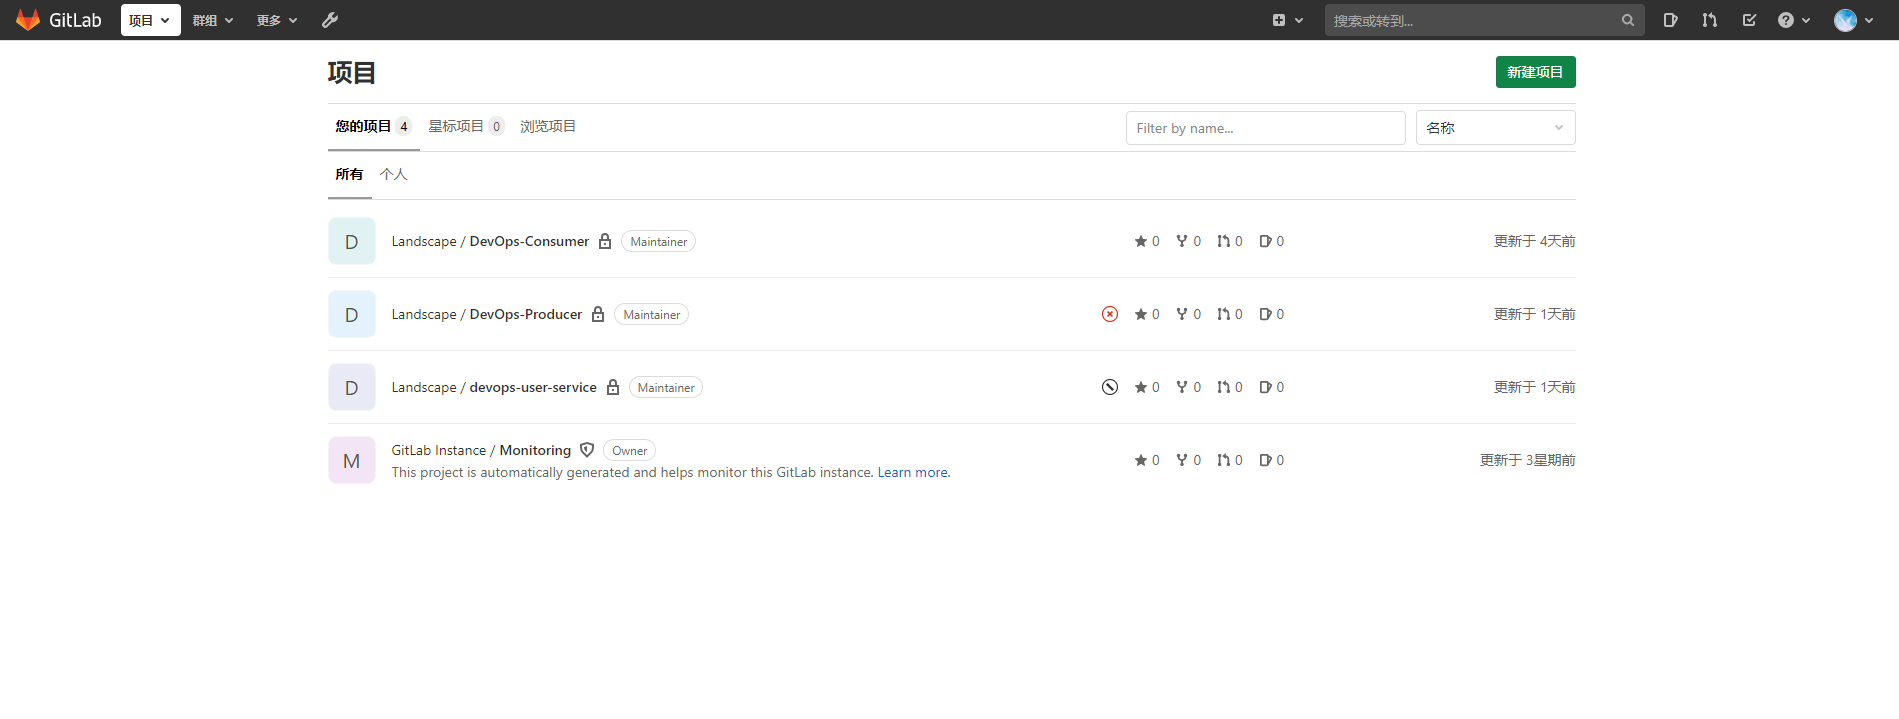
3.3.4 Gitlab
分为两个仓库:Producer、Consumer
3.3.5 Dockerfile
以Producer为例,Consumer类似(这里是嵌入了Skywalking agent的):
FROM openjdk:8u275-jre

LABEL MAINTAINER="Landscape"

COPY target/producer.jar /opt/app.jar
COPY lib/agent/ /opt/agent/

ENV SW_AGENT_NAME ProducerApplication
ENV SW_AGENT_COLLECTOR_BACKEND_SERVICES 192.168.31.60:11800

EXPOSE 8010

ENTRYPOINT ["java", \
            "-javaagent:/opt/agent/skywalking-agent.jar", \
            "-jar", \
            "/opt/app.jar"]
3.3.6 Docker Stack
关键点:
- 挂载存储 Skywalking agent jar包 的volume
- 网络选择overlay表示覆盖整个集群
- stop_grace_period 表示最长等待优雅下线的时间,进程需要自己捕获 SIGTERM 信号来进行优雅处理,当然Dockerfile需要是exec格式的,如上Dockerfile,因为sh格式的dockerfile 应用进程将会在子shell中运行。
version: '3.2'

services:
  producer:
    image: 192.168.31.197:8000/devops/producer:latest
    networks:
      - psnet
    ports:
      - "8010:8010"
    volumes:
      - sw_agent:/opt/agent
    stop_grace_period: 1m30s
    deploy:
      mode: replicated
      replicas: 2
      placement:
        constraints: [node.platform.os == linux]
  consumer:
    image: 192.168.31.197:8000/devops/consumer:latest
    depends_on:
      - producer
    networks:
      - psnet
    ports:
      - "8011:8011"
    volumes:
      - sw_agent:/opt/agent
    deploy:
      mode: replicated
      replicas: 1
      placement:
        constraints: [node.platform.os == linux]
networks:
  psnet:
    driver: overlay
    attachable: true
volumes:
  sw_agent:
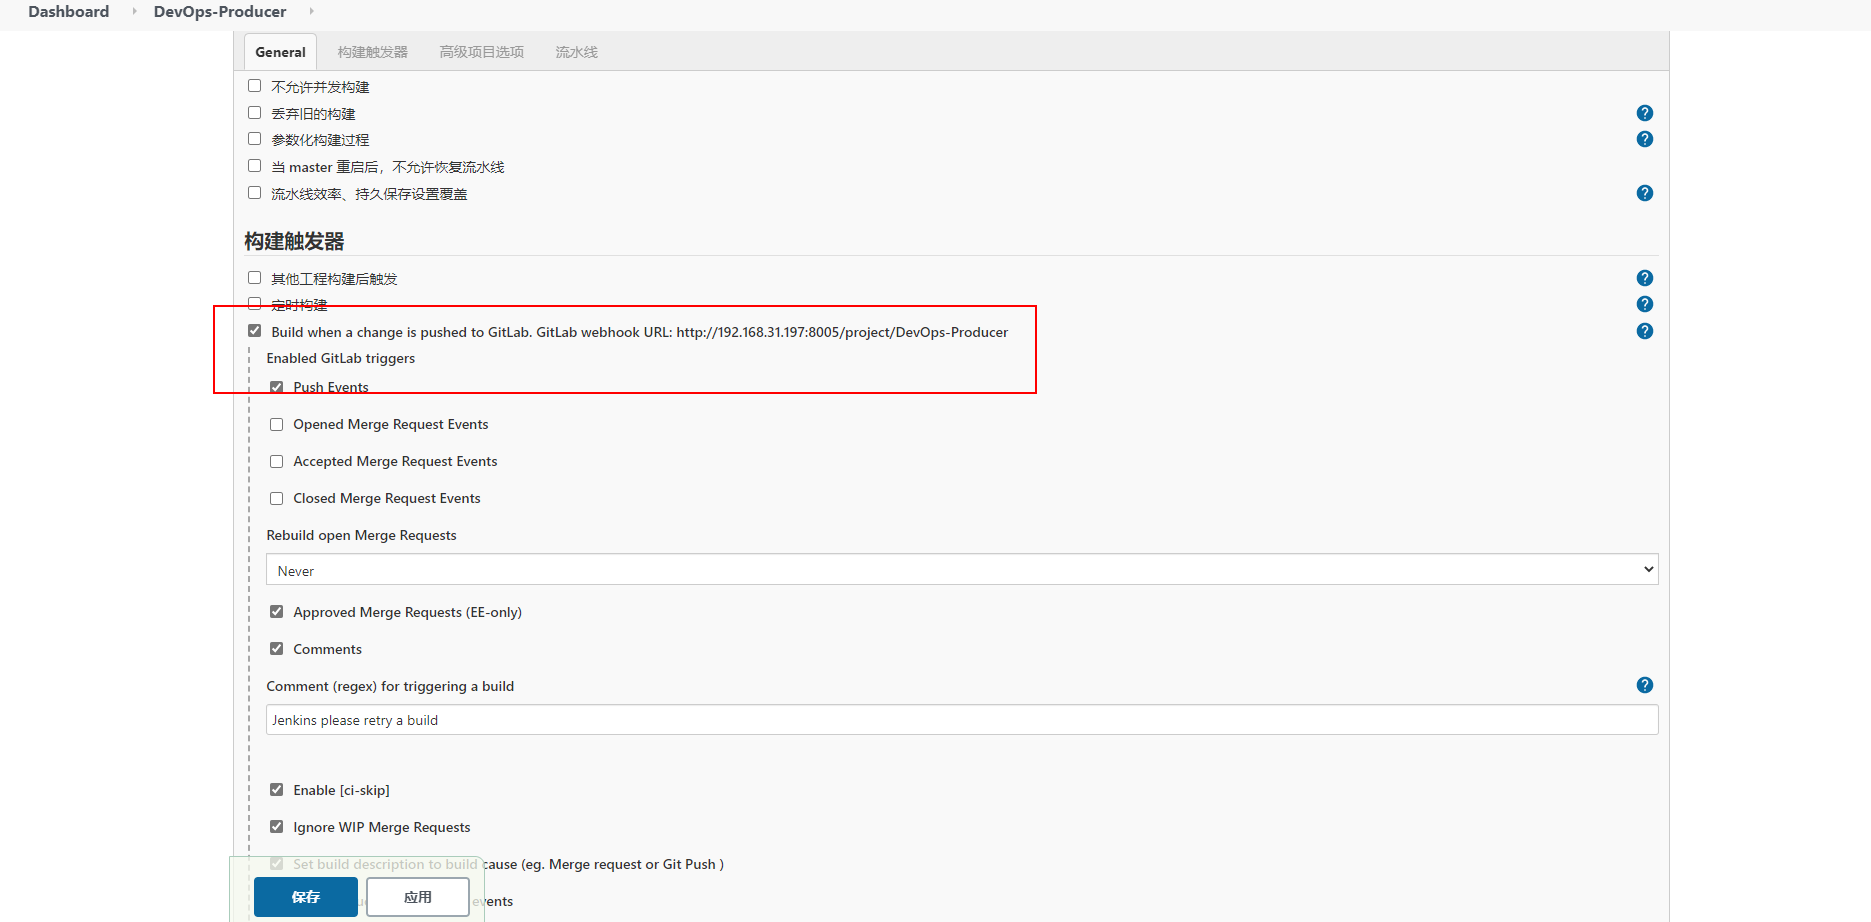
3.3.7 Jenkins
勾选 Webhook, 选择自己希望触发的事件,然后在Gitlab的Webhook页面配置好钩子调用
Jenkinsfile(流水线脚本):
def build_args = [:]

build_args.harbor_address = "192.168.31.197:8000"
build_args.image_name = anyOf("DevOps-Producer",JOB_NAME)

build_args.maven_image="registry.cn-hangzhou.aliyuncs.com/acs/maven"


node(){
    stage('pull'){
        checkout([
            $class: 'GitSCM',
            branches: [[name: "feature-devops"]],
            browser: [
                $class: 'GitLab', repoUrl: 'http://192.168.31.196/root/DevOps-Producer',
                version: '13.7.4'
                ],
            doGenerateSubmoduleConfigurations: false,
            extensions: [],
            ubmoduleCfg: [],
            userRemoteConfigs: [[
                credentialsId: '3', url: 'http://192.168.31.196/root/DevOps-Producer.git'
            ]]]
        )
    }
    stage('compile'){
        docker.image("$build_args.maven_image").inside('-v maven-repo:/usr/share/maven/ref'){
            sh "mvn -s /usr/share/maven/ref/settings.xml clean compile"
        }
    }

    stage('check'){
        parallel test:{
            docker.image("$build_args.maven_image").inside('-v maven-repo:/usr/share/maven/ref'){
                sh "mvn -s /usr/share/maven/ref/settings.xml  test"
            }
        },sonar:{
            docker.image("$build_args.maven_image").inside('-v maven-repo:/usr/share/maven/ref -v sonar-cache:/root/.sonar/cache'){
                sh "mvn -s /usr/share/maven/ref/settings.xml sonar:sonar \
                    -Dsonar.projectKey=DevOps-Producer \
                    -Dsonar.host.url=http://192.168.31.200:9000 \
                    -Dsonar.login=0758a52664a843769e3e105ca38cda85acf60f1c"
            }

        }
    }

    stage('release'){
        docker.image("$build_args.maven_image").inside('-v maven-repo:/usr/share/maven/ref'){
            sh "mvn -s /usr/share/maven/ref/settings.xml clean compile package"
        }
    }

    stage('docker build'){
        sh "cp -r ~/lib ./"
        sh "docker build -f devops/Dockerfile -t 192.168.31.197:8000/devops/producer:v${BUILD_ID} ."
        sh 'docker login -u admin -p buzhidao http://192.168.31.197:8000/'
        sh "docker push 192.168.31.197:8000/devops/producer:v${BUILD_ID}"
    }
    stage('deploy'){
        sh "docker service update --with-registry-auth --image 192.168.31.197:8000/devops/producer:v${BUILD_ID} devops_producer"
    }
}


def anyOf(String defaultStr,String[] options){
    for(a in options){
        if(a && a.trim()){
            return a
        }
    }
    return defaultStr
}
以上是本次实践过程中完成的流水线脚本,还有不少可优化的地方,例如一些路径位置可替换为变量,账号密码可以用credentials方法等,仅供参考 .~
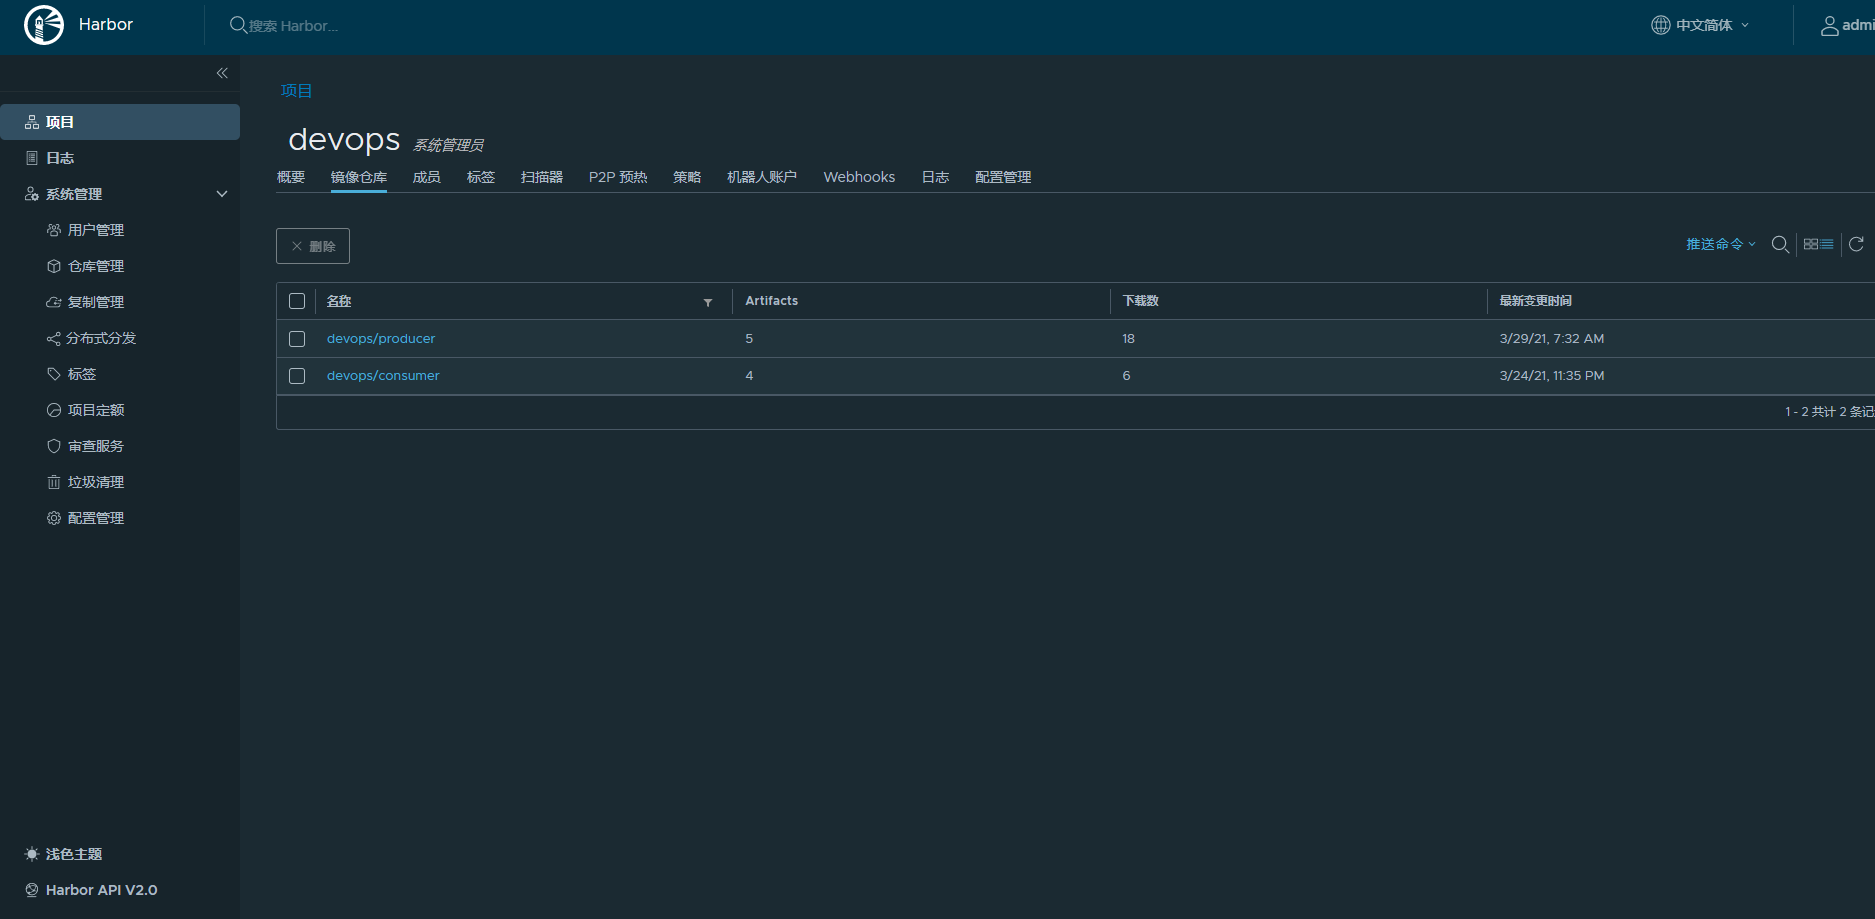
3.3.8 Harbor仓库
预先建好项目
3.3.9 SonarQube
预先建好项目、配置Token
3.3.10 Portainer
可有可无,只是一个WebUI ,在一定程度上可屏蔽集群信息,减少对宿主机的依赖,但是有时候感觉用起来还不如命令

4. 流水线运行
启动Jenkins流水线,手动或者推送代码通过Webhook都行
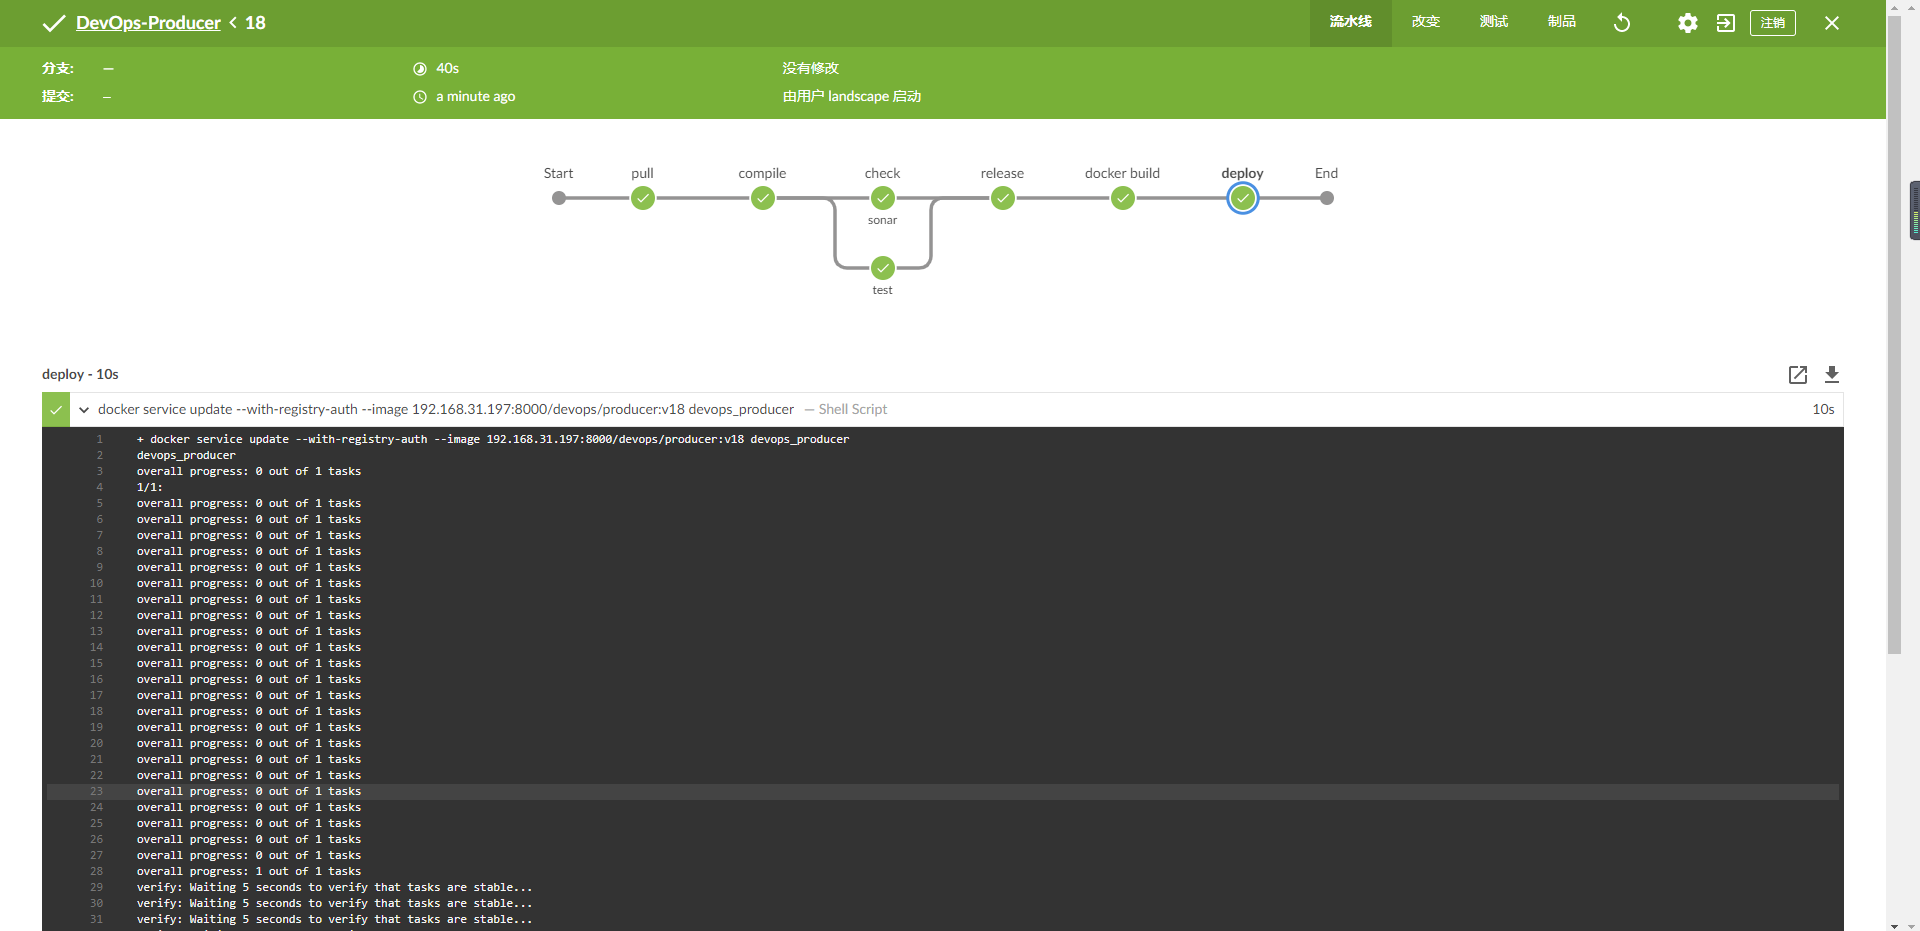
验证一下结果,接口请求:

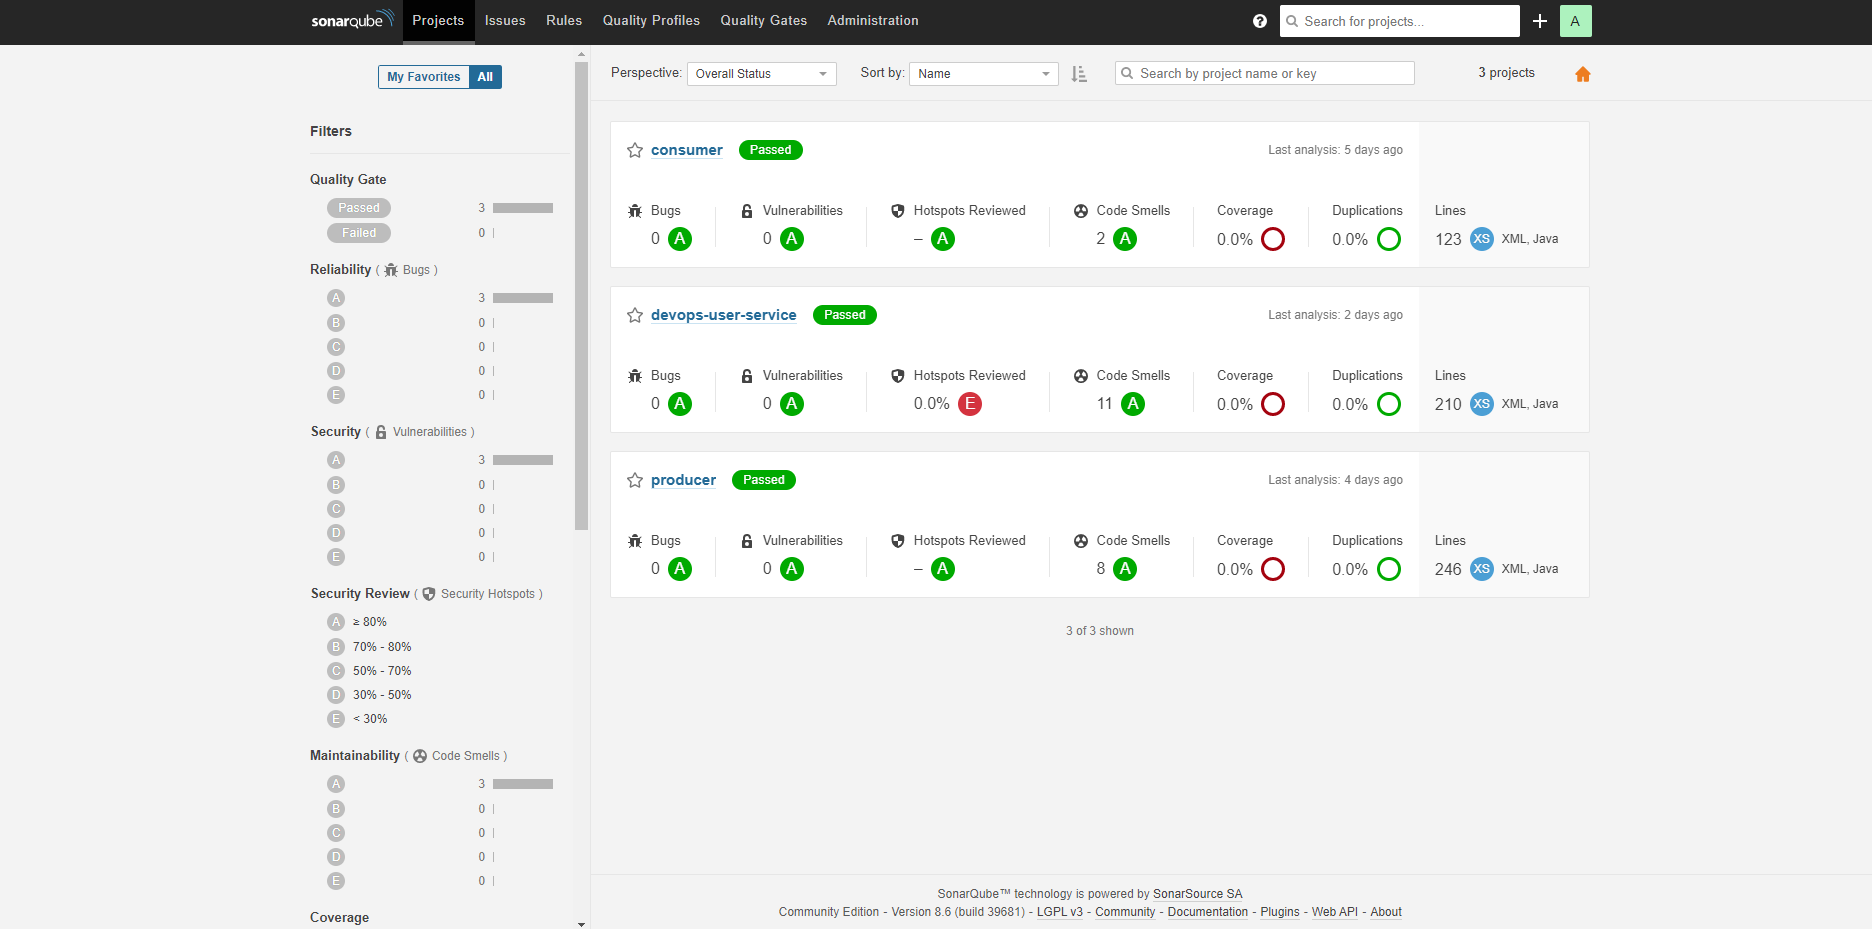
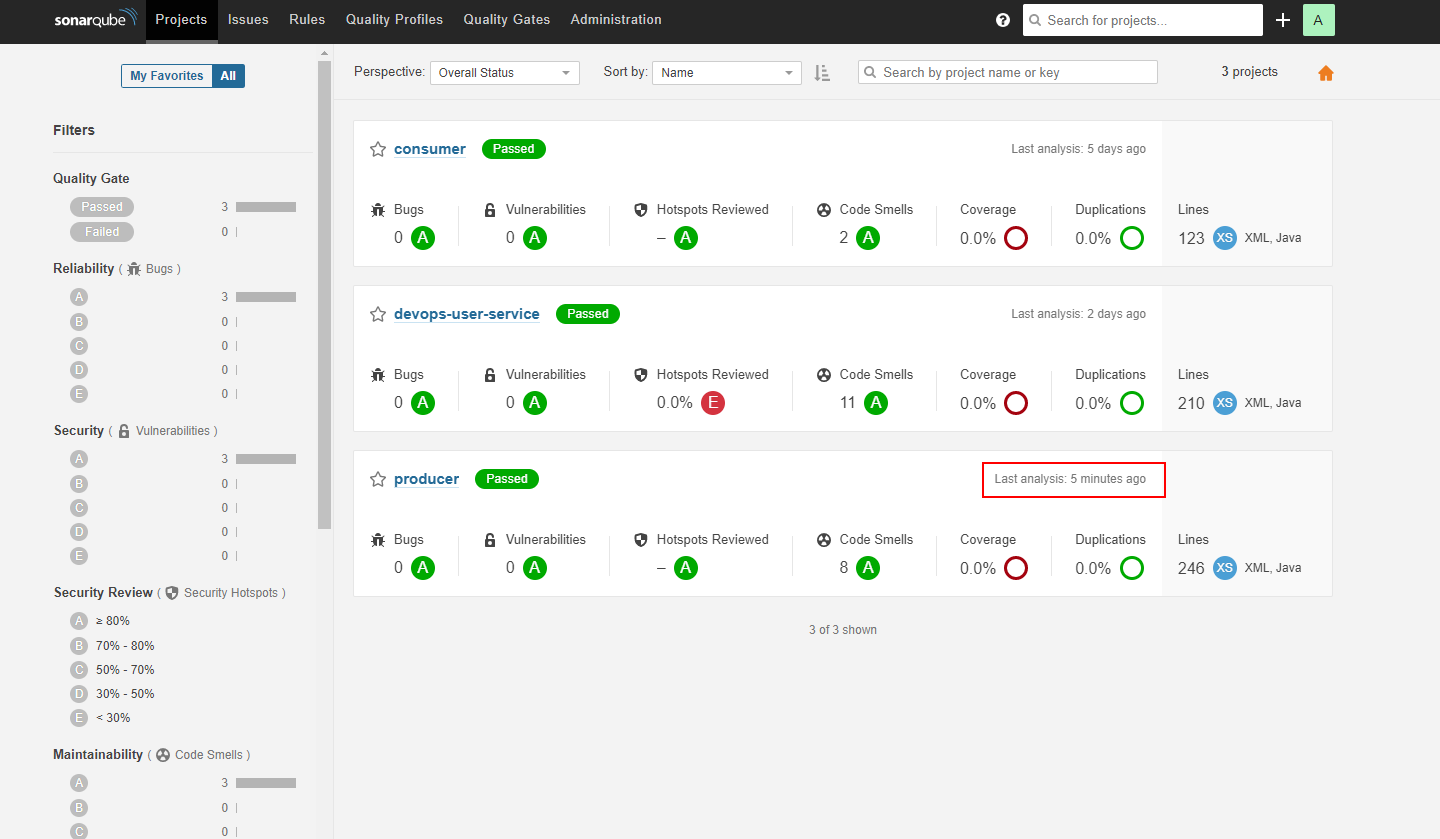
Sonar分析结果:
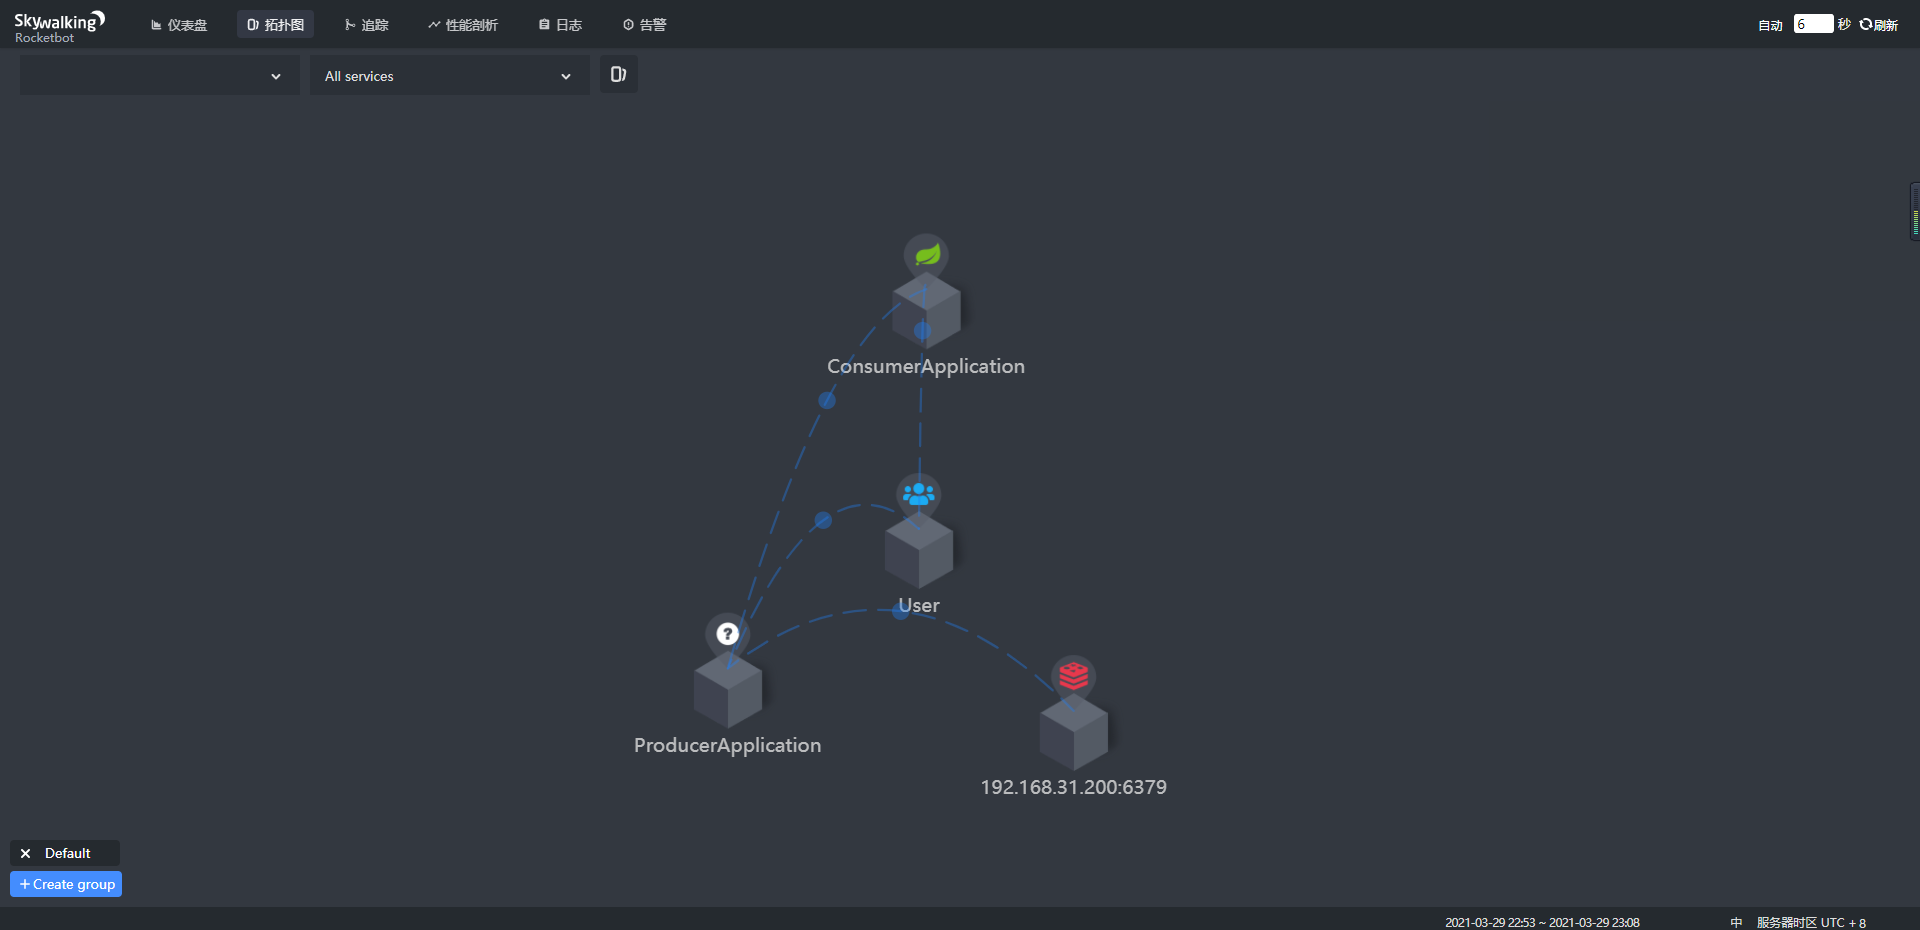
Skywalking 追踪结果:
5. 一些流水线的细节
5.1 Jenkins流水线运行过程中的同级容器
流水线运行过程中对于需要的工具创建同级容器的方式可以基本杜绝对宿主机的依赖,只需要集群环境有相同的容器运行时即可。例如编译、构建、测试等步骤都依赖Maven,则通过Maven镜像完成所有工作,不需要宿主机上安装Maven。
但这样需要考虑的是Maven这样的本地缓存应用如果每次都重新下载缓存的话就得不偿失了,所以需要提前挂载本地仓库卷。
另外如何挂载卷也是一个问题,因为Jenkins挂载了宿主机的 docker.sock 与宿主机进行通信,但如果在运行的过程中 Jenkins 希望启动新容器并挂载容器内的 “/opt/one_path”,这是Jenkins可以在容器内访问到的路径,而宿主机的Docker Daemon只能看到宿主机的文件系统,找不到宿主机上的 “/opt/one_path” 则执行失败。
这也是为什么在上例 Jenkinsfile 中使用了Docker插件的原因,Docker插件的文档中说如下说明:
The above is a complete Pipeline script.
insidewill:
- Automatically grab an agent and a workspace (no extra
nodeblock is required).- Pull the requested image to the Docker server (if not already cached).
- Start a container running that image.
- Mount the Jenkins workspace as a "volume" inside the container, using the same file path. (这是重点)
- Run your build steps. External processes like
shwill be wrapped indocker execso they are run inside the container. Other steps (such as test reporting) run unmodified: they can still access workspace files created by build steps.- At the end of the block, stop the container and discard any storage it consumed.
- Record the fact that the build used the specified image. This unlocks features in other Jenkins plugins: you can track all projects using an image, or configure this project to be triggered automatically when an updated image is pushed to the Docker registry. If you use Docker Traceability plugin, you will be also able to see a history of the image deployments on Docker servers.
第四条翻译为:使用相同的文件路径将Jenkins工作区作为一个“卷”挂载到容器中。
如此一来,我们通过插件即可实现不进行任何手动挂载即可让运行时的同级容器看到Jenkins 的Workspace,例如将maven的配置文件放在Workspace的某个目录,挂载仓库卷 + 命令指定配置文件,完成需求且不需要直接挂载宿主机目录。_
5.2 关于SonarQube代码分析和单元测试
这一点在上一章写过了,SonarQube如果只作为Review优化标准的话可以无视结果,有需要可以在上面加入try catch
5.3 关于优雅下线
读者可自行尝试在Shell中捕获SIGTERM和 SIGINT,提供示例脚本
-
TrapTerm.sh:
#!/bin/bash trap "echo '当前进程不可结束 by kill'" SIGTERM count=1 while [ $count -le 10 ] do echo "Loop #$count" sleep 3 count=$[ $count + 1 ] done # echo "This is the end of the test script" -
TrapInterrupt.sh
#!/bin/bash
trap "echo '当前进程不可中断 Ctrl-C'" SIGINT
count=1
while [ $count -le 10 ]
do
echo "Loop #$count"
sleep 1
count=$[ $count + 1 ]
done
#
echo "This is the end of the test script"
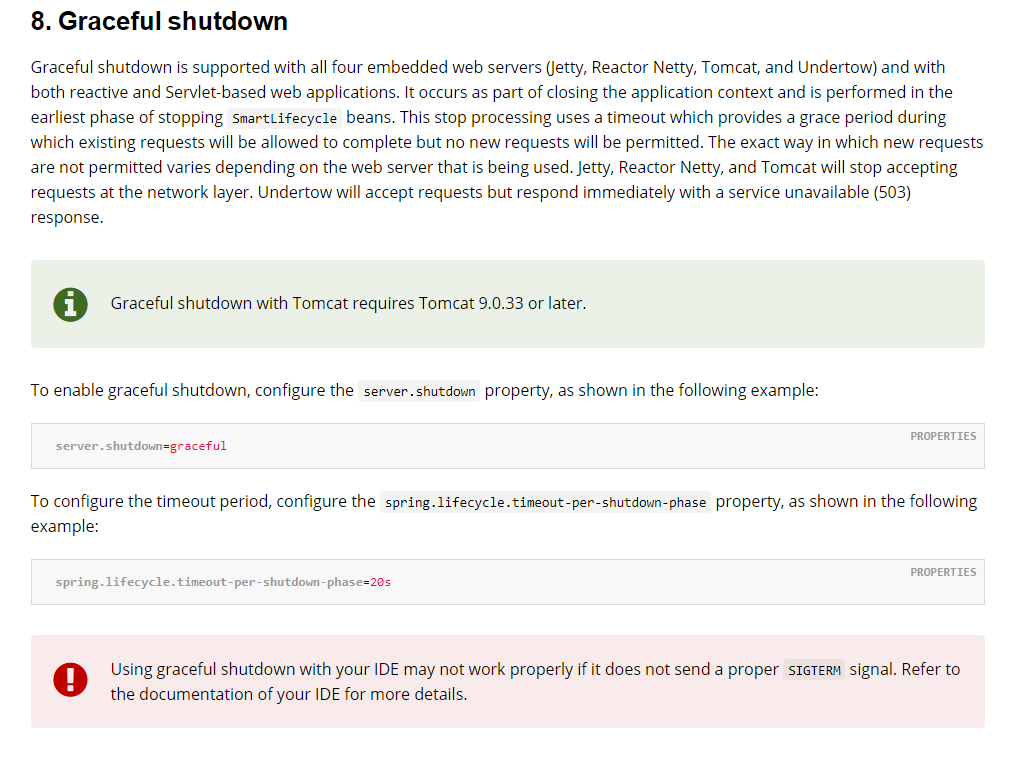
配合Spring Boot文档食用(Graceful shutdown):
6. 结语
Jenkins是很强大的持续集成服务器,声明式流水线语法非常规整、优雅,脚本式流水线语法更加自由。顺便有时候还会用来做一些闲散的操作,例如:
-
Grafana/Prometheus 的钉钉报警格式不友好?Jenkins Webhook + Groovy 处理 ~
-
Jira任务太多看不过来,发布版本不方便整理总结?Jenkins Webhook + Groovy 处理 ~
。。。。。。
文中组件没有深入讲解使用与原理,因为题目是CI/CD相关,本条流水线的部分原本是由我本人编写并运行在我当前所在公司的生产环境,后来看到前一篇文章中Gitlab流水线获得了一些灵感加以优化,虽然不完整但足以理解基本思想,如有建议欢迎探讨 :