Dapper.NET is not just another ORM tool, it’s considered as the king of ORM. Because it’s fast, easy to integrate, requires fewer lines of code, supports bulk data insertion and supports static and dynamic object binding. And Dapper ORM can be used with .NET. So in this post, let’s find out how to use Dapper ORM with ASP.NET Core for CRUD operations.
Use Dapper ORM With ASP.NET Core
For this post, we will be using SQL Server as a database with Dapper ORM. So let’s first create the database. Open SQL Server Management Studio and create a new database called “DapperDemo” or you can name it anything of your choice. And create a table named “Products”.
|
1
2
3
4
5
6
7
8
9
10
11
12
|
CREATE TABLE [dbo].[Products]( [ProductID] [int] IDENTITY(1,1) NOT NULL, [Name] [nvarchar](max) NULL, [Quantity] [int] NULL, [Price] [float] NULL, CONSTRAINT [PK_Products] PRIMARY KEY CLUSTERED ( [ProductID] ASC)WITH (PAD_INDEX = OFF, STATISTICS_NORECOMPUTE = OFF, IGNORE_DUP_KEY = OFF, ALLOW_ROW_LOCKS = ON, ALLOW_PAGE_LOCKS = ON) ON [PRIMARY]) ON [PRIMARY] TEXTIMAGE_ON [PRIMARY]GO |
Okay. Let’s create an ASP.NET Core Web API project. The default Web API template comes with a controller named “Value”. We don’t need this for demo, so I deleted it. To use Dapper ORM, we need to install following nuget package.
- “Dapper”: “1.50.2”
To test our WEB API, also add Swagger. If you don’t know about using Swagger then read how to add swagger to the ASP.NET Core WEB API
So your project.json should look like this,
|
1
2
3
4
5
6
7
8
9
10
11
12
13
14
15
16
17
18
19
|
"dependencies": { "Microsoft.NETCore.App": { "version": "1.0.0", "type": "platform" }, "Microsoft.ApplicationInsights.AspNetCore": "1.0.0", "Microsoft.AspNetCore.Mvc": "1.0.0", "Microsoft.AspNetCore.Server.IISIntegration": "1.0.0", "Microsoft.AspNetCore.Server.Kestrel": "1.0.0", "Microsoft.Extensions.Configuration.EnvironmentVariables": "1.0.0", "Microsoft.Extensions.Configuration.FileExtensions": "1.0.0", "Microsoft.Extensions.Configuration.Json": "1.0.0", "Microsoft.Extensions.Logging": "1.0.0", "Microsoft.Extensions.Logging.Console": "1.0.0", "Microsoft.Extensions.Logging.Debug": "1.0.0", "Microsoft.Extensions.Options.ConfigurationExtensions": "1.0.0", "Swashbuckle": "6.0.0-beta901", "Dapper": "1.50.2"}, |
Now, we need to add Product entity model. So create a folder named “Model” and create a new class “Product.cs” as follows,
|
1
2
3
4
5
6
7
8
|
public class Product{ [Key] public int ProductId { get; set; } public string Name { get; set; } public int Quantity { get; set; } public double Price { get; set; }} |
Setting up Dapper is very easy process and similarly using it is also very simple and straightforward. You need to follow 3 simple steps to use it.
- Create an
IDBConnectionobject with a connection string. - Form your raw SQL query.
- Pass the query to Dapper and it’s done.
So let’s create ProductRepository for all database calls. Create a folder named “Repository” and create a new class “ProductRepository.cs” as follows,
|
1
2
3
4
5
6
7
8
9
10
11
12
13
14
15
16
17
18
19
20
21
22
23
24
25
26
27
28
29
30
31
32
33
34
35
36
37
38
39
40
41
42
43
44
45
46
47
48
49
50
51
52
53
54
55
56
57
58
59
60
61
62
63
64
65
66
67
68
69
|
public class ProductRepository{ private string connectionString; public ProductRepository() { connectionString = @"Server=localhost;Database=DapperDemo;Trusted_Connection=true;"; } public IDbConnection Connection { get { return new SqlConnection(connectionString); } } public void Add(Product prod) { using (IDbConnection dbConnection = Connection) { string sQuery = "INSERT INTO Products (Name, Quantity, Price)" + " VALUES(@Name, @Quantity, @Price)"; dbConnection.Open(); dbConnection.Execute(sQuery, prod); } } public IEnumerable<Product> GetAll() { using (IDbConnection dbConnection = Connection) { dbConnection.Open(); return dbConnection.Query<Product>("SELECT * FROM Products"); } } public Product GetByID(int id) { using (IDbConnection dbConnection = Connection) { string sQuery = "SELECT * FROM Products" + " WHERE ProductId = @Id"; dbConnection.Open(); return dbConnection.Query<Product>(sQuery, new { Id = id }).FirstOrDefault(); } } public void Delete(int id) { using (IDbConnection dbConnection = Connection) { string sQuery = "DELETE FROM Products" + " WHERE ProductId = @Id"; dbConnection.Open(); dbConnection.Execute(sQuery, new { Id = id }); } } public void Update(Product prod) { using (IDbConnection dbConnection = Connection) { string sQuery = "UPDATE Products SET Name = @Name," + " Quantity = @Quantity, Price= @Price" + " WHERE ProductId = @ProductId"; dbConnection.Open(); dbConnection.Query(sQuery, prod); } }} |
There are CRUD methods defined using raw SQL queries for all DB operations. As mentioned earlier, in every method
- Create IDbConnection object.
- Form the Query.
- Open the connection and execute the query.
Now, lets create a new controller “ProductController.cs” as follows,
|
1
2
3
4
5
6
7
8
9
10
11
12
13
14
15
16
17
18
19
20
21
22
23
24
25
26
27
28
29
30
31
32
33
34
35
36
37
38
39
40
41
42
43
44
45
46
|
[Route("api/[controller]")]public class ProductController : Controller{ private readonly ProductRepository productRepository; public ProductController() { productRepository = new ProductRepository(); } // GET: api/values [HttpGet] public IEnumerable<Product> Get() { return productRepository.GetAll(); } // GET api/values/5 [HttpGet("{id}")] public Product Get(int id) { return productRepository.GetByID(id); } // POST api/values [HttpPost] public void Post([FromBody]Product prod) { if (ModelState.IsValid) productRepository.Add(prod); } // PUT api/values/5 [HttpPut("{id}")] public void Put(int id, [FromBody]Product prod) { prod.ProductId = id; if (ModelState.IsValid) productRepository.Update(prod); } // DELETE api/values/5 [HttpDelete("{id}")] public void Delete(int id) { productRepository.Delete(id); }} |
This controller has methods for GET, POST, PUT and DELETE. That’s all to code. Now, let’s just run the application and execute the GET API. Since the table is empty, so you should see following.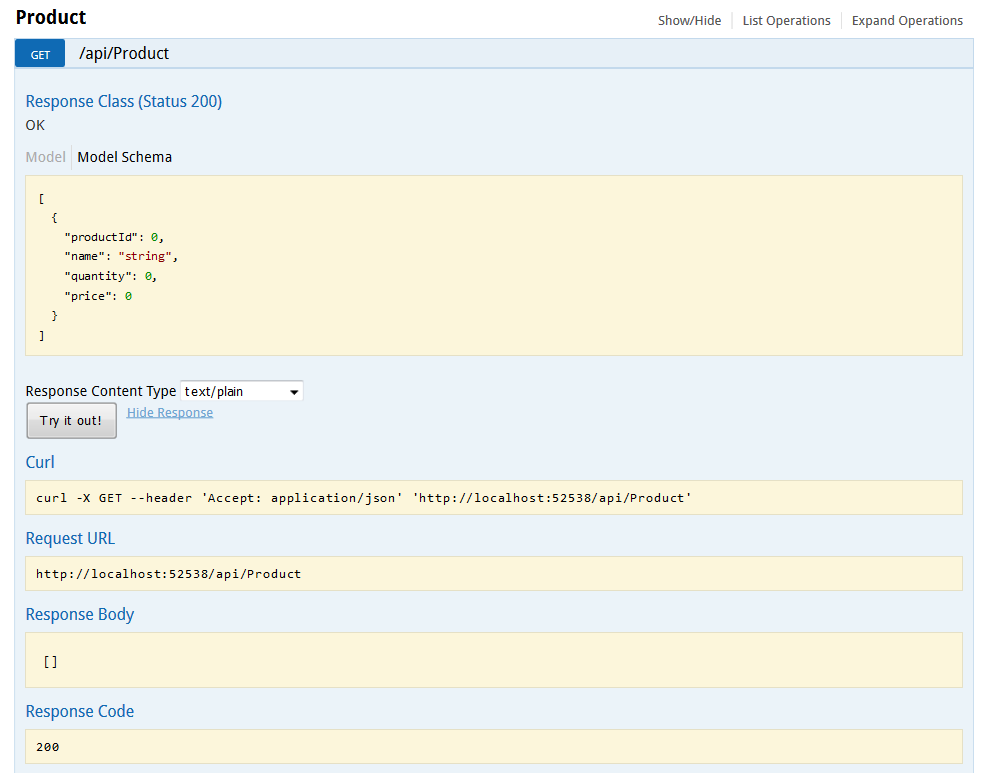
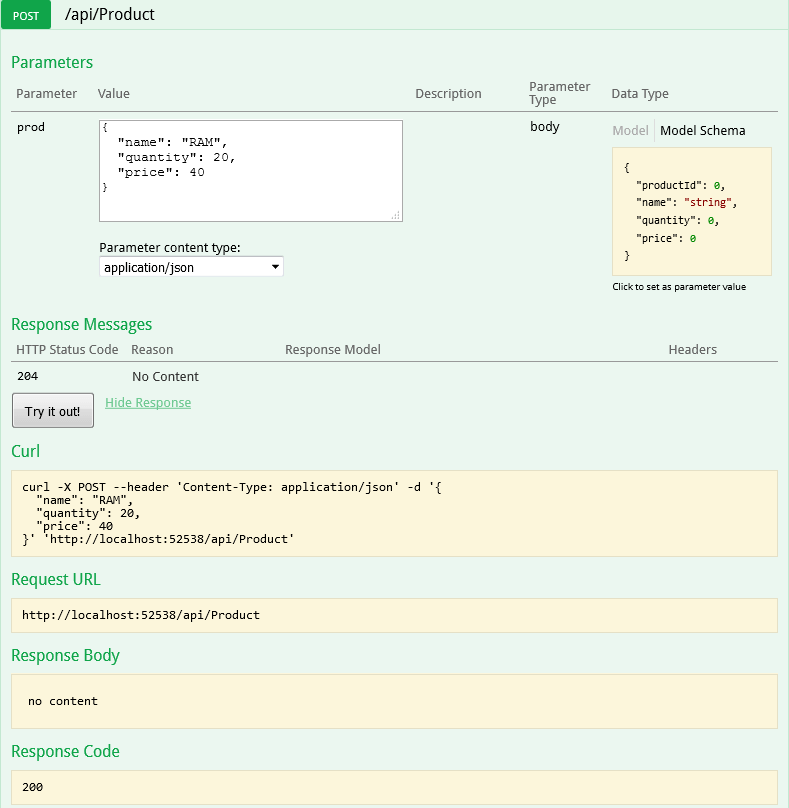
Now, let’s add a product via Post API.
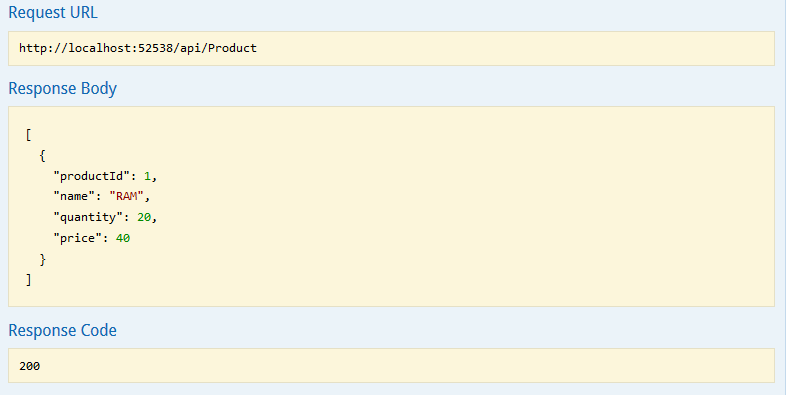
And now call the GET Product API again and you should see that product you just added is returned.
Here is the gif version of all 5 methods.
That’s it. Dapper.NET ORM is considered to be the fastest ORM as it directly executes the RAW SQL without any additional overhead. We saw how easy it was to integrate and use it with ASP.NET Core. If you want to support any other database providers like SQLite, then you need to change in public IDbConnection Connection property.
|
1
2
3
4
5
6
7
|
public IDbConnection Connection{ get { return new SqliteConnection(connectionString); }} |
You will also need to include the SQLite nuget package "Microsoft.Data.Sqlite": "1.0.0" in your project.json. Of course, based on database provider the SQL query syntax may differ. Hope you liked it. Just for your information Project.json for ASP.NET Core is going away.
If you are interested in Entity Framework Core, then read my posts about EF Core.
Thank you for reading. Keep visiting this blog and share this in your network. Please put your thoughts and feedback in the comments section.