这里使用到一个插件nsJSON 下载该插件并把对应的dll复制到你的插件文件夹即可。
读取和生成json文件
Section "Example1.json" Example1
    ; 读取json文件
    nsJSON::Set /file $EXEDIRInputExample1.json
    ; 把内容序列化到文件中
    nsJSON::Serialize /format /file $EXEDIROutputExample1.json
    DetailPrint `Generate: $EXEDIROutputExample1.json`
SectionEnd
json文件的编码转换
Section /o `Convert Example1_Unicode.json (no BOM)` EXAMPLE1B

  ; 读取一个 Unicode编码的json文件
  nsJSON::Set /file /unicode $EXEDIRInputExample1_Unicode.json

  ; 把Unicode编码的json文件转换成 ANSII 编码的文件.
  nsJSON::Serialize /format /file $EXEDIROutputExample1B_ASCII.json
  DetailPrint `Generate: $EXEDIROutputExample1B_ASCII.json`

  ; 仍然序列化成Unicode编码的json文件
  nsJSON::Serialize /format /file /unicode $EXEDIROutputExample1B_Unicode.json
  DetailPrint `Generate: $EXEDIROutputExample1B_Unicode.json`

SectionEnd
创建一个新的json文件
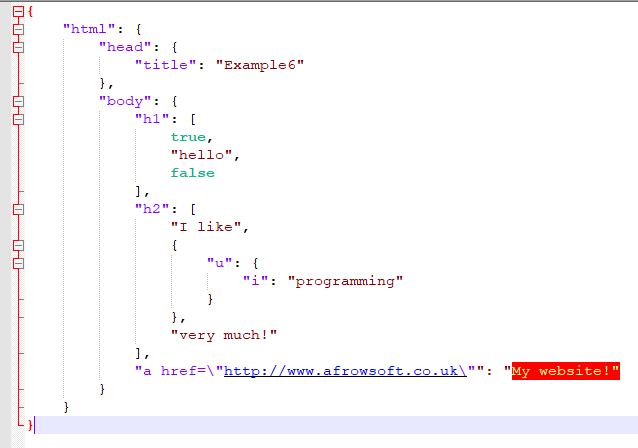
Section /o `Generate Example6.json` EXAMPLE6

  nsJSON::Set /value `{}` ; 创建根节点
  ; 设置html.head.title = Example6
  nsJSON::Set `html` `head` `title` /value `"Example6"`

  ; 设置html.body.h1 = []
  nsJSON::Set `html` `body` `h1` /value `[]`
  ; 设置html.body.h1 = "Hello,	my name is"
  nsJSON::Set `html` `body` `h1` /value `"Hello,	my name is"`
  ; 设置html.body.h1.i = "Stuart."
  nsJSON::Set `html` `body` `h1` `i` /value `"Stuart."`
  ; 设置html.body.h1 = "Howdy"
  nsJSON::Set `html` `body` `h1` /value `"Howdy"`
  ; 设置html.body.h1 = "!"
  nsJSON::Set `html` `body` `h1` /value `"!"`
  ; 设置html.body.h1 = [ true, "hello", false ]
  nsJSON::Set `html` `body` `h1` /value `[ true, "hello", false ]` ; 最终html.body.h1为该值,前面的都会被覆盖

  ; 设置html.body.h2 = [ "I like", { "u": { "i" : "programming" } }, "very much!" ]
  nsJSON::Set `html` `body` `h2` /value `[ "I like", { "u": { "i" : "programming" } }, "very much!" ]`

  ; 设置html.body.a href="http://www.afrowsoft.co.uk" = "My website!"
  nsJSON::Set `html` `body` `a href="http://www.afrowsoft.co.uk"` /value `"My website!"`

  ; 序列化到json文件中
  nsJSON::Serialize /format /file $EXEDIROutputExample6.json
  DetailPrint `Generate: $EXEDIROutputExample6.json`

SectionEnd
最终生成的json文件内容如下:
修改json文件
Section
  ; 读取json配置文件
  nsJSON::Set /file $EXEDIRInputappsettings.json
  ClearErrors
  ; 查询指定节点是否存在
  nsJSON::Get `ConnectionStrings` `Default` /end
  ${IfNot} ${Errors}
    Pop $R0
    DetailPrint `ConnectionStrings->Default = $R0`
  ${EndIf}
  ClearErrors
  ; 更新数据库连接字符串设置
  nsJSON::Set `ConnectionStrings` `Default` /value `"Server=localhost; port=3306; Database=newDb; uid=root; pwd=newPwd; Convert Zero Datetime=True"`
  nsJSON::Get `ConnectionStrings` `Default` /end
  ${IfNot} ${Errors}
    Pop $R0
    DetailPrint `ConnectionStrings->Default = $R0`
  ${EndIf}
  ; 序列化到文件中
  nsJSON::Serialize /format /file $EXEDIROutputappsettings.json
SectionEnd
nsJSON::Set 用户在内存中设置内容,可以自定义设置也可以从文件中读取,读取文件使用 /file参数,后面跟json文件的路径名
nsJSON::Set /file $EXEDIRInputExample1.json

如果没有指定文件,可以直接创建一个空的json文件,使用 /value设置内容
nsJSON::Set /value `{}`

如果要设置指定节点的内容,直接在Set后跟节点名称即可
nsJSON::Set `ConnectionStrings` `Default` /value `"Server=localhost; port=3306; Database=newDb; uid=root; pwd=newPwd; Convert Zero Datetime=True"`

最终保存到文件,可以指定格式化参数 /format 同时带上文件参数 /file后面跟文件的路径名
nsJSON::Serialize /format /file $EXEDIROutputappsettings.json