缓存是我们常用的一种优化系统的方案。
无论是前端缓存还是应用层缓存或者数据库缓存,其本质都是将查询过的数据缓存下来,下次再次查询该数据的时候如果数据没有过期,则直接返回缓存中该数据即可,不再执行查询操作。
SpringCache是我们常用的一种应用层缓存方案,其一般应用在方法上,下面我们先来看下具体的使用方式,然后再从源码角度分析其实现方案
1.SpringCache的使用
1)maven引入依赖
cache功能相关代码都在spring-context中,一般使用Spring的项目中都有该包,所以不用再单独引入
2)Service(业务处理类,代码参考网上文章,非原创,有改动)
// 接口类
package cache;

public interface IService {
    Account getAccountByName(String userName);
    void updateAccount(Account account);
}

// 实现类
public class AccountService implements IService{
    @Override
    @Cacheable(value = "accountCache") // 使用了一个缓存名叫 accountCache
    public Account getAccountByName(String userName) {
        // 方法内部实现不考虑缓存逻辑,直接实现业务
        System.out.println("real query account." + userName);
        return getFromDB(userName);
    }

    @Override
    @CacheEvict(value="accountCache",key="#account.getName()")
    public void updateAccount(Account account) {
        updateDB(account);
    }

    @CacheEvict(value = "accountCache", allEntries = true)
    public void reload() {
    }

    private Account getFromDB(String acctName) {
        System.out.println("real querying db..." + acctName);
        return new Account(acctName);
    }

    private void updateDB(Account account) {
        System.out.println("real update db..." + account.getName());
    }
}
如上所示:在方法上加上@cacheable等注解即可
3)Spring-cache-anno.xml文件(用于定义bean)
<?xml version="1.0" encoding="UTF-8"?>
<beans xmlns="http://www.springframework.org/schema/beans"
    xmlns:xsi="http://www.w3.org/2001/XMLSchema-instance" xmlns:cache="http://www.springframework.org/schema/cache"
    xmlns:p="http://www.springframework.org/schema/p"
    xsi:schemaLocation="http://www.springframework.org/schema/beans
    http://www.springframework.org/schema/beans/spring-beans.xsd
    http://www.springframework.org/schema/cache
    http://www.springframework.org/schema/cache/spring-cache.xsd">

    <!-- 添加driven -->
    <cache:annotation-driven />

    <bean id="accountServiceBean" class="cache.AccountService" />
    <!-- generic cache manager -->
    <bean id="cacheManager" class="org.springframework.cache.support.SimpleCacheManager">
        <property name="caches">
            <set>
                <bean
                    class="org.springframework.cache.concurrent.ConcurrentMapCacheFactoryBean"
                    p:name="accountCache" />
            </set>
        </property>
    </bean>
</beans>
使用默认的SimpleCacheManager
4)测试(测试缓存是否生效)
public class Test {

    public static void main(String[] args) {
        ApplicationContext context = new ClassPathXmlApplicationContext("spring-cache-anno.xml");
        IService s = context.getBean(IService.class);
        // 第一次查询,应该走数据库
        System.out.print("first query...");
        s.getAccountByName("somebody");
        // 第二次查询,应该不查数据库,直接返回缓存的值
        System.out.print("second query...");
        s.getAccountByName("somebody");
        System.out.println();
    }
}

//result:
first query...
real query account.somebody
real querying db...somebody
second query...
总结:根据结果可以看到,第二次查询的时候没有真正执行getFromDB()方法,而是从缓存中取的数据
2.写在源码分析之前
如果是我们来做的话,如何实现该功能?
基于我们对Spring的一贯理解,这应该是个代理,我们在获取IService的bean时候,应该获取的是个代理类,代理类执行业务方法,先去查询是否在缓存中有该数据,如果有则直接从缓存中获取,如果没有,则调用AccountService的方法
3.SpringCache源码结构分析
根据我们的示例可知,真正的内容都放在配置文件里了
配置文件中添加了一个driven(真正的功能应该在这里实现的)
<cache:annotation-driven />
下面是两个bean(accountServiceBean是我们需要的,需要将AccountService注入到容器中。
至于SimpleCacheManager暂时不知道其作用,只知道其实现了CacheManage接口,我们先暂时放一下)
<bean id="accountServiceBean" class="cache.AccountService" />
    <!-- generic cache manager -->
    <bean id="cacheManager" class="org.springframework.cache.support.SimpleCacheManager">
        <property name="caches">
            <set>
                <bean
                    class="org.springframework.cache.concurrent.ConcurrentMapCacheFactoryBean"
                    p:name="accountCache" />
            </set>
        </property>
    </bean>
1)<cache:annotation-driven/>的分析
但凡这种注解,都有对应的解析器,从之前分析AOP功能的源码可知,解析器都实现了NamespaceHandlerSupport类,我们来获取下NamespaceHandlerSupport的实现类都有哪些
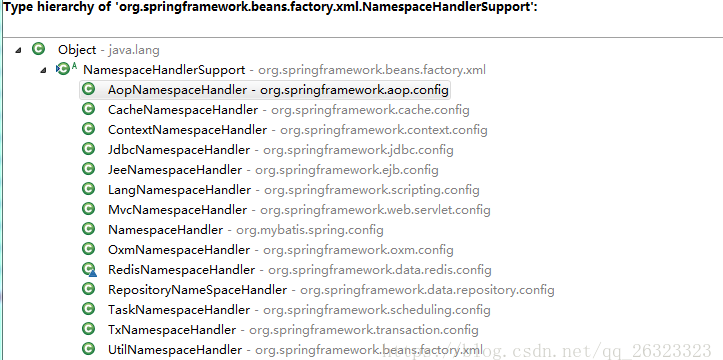
里面有一个叫做CacheNamespaceHandler的类,看名字就像这个,我们来看下这个类
2)CacheNamespaceHandler
public class CacheNamespaceHandler extends NamespaceHandlerSupport {

    static final String CACHE_MANAGER_ATTRIBUTE = "cache-manager";

    static final String DEFAULT_CACHE_MANAGER_BEAN_NAME = "cacheManager";
    ...
    @Override
    public void init() {
        // 主要是这句代码
        registerBeanDefinitionParser("annotation-driven", new AnnotationDrivenCacheBeanDefinitionParser());
        registerBeanDefinitionParser("advice", new CacheAdviceParser());
    }
}
Spring会默认调用其init()方法,annotation-driven对应的是AnnotationDrivenCacheBeanDefinitionParser解析器,我们来看下这个解析器的作用
3)AnnotationDrivenCacheBeanDefinitionParser
@Override
    public BeanDefinition parse(Element element, ParserContext parserContext) {
        String mode = element.getAttribute("mode");// mode默认为proxy
        if ("aspectj".equals(mode)) {
            // mode="aspectj"
            registerCacheAspect(element, parserContext);
        }
        else {
            // 直接调用该方法
            registerCacheAdvisor(element, parserContext);
        }

        return null;
    }

// registerCacheAdvisor()
    private void registerCacheAdvisor(Element element, ParserContext parserContext) {
        // 1.注册ProxyCreator类 在4)中详细分析
        AopNamespaceUtils.registerAutoProxyCreatorIfNecessary(parserContext, element);
        // 2.注册CacheAdvisor 在5)中详细分析
        SpringCachingConfigurer.registerCacheAdvisor(element, parserContext);
        if (jsr107Present && jcacheImplPresent) {
            // 默认不会调用
            JCacheCachingConfigurer.registerCacheAdvisor(element, parserContext);
        }
    }
4)AopNamespaceUtils.registerAutoProxyCreatorIfNecessary(parserContext, element)
public static void registerAutoProxyCreatorIfNecessary(
            ParserContext parserContext, Element sourceElement) {
        // 重点在这里
        BeanDefinition beanDefinition = AopConfigUtils.registerAutoProxyCreatorIfNecessary(
                parserContext.getRegistry(), parserContext.extractSource(sourceElement));
        useClassProxyingIfNecessary(parserContext.getRegistry(), sourceElement);
        registerComponentIfNecessary(beanDefinition, parserContext);
    }

// AopConfigUtils.registerAutoProxyCreatorIfNecessary()
    public static BeanDefinition registerAutoProxyCreatorIfNecessary(BeanDefinitionRegistry registry, Object source) {
        // 重点在这里
        return registerOrEscalateApcAsRequired(InfrastructureAdvisorAutoProxyCreator.class, registry, source);
    }
可以看到,主要是为了将InfrastructureAdvisorAutoProxyCreator注册到容器中
5)SpringCachingConfigurer.registerCacheAdvisor(element, parserContext)
private static void registerCacheAdvisor(Element element, ParserContext parserContext) {
            if (!parserContext.getRegistry().containsBeanDefinition(CacheManagementConfigUtils.CACHE_ADVISOR_BEAN_NAME)) {
                Object eleSource = parserContext.extractSource(element);

                // 1.注册AnnotationCacheOperationSource类到容器中
                RootBeanDefinition sourceDef = new RootBeanDefinition("org.springframework.cache.annotation.AnnotationCacheOperationSource");
                sourceDef.setSource(eleSource);
                sourceDef.setRole(BeanDefinition.ROLE_INFRASTRUCTURE);
                String sourceName = parserContext.getReaderContext().registerWithGeneratedName(sourceDef);

                // 2.注册CacheInterceptor类到容器中
                RootBeanDefinition interceptorDef = new RootBeanDefinition(CacheInterceptor.class);
                interceptorDef.setSource(eleSource);
                interceptorDef.setRole(BeanDefinition.ROLE_INFRASTRUCTURE);
                parseCacheResolution(element, interceptorDef, false);
                parseErrorHandler(element, interceptorDef);
                CacheNamespaceHandler.parseKeyGenerator(element, interceptorDef);
                interceptorDef.getPropertyValues().add("cacheOperationSources", new RuntimeBeanReference(sourceName));
                String interceptorName = parserContext.getReaderContext().registerWithGeneratedName(interceptorDef);

                // 3.注册BeanFactoryCacheOperationSourceAdvisor类到容器中,
                RootBeanDefinition advisorDef = new RootBeanDefinition(BeanFactoryCacheOperationSourceAdvisor.class);
                advisorDef.setSource(eleSource);
                advisorDef.setRole(BeanDefinition.ROLE_INFRASTRUCTURE);
                // 注意这里,将AnnotationCacheOperationSource和CacheInterceptor作为其属性注入进来
                advisorDef.getPropertyValues().add("cacheOperationSource", new RuntimeBeanReference(sourceName));
                advisorDef.getPropertyValues().add("adviceBeanName", interceptorName);
                if (element.hasAttribute("order")) {
                    advisorDef.getPropertyValues().add("order", element.getAttribute("order"));
                }
                // 注意这句,将BeanFactoryCacheOperationSourceAdvisor类的注册名称设置为
                // org.springframework.cache.config.internalCacheAdvisor
                // 在下面会用到这个名称
                parserContext.getRegistry().registerBeanDefinition(CacheManagementConfigUtils.CACHE_ADVISOR_BEAN_NAME, advisorDef);

                ...
            }
        }
总结:由以上分析可知,我们添加<cache:annotation-driven />注解,主要是将以下类注入进Spring容器
* InfrastructureAdvisorAutoProxyCreator
* AnnotationCacheOperationSource
* CacheInterceptor(主要的拦截功能都实现在这里)
* BeanFactoryCacheOperationSourceAdvisor(重点关注这个,这个类在创建代理的时候被使用)
我们暂时只知道加载driven注解的时候,只是将这四个类注入到Spring容器中,而这些类具体在做什么,我们也不知道,更不知道与我们的AccountService类有什么关联。这些我们先暂时放一下,先看下CacheInterceptor和InfrastructureAdvisorAutoProxyCreator的功能简介
4.CacheInterceptor功能简单分析
其代码结构如下
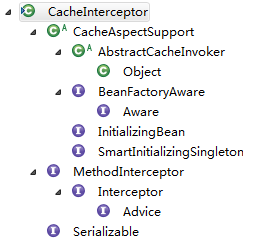
可知:
* 其实现了InitializingBean接口,则CacheInterceptor创建的时候会默认调用afterPropertiesSet()方法;
* 其实现了SmartInitializingSingleton接口,则CacheInterceptor创建的时候会默认调用afterSingletonsInstantiated()方法
* 其实现了MethodInterceptor接口,则在被其拦截的方法上,默认会调用其invoke()方法
有关于这些接口的作用,不太明白的同学可以先看下对应的文章了解其大致作用
1)初始化afterPropertiesSet()方法
// 只是做了校验,没有其他功能
    public void afterPropertiesSet() {
        Assert.state(getCacheOperationSource() != null, "The 'cacheOperationSources' property is required: " +
                "If there are no cacheable methods, then don't use a cache aspect.");
        Assert.state(getErrorHandler() != null, "The 'errorHandler' property is required");
    }
2)初始化afterSingletonsInstantiated()方法
public void afterSingletonsInstantiated() {
        if (getCacheResolver() == null) {
            // Lazily initialize cache resolver via default cache manager...
            try {
                // 重点在这里
                // 从工厂类中获取CacheManager的实现类
                // 这里就与我们的Spring-cache-anno.xml配置文件中的创建的cacheManager
                // bean关联起来了,在配置文件中创建的bean实现了接口CacheManager
                // 则会在这里被使用
                setCacheManager(this.beanFactory.getBean(CacheManager.class));
            }
            ...
        }
        this.initialized = true;
    }

// setCacheManager()
    public void setCacheManager(CacheManager cacheManager) {
        //     private CacheResolver cacheResolver;
        this.cacheResolver = new SimpleCacheResolver(cacheManager);
    }
3)invoke()执行拦截方法(这个我们暂时先不分析,读者只需要知道这个拦截方法的存在即可)
public Object invoke(final MethodInvocation invocation) throws Throwable {
        Method method = invocation.getMethod();

        CacheOperationInvoker aopAllianceInvoker = new CacheOperationInvoker() {
            @Override
            public Object invoke() {
                try {
                    return invocation.proceed();
                }
                catch (Throwable ex) {
                    throw new ThrowableWrapper(ex);
                }
            }
        };

        try {
            return execute(aopAllianceInvoker, invocation.getThis(), method, invocation.getArguments());
        }
        catch (CacheOperationInvoker.ThrowableWrapper th) {
            throw th.getOriginal();
        }
    }
总结4:
CacheInterceptor主要是一个方法拦截器,在初始化的时候将CacheManager的实现类(由用户自定义实现)添加进来;
invoke()方法,真正执行拦截的方法
5.InfrastructureAdvisorAutoProxyCreator功能分析
其代码结构如下:
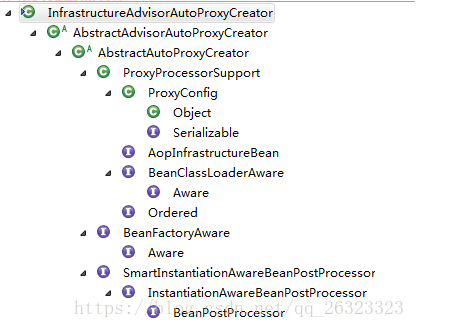
可以看到,其实现了BeanPostProcessor接口,则Spring在创建bean的时候,会默认调用InfrastructureAdvisorAutoProxyCreator的postProcessAfterInitialization()方法,就是在这个方法中创建代理类的,下面我们来看下这个方法
1)AbstractAutoProxyCreator.postProcessAfterInitialization()
public Object postProcessAfterInitialization(Object bean, String beanName) throws BeansException {
        if (bean != null) {
            Object cacheKey = getCacheKey(bean.getClass(), beanName);
            if (!this.earlyProxyReferences.contains(cacheKey)) {
                // 重要方法
                return wrapIfNecessary(bean, beanName, cacheKey);
            }
        }
        return bean;
    }

// wrapIfNecessary()
    protected Object wrapIfNecessary(Object bean, String beanName, Object cacheKey) {
        ...

        // 1.获取当前类的所有切面拦截类,在2)中详细分析
        Object[] specificInterceptors = getAdvicesAndAdvisorsForBean(bean.getClass(), beanName, null);
        // 2.如果拦截类不为空,则需要创建当前类的代理类
        if (specificInterceptors != DO_NOT_PROXY) {
            this.advisedBeans.put(cacheKey, Boolean.TRUE);
            // 3.创建代理类,在3)中详细分析
            Object proxy = createProxy(
                    bean.getClass(), beanName, specificInterceptors, new SingletonTargetSource(bean));
            this.proxyTypes.put(cacheKey, proxy.getClass());
            return proxy;
        }

        this.advisedBeans.put(cacheKey, Boolean.FALSE);
        return bean;
    }
以上逻辑类似于之前分析的AOP源码,读者也可以先看下 https://blog.csdn.net/qq_26323323/article/details/81012855
2)getAdvicesAndAdvisorsForBean()获取当前类的所有切面拦截器
本方法为抽象方法,实现由子类AbstractAdvisorAutoProxyCreator实现
protected Object[] getAdvicesAndAdvisorsForBean(Class<?> beanClass, String beanName, TargetSource targetSource) {
        List<Advisor> advisors = findEligibleAdvisors(beanClass, beanName);//重点在这里
        if (advisors.isEmpty()) {
            return DO_NOT_PROXY;
        }
        return advisors.toArray();
    }

// findEligibleAdvisors()
    protected List<Advisor> findEligibleAdvisors(Class<?> beanClass, String beanName) {
        // 1.获取所有的Advisor
        List<Advisor> candidateAdvisors = findCandidateAdvisors();
        // 2.获取适合当前类的Advisor
        List<Advisor> eligibleAdvisors = findAdvisorsThatCanApply(candidateAdvisors, beanClass, beanName);
        extendAdvisors(eligibleAdvisors);
        if (!eligibleAdvisors.isEmpty()) {
            eligibleAdvisors = sortAdvisors(eligibleAdvisors);
        }
        return eligibleAdvisors;
    }
* findCandidateAdvisors()获取所有的Advisor
//     findCandidateAdvisors()
    protected List<Advisor> findCandidateAdvisors() {
        return this.advisorRetrievalHelper.findAdvisorBeans();
    }


//findAdvisorBeans()
    public List<Advisor> findAdvisorBeans() {
        // Determine list of advisor bean names, if not cached already.
        String[] advisorNames = null;
        synchronized (this) {
            // 1.cachedAdvisorBeanNames=org.springframework.cache.config.internalCacheAdvisor
            advisorNames = this.cachedAdvisorBeanNames;
            if (advisorNames == null) {
                // Do not initialize FactoryBeans here: We need to leave all regular beans
                // uninitialized to let the auto-proxy creator apply to them!
                advisorNames = BeanFactoryUtils.beanNamesForTypeIncludingAncestors(
                        this.beanFactory, Advisor.class, true, false);
                this.cachedAdvisorBeanNames = advisorNames;
            }
        }
        if (advisorNames.length == 0) {
            return new LinkedList<Advisor>();
        }

        List<Advisor> advisors = new LinkedList<Advisor>();
        for (String name : advisorNames) {
            if (isEligibleBean(name)) {
                if (this.beanFactory.isCurrentlyInCreation(name)) {
                    if (logger.isDebugEnabled()) {
                        logger.debug("Skipping currently created advisor '" + name + "'");
                    }
                }
                else {
                    try {
                        // 2.从工厂中获取CacheInterceptor对应的bean
                        // 在上述代码 3节5)中,可知,
                        // org.springframework.cache.config.internalCacheAdvisor这个名称对应bean为
                        // BeanFactoryCacheOperationSourceAdvisor类,
                        advisors.add(this.beanFactory.getBean(name, Advisor.class));
                    }
                    catch (BeanCreationException ex) {
                        Throwable rootCause = ex.getMostSpecificCause();
                        if (rootCause instanceof BeanCurrentlyInCreationException) {
                            BeanCreationException bce = (BeanCreationException) rootCause;
                            if (this.beanFactory.isCurrentlyInCreation(bce.getBeanName())) {
                                if (logger.isDebugEnabled()) {
                                    logger.debug("Skipping advisor '" + name +
                                            "' with dependency on currently created bean: " + ex.getMessage());
                                }
                                // Ignore: indicates a reference back to the bean we're trying to advise.
                                // We want to find advisors other than the currently created bean itself.
                                continue;
                            }
                        }
                        throw ex;
                    }
                }
            }
        }
        return advisors;
    }
总结2):适合当前类的Advisor最终为BeanFactoryCacheOperationSourceAdvisor类,也就是我们之前在分析<cache:annotation-driven/>中注册的BeanFactoryCacheOperationSourceAdvisor bean
3)createProxy( Class<?> beanClass, String beanName, Object[] specificInterceptors, TargetSource targetSource)
创建代理类
这里笔者就不再继续分析了,具体读者可参考 https://blog.csdn.net/qq_26323323/article/details/81012855 博文中创建proxy过程分析一节
总结5:InfrastructureAdvisorAutoProxyCreator的主要作用就是实现了BeanPostProcessor接口,那么Spring的每个bean在创建的过程中,都需要调用其postProcessAfterInitialization()方法,在这个方法中查询出所有适合当前类的Advisor,然后创建当前类的代理类,并将Advisor封装进来,在以后调用当前类的方法时使用
6.代理类invoke()方法调用
通过以上分析可知,Spring为我们创建的AccountService bean实际是一个关于AccountService的代理类,在调用AccountService的相关方法时,实际调用的是代理类的invoke()方法,下面我们就来分析下,invoke()方法被调用的过程,具体了解下我们的缓存是如何工作的
由于本例是JDKProxy创建的方式,而非CGLIBProxy的创建方式,所以AccountService的代理类为JdkDynamicAopProxy,下面看下其invoke()方法
1)JdkDynamicAopProxy.invoke()
public Object invoke(Object proxy, Method method, Object[] args) throws Throwable {
        MethodInvocation invocation;
        Object oldProxy = null;
        boolean setProxyContext = false;

        TargetSource targetSource = this.advised.targetSource;
        Class<?> targetClass = null;
        Object target = null;

        try {
            ...
            Object retVal;

            if (this.advised.exposeProxy) {
                // Make invocation available if necessary.
                oldProxy = AopContext.setCurrentProxy(proxy);
                setProxyContext = true;
            }

            target = targetSource.getTarget();
            if (target != null) {
                targetClass = target.getClass();
            }

            // 1.获取当前方法的拦截器链,也就是Advisor列表
            // 最终返回的是当前Advisor的拦截器MethodInterceptor列表
            // 在2)中详细分析
            List<Object> chain = this.advised.getInterceptorsAndDynamicInterceptionAdvice(method, targetClass);

            // 2.如果拦截器链为空,说明当前方法没有缓存注解,直接调用方法即可
            if (chain.isEmpty()) {
                Object[] argsToUse = AopProxyUtils.adaptArgumentsIfNecessary(method, args);
                retVal = AopUtils.invokeJoinpointUsingReflection(target, method, argsToUse);
            }
            // 3.说明当前方法有缓存注解,则需要先调用拦截器链的方法
            else {
                invocation = new ReflectiveMethodInvocation(proxy, target, method, args, targetClass, chain);
                // 真正的调用在这里
                // 在3)中详细分析
                retVal = invocation.proceed();
            }

            ...
            return retVal;
        }
        ...
    }
2)AdvisedSupport.getInterceptorsAndDynamicInterceptionAdvice(method, targetClass);获取当前方法的拦截器链
public List<Object> getInterceptorsAndDynamicInterceptionAdvice(Method method, Class<?> targetClass) {
        MethodCacheKey cacheKey = new MethodCacheKey(method);
        List<Object> cached = this.methodCache.get(cacheKey);
        if (cached == null) {
            // 真正的实现在这里
            cached = this.advisorChainFactory.getInterceptorsAndDynamicInterceptionAdvice(
                    this, method, targetClass);
            this.methodCache.put(cacheKey, cached);
        }
        return cached;
    }

//DefaultAdvisorChainFactory.getInterceptorsAndDynamicInterceptionAdvice()
    public List<Object> getInterceptorsAndDynamicInterceptionAdvice(
            Advised config, Method method, Class<?> targetClass) {

        // This is somewhat tricky... We have to process introductions first,
        // but we need to preserve order in the ultimate list.
        List<Object> interceptorList = new ArrayList<Object>(config.getAdvisors().length);
        Class<?> actualClass = (targetClass != null ? targetClass : method.getDeclaringClass());
        boolean hasIntroductions = hasMatchingIntroductions(config, actualClass);
        AdvisorAdapterRegistry registry = GlobalAdvisorAdapterRegistry.getInstance();

        // 1.遍历当前bean的所有Advisor
        // 就当前示例而言,只有一个Advisor,就是之前创建的BeanFactoryCacheOperationSourceAdvisor
        for (Advisor advisor : config.getAdvisors()) {
            if (advisor instanceof PointcutAdvisor) {
                // Add it conditionally.
                PointcutAdvisor pointcutAdvisor = (PointcutAdvisor) advisor;
                if (config.isPreFiltered() || pointcutAdvisor.getPointcut().getClassFilter().matches(actualClass)) {
                    // 2.获取Advisor的Interceptor,也就是在分析<cache:annotation-driven />时
                    // 被添加到BeanFactoryCacheOperationSourceAdvisor类的CacheInterceptor类
                    MethodInterceptor[] interceptors = registry.getInterceptors(advisor);
                    MethodMatcher mm = pointcutAdvisor.getPointcut().getMethodMatcher();
                    if (MethodMatchers.matches(mm, method, actualClass, hasIntroductions)) {
                        if (mm.isRuntime()) {
                            // Creating a new object instance in the getInterceptors() method
                            // isn't a problem as we normally cache created chains.
                            for (MethodInterceptor interceptor : interceptors) {
                                interceptorList.add(new InterceptorAndDynamicMethodMatcher(interceptor, mm));
                            }
                        }
                        else {
                            interceptorList.addAll(Arrays.asList(interceptors));
                        }
                    }
                }
            }
            else if (advisor instanceof IntroductionAdvisor) {
                IntroductionAdvisor ia = (IntroductionAdvisor) advisor;
                if (config.isPreFiltered() || ia.getClassFilter().matches(actualClass)) {
                    Interceptor[] interceptors = registry.getInterceptors(advisor);
                    interceptorList.addAll(Arrays.asList(interceptors));
                }
            }
            else {
                Interceptor[] interceptors = registry.getInterceptors(advisor);
                interceptorList.addAll(Arrays.asList(interceptors));
            }
        }

        return interceptorList;
    }
所以,拦截器链最终返回的是我们之前分析的CacheInterceptor类
3)ReflectiveMethodInvocation.proceed()拦截器链的调用分析
// InterceptedMethodInvocation.proceed()
    public Object proceed() throws Throwable {
      try {
        // 主要就是遍历调用Interceptor的invoke方法
        return index == interceptors.length
            ? methodProxy.invokeSuper(proxy, arguments)
            : interceptors[index].invoke(
                new InterceptedMethodInvocation(proxy, methodProxy, arguments, index + 1));
      } catch (Throwable t) {
        pruneStacktrace(t);
        throw t;
      }
    }
那我们看下CacheInterceptor.invoke()方法
public Object invoke(final MethodInvocation invocation) throws Throwable {
        Method method = invocation.getMethod();

        CacheOperationInvoker aopAllianceInvoker = new CacheOperationInvoker() {
            @Override
            public Object invoke() {
                try {
                    return invocation.proceed();
                }
                catch (Throwable ex) {
                    throw new ThrowableWrapper(ex);
                }
            }
        };

        try {
            // 重点方法
            return execute(aopAllianceInvoker, invocation.getThis(), method, invocation.getArguments());
        }
        catch (CacheOperationInvoker.ThrowableWrapper th) {
            throw th.getOriginal();
        }
    }

//CacheAspectSupport.execute()
    protected Object execute(CacheOperationInvoker invoker, Object target, Method method, Object[] args) {
        // Check whether aspect is enabled (to cope with cases where the AJ is pulled in automatically)
        if (this.initialized) {
            Class<?> targetClass = getTargetClass(target);
            // 1.获取当前方法的缓存操作
            Collection<CacheOperation> operations = getCacheOperationSource().getCacheOperations(method, targetClass);
            if (!CollectionUtils.isEmpty(operations)) {
                // 2.执行缓存操作
                return execute(invoker, method, new CacheOperationContexts(operations, method, args, target, targetClass));
            }
        }

        return invoker.invoke();
    }
* getCacheOperationSource().getCacheOperations(method, targetClass)获取当前方法的缓存操作
默认实现类为AbstractFallbackCacheOperationSource
// AbstractFallbackCacheOperationSource.getCacheOperations(Method method, Class<?> targetClass)
    public Collection<CacheOperation> getCacheOperations(Method method, Class<?> targetClass) {
        if (method.getDeclaringClass() == Object.class) {
            return null;
        }

        Object cacheKey = getCacheKey(method, targetClass);
        Collection<CacheOperation> cached = this.attributeCache.get(cacheKey);

        if (cached != null) {
            return (cached != NULL_CACHING_ATTRIBUTE ? cached : null);
        }
        else {
            Collection<CacheOperation> cacheOps = computeCacheOperations(method, targetClass);
            if (cacheOps != null) {
                if (logger.isDebugEnabled()) {
                    logger.debug("Adding cacheable method '" + method.getName() + "' with attribute: " + cacheOps);
                }
                this.attributeCache.put(cacheKey, cacheOps);
            }
            else {
                this.attributeCache.put(cacheKey, NULL_CACHING_ATTRIBUTE);
            }
            return cacheOps;
        }
    }
* 执行execute()方法(关于操作缓存细节笔者不再详细分析,读者可自行分析)
private Object execute(final CacheOperationInvoker invoker, Method method, CacheOperationContexts contexts) {
        // Special handling of synchronized invocation
        if (contexts.isSynchronized()) {
            CacheOperationContext context = contexts.get(CacheableOperation.class).iterator().next();
            if (isConditionPassing(context, CacheOperationExpressionEvaluator.NO_RESULT)) {
                Object key = generateKey(context, CacheOperationExpressionEvaluator.NO_RESULT);
                Cache cache = context.getCaches().iterator().next();
                try {
                    return wrapCacheValue(method, cache.get(key, new Callable<Object>() {
                        @Override
                        public Object call() throws Exception {
                            return unwrapReturnValue(invokeOperation(invoker));
                        }
                    }));
                }
                catch (Cache.ValueRetrievalException ex) {
                    // The invoker wraps any Throwable in a ThrowableWrapper instance so we
                    // can just make sure that one bubbles up the stack.
                    throw (CacheOperationInvoker.ThrowableWrapper) ex.getCause();
                }
            }
            else {
                // No caching required, only call the underlying method
                return invokeOperation(invoker);
            }
        }


        // Process any early evictions
        processCacheEvicts(contexts.get(CacheEvictOperation.class), true,
                CacheOperationExpressionEvaluator.NO_RESULT);

        // Check if we have a cached item matching the conditions
        Cache.ValueWrapper cacheHit = findCachedItem(contexts.get(CacheableOperation.class));

        // Collect puts from any @Cacheable miss, if no cached item is found
        List<CachePutRequest> cachePutRequests = new LinkedList<CachePutRequest>();
        if (cacheHit == null) {
            collectPutRequests(contexts.get(CacheableOperation.class),
                    CacheOperationExpressionEvaluator.NO_RESULT, cachePutRequests);
        }

        Object cacheValue;
        Object returnValue;

        if (cacheHit != null && cachePutRequests.isEmpty() && !hasCachePut(contexts)) {
            // If there are no put requests, just use the cache hit
            cacheValue = cacheHit.get();
            returnValue = wrapCacheValue(method, cacheValue);
        }
        else {
            // Invoke the method if we don't have a cache hit
            returnValue = invokeOperation(invoker);
            cacheValue = unwrapReturnValue(returnValue);
        }

        // Collect any explicit @CachePuts
        collectPutRequests(contexts.get(CachePutOperation.class), cacheValue, cachePutRequests);

        // Process any collected put requests, either from @CachePut or a @Cacheable miss
        for (CachePutRequest cachePutRequest : cachePutRequests) {
            cachePutRequest.apply(cacheValue);
        }

        // Process any late evictions
        processCacheEvicts(contexts.get(CacheEvictOperation.class), false, cacheValue);

        return returnValue;
    }
总结:
缓存功能的实现实际也是通过Spring代理来实现的。生成当前类的代理类,调用代理类的invoke()方法,在invoke()方法中调用CacheInterceptor拦截器的execute()方法,拦截器会使用缓存器(本例中的SimpleCacheManager)来进行具体方法实现。
重要操作流程如下:
1)解析<cache:annotation-driven />,将InfrastructureAdvisorAutoProxyCreator注入到Spring容器中,该类的作用是在Spring创建bean实例的时候,会执行其postProcessAfterInitialization()方法,生成bean实例的代理类
2)解析<cache:annotation-driven />,将BeanFactoryCacheOperationSourceAdvisor类注入到Spring容器中,该类的主要作用是作为一个Advisor添加到上述代理类中
3)BeanFactoryCacheOperationSourceAdvisor类拥有对CacheInterceptor的依赖,CacheInterceptor作为一个方法拦截器,负责对缓存方法的拦截,
4)当前类方法调用被拦截到CacheInterceptor后,CacheInterceptor会调用我们在配置文件中配置的CacheManager实现(也就是本例中的SimpleCacheManager),来真正实现缓存功能
原文链接:https://blog.csdn.net/qq_26323323/article/details/81700626