所有CSS伪类/元素
| 选择器 | 示例 | 示例说明 |
|---|---|---|
| :checked | input:checked | 选择所有选中的表单元素 |
| :disabled | input:disabled | 选择所有禁用的表单元素 |
| :empty | p:empty | 选择所有没有子元素的p元素 |
| :enabled | input:enabled | 选择所有启用的表单元素 |
| :first-of-type | p:first-of-type | 选择的每个 p 元素是其父元素的第一个 p 元素 |
| :in-range | input:in-range | 选择元素指定范围内的值 |
| :invalid | input:invalid | 选择所有无效的元素 |
| :last-child | p:last-child | 选择所有p元素的最后一个子元素 |
| :last-of-type | p:last-of-type | 选择每个p元素是其母元素的最后一个p元素 |
| :not(selector) | :not(p) | 选择所有p以外的元素 |
| :nth-child(n) | p:nth-child(2) | 选择所有 p 元素的父元素的第二个子元素 |
| :nth-last-child(n) | p:nth-last-child(2) | 选择所有p元素倒数的第二个子元素 |
| :nth-last-of-type(n) | p:nth-last-of-type(2) | 选择所有p元素倒数的第二个为p的子元素 |
| :nth-of-type(n) | p:nth-of-type(2) | 选择所有p元素第二个为p的子元素 |
| :only-of-type | p:only-of-type | 选择所有仅有一个子元素为p的元素 |
| :only-child | p:only-child | 选择所有仅有一个子元素的p元素 |
| :optional | input:optional | 选择没有"required"的元素属性 |
| :out-of-range | input:out-of-range | 选择指定范围以外的值的元素属性 |
| :read-only | input:read-only | 选择只读属性的元素属性 |
| :read-write | input:read-write | 选择没有只读属性的元素属性 |
| :required | input:required | 选择有"required"属性指定的元素属性 |
| :root | root | 选择文档的根元素 |
| :target | #news:target | 选择当前活动#news元素(点击URL包含锚的名字) |
| :valid | input:valid | 选择所有有效值的属性 |
| :link | a:link | 选择所有未访问链接 |
| :visited | a:visited | 选择所有访问过的链接 |
| :active | a:active | 选择正在活动链接 |
| :hover | a:hover | 把鼠标放在链接上的状态 |
| :focus | input:focus | 选择元素输入后具有焦点 |
| :first-letter | p:first-letter | 选择每个<p> 元素的第一个字母 |
| :first-line | p:first-line | 选择每个<p> 元素的第一行 |
| :first-child | p:first-child | 选择器匹配属于任意元素的第一个子元素的 <p> 元素 |
| :before | p:before | 在每个<p>元素之前插入内容 |
| :after | p:after | 在每个<p>元素之后插入内容 |
| :lang(language) | p:lang(it) | 为<p>元素的lang属性选择一个开始值 |
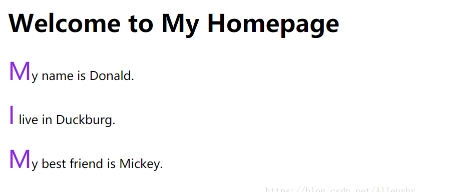
1.::first-letter
选中元素的首字符,为其设置样式
<!DOCTYPE html>
<html>
<head>
<style>
p:first-letter
{
font-size:200%;
color:#8A2BE2;
}
</style>
</head>
<body>

<h1>Welcome to My Homepage</h1>
<p>My name is Donald.</p>
<p>I live in Duckburg.</p>
<p>My best friend is Mickey.</p>

</body>
</html>

2. ::first-line
选中元素的地一行
3.::before和::after
::before和::after可在元素前后添加内容,使用十分灵活,没有做不到,只有想不到!!
需要注意的是: 1.::before和::after添加的内容都是放在该元素的子元素的最前面或者最后面的!
2.::before和::after下特有的content不会改变文档内容,仅作为一种渲染使用!
下面介绍::before和::after的种用法
将content的属性设置为空,把它做成 一个内容很少的盒子
<!DOCTYPE html>
<html>
<head>
<style>
p:before
{
content:"";
width:12px;
height:12px;
display:inline-block;
background-color:red;
}
</style>
</head>

<body>

<p>我是唐老鸭。</p>
<p>我住在 Duckburg。</p>

<p><b>注释:</b>对于在 IE8 中工作的 :before,必须声明 DOCTYPE。</p>

</body>
</html>

3.在元素之前或者之后插入非文本内容
插入一张图像:如下所示(图像大小按照自己的要求设置)
p:before
{
content:url(xxx.png);}
通过attr()调用当前元素的属性,比如将图片alt提示文字或者链接的href地址显示出来。
p::after{
content:attr(href);
}