一,mina的架构
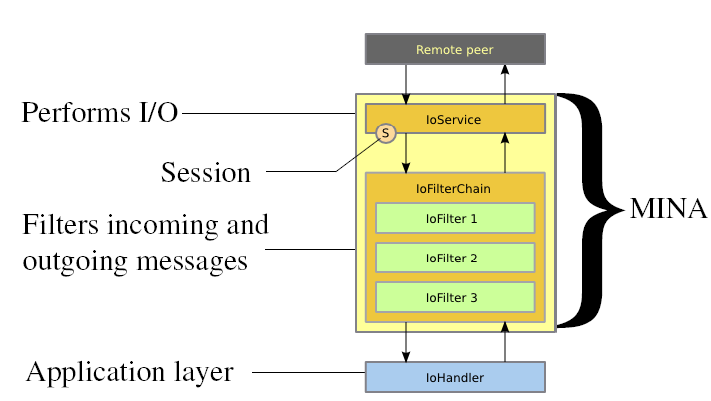
mina 架构可以大致分为三部分,ioService ,ioFilterChain , IoHandler
ioService:用于接受服务或者连接服务,例如socket 接收器,连接器。
ioFilterChain:对接受的数据或发送的数据进行处理,例如接收到的字节数组转化成字符串,打日志等。
ioHandler:业务处理类,我们自己写的业务逻辑,例如对接受到的数据进行怎么样的数据,需要返回什么数据。
二,聊天室代码。
下面看下mina-2.0.9中聊天室例子。聊天室服务器的代码:
   public static void main(String[] args) throws Exception {
        NioSocketAcceptor acceptor = new NioSocketAcceptor();//创建接收器,用于接受socket连接。
        DefaultIoFilterChainBuilder chain = acceptor.getFilterChain();//获取filterChain

        MdcInjectionFilter mdcInjectionFilter = new MdcInjectionFilter();//获取mdc inject filter
        chain.addLast("mdc", mdcInjectionFilter);//设置filterChain 链中最好一个过滤器为mdcInjectionFilter

        // Add SSL filter if SSL is enabled.
        if (USE_SSL) {
            addSSLSupport(chain);
        }

        chain.addLast("codec", new ProtocolCodecFilter(
                new TextLineCodecFactory()));//字节组和字符串转换 filter

        addLogger(chain); //日志 filter

        // Bind
        acceptor.setHandler(new ChatProtocolHandler()); //设置接受的信息的业务处理类
        acceptor.bind(new InetSocketAddress(PORT));//绑定端口

        System.out.println("Listening on port " + PORT);
    }
然后看下ChatProtocolHandler ,该类是继承了IoHandlerAdapter类,看下具体实现逻辑的方法,简化了大部分代码。
 @Override
    public void messageReceived(IoSession session, Object message) {
        String theMessage = (String) message;//接受得来的字符串
        session.write("LOGIN OK");//返回登录成功,
    }
上面代码出现了一个session的概念,这个session的概念在mina中是比较重要的,下面来看下,mina在底层帮我们做了哪些事情。
主要是看下
 NioSocketAcceptor acceptor = new NioSocketAcceptor();//创建接收器,用于接受socket连接。
 acceptor.bind(new InetSocketAddress(PORT));//绑定端口
这两行代码背后mina都做了哪些事情。
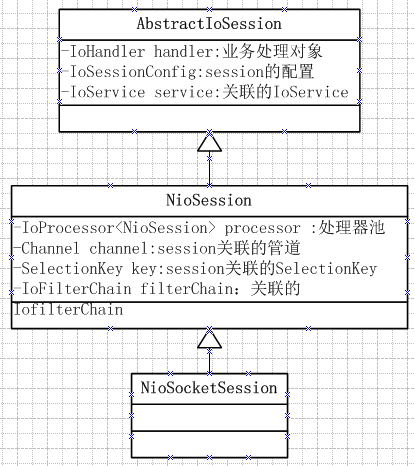
先看下下面这行代码初始化的时候,都初始化了哪些属性,下图的属性是初始化中比较关键的。
三,接受新连接
NioSocketAcceptor acceptor = new NioSocketAcceptor();//创建接收器,用于接受socket连接。
NioSocketAcceptor的继承图如下,属性只列出了相对重要的属性。
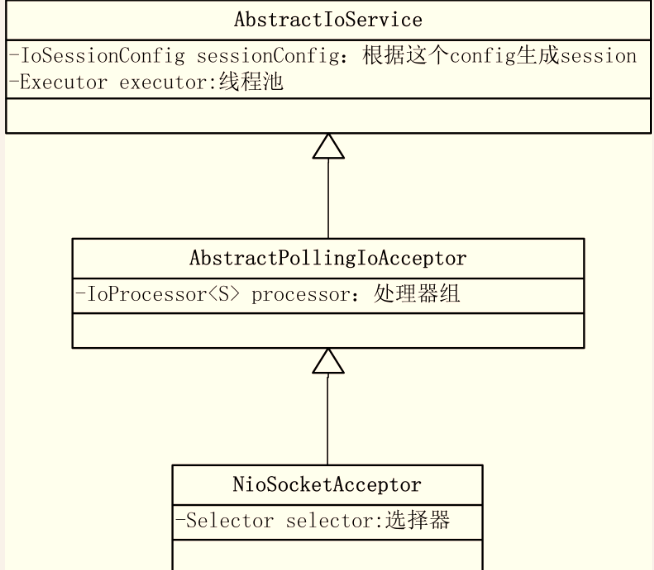
1.初始化sessionConfig的实现是 DefaultSocketSessionConfig(),里面配置了一些参数用于后续创建session.
2.初始化executor,
executor = Executors.newCachedThreadPool();
newCachedThreadPool线程池的用法如下:
“创建一个可根据需要创建新线程的线程池,但是在以前构造的线程可用时将重用它们。对于执行很多短期异步任务的程序而言,这些线程池通常可提高程序性能。调用 execute 将重用以前构造的线程(如果线程可用)。如果现有线程没有可用的,则创建一个新线程并添加到池中。终止并从缓存中移除那些已有 60 秒钟未被使用的线程。因此,长时间保持空闲的线程池不会使用任何资源。注意,可以使用 ThreadPoolExecutor 构造方法创建具有类似属性但细节不同(例如超时参数)的线程池。 ”
3.初始化processor,创建了下面这个对象。
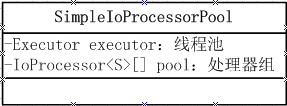
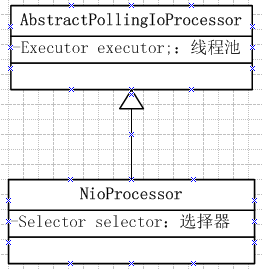
new SimpleIoProcessorPool<S>( NioProcessor.class),该对象有两个比较关键的属性,分别是executor和pool。executor和上面一样是一个Executors.newCachedThreadPool(),pool为一个NioProcessor的数组。NioProcessor如下,也有两个关键属性,selector选择器和executor线程池(newCachedThreadPool)。
看下这行代码背后都做了哪些东西。
acceptor.bind(new InetSocketAddress(PORT));//绑定端口
1.这块代码主要做的事情就是启动了一个线程,用户监听连接。
主要的runnable为AbstractPollingIoAcceptor.Acceptor
Acceptor中会调用NioSocketAcceptor.open方法,在open方法中,我们能看到熟悉的创建接收器的代码。简化代码如下:
protected ServerSocketChannel open(SocketAddress localAddress) throws Exception {
        // Creates the listening ServerSocket
        ServerSocketChannel channel = null;
        if (selectorProvider != null) {
            channel = selectorProvider.openServerSocketChannel();
        } else {
            channel = ServerSocketChannel.open();//创建一个ServerSocketChannel对象
        }

            // This is a non blocking socket channel
            channel.configureBlocking(false);//设定管道为非阻塞
            // Configure the server socket,
            ServerSocket socket = channel.socket();//获取管道中关联的ServerSocket
            // Set the reuseAddress flag accordingly with the setting
            socket.setReuseAddress(isReuseAddress());
            // and bind.

                socket.bind(localAddress, getBacklog());//绑定地址
         ...
            // Register the channel within the selector for ACCEPT event
            channel.register(selector, SelectionKey.OP_ACCEPT);//管道注册到选择器,监听socket的接受事件,该selector为NioSocketAcceptor的属性

       ....
        return channel;
    }
看下Acceptor的run方法,同样可以看到熟悉的selector代码:
 private class Acceptor implements Runnable {
        public void run() {
            assert (acceptorRef.get() == this);
            int nHandles = 0;
            // Release the lock
            lock.release();
            while (selectable) {
                try {
                    // Detect if we have some keys ready to be processed
                    // The select() will be woke up if some new connection
                    // have occurred, or if the selector has been explicitly
                    // woke up
                    int selected = select();//第一次访问到这个地方的时候,会在AbstractPollingIoAcceptor. bindInternal()中的wakeUp()方法中会被打断,直接执行下面registerHandles的初始化。
                    // this actually sets the selector to OP_ACCEPT,
                    // and binds to the port on which this class will
                    // listen on
                    nHandles += registerHandles();//主要是执行上面的open方法。
                    // Now, if the number of registred handles is 0, we can
                    // quit the loop: we don't have any socket listening
                    // for incoming connection.
                    if (nHandles == 0) {
                       .....
                    }
                    if (selected > 0) {//如果有新连接进来
                        // We have some connection request, let's process
                        // them here.
                        processHandles(selectedHandles());
                    }
                    // check to see if any cancellation request has been made.
                    nHandles -= unregisterHandles();
                } .....
            // Cleanup all the processors, and shutdown the acceptor.
            if (selectable && isDisposing()) {
                selectable = false;
               ......
        }}}
然后看下下面这段代码背后都做了哪些事情。
  if (selected > 0) {//如果有新连接进来
    // We have some connection request, let's process
    // them here.
    processHandles(selectedHandles());
                    }
selectedHandles()方法中主要是获取当前selector中已经就绪的selectedKey 的集合,具体的方法如下:
    @Override
    protected Iterator<ServerSocketChannel> selectedHandles() {
        return new ServerSocketChannelIterator(selector.selectedKeys());
    }
processHandles的的方法如下:
private void processHandles(Iterator<H> handles) throws Exception {
            while (handles.hasNext()) {
                H handle = handles.next();
                handles.remove();
                // Associates a new created connection to a processor,
                // and get back a session
                S session = accept(processor, handle);//生成一个NioSocketSession
                if (session == null) {
                    continue;
                }
                initSession(session, null, null);//对session中的部分attribute和writeRequestQueue等进行默认的初始化。
                // add the session to the SocketIoProcessor
                session.getProcessor().add(session);
            }
        }
看一下accept方法
  @Override
    protected NioSession accept(IoProcessor<NioSession> processor, ServerSocketChannel handle) throws Exception {
        SelectionKey key = null;
        if (handle != null) {
            key = handle.keyFor(selector);//
        }
        if ((key == null) || (!key.isValid()) || (!key.isAcceptable())) {
            return null;
        }
        // accept the connection from the client
        SocketChannel ch = handle.accept();//接受一个新连接
        if (ch == null) {
            return null;
        }
        return new NioSocketSession(this, processor, ch);
    }
new NioSocketSession(this, processor, ch)中有几个主要的操作:
 this.service = service;//设置当前当前session关联的IoService在这里是NioSocketAcceptor
 this.handler = service.getHandler();//设置当前session关联的handler,在这里对应的是new ChatProtocolHandler()
 sessionId = idGenerator.incrementAndGet();//获取唯一的sessionId
 this.channel = channel;//设置当前的Channel,这里为新进来的socket连接对应的SocketChannel
 this.processor = processor;//设置当前IoProcessor<NioSession> processor ,这里设为AbstractPollingIoAcceptor.processor 也就是上面初始化的SimpleIoProcessorPool(..)
 filterChain = new DefaultIoFilterChain(this);//初始化默认的filterChain
 this.config.setAll(service.getSessionConfig());//设置SessionCofig 为NioSocketAcceptor.getSessionConfig();
NioSocketSession的继承图如下:属性只列出了关键的属性。
再看下
initSession(session, null, null);//对session中的部分attribute和writeRequestQueue等进行默认的初始化。
最后是:
session.getProcessor().add(session);
session.getProcessor()获取刚才初始化processor,SimpleIoProcessorPool 的一个对象
在看下SimpleIoProcessorPool的add(Session session)方法:
 public final void add(S session) {
        getProcessor(session).add(session);//toread
    }
getProcessor(session) 中首先会在SimpleIoProcessorPool.pool中去取一个IoProcessor<S> 的实例,这里是NioProcessor实例,然后session和这个NioProcessor的实例关联起来。简化代码如下:
IoProcessor<S> processor  = pool[Math.abs((int) session.getId()) % pool.length];
 session.setAttributeIfAbsent(PROCESSOR, processor);
然后再看下NioProcessor.add(Session session)方法,其实是执行了NioProcessor的父类AbstractPollingIoProcessor的add方法。
该add方法,首先是在Queue<S> newSessions这个队列中增加了上面传进来的session,然后启动了一个新的线程AbstractPollingIoProcessor的内部类 Processor。简化的run方法如下:
  private class Processor implements Runnable {
        public void run() {
      int selected = select(SELECT_TIMEOUT);//获取当前是否有新的请求进来。
      nSessions += handleNewSessions();
     if (selected > 0) {
                        //LOG.debug("Processing ..."); // This log hurts one of the MDCFilter test...
                        process();
                    }
      flush(currentTime);//如果有session有写请求在这里面处理
        }
}
hanldeNewSession()中对刚才在
Queue<S> newSessions
增加的新session进行初始化操作,首先是:NioProcessor中的初始化方法:
   @Override
    protected void init(NioSession session) throws Exception {
        SelectableChannel ch = (SelectableChannel) session.getChannel();//获取session关联的SocketChannel
        ch.configureBlocking(false);//设置为非阻塞
        session.setSelectionKey(ch.register(selector, SelectionKey.OP_READ, session));//把socketChannel注册到NioProcessor的selector中,并且监听的时间为OP_READ,可读事件。
    }
然后是初始session的filterChain,初始化为session关联的IoService的FilterChainBuilder,这里就是我们一开始初始化NioSocketAcceptor的filterChain
代码如下:
              // Build the filter chain of this session.
IoFilterChainBuilder chainBuilder = session.getService().getFilterChainBuilder();
chainBuilder.buildFilterChain(session.getFilterChain());
四,处理请求
然后执行下面的代码,如果当前NioProcessor.selector有可读的channel的话,执行process()方法
     if (selected > 0) {
                        //LOG.debug("Processing ..."); // This log hurts one of the MDCFilter test...
                        process();
                    }
process()方法就是真正处理数据和执行业务逻辑的地方了。首先会调用filterChain然后执行设定的handler.
process()方法中主要是read()方法,该方法主要是读取socket中的数据,并且执行filterChain和handler 简化的代码如下:
 private void read(S session) {
        IoSessionConfig config = session.getConfig();
        int bufferSize = config.getReadBufferSize();
        IoBuffer buf = IoBuffer.allocate(bufferSize);
        final boolean hasFragmentation = session.getTransportMetadata().hasFragmentation();
        try {
            int readBytes = 0;
            int ret;
            try {
                if (hasFragmentation) {
                    while ((ret = read(session, buf)) > 0) {//读取数据
                        readBytes += ret;
                        if (!buf.hasRemaining()) {
                            break;
                        }
                    }
                } else {
                    ret = read(session, buf);
                    if (ret > 0) {
                        readBytes = ret;
                    }
                }
            } finally {
                buf.flip();
            }
            if (readBytes > 0) {
                IoFilterChain filterChain = session.getFilterChain();//获取filterChain
                filterChain.fireMessageReceived(buf);//执行filterChain中的messageReceived事件。
                buf = null;
            IoFilterChain filterChain = session.getFilterChain();
            filterChain.fireExceptionCaught(e);
        }
    }
session如有写的请求的话,先把请求封装成WriteRequest,最后把结果存在session.writeRequestQueue中,待执行flush方法的时候,才真正的把数据写进去。
写操作具体的代码在AbstractPollingIoProcessor的flushNow里,最终写操作是在NioProcessor的write方法中完成的
NioProcessor. write如下代码 , 就是主要就是Channnel的write方法了:
    @Override
    protected int write(NioSession session, IoBuffer buf, int length) throws Exception {
        if (buf.remaining() <= length) {
            return session.getChannel().write(buf.buf());
        }
        int oldLimit = buf.limit();
        buf.limit(buf.position() + length);
        try {
            return session.getChannel().write(buf.buf());
        } finally {
            buf.limit(oldLimit);
        }
    }
五,概括
最后来看下mina中IoService,IoSession,IoProcessor,IoFilterChain,Handler之间的关系。还是以上面聊天室的为例,从服务器开始监听端口,到有第一个请求进来,流程如下。
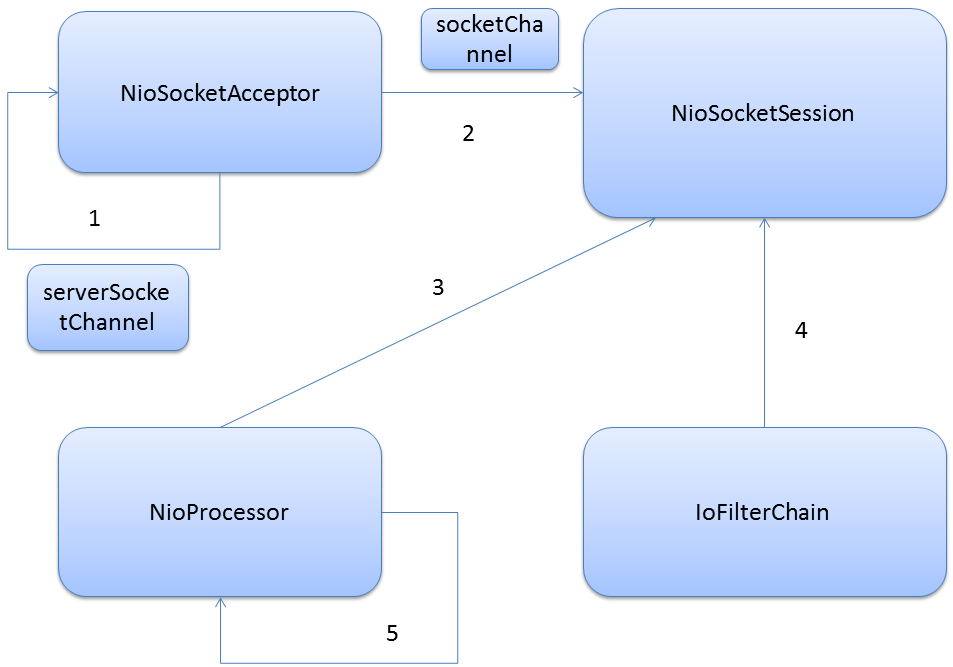
1.NioSocketAcceptor 会启动一个线程用于接受socket连接,另外还会创建一个NioProcessor池.在新建NioSocketAcceptor之后需要设置IoFilterChain和Handler,Handler就是具体的业务处理逻辑。
2.当有一个新的连接进来的时候,会创建一个NioSocketSession,这个session会和新创建的socketChannel关联起来.
3.在NioProcessor池中取出一个NioProcessor来处理该session.
4.session关联IoFilterChain,当有Channel有读写事件的时候都需要经过FilterChain,FilterChain中根据不同的事件,例如接受消息,写事件,发送事件都有特定的方法。
5.NioProcessor中会启动一个线程用于监听该socketChannel是否有新消息进来,sochetChannel在selector中注册了OP_READ这个事件。NioProcessor中主要就是处理socketChannel中发生的各种事件,包括读写操作。
end~