一、配置中心应用(Git)
1、如果在GitHub上建立的仓库是私有的,那么还要加上spring.cloud.config.server.git.username和spring.cloud.config.server.git.password 这两个配置
2、springcloud config 的URL与配置文件的映射关系如下:
/{application}/{profile}[/{label}]
/{application}-{profile}.yml
/{label}/{application}-{profile}.yml
/{application}-{profile}.properties
/{label}/{application}-{profile}.properties
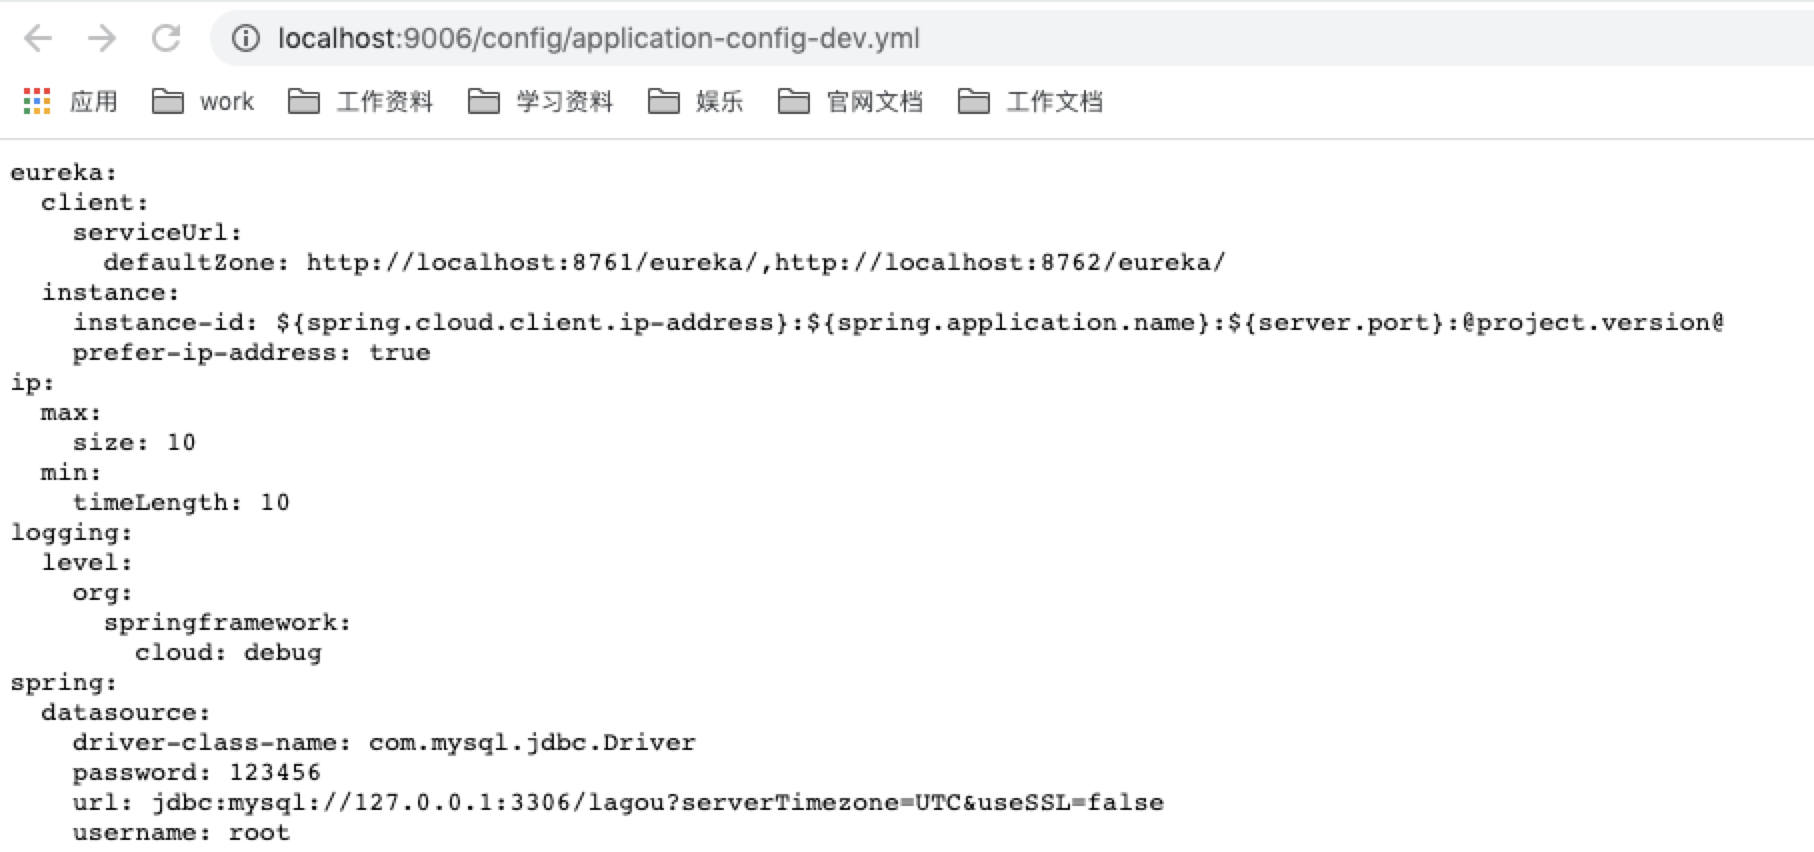
3、如果github上建立的目录下的文件为application-config-dev.yml,那么当启动配置中心服务器端时,可以通过http://localhost:9006/config/application-config-dev.yml访问配置文件,如果访问成功则表示配置中心搭建成功。这里的config是分支名称
第一步:配置中心服务端
1、依赖配置
<dependency>
    <groupId>org.springframework.cloud</groupId>
    <artifactId>spring-cloud-config-server</artifactId>
</dependency>
<dependency>
    <groupId>org.springframework.cloud</groupId>
    <artifactId>spring-cloud-starter-netflix-eureka-client</artifactId>
</dependency>
2、配置文件
spring:
  application:
    #应⽤名称,会在Eureka中作为服务的id标识(serviceId)
    name: config-server9006
  cloud:
    config:
      server:
        git:
          uri: git@gitee.com:niunafei1/springcloud.git
          username: niunafei0315@163.com
          password:
      label: config
eureka:
  client:
    #eureka server的路径
    serviceUrl:
      #注册单实例只需要写一台服务器即可
      #集群模式下,也需要写其它 http://Server其他服务地址:其他服务端口/eureka,如果多个服务需要使用逗号分隔
      defaultZone: http://localhost:8761/eureka/,http://localhost:8762/eureka/
  instance:
    #使⽤ip注册,否则会使⽤主机名注册了(此处考虑到对⽼版本的兼容,新版本经过实验都是ip)
    prefer-ip-address: true
    #⾃定义实例显示格式,加上版本号,便于多版本管理,注意是ip-address,早期版本是ipAddress
    instance-id: ${spring.cloud.client.ip-address}:${spring.application.name}:${server.port}:@project.version@
3、在启动类上添加注解,@EnableDiscoveryClient【@EnableDiscoveryClient注解可替换为@EnableEurekaClient】和@EnableConfigServer
package city.albert;

import org.springframework.boot.SpringApplication;
import org.springframework.boot.autoconfigure.SpringBootApplication;
import org.springframework.cloud.client.discovery.EnableDiscoveryClient;
import org.springframework.cloud.config.server.EnableConfigServer;

/**
 * @author niunafei
 * @function
 * @email niunafei0315@163.com
 * @date 2020/9/22  11:44 PM
 */
@SpringBootApplication
@EnableDiscoveryClient
@EnableConfigServer
public class ConfigServer9006 {

    public static void main(String[] args) {
        SpringApplication.run(ConfigServer9006.class, args);
    }
}
访问:http://localhost:9006/config/application-config-dev.yml
第二步:配置中心客户端
1、引入依赖
        <dependency>
            <groupId>org.springframework.cloud</groupId>
            <artifactId>spring-cloud-config-client</artifactId>
        </dependency>
2、配置文件设置,文件名为bootstrap.yml
在spring boot中系统文件名bootstrap.yml优先被加载使用,需要在系统加载application.yml之前初始化获取配置文件。
spring:
  application:
    #应⽤名称,会在Eureka中作为服务的id标识(serviceId)
    name: gateway-server9002
  cloud:
    config:
      name: application-config #配置⽂件名称
      profile: dev #后缀名称
      label: config #分⽀名称
      uri: http://localhost:9006 #ConfigServer配置中⼼地址
3、使用可以用@Value("${spring.port}")注入即可
二、配置中心的手动刷新
实现手动刷新不⽤重启微服务,只需要⼿动的做⼀些其他的操作(访问⼀个地址/refresh)刷新,之后再访问即可此时,客户端取到了配置中⼼的值,但当我们修改GitHub上⾯的值时,服务端(Confifig Server)能实时获取最新的值,但客户端(Confifig Client)读的是缓存,⽆法实时获取最新值。Spring Cloud已 经为我们解决了这个问题,那就是客户端使⽤post去触发refresh,获取最新数据。
        <dependency>
            <groupId>org.springframework.boot</groupId>
            <artifactId>spring-boot-starter-actuator</artifactId>
        </dependency>
management:
  endpoints:
    web:
     exposure:
       include: "*"
三、配置中心的自动刷新(Spring Cloud Confifig+Spring Cloud Bus 实现)
MQ消息代理,我们还选择使⽤RabbitMQ,ConfifigServer和ConfifigClient都添加都消息总线的⽀持以及与RabbitMq的连接信息
        <dependency>
            <groupId>org.springframework.cloud</groupId>
            <artifactId>spring-cloud-starter-bus-amqp</artifactId>
        </dependency>
spring:
  rabbitmq:
    host: 127.0.0.1
    password: guest
    port: 5672
    username: guest
        <dependency>
            <groupId>org.springframework.boot</groupId>
            <artifactId>spring-boot-starter-actuator</artifactId>
        </dependency>
b、暴露服务
management:
  endpoints:
    web:
     exposure:
       include: "*"
四、配置中心应用(数据库)
        <!--连接msql数据库相关jar包-->
        <dependency>
            <groupId>org.springframework.boot</groupId>
            <artifactId>spring-boot-starter-jdbc</artifactId>
        </dependency>
        <dependency>
            <groupId>mysql</groupId>
            <artifactId>mysql-connector-java</artifactId>
            <version>5.1.21</version>
        </dependency>
2、改动配置文件
spring:
  application:
    name: config-server-jdbc
  profiles:
    active: jdbc
  cloud:
    config:
      server:
        default-label: dev
        jdbc:
          sql: SELECT akey , avalue FROM config_server where APPLICATION=? and APROFILE=? and LABEL=?
 # mysql 属性配置
  datasource:
    driver-class-name: com.mysql.jdbc.Driver
    url: jdbc:mysql://127.0.0.1:3306/test
    username: root
    password: root
这里主要讲下连接配置信息
(1)spring.profiles.active=jdbc,自动实现JdbcEnvironmentRepository。
(2)sql语句自定义,否则会默认为“SELECT KEY, VALUE from PROPERTIES where APPLICATION=? and PROFILE=? and LABEL=?”,具体可以参考JdbcEnvironmentRepository实现。
(3)本人数据库建表为config_server,由于key,value和profile是mysql关键字,所以我都在最前面加了a。当然表名字段名都可以自定义。
(4) {application} 对应客户端的"spring.application.name"属性;
{aprofile} 对应客户端的 "spring.profiles.active"属性(逗号分隔的列表); 和
{label} 对应服务端属性,这个属性能标示一组配置文件的版本.
(5)只要select出来是两个字段,框架会自动包装到environment的map<key,value>。