一、什么是webSocket
WebSocket是HTML5新增的协议,它的目的是在浏览器和服务器之间建立一个不受限的双向通信的通道,比如说,服务器可以在任意时刻发送消息给浏览器。
传统的Http协议连接是有浏览器发起的单通信通道,而服务器没有办法向客户端发送消息。这样一来,要在浏览器中搞一个实时聊天,在线炒股(不鼓励),或者在线多人游戏的话就没法实现了,只能借助Flash这些插件。
也有人说,HTTP协议其实也能实现啊,比如用轮询或者Comet。轮询是指浏览器通过JavaScript启动一个定时器,然后以固定的间隔给服务器发请求,询问服务器有没有新消息。这个机制的缺点一是实时性不够,二是频繁的请求会给服务器带来极大的压力。
Comet本质上也是轮询,但是在没有消息的情况下,服务器先拖一段时间,等到有消息了再回复。这个机制暂时地解决了实时性问题,但是它带来了新的问题:以多线程模式运行的服务器会让大部分线程大部分时间都处于挂起状态,极大地浪费服务器资源。另外,一个HTTP连接在长时间没有数据传输的情况下,链路上的任何一个网关都可能关闭这个连接,而网关是我们不可控的,这就要求Comet连接必须定期发一些ping数据表示连接“正常工作”。
以上两种机制都治标不治本,所以,HTML5推出了WebSocket标准,让浏览器和服务器之间可以建立无限制的全双工通信,任何一方都可以主动发消息给对方。
WebSocket协议
WebSocket协议并不是全新的协议,而是利用了HTTP协议来建立连接。我们来看看WebSocket连接是如何创建的。
首先,WebSocket连接必须由浏览器发起,因为请求协议是一个标准的HTTP请求,格式如下:
GET ws://localhost:3000/ws/chat HTTP/1.1
Host: localhost
Upgrade: websocket
Connection: Upgrade
Origin: http://localhost:3000
Sec-WebSocket-Key: client-random-string
Sec-WebSocket-Version: 13
该请求和普通的HTTP请求有几点不同:
- GET请求的地址不是类似
/path/,而是以ws://开头的地址; - 请求头
Upgrade: websocket和Connection: Upgrade表示这个连接将要被转换为WebSocket连接; Sec-WebSocket-Key是用于标识这个连接,并非用于加密数据;Sec-WebSocket-Version指定了WebSocket的协议版本。
随后,服务器如果接受该请求,就会返回如下响应:
HTTP/1.1 101 Switching Protocols
Upgrade: websocket
Connection: Upgrade
Sec-WebSocket-Accept: server-random-string
该响应代码101表示本次连接的HTTP协议即将被更改,更改后的协议就是Upgrade: websocket指定的WebSocket协议。
版本号和子协议规定了双方能理解的数据格式,以及是否支持压缩等等。如果仅使用WebSocket的API,就不需要关心这些。
现在,一个WebSocket连接就建立成功,浏览器和服务器就可以随时主动发送消息给对方。消息有两种,一种是文本,一种是二进制数据。通常,我们可以发送JSON格式的文本,这样,在浏览器处理起来就十分容易。
为什么WebSocket连接可以实现全双工通信而HTTP连接不行呢?实际上HTTP协议是建立在TCP协议之上的,TCP协议本身就实现了全双工通信,但是HTTP协议的请求-应答机制限制了全双工通信。WebSocket连接建立以后,其实只是简单规定了一下:接下来,咱们通信就不使用HTTP协议了,直接互相发数据吧。
安全的WebSocket连接机制和HTTPS类似。首先,浏览器用wss://xxx创建WebSocket连接时,会先通过HTTPS创建安全的连接,然后,该HTTPS连接升级为WebSocket连接,底层通信走的仍然是安全的SSL/TLS协议。
浏览器
很显然,要支持WebSocket通信,浏览器得支持这个协议,这样才能发出ws://xxx的请求。目前,支持WebSocket的主流浏览器如下:
- Chrome
- Firefox
- IE >= 10
- Sarafi >= 6
- Android >= 4.4
- iOS >= 8
服务器
由于WebSocket是一个协议,服务器具体怎么实现,取决于所用编程语言和框架本身。Node.js本身支持的协议包括TCP协议和HTTP协议,要支持WebSocket协议,需要对Node.js提供的HTTPServer做额外的开发。已经有若干基于Node.js的稳定可靠的WebSocket实现,我们直接用npm安装使用即可。
二、webSocket与socket区别
WebSocket在建立握手时,数据是通过HTTP传输的。但是建立之后,在真正传输时候是不需要HTTP协议的。
Socket其实并不是一个协议,而是为了方便使用TCP或UDP而抽象出来的一层,是位于应用层和传输控制层之间的一组接口。
Socket是应用层与TCP/IP协议族通信的中间软件抽象层,它是一组接口。在设计模式中,Socket其实就是一个门面模式,它把复杂的TCP/IP协议族隐藏在Socket接口后面,对用户来说,一组简单的接口就是全部,让Socket去组织数据,以符合指定的协议。
当两台主机通信时,必须通过Socket连接,Socket则利用TCP/IP协议建立TCP连接。TCP连接则更依靠于底层的IP协议,IP协议的连接则依赖于链路层等更低层次。
WebSocket则是一个典型的应用层协议。
三、springboot2.x使用webSocket搭建
1、引入maven的依赖到pom文件
        <!-- https://mvnrepository.com/artifact/org.springframework.boot/spring-boot-starter -->
        <!--springboot项目依赖包-->
        <dependency>
            <groupId>org.springframework.boot</groupId>
            <artifactId>spring-boot-starter</artifactId>
            <version>2.2.2.RELEASE</version>
        </dependency>
        <!-- https://mvnrepository.com/artifact/org.springframework.boot/spring-boot-starter-websocket -->
        <!--webSocket依赖包-->
        <dependency>
            <groupId>org.springframework.boot</groupId>
            <artifactId>spring-boot-starter-websocket</artifactId>
            <version>2.2.2.RELEASE</version>
        </dependency>
        <!-- https://mvnrepository.com/artifact/com.alibaba/fastjson -->
        <!--json转换使用依赖-->
        <dependency>
            <groupId>com.alibaba</groupId>
            <artifactId>fastjson</artifactId>
            <version>1.2.62</version>
        </dependency>
2、创建application.yml或properties配置文件
server:
  port: 8080
  servlet:
    context-path: /demo
3、创建启动类型并且声明websocket配置
/**
 * @author niunafei
 * @function
 * @email niunafei0315@163.com
 * @date 2020/5/11  1:08 PM
 */
@SpringBootApplication
public class MainApplication {

    public static void main(String[] args) {
        SpringApplication.run(MainApplication.class, args);
    }

    /**
     * 创建webSocket配置对象
     * @return
     */
    @Bean
    public ServerEndpointExporter serverEndpointExporter() {
        return new ServerEndpointExporter();
    }
}
4、创建websocket对象
package com.niu.websocket;

import com.alibaba.fastjson.JSONObject;
import org.springframework.stereotype.Component;

import javax.websocket.*;
import javax.websocket.server.PathParam;
import javax.websocket.server.ServerEndpoint;
import java.io.IOException;
import java.util.concurrent.ConcurrentHashMap;

/**
 * @author niunafei
 * @function
 * @email niunafei0315@163.com
 * @date 2020/5/11  1:18 PM
 */

@ServerEndpoint("/imserver/{userId}")
@Component
public class WebSocketServer {

    /**
     * 静态变量,用来记录当前在线连接数。应该把它设计成线程安全的。
     */
    private static int onlineCount = 0;
    /**
     * concurrent包的线程安全Set,用来存放每个客户端对应的MyWebSocket对象。
     */
    private static ConcurrentHashMap<String, WebSocketServer> webSocketMap = new ConcurrentHashMap<>();
    /**
     * 与某个客户端的连接会话,需要通过它来给客户端发送数据
     */
    private Session session;
    /**
     * 接收userId
     */
    private String userId = "";

    /**
     * 连接建立成功调用的方法
     */
    @OnOpen
    public void onOpen(Session session, @PathParam("userId") String userId) {
        this.session = session;
        this.userId = userId;
        if (webSocketMap.containsKey(userId)) {
            webSocketMap.remove(userId);
            webSocketMap.put(userId, this);
            //加入set中
        } else {
            webSocketMap.put(userId, this);
            //加入set中
            addOnlineCount();
            //在线数加1
        }

        System.out.println("用户连接:" + userId + ",当前在线人数为:" + getOnlineCount());

        try {
            sendMessage("连接成功");
        } catch (IOException e) {
            System.out.println("用户:" + userId + ",网络异常!!!!!!");
        }
    }

    /**
     * 连接关闭调用的方法
     */
    @OnClose
    public void onClose() {
        if (webSocketMap.containsKey(userId)) {
            webSocketMap.remove(userId);
            //从set中删除
            subOnlineCount();
        }
        System.out.println("用户退出:" + userId + ",当前在线人数为:" + getOnlineCount());
    }

    /**
     * 收到客户端消息后调用的方法
     *
     * @param message 客户端发送过来的消息
     */
    @OnMessage
    public void onMessage(String message, Session session) {
        System.out.println("用户消息:" + userId + ",报文:" + message);
        //可以群发消息
        //消息保存到数据库、redis
        if (message == null) {
            return;
        }
        try {
            //解析发送的报文
            JSONObject jsonObject = JSONObject.parseObject(message);
            //追加发送人(防止串改)
            jsonObject.put("fromUserId", this.userId);
            String toUserId = jsonObject.getString("toUserId");
            //传送给对应toUserId用户的websocket
            if (toUserId != null && webSocketMap.containsKey(toUserId)) {
                webSocketMap.get(toUserId).sendMessage(jsonObject.toJSONString());
            } else {
                System.out.println("请求的userId:" + toUserId + "不在该服务器上");
                //否则不在这个服务器上,发送到mysql或者redis
            }
        } catch (Exception e) {
            e.printStackTrace();
        }

    }

    /**
     * @param session
     * @param error
     */
    @OnError
    public void onError(Session session, Throwable error) {
        System.out.println("用户错误:" + this.userId + ",原因:" + error.getMessage());
        error.printStackTrace();
    }

    /**
     * 实现服务器主动推送
     */
    public void sendMessage(String message) throws IOException {
        this.session.getBasicRemote().sendText(message);
    }


    /**
     * 发送自定义消息
     */
    public static void sendInfo(String message, @PathParam("userId") String userId) throws IOException {

        System.out.println("发送消息到:" + userId + ",报文:" + message);
        if (userId != null && webSocketMap.containsKey(userId)) {
            webSocketMap.get(userId).sendMessage(message);
        } else {
            System.out.println("用户" + userId + ",不在线!");
        }
    }

    public static synchronized int getOnlineCount() {
        return onlineCount;
    }

    public static synchronized void addOnlineCount() {
        WebSocketServer.onlineCount++;
    }

    public static synchronized void subOnlineCount() {
        WebSocketServer.onlineCount--;
    }
}
5、在resources下添加h5的index.html文件
<!DOCTYPE html> <html> <head> <meta charset="utf-8"> <title>websocket通讯</title> </head> <script src="https://cdn.bootcss.com/jquery/3.3.1/jquery.js"></script> <script> var socket; function openSocket() { if (typeof(WebSocket) == "undefined") { console.log("您的浏览器不支持WebSocket"); } else { console.log("您的浏览器支持WebSocket"); //实现化WebSocket对象,指定要连接的服务器地址与端口 建立连接,注意协议为ws var socketUrl = "ws://localhost:8080/demo/imserver/" + $("#userId").val(); console.log(socketUrl); if (socket != null) { socket.close(); socket = null; } socket = new WebSocket(socketUrl); //打开事件 socket.onopen = function () { $("#msg").append(msg.data) console.log("websocket已打开"); }; //获得消息事件 socket.onmessage = function (msg) { console.log(msg.data); //发现消息进入 开始处理前端触发逻辑 $("#msg").append("</br>") $("#msg").append(msg.data) }; //关闭事件 socket.onclose = function () { $("#msg").append("</br>") $("#msg").append(msg.data) console.log("websocket已关闭"); }; //发生了错误事件 socket.onerror = function () { $("#msg").append("</br>") $("#msg").append(msg.data) console.log("websocket发生了错误"); } } } function sendMessage() { if (typeof(WebSocket) == "undefined") { console.log("您的浏览器不支持WebSocket"); } else { console.log("您的浏览器支持WebSocket"); console.log('{"toUserId":"' + $("#toUserId").val() + '","contentText":"' + $("#contentText").val() + '"}'); socket.send('{"toUserId":"' + $("#toUserId").val() + '","contentText":"' + $("#contentText").val() + '"}'); } } </script> <body> <div><label style=" 40px;">userId:</label><input id="userId" name="userId" type="text" value="1"></div> <div><label style=" 40px;">toUserId:</label><input id="toUserId" name="toUserId" type="text" value="2"></div> <div><label style=" 40px;">消息内容:</label><input id="contentText" name="contentText" type="text" value="你好!webSocket"></div> <div><label style=" 40px;">操作:</label> <button onclick="openSocket()">开启socket</button> <button onclick="sendMessage()">发送消息</button> </div> <div id="msg"></div> </body> </html>
6、为啦不出现404的问题在mvc配置处进行修改
package com.niu.websocket;

import org.springframework.context.annotation.Configuration;
import org.springframework.web.servlet.config.annotation.ResourceHandlerRegistry;
import org.springframework.web.servlet.config.annotation.WebMvcConfigurationSupport;

/**
 * @author niunafei
 * @function
 * @email niunafei0315@163.com
 * @date 2020/5/11  1:37 PM
 */
@Configuration
public class MvcConfig extends WebMvcConfigurationSupport {
    @Override
    public void addResourceHandlers(ResourceHandlerRegistry registry) {
        // 这里之所以多了一"/",是为了解决打jar时访问不到问题
        registry.addResourceHandler("/index.html").addResourceLocations("/index.html","classpath:/index.html");
    }
}
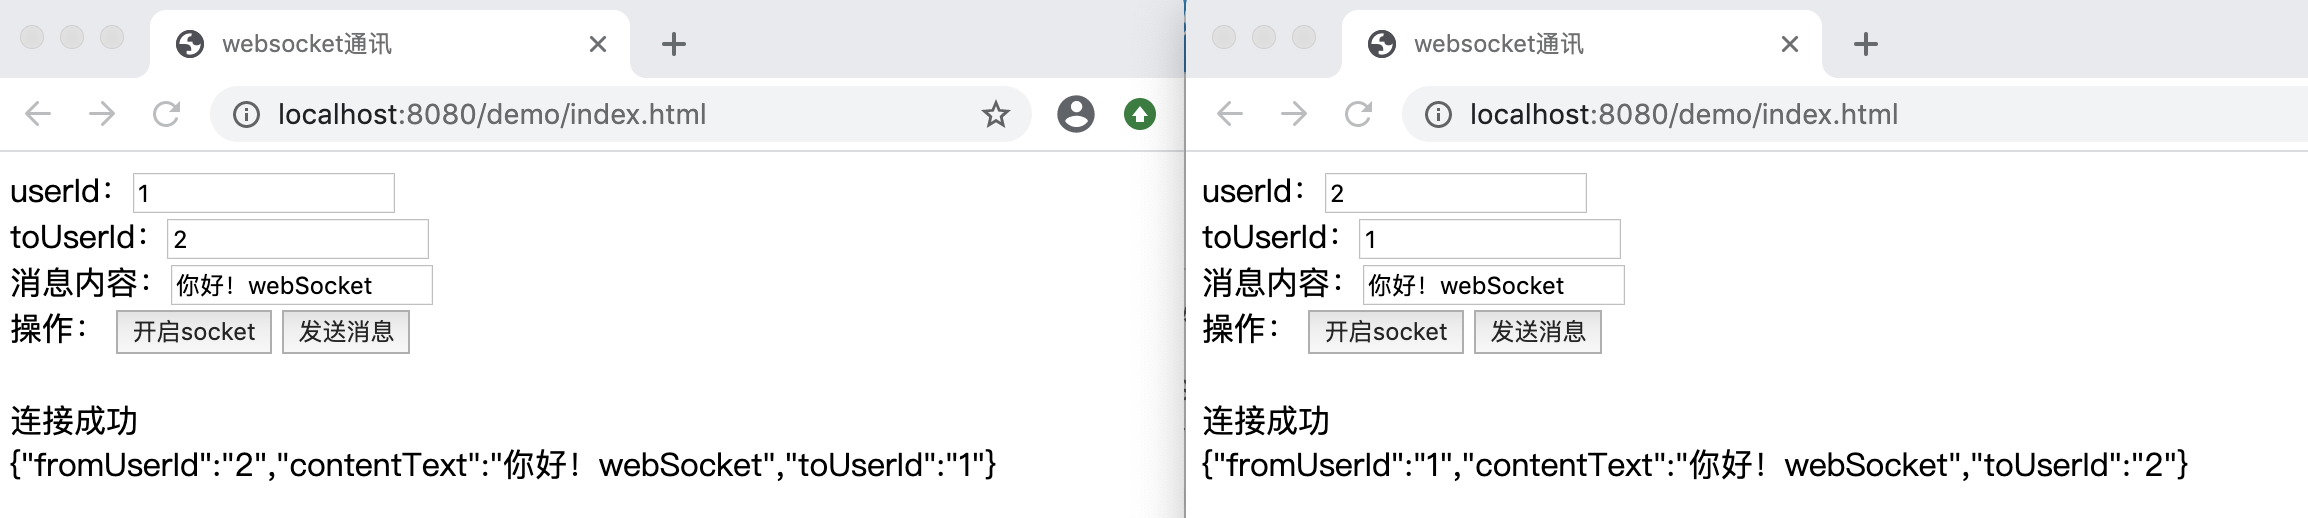
7、启动项目浏览器访问http://localhost:8080/demo/index.html 进行测试结果如下图。