一、Restful_CRUD_需求
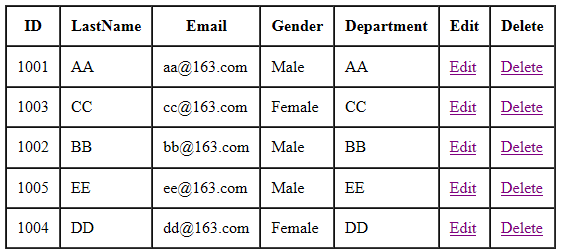
1、显示所有员工信息
URI:emps
请求方式:GET
效果:
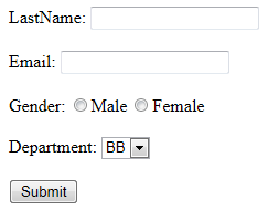
2、添加员工信息
(1)显示添加页面:
URI:emp
请求方式:GET
显示效果:
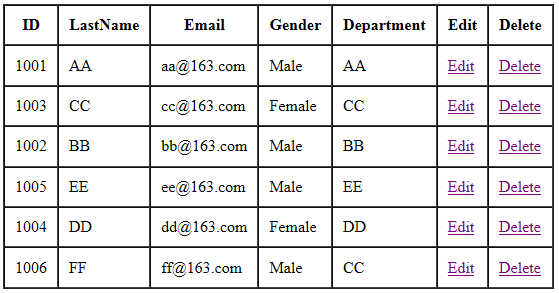
(2)添加员工信息
URI:emp
请求方式:POST
显示效果:完成添加,重定向到 list 页面
3、删除操作
URL:emp/{id}
请求方式:DELETE
删除后效果:对应记录从数据表中删除
4、修改操作:lastName 不可修改!
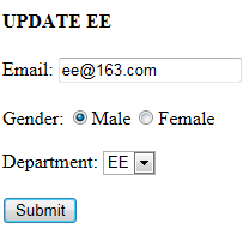
(1)显示修改页面
URI:emp/{id}
请求方式:GET
显示效果:回显表单
(2)修改员工信息
URI:emp
请求方式:PUT
显示效果:完成修改,重定向到 list 页面
效果:
二、环境搭建
1、添加依赖
2、创建配置文件:springmvc.xml
<?xml version="1.0" encoding="UTF-8"?>
<beans xmlns="http://www.springframework.org/schema/beans"
       xmlns:xsi="http://www.w3.org/2001/XMLSchema-instance"
       xmlns:context="http://www.springframework.org/schema/context"
       xmlns:mvc="http://www.springframework.org/schema/mvc"
       xsi:schemaLocation="http://www.springframework.org/schema/beans
       http://www.springframework.org/schema/beans/spring-beans.xsd
       http://www.springframework.org/schema/context
       http://www.springframework.org/schema/context/spring-context.xsd http://www.springframework.org/schema/mvc http://www.springframework.org/schema/mvc/spring-mvc.xsd">


    <!--  扫描所有的组件  -->
    <!-- 扫描组件,将加上@Controller注解的类作为springMVC的控制层 -->
    <context:component-scan base-package="com.njf.rest"></context:component-scan>


    <!--  配置一个视图解析器 :能帮我们拼接页面地址-->
    <bean class="org.springframework.web.servlet.view.InternalResourceViewResolver">
        <property name="prefix" value="/WEB-INF/pages/"></property>
        <property name="suffix" value=".jsp"></property>
    </bean>


    <!--
     配置Tomcat中默认的servlet,DefaultServlet
     注意:当DefaultServlet所设置的<url-pattern>的值和开发人员所配置的servlet的<url-pattern>相同,以开发人员所配置的servlet优先
     作用:当客户端发送请求,由于DefaultServlet所设置的<url-pattern>的值和开发人员所配置DispatcherServlet的<url-pattern>都是/
          因此先通过DispatcherServlet处理请求,找该请求是否有相对应的处理器,有则处理,无则交给DefaultServlet处理
    -->
    <!--  默认前端控制器是拦截所有资源(除过jsp),js 文件就404了,要js文件请求是交给Tomcat来处理  -->
    <!--告诉SpringMVC,自己映射的请求就自己处理,不能处理的请求直接交给 Tomcat-->
    <!--静态资源能访问,动态映射的请求就不行-->
    <mvc:default-servlet-handler/>

    <!-- mvc驱动 SpringMVC 可以保证动态请求和静态请求都能访问-->
    <mvc:annotation-driven />
</beans>
3、web.xml 相关配置
<?xml version="1.0" encoding="UTF-8"?>
<web-app xmlns="http://java.sun.com/xml/ns/javaee"
         xmlns:xsi="http://www.w3.org/2001/XMLSchema-instance"
         xsi:schemaLocation="http://java.sun.com/xml/ns/javaee
                      http://java.sun.com/xml/ns/javaee/web-app_3_0.xsd"
         version="3.0">
    <welcome-file-list>
        <welcome-file>index.jsp</welcome-file>
    </welcome-file-list>

    <!--  前端控制器(核心控制器)  -->
    <servlet>
        <servlet-name>DispatcherServlet</servlet-name>
        <servlet-class>org.springframework.web.servlet.DispatcherServlet</servlet-class>
        <!-- 配置DispatcherServlet的初始化參數:设置文件的路径和文件名称 -->
        <init-param>
            <param-name>contextConfigLocation</param-name>
            <param-value>classpath:springmvc.xml</param-value>
        </init-param>
        <!--
           servlet 启动加载,servlet 原本是第一次访问创建对象
           load-on-startup:服务器启动的时候就创建对象,值越小优先级越高,越先创建对象
         -->
        <load-on-startup>1</load-on-startup>
    </servlet>

    <!--
      /* 和 / 都是拦截所有请求,/:会拦截所有请求,但是不会拦截 *.jsp,能保证 jsp访问正常;
      /* 的范围更大,还会拦截 *.jsp 这些请求,一旦拦截 jsp 页面就不能显示了
    -->
    <servlet-mapping>
        <servlet-name>DispatcherServlet</servlet-name>
        <url-pattern>/</url-pattern>     <!-- / 这样写,只有请求才处理,页面会过滤掉 -->
    </servlet-mapping>


    <!--  字符编码过滤器  -->
    <filter>
        <filter-name>characterEncodingFilter</filter-name>
        <filter-class>org.springframework.web.filter.CharacterEncodingFilter</filter-class>
        <!-- 设置字符编码 -->
        <init-param>
            <param-name>encoding</param-name>
            <param-value>UTF-8</param-value>
        </init-param>
        <!-- 强制设置响应进行编码 -->
        <init-param>
            <param-name>forceEncoding</param-name>
            <param-value>true</param-value>
        </init-param>
    </filter>
    <filter-mapping>
        <filter-name>characterEncodingFilter</filter-name>
        <url-pattern>/*</url-pattern>  <!-- 对所有的请求都拦截,处理所有响应-->
    </filter-mapping>

    <!-- REST 风格过滤器-->
    <filter>
        <filter-name>HiddenHttpMethodFilter</filter-name>
        <filter-class>org.springframework.web.filter.HiddenHttpMethodFilter</filter-class>
    </filter>
    <filter-mapping>
        <filter-name>HiddenHttpMethodFilter</filter-name>
        <url-pattern>/*</url-pattern>
    </filter-mapping>

</web-app>
4、增加实体类
Department:
public class Department {
    private Integer id;
    private String departmentName;
}
Employee:
public class Employee {
    private Integer id;
    private String lastName;
    private String email;
    private Integer gender;
    private Department department;
}
5、增加dao层
DepartmentDao层:
@Repository
public class DepartmentDao {

    private static Map<Integer, Department> departments = null;
    static{
        departments = new HashMap<Integer, Department>();

        departments.put(101, new Department(101, "D-AA"));
        departments.put(102, new Department(102, "D-BB"));
        departments.put(103, new Department(103, "D-CC"));
        departments.put(104, new Department(104, "D-DD"));
        departments.put(105, new Department(105, "D-EE"));
    }

    public Collection<Department> getDepartments(){
        return departments.values();
    }

    public Department getDepartment(Integer id){
        return departments.get(id);
    }

}
EmployeeDao层:
@Repository
public class EmployeeDao {

    private static Map<Integer, Employee> employees = null;

    @Autowired
    private DepartmentDao departmentDao;

    static{
        employees = new HashMap<Integer, Employee>();

        employees.put(1001, new Employee(1001, "E-AA", "aa@163.com", 1, new Department(101, "D-AA")));
        employees.put(1002, new Employee(1002, "E-BB", "bb@163.com", 1, new Department(102, "D-BB")));
        employees.put(1003, new Employee(1003, "E-CC", "cc@163.com", 0, new Department(103, "D-CC")));
        employees.put(1004, new Employee(1004, "E-DD", "dd@163.com", 0, new Department(104, "D-DD")));
        employees.put(1005, new Employee(1005, "E-EE", "ee@163.com", 1, new Department(105, "D-EE")));
    }

    private static Integer initId = 1006;


    public void save(Employee employee){
        if(employee.getId() == null){
            employee.setId(initId++);
        }

        employee.setDepartment(departmentDao.getDepartment(employee.getDepartment().getId()));
        employees.put(employee.getId(), employee);
    }

    public Collection<Employee> getAll(){
        return employees.values();
    }

    public Employee get(Integer id){
        return employees.get(id);
    }

    public void delete(Integer id){
        employees.remove(id);
    }
}
三、显示所有员工信息
思路:
员工列表展示:访问index.jsp -->直接发送/emps --> 控制器查询所有员工 -->放在请求域中-->转发到list页面展示
1、添加访问链接
<%@ page contentType="text/html;charset=UTF-8" language="java" %>
<html>
<body>
<h2>Hello World!</h2>
<a href="/hello">测试</a>
<a href="/emps">员工信息</a>

<%--访问项目就要展示员工列表页面--%>
<jsp:forward page="/emps"></jsp:forward>

</body>
</html>
2、控制器
    @RequestMapping(value = "/emps", method = RequestMethod.GET)
    public String getEmps(Model model) {
        Collection<Employee> emps = employeeDao.getAll();
        //默认放到 request 域中
        model.addAttribute("emps", emps);
        return "list";
    }
3、SpringMVC中没遍历的标签,需要使用jstl标签进行集合遍历增加jstl标签库jar包
<%@ page contentType="text/html;charset=UTF-8" language="java" %>
<%@ taglib uri="http://java.sun.com/jsp/jstl/core"  prefix="c" %>
<html>
<head>
    <title>员工信息</title>
</head>
<body>
<h2>员工信息</h2>
<c:if test="${empty requestScope.emps }">
    对不起,没有找到任何员工!
</c:if>

<c:if test="${!empty requestScope.emps }">
    <table border="1" cellpadding="10" cellspacing="0" >
        <tr>
            <th>编号</th>
            <th>姓名</th>
            <th>邮箱</th>
            <th>性别</th>
            <th>部门</th>
            <th>操作(<a href="emp">ADD</a>)</th>
        </tr>

        <c:forEach items="${requestScope.emps }"  var="emp">
            <tr>
                <td>${emp.id }</td>
                <td>${emp.lastName }</td>
                <td>${emp.email }</td>
                <td>${emp.gender == 0 ? '女':'男' }</td>
                <td>${emp.department.departmentName }</td>

                <td>
                    <a href="emp/${emp.id  }">UPDARE</a>
                    <a class="del"  href="emp/${emp.id }">DELETE</a>
                </td>
            </tr>
        </c:forEach>
    </table>
</c:if>

</body>
</html>
四、添加操作
分析:
员工添加 --> 来到添加页面(add.jsp)--->输入员工数据 --> 点击保存 ---> 处理器收到员工请求保存请求(保存员工) -->保存完毕,来到列表页面
1、在 list.jsp 页面上添加链接
<th>操作(<a href="/toAddPage">ADD</a>)</th>
2、跳转到添加页面,并把部门信息放在请求域中
    /**
     * 去添加页面,把需要的部门信息放在请求域中带到页面
     * @param model
     * @return
     */
    @RequestMapping(value = "/toAddPage", method = RequestMethod.GET)
    public String toAddPage(Model model) {
        Collection<Department> depts = departmentDao.getDepartments();
        //默认放到 request 域中
        model.addAttribute("depts", depts);
        return "add";
    }
3、添加信息页面
<%@ page contentType="text/html;charset=UTF-8" language="java" %>
<%@ taglib uri="http://java.sun.com/jsp/jstl/core"  prefix="c" %>
<html>
<head>
    <title>添加员工信息</title>
</head>
<body>
<h2>添加员工信息</h2>
<form action="/emp" method="post">
    lastName:<input name="lastName" type="text"/><br/>
    email:<input name="email" type="text"/><br/>
    gender:<br>
        男 <input type="radio" name="gender" value="1"><br/>
        女 <input type="radio" name="gender" value="0"><br/>
    dept:
        <select name="department.id">
            <c:forEach items="${depts}" var="dept">
                <option value="${dept.id}">${dept.departmentName}</option>
            </c:forEach>
        </select>
    <br>
    <input type="submit" value="保存">
</form>
</body>
</html>
4、添加完毕,进行提交,并重定向到员工列表页面
    @RequestMapping(value = "/emp", method = RequestMethod.POST)
    public String addEmp(Employee employee) {
        employeeDao.save(employee);
        //重定向到 emps 查询所有,然后在 list.jsp 显示
        return "redirect:/emps";
    }
五、删除操作
这是一个删除操作,如果要使用 REST 风格,必须发送 DELETE请求。
所以,在这里,需要借助 HiddenHttpMethodFilter 过滤器,将 删除操作必须通过 POST 请求转换为 DELETE 请求。
1、页面链接
<head>
    <%
        pageContext.setAttribute("ctp", request.getContextPath());
    %>
    <title>员工信息</title>
    <script type="text/javascript" src="${ctp}/js/jquery-1.8.2.min.js"></script>
</head>

...
  <td>
    <a href="${ctp}/emp/${emp.id}">UPDARE</a>
    <a class="del" href="${ctp}/emp/${emp.id }">DELETE</a>
  </td>
...

<form id="del_from" action="${ctp}/emp/${emp.id }" method="post">
    <input type="hidden" name="_method" value="DELETE">
</form>


<script>
    $(".del").click(function() {
        if (confirm("确定删除吗?")) {
            $("#del_from").attr("action", $(this).attr("href")).submit();// this.href ==  $(this).attr("href")
            return false;
        }
        //将超链接的默认行为取消
        return false;
    });

</script>
2、控制器方法
    @RequestMapping(value = "/emp/{id}", method = RequestMethod.DELETE)
    public String deleteEmpById(@PathVariable("id") Integer id) {
        employeeDao.delete(id);
        return "redirect:/emps";
    }
图解:

HiddenHttpMethodFilter过滤器
发起请求,无法执行,因为delete请求必须通过post请求转换为delete请求,借助:HiddenHttpMethodFilter过滤器
六、修改操作
1、页面请求链接
<a href="emp/${emp.id }">UPDARE</a> //把员工的id传过去,使数据能够回显
2、控制器方法
    /**
      * 获取要回显的数据,跳转到修改页面,并回显
      * @param id
      * @param map
      * @return
      */
     @RequestMapping(value="/emp/{id}",  method=RequestMethod.GET)
     public String toUpdate(@PathVariable("id") Integer  id, Map<String, Object> map) {
         //获取要修改的员工的信息
         Employee emp = employeeDao.get(id);
         //查询所有的部门信息,供用户选择
         Collection<Department> depts =  departmentDao.getDepartments();

         map.put("emp", emp);
         map.put("depts", depts);
         return "update";
     }

     /**
      * 修改员工信息
      * @param employee
      * @return
      */
     @RequestMapping(value="/emp",  method=RequestMethod.PUT)
     public String updateEmp(Employee employee) {
         employeeDao.save(employee);
         return "redirect:/emps";      //重定向到 emps,查询员工在 list.jsp 显示
     }