使用Maven创建Spring-web项目的基本流程
简介:使用Spring、mybatis框架实现学生注册查询功能。
第一步:创建Maven项目
-
使用提供的maven-archetype-webapp模板。
- 创建好之后,将java文件夹标记为
Sources Root. - 创建资源文件夹
resources,将资源文件夹标记为Resources Root.
- 创建好之后,将java文件夹标记为
-
配置
pom.xml文件。主要的配置内容有:
- 修改<maven.compiler.source>1.7</maven.compiler.source>为
1.8 - 添加依赖:主要有:junit、spring-context、mybatis、spring-tx(在本项目中没用到事务)、spring-jdbc(与事务一块使用的)、mybatis-spring、mysql-connector-java、druid、jsp-api、servlet-api、spring-web。
- 添加build中的resources配置,目的是将Sources Root中的配置文件在编译的时候能够拷贝到classes对应的文件夹下。
<?xml version="1.0" encoding="UTF-8"?> <project xmlns="http://maven.apache.org/POM/4.0.0" xmlns:xsi="http://www.w3.org/2001/XMLSchema-instance" xsi:schemaLocation="http://maven.apache.org/POM/4.0.0 http://maven.apache.org/xsd/maven-4.0.0.xsd"> <modelVersion>4.0.0</modelVersion> <groupId>com.example</groupId> <artifactId>Spring10_web</artifactId> <version>1.0-SNAPSHOT</version> <packaging>war</packaging> <properties> <project.build.sourceEncoding>UTF-8</project.build.sourceEncoding> <maven.compiler.source>1.8</maven.compiler.source> <maven.compiler.target>1.8</maven.compiler.target> </properties> <dependencies> <!--junit--> <dependency> <groupId>junit</groupId> <artifactId>junit</artifactId> <version>4.11</version> <scope>test</scope> </dependency> <!--org.springframework--> <dependency> <groupId>org.springframework</groupId> <artifactId>spring-context</artifactId> <version>5.2.5.RELEASE</version> </dependency> <!--mybatis--> <dependency> <groupId>org.mybatis</groupId> <artifactId>mybatis</artifactId> <version>3.5.1</version> </dependency> <!-- spring事务 --> <dependency> <groupId>org.springframework</groupId> <artifactId>spring-tx</artifactId> <version>5.2.5.RELEASE</version> </dependency> <dependency> <groupId>org.springframework</groupId> <artifactId>spring-jdbc</artifactId> <version>5.2.5.RELEASE</version> </dependency> <!-- mybatis-spring集成的依赖 --> <dependency> <groupId>org.mybatis</groupId> <artifactId>mybatis-spring</artifactId> <version>1.3.2</version> </dependency> <!--mysql-connector-java--> <dependency> <groupId>mysql</groupId> <artifactId>mysql-connector-java</artifactId> <version>8.0.16</version> </dependency> <!--阿里的连接池--> <dependency> <groupId>com.alibaba</groupId> <artifactId>druid</artifactId> <version>1.1.10</version> </dependency> <!--jsp的依赖--> <dependency> <groupId>javax.servlet.jsp</groupId> <artifactId>jsp-api</artifactId> <version>2.1</version> <scope>provided</scope> </dependency> <!--servlet的依赖--> <dependency> <groupId>javax.servlet</groupId> <artifactId>servlet-api</artifactId> <version>2.5</version> <scope>provided</scope> </dependency> <!-- 为了使用监听器,需要引入spring-web的依赖--> <dependency> <groupId>org.springframework</groupId> <artifactId>spring-web</artifactId> <version>5.2.5.RELEASE</version> </dependency> </dependencies> <build> <!--将src/main/java下的mapper文件复制到classes文件中--> <resources> <resource> <directory>src/main/java</directory><!--所在的源代码目录--> <!--该文件夹下的以properties和xml为后缀文件都会被扫描到,在编译的时候会将其复制到classes文件夹下,而不会丢失配置文件。--> <includes> <include>**/*.properties</include> <include>**/*.xml</include> </includes> <filtering>false</filtering> </resource> </resources> </build> </project> - 修改<maven.compiler.source>1.7</maven.compiler.source>为
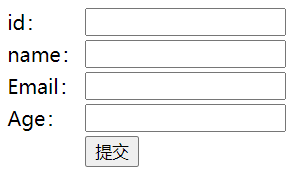
第二步:准备前端页面index.jsp
<html>
<head>
    <title>学生注册页面</title>
</head>
<body>
<form action="${pageContext.request.contextPath}/register" method="post">
    <table>
        <tr>
            <td>id:</td>
            <td><input type="text" name="id"></td>
        </tr>
        <tr>
            <td>name:</td>
            <td><input type="text" name="name"></td>
        </tr>
        <tr>
            <td>Email:</td>
            <td><input type="text" name="email"></td>
        </tr>
        <tr>
            <td>Age:</td>
            <td><input type="text" name="age"></td>
        </tr>
        <tr>
            <td></td>
            <td><input type="submit" value="提交"></td>
        </tr>
    </table>
</form>
</body>
</html>
效果如下:
第三步:准备Student实体类
public class Student {
    private Integer id;
    private String name;
    private String email;
    private Integer age;
    //对应的无参、有参的构造方法。
	//对应的get、set和toString方法。
}
第四步:准备StudentService和StudentServiceImpl
StudentService.java
public interface StudentService {
    //添加学生信息
    Integer addStudent(Student student);
	//查询所有学生信息
    List<Student> getAllStudent();
}
StudentServiceImpl.java
public class StudentServiceImpl implements StudentService {
    //引用类型
    private StudentDao studentDao;
    //用于setter方法注入
    public void setStudentDao(StudentDao studentDao) {
        this.studentDao = studentDao;
    }

    //添加学生信息
    @Override
    public Integer addStudent(Student student) {
        Integer integer = studentDao.insertStudent(student);
        return integer;
    }

    //查询所有学生信息
    @Override
    public List<Student> getAllStudent() {
        List<Student> studentList = studentDao.getStudents();
        return studentList;
    }
第五步:准备StudentDao和StudentDao.xml
StudentDao.java
public interface StudentDao {
    Integer insertStudent(Student student);
    List<Student> getStudents();
}
StudentDao.xml
<?xml version="1.0" encoding="UTF-8" ?>
<!DOCTYPE mapper
        PUBLIC "-//mybatis.org//DTD Mapper 3.0//EN"
        "http://mybatis.org/dtd/mybatis-3-mapper.dtd">
<mapper namespace="com.example.dao.StudentDao">
    <!--添加学生信息-->
    <insert id="insertStudent">
        insert into student values (#{id},#{name},#{email},#{age})
    </insert>
	<!--查询所有学生信息-->
    <select id="getStudents" resultType="student">
        select * from student order by id desc
    </select>
</mapper>
第六步:书写mybatis主配置文件mybatis.xml
主要的配置内容有:
-
设置mybatis的打印日志,在调试的时候使用。
<setting name="logImpl" value="STDOUT_LOGGING"/> -
设置别名,目的是在mapper映射文件中,使用resultType可以使用别名。
格式是:接口名称首字母小写大写都可以。如:studentDao或者StudentDao
-
配置sql mapper(sql映射文件)的位置。
<package name="com.example.dao"/>加载这个包下的所有mapper文件.
mybatis.xml
<?xml version="1.0" encoding="UTF-8"?>
<!DOCTYPE configuration
        PUBLIC "-//mybatis.org//DTD Config 3.0//EN"
        "http://mybatis.org/dtd/mybatis-3-config.dtd">
<configuration>
    <!--<settings>-->
        <!--设置mybatis的打印日志-->
        <!--<setting name="logImpl" value="STDOUT_LOGGING"/>-->
    <!--</settings>-->

    <!--设置别名-->
    <typeAliases>
        <!--name:实体类所在的包名-->
        <package name="com.example.domain"/>
    </typeAliases>

    <!-- sql mapper(sql映射文件)的位置-->
    <mappers>
        <!--name:mapper文件所在包名,可以加载这个包下的所有mapper文件-->
        <package name="com.example.dao"/>
    </mappers>
</configuration>
第七步:书写RegisterServlet
RegisterServlet.java
public class RegisterServlet extends HttpServlet {
    protected void doPost(HttpServletRequest request, HttpServletResponse response) throws ServletException, IOException {
        //处理中文乱码
        request.setCharacterEncoding("utf-8");
        String id = request.getParameter("id");
        String name = request.getParameter("name");
        String email = request.getParameter("email");
        String age = request.getParameter("age");
        Student student = new Student(Integer.valueOf(id), name, email, Integer.valueOf(age));

        //获取ApplicationContext对象
        WebApplicationContext ac = WebApplicationContextUtils.getRequiredWebApplicationContext(getServletContext());
		//获取StudentService对象
        StudentService studentService = (StudentService) ac.getBean("studentService");
        //执行添加学生信息的操作
        Integer integer = studentService.addStudent(student);
        if (integer > 0) {
        response.sendRedirect(request.getContextPath()+"/result.jsp");
    } else {
        response.getWriter().print("注册失败");
    }
}

    protected void doGet(HttpServletRequest request, HttpServletResponse response) throws ServletException, IOException {
        doPost(request, response);
    }
}
第八步:书写spring配置文件applicationContext.xml
主要的配置内容有:
-
配置数据库配置文件的路径。
<context:property-placeholder location="classpath:db.properties"/>db.properties的内容如下:
jdbc.url=jdbc:mysql://localhost:3306/test?serverTimezone=UTC jdbc.username=root jdbc.password=root jdbc.maxActive=20 -
声明数据源,使用阿里的druid连接池。
<bean id="dataSource" class="com.alibaba.druid.pool.DruidDataSource" init-method="init" destroy-method="close"> -
声明mybatis中提供的SqlSessionFactoryBean类,该类可以创建SqlSessionFactory对象。
<bean id="sqlSessionFactory" class="org.mybatis.spring.SqlSessionFactoryBean"> <property name="dataSource" ref="dataSource"/> <property name="configLocation" value="classpath:mybatis.xml"/> </bean> -
声明MapperScannerConfigurer类,该类内部封装了生成每个dao接口的代理对象。
<bean class="org.mybatis.spring.mapper.MapperScannerConfigurer"> <property name="sqlSessionFactoryBeanName" value="sqlSessionFactory"/> <property name="basePackage" value="com.example.dao"/> </bean> -
声明StudentServiceImpl实现类.
<bean id="studentService" class="com.example.service.impl.StudentServiceImpl"> <property name="studentDao" ref="studentDao"/> </bean>
applicationContext.xml
<?xml version="1.0" encoding="UTF-8"?>
<beans xmlns="http://www.springframework.org/schema/beans"
       xmlns:xsi="http://www.w3.org/2001/XMLSchema-instance"
       xmlns:context="http://www.springframework.org/schema/context"
       xsi:schemaLocation="http://www.springframework.org/schema/beans http://www.springframework.org/schema/beans/spring-beans.xsd http://www.springframework.org/schema/context https://www.springframework.org/schema/context/spring-context.xsd">

    <!--数据库的配置文件-->
    <context:property-placeholder location="classpath:db.properties"/>
    <!--声明数据源,目的是连接数据库的-->
    <bean id="dataSource" class="com.alibaba.druid.pool.DruidDataSource" init-method="init" destroy-method="close">
        <property name="url" value="${jdbc.url}"/>
        <property name="username" value="${jdbc.username}"/>
        <property name="password" value="${jdbc.password}"/>
        <property name="maxActive" value="${jdbc.maxActive}"/>
    </bean>

    <!--声明的是mybatis中提供的SqlSessionFactoryBean类,这个类可以创建SqlSessionFactory对象-->
    <bean id="sqlSessionFactory" class="org.mybatis.spring.SqlSessionFactoryBean">
        <property name="dataSource" ref="dataSource"/>
        <property name="configLocation" value="classpath:mybatis.xml"/>
    </bean>

    <!--
       创建dao对象,使用sqlSessionFactory.getMapper(Student.class)
       Spring-mybatis整合了dao的获取方式,在MapperScannerConfigurer内部调用了getMapper方法,
       生成每个dao接口的代理对象。
   -->
    <bean class="org.mybatis.spring.mapper.MapperScannerConfigurer">
        <property name="sqlSessionFactoryBeanName" value="sqlSessionFactory"/>
        <property name="basePackage" value="com.example.dao"/>
    </bean>

    <!--声明StudentServiceImpl实现类-->
    <bean id="studentService" class="com.example.service.impl.StudentServiceImpl">
        <property name="studentDao" ref="studentDao"/>
    </bean>

</beans>
第九步:书写web.xml文件
主要的配置内容有:
-
注册ContextLoaderListener监听器,监听器的名称为:
org.springframework.web.context.ContextLoaderListener -
指定spring配置文件的位置。
<context-param> <param-name>contextConfigLocation</param-name> <param-value>classpath:applicationContext.xml</param-value> </context-param> -
注册Studentservlet。
<?xml version="1.0" encoding="UTF-8"?>
<web-app xmlns="http://xmlns.jcp.org/xml/ns/javaee"
         xmlns:xsi="http://www.w3.org/2001/XMLSchema-instance"
         xsi:schemaLocation="http://xmlns.jcp.org/xml/ns/javaee http://xmlns.jcp.org/xml/ns/javaee/web-app_4_0.xsd"
         version="4.0">

    <!--注册ContextLoaderListener监听器:
        由于监听器需要创建ApplicationContext对象,默认会读取/WEB-INF/applicationContext.xml的配置文件,
        由于applicationContext.xml在resources文件夹下,所以会报异常:
        FileNotFoundException: Could not open ServletContext resource [/WEB-INF/applicationContext.xml]
        解决方法:手动指定spring配置文件的位置。

        配置监听器的目的:目的是为了创建容器对象,就能把applicationContext中的所有对象给创建好,用户拿来用就行了。
    -->
    <!--指定spring配置文件的位置-->
    <context-param>
        <param-name>contextConfigLocation</param-name>
        <param-value>classpath:applicationContext.xml</param-value>
    </context-param>
    <listener>
        <listener-class>org.springframework.web.context.ContextLoaderListener</listener-class>
    </listener>

    <servlet>
        <servlet-name>RegisterServlet</servlet-name>
        <servlet-class>com.example.controller.RegisterServlet</servlet-class>
    </servlet>
    <servlet-mapping>
        <servlet-name>RegisterServlet</servlet-name>
        <url-pattern>/register</url-pattern>
    </servlet-mapping>
</web-app>
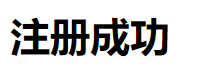
第十步:测试