24.spring配置dbcp并完成CRUD操作
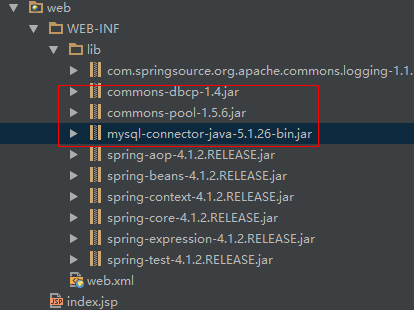
1.准备jar包
2.编辑Product模型


 1 package com.day02.ssm.spring.model;
 2
 3 public class Product{
 4     private Integer id;
 5     private String productName;  //产品名称
 6     private Integer salePrice;
 7     private Integer costPrice;
 8
 9     public Integer getId() {
10         return id;
11     }
12
13     public void setId(Integer id) {
14         this.id = id;
15     }
16
17     public String getProductName() {
18         return productName;
19     }
20
21     public void setProductName(String productName) {
22         this.productName = productName;
23     }
24
25     public Integer getSalePrice() {
26         return salePrice;
27     }
28
29     public void setSalePrice(Integer salePrice) {
30         this.salePrice = salePrice;
31     }
32
33     public Integer getCostPrice() {
34         return costPrice;
35     }
36
37     public void setCostPrice(Integer costPrice) {
38         this.costPrice = costPrice;
39     }
40 }
3.编辑接口
 1 package com.day02.ssm.spring.dao;
 2
 3 import com.day02.ssm.spring.model.Product;
 4
 5 import java.sql.SQLException;
 6
 7 /**
 8  * 课程笔记:http://www.cnblogs.com/newAndHui/category/1153640.html
 9  * 疑问咨询wx:851298348
10  */
11 public interface IProductDao {
12     //增
13     public void save(Product product) throws SQLException;
14     //删
15     public void delete(int id);
16     //改
17     public void update(Product product);
18     //查
19     public Product query(int id);
20
21 }
4.编辑实现类
 1 package com.day02.ssm.spring.dao.impl;
 2
 3 import com.day02.ssm.spring.dao.IProductDao;
 4 import com.day02.ssm.spring.model.Product;
 5 import org.apache.commons.dbcp.BasicDataSource;
 6
 7 import java.sql.Connection;
 8 import java.sql.PreparedStatement;
 9 import java.sql.SQLException;
10
11 /**
12  * 课程笔记:http://www.cnblogs.com/newAndHui/category/1153640.html
13  * 疑问咨询wx:851298348
14  */
15 public class ProductDao implements IProductDao {
16     private BasicDataSource basicDataSource;
17     @Override
18     public void save(Product product) {
19         try {
20             //连接
21             Connection connection = basicDataSource.getConnection();
22             String sql = "INSERT INTO product (product_name,sale_price) VALUES (?,?)";
23             //创建编译语句
24             PreparedStatement preparedStatement = connection.prepareStatement(sql);
25             preparedStatement.setString(1,product.getProductName());
26             preparedStatement.setInt(2,product.getSalePrice());
27             //执行
28             preparedStatement.executeUpdate();
29             //释放
30             preparedStatement.close();
31             connection.close();
32         } catch (SQLException e) {
33             e.printStackTrace();
34         }
35     }
36
37     @Override
38     public void delete(int id) {
39
40     }
41
42     @Override
43     public void update(Product product) {
44
45     }
46
47     @Override
48     public Product query(int id) {
49         return null;
50     }
51
52     public BasicDataSource getBasicDataSource() {
53         return basicDataSource;
54     }
55
56     public void setBasicDataSource(BasicDataSource basicDataSource) {
57         this.basicDataSource = basicDataSource;
58     }
59 }
5.编写spring配置文件bdcp-config.xml
 1 <?xml version="1.0" encoding="UTF-8"?>
 2 <beans xmlns="http://www.springframework.org/schema/beans"
 3         xmlns:xsi="http://www.w3.org/2001/XMLSchema-instance"
 4         xsi:schemaLocation="http://www.springframework.org/schema/beans
 5         http://www.springframework.org/schema/beans/spring-beans.xsd">
 6      <!--配置dataSources-->
 7     <bean id="dataSource" class="org.apache.commons.dbcp.BasicDataSource">
 8         <property name="url" value="jdbc:mysql://localhost:3306/station_data"/>
 9         <property name="username" value="root"/>
10         <property name="password" value="admin"/>
11     </bean>
12    <!-- ProductDao配置dao-->
13     <bean id="productDao" class="com.day02.ssm.spring.dao.impl.ProductDao">
14         <property name="basicDataSource" ref="dataSource"/>
15     </bean>
16 </beans>
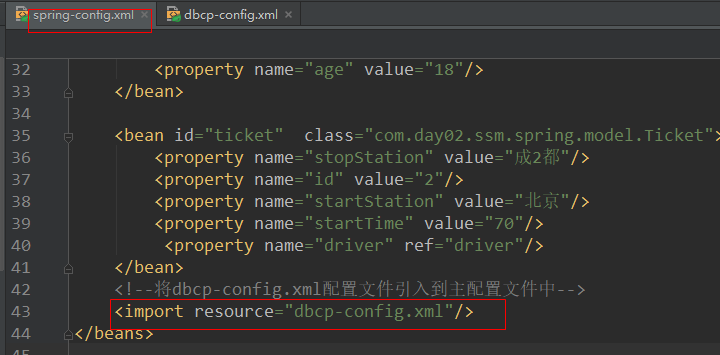
6.将bdcp-config.xml配置文件引入到主配置文件中(非常容易忘记)
7.测试dao
 1 package com.day02.ssm.spring.test;
 2
 3 import com.day02.ssm.spring.dao.impl.ProductDao;
 4 import com.day02.ssm.spring.model.Product;
 5 import com.day02.ssm.spring.model.Ticket;
 6 import org.junit.Test;
 7 import org.junit.runner.RunWith;
 8 import org.springframework.beans.factory.BeanFactory;
 9 import org.springframework.beans.factory.annotation.Autowired;
10 import org.springframework.test.context.ContextConfiguration;
11 import org.springframework.test.context.junit4.SpringJUnit4ClassRunner;
12
13 /**
14  * 课程笔记:http://www.cnblogs.com/newAndHui/category/1153640.html
15  * 疑问咨询wx:851298348
16  */
17 @RunWith(SpringJUnit4ClassRunner.class)//把junit加载到spring容器中去
18 @ContextConfiguration("classpath:spring-config.xml")
19 public class TestProductDao {
20
21    // private ProductDao productDao=new ProductDao();
22     @Autowired
23     private ProductDao productDao;//从spring中获取dao对象
24     @Test
25     public void test(){
26         Product product = new Product();
27         product.setProductName("苹果");
28         product.setSalePrice(89);
29         productDao.save(product);
30     }
31
32 }
25.spring中的硬编码解决
1.配置文件
2.使用
26.spring中的继承使用

27.Autowired详细讲解
Autowired和Qualifier标签:
1.通过@Autowired标签可以让Spring自动的把属性需要的对象从Spring容器中找出来,并注入给该属性。(生产上就用这一招)
2.第三方程序:Spring3.0之前,需要手动配置@Autowired解析注解程序,Spring就会自动的加入针对@Autowired标签的解析程序。从Spring3.0开始,可以不再需要改配置了,但是只能在Spring容器中才生效.。
<context:annotation-config />,
无论使用哪一个版本,都得配置.
3.@Autowired标签贴在字段或者setter方法上。
4.@Autowired可以同时为一个属性注入多个对象。
public void setXxx(OtherBean1 other1,OtherBean2 other2) {}
5.使用@Autowired标签可以注入Spring内置的重要对象,比如BeanFactory,ApplicationContext。
@RunWith(SpringJUnit4ClassRunner.class)
@ContextConfiguration
public class SpringTest {
@Autowired
private ApplicationContext ctx;
}
6.默认情况下@Autowired标签必须要能找到对应的对象,否则报错。不过,可使用required=false来避免该问题:@Autowired(required=false)
7.@Autowired找bean的方式:
1)、首先按照依赖对象的类型找,如果找到则使用setter方法或者字段直接注入;
2)、如果在Spring上下文中找到多个匹配的类型,再按照名字去找,如果没有匹配则报错;
3)、可以通过使用@Qualifier("otherBean")标签来规定依赖对象按照bean的id+类型去找;
public class SomeBean {
@Autowired
private OtherBean1 other1;
@Autowired(required = false)
@Qualifier("otherbean2")
private OtherBean2 other2;
public String toString() {
return "SomeBean [other=" + other1 + ", other2=" + other2 + "]";
}
}
演示代码:
SomeBean
 1 package com.day02.ssm.spring.model2;
 2
 3 import org.springframework.beans.factory.annotation.Autowired;
 4 import org.springframework.beans.factory.annotation.Qualifier;
 5
 6 /**
 7  * 课程笔记:http://www.cnblogs.com/newAndHui/category/1153640.html
 8  * 疑问咨询wx:851298348
 9  */
10 public class SomeBean {
11     private String name;
12     //添加OtherBean1对象
13     @Autowired
14     @Qualifier("otherBean11")
15     private OtherBean1 otherBean1;
16     private OtherBean2 otherBean2;
17
18     public String getName() {
19         return name;
20     }
21
22     public void setName(String name) {
23         this.name = name;
24     }
25    // @Autowired
26    /* public void setOtherBean1(OtherBean1 otherBean1) {
27         this.otherBean1 = otherBean1;
28     }*/
29   /*  @Autowired
30     public void setTwo(OtherBean1 otherBean1,OtherBean2 otherBean2) {
31         System.out.println("==otherBean1=============otherBean2=====");
32         this.otherBean1 = otherBean1;
33         this.otherBean2 = otherBean2;
34
35     }*/
36 }
OtherBean1
 1 package com.day02.ssm.spring.model2;
 2
 3 /**
 4  * 课程笔记:http://www.cnblogs.com/newAndHui/category/1153640.html
 5  * 疑问咨询wx:851298348
 6  */
 7 public class OtherBean1 {
 8     private String name;
 9
10     public String getName() {
11         return name;
12     }
13
14     public void setName(String name) {
15         this.name = name;
16     }
17 }
OtherBean2
 1 package com.day02.ssm.spring.model2;
 2
 3 /**
 4  * 课程笔记:http://www.cnblogs.com/newAndHui/category/1153640.html
 5  * 疑问咨询wx:851298348
 6  */
 7 public class OtherBean2 {
 8     private String name;
 9
10     public String getName() {
11         return name;
12     }
13
14     public void setName(String name) {
15         this.name = name;
16     }
17 }
spring配置文件
 1 <?xml version="1.0" encoding="UTF-8"?>
 2 <beans xmlns="http://www.springframework.org/schema/beans"
 3        xmlns:xsi="http://www.w3.org/2001/XMLSchema-instance"
 4        xmlns:context="http://www.springframework.org/schema/context"
 5        xsi:schemaLocation="http://www.springframework.org/schema/beans
 6         http://www.springframework.org/schema/beans/spring-beans.xsd
 7          http://www.springframework.org/schema/context
 8           http://www.springframework.org/schema/context/spring-context.xsd">
 9     <!--开启注解-->
10     <context:annotation-config/>
11     <!--把someBean交给spring管理-->
12     <bean id="someBean" class="com.day02.ssm.spring.model2.SomeBean">
13         <property name="name" value="someBean-1"/>
14     </bean>
15
16     <!--把OtherBean1交给spring管理-->
17     <bean id="otherBean17" class="com.day02.ssm.spring.model2.OtherBean1">
18         <property name="name" value="otherBean1-1"/>
19     </bean>
20
21     <bean id="otherBean11" class="com.day02.ssm.spring.model2.OtherBean1">
22         <property name="name" value="otherBean1-11"/>
23     </bean>
24
25     <!--把OtherBean2交给spring管理-->
26     <bean id="otherBean2" class="com.day02.ssm.spring.model2.OtherBean2">
27         <property name="name" value="otherBean2-2"/>
28     </bean>
29 </beans>
测试代码
 1 package com.day02.ssm.spring.model2;
 2
 3 import org.junit.Test;
 4 import org.junit.runner.RunWith;
 5 import org.springframework.beans.factory.annotation.Autowired;
 6 import org.springframework.context.ApplicationContext;
 7 import org.springframework.test.context.ContextConfiguration;
 8 import org.springframework.test.context.junit4.SpringJUnit4ClassRunner;
 9
10 /**
11  * 课程笔记:http://www.cnblogs.com/newAndHui/category/1153640.html
12  * 疑问咨询wx:851298348
13  */
14 @RunWith(SpringJUnit4ClassRunner.class)//把junit加载到spring容器中去
15 @ContextConfiguration("classpath:spring-config2.xml")
16 public class TestSomeBean {
17
18     @Autowired(required = false)
19      private SomeBean  someBean;
20    // @Autowired
21    // private ApplicationContext ctx;
22
23     @Test
24     public void test() {
25        // SomeBean someBean = (SomeBean) ctx.getBean("someBean11");
26         System.out.println("someBean"+ someBean);
27     }
28
29 }
28.Resource标签
@Resource标签:
1,@Resource标签是JavaEE规范的标签;
2,@Resource标签也可以作用于字段或者setter方法;
3,也可以使用@Resource标签注入一些spring内置的重要对象,比如BeanFactory.ApplicationContext;
4,@Resource必须要求有匹配的对象;
5,<context:annotation-config>既引入了@Autowired标签的解析器,也引入了@Resource的解析器;
6,@Resource标签找bean的方式:
1),首先按照名字去找,如果找到,就使用setter或者字段注入;
2),如果按照名字找不到,再按照类型去找,但如果找到多个匹配类型,报错;
3),可以直接使用name属性指定bean的名称;但是,如果指定的name,就只能按照name去找,如果找不到,就不会再按照类型去找;
public class SomeBean {
@Resource(name="otherBean1")
private OtherBean1 other1;
@Resource(name="otherBean2")
private OtherBean2 other2;
public String toString() {
return "SomeBean [otherBean=" + other1 + ", otherBean2="
+ other2 + "]";
}
@Resource(name = "other1") 和 @Autowired ,@Qualifier("other1")选用:
1:使用Autowired标签,让代码和Spring耦合在一起,若某一天不使用Spring,就得改源代码. 重点:生产上一般使用:Autowired
2:Resource标签,本身就是javaEE的,本身不存在耦合问题.
随便使用哪一组,要求:都得掌握.
29.使用注解简化IoC
使用标签简化IoC:
1.使用标签来完成IoC,就必须有IoC标签的解析器
使用context:component-scan来扫描spring需要管理的bean
base-package就告诉spring,去哪些包及其子包里去扫描bean,如果有多个包需要被扫描;只需要用逗号隔开多个包即可
<!-- 扫描包-->
<context:component-scan base-package="com.day02.ssm.spring.model2" />
<!--开启注解-->
<context:annotation-config/>
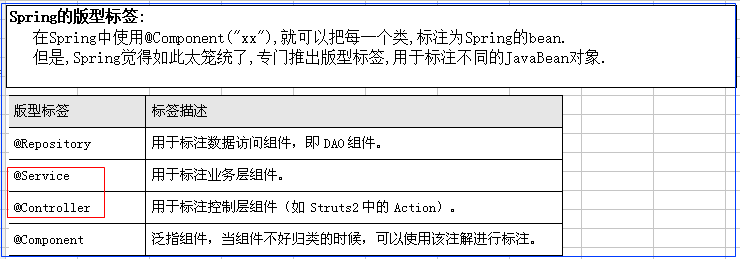
2.标注Bean的注解:@Component
默认情况,直接使用类的名字(首字母小写作为bean的名字)
如果要修改bean的名称;直接使用value属性来重新定义bean的名称
@Component("otherbean")
public class OtherBean {}
Spring的零配置

IoC和DI操作,选用注解还是XML?
1):使用XML,直观,侵入性低,统一配置.
2):使用注解,简单,快速,不是很直观,让配置分散.
有时候,只能使用xml,不能使用注解?
比如配置一个DataSource.
你不可能去DataSource类上去贴标签.
一般的,我们使用xml做统一的配置,若有特殊的配置,可以使用注解来辅助.
二者都得掌握.