参考文档:
- kubernetes插件:https://github.com/kubernetes/kubernetes/tree/master/cluster/addons/dns/coredns
- 自定义dns服务:https://kubernetes.io/docs/tasks/administer-cluster/dns-custom-nameservers/
- CoreDNS提供直接替换kube-dns的部署方式,请见:https://github.com/coredns/deployment/tree/master/kubernetes
从功能角度来看,CoreDNS 更像是一个通用 DNS 方案(类似于 BIND),然后通过插件模式来极大地扩展自身功能,可以适用于不同的场景(比如 Kubernetes)。
一.环境
kubernetes集群已提前部署完成:https://www.cnblogs.com/netonline/tag/kubernetes/
组件版本如下:
|
组件 |
版本 |
Remark |
|
kubernetes |
v1.9.2 |
|
|
CoreDNS |
v1.2.2 |
二.部署CoreDNS
1. coredns范本
# 下载
[root@kubenode1 coredns]# cd ~
[root@kubenode1 ~]# mkdir -p /usr/local/src/yaml/coredns
[root@kubenode1 ~]# cd /usr/local/src/yaml/coredns
[root@kubenode1 coredns]# wget -O coredns.yaml https://raw.githubusercontent.com/kubernetes/kubernetes/master/cluster/addons/dns/coredns/coredns.yaml.base

# 本实验使用yaml文件(修改版,供参考):https://github.com/Netonline2016/kubernetes/tree/master/addons/coredns
2. 配置coredns.yaml
# coredns所有相关资源通过1个yaml文件下发,注意红色加粗字体部分即需要根据规划修改;
# 将”ConfigMap”资源抽出来单独做1个yaml文件,方便后续修改上游dns服务器或自定义dns记录;
# 除”ConfigMap”资源抽出外,主要修改两处:”Deployment”资源的”image”与”Service”中的”clusterip”;
# 在deployment中设置pod的副本数为2(可选)
[root@kubenode1 coredns]# vim coredns.yaml
# Warning: This is a file generated from the base underscore template file: coredns.yaml.base

apiVersion: v1
kind: ServiceAccount
metadata:
  name: coredns
  namespace: kube-system
  labels:
      kubernetes.io/cluster-service: "true"
      addonmanager.kubernetes.io/mode: Reconcile
---
apiVersion: rbac.authorization.k8s.io/v1
kind: ClusterRole
metadata:
  labels:
    kubernetes.io/bootstrapping: rbac-defaults
    addonmanager.kubernetes.io/mode: Reconcile
  name: system:coredns
rules:
- apiGroups:
  - ""
  resources:
  - endpoints
  - services
  - pods
  - namespaces
  verbs:
  - list
  - watch
---
apiVersion: rbac.authorization.k8s.io/v1
kind: ClusterRoleBinding
metadata:
  annotations:
    rbac.authorization.kubernetes.io/autoupdate: "true"
  labels:
    kubernetes.io/bootstrapping: rbac-defaults
    addonmanager.kubernetes.io/mode: EnsureExists
  name: system:coredns
roleRef:
  apiGroup: rbac.authorization.k8s.io
  kind: ClusterRole
  name: system:coredns
subjects:
- kind: ServiceAccount
  name: coredns
  namespace: kube-system
---
apiVersion: extensions/v1beta1
kind: Deployment
metadata:
  name: coredns
  namespace: kube-system
  labels:
    k8s-app: kube-dns
    kubernetes.io/cluster-service: "true"
    addonmanager.kubernetes.io/mode: Reconcile
    kubernetes.io/name: "CoreDNS"
spec:
  # replicas: not specified here:
  # 1. In order to make Addon Manager do not reconcile this replicas parameter.
  # 2. Default is 1.
  # 3. Will be tuned in real time if DNS horizontal auto-scaling is turned on.
  replicas: 2
  strategy:
    type: RollingUpdate
    rollingUpdate:
      maxUnavailable: 1
  selector:
    matchLabels:
      k8s-app: kube-dns
  template:
    metadata:
      labels:
        k8s-app: kube-dns
      annotations:
        seccomp.security.alpha.kubernetes.io/pod: 'docker/default'
    spec:
      serviceAccountName: coredns
      tolerations:
        - key: node-role.kubernetes.io/master
          effect: NoSchedule
        - key: "CriticalAddonsOnly"
          operator: "Exists"
      containers:
      - name: coredns
        image: netonline/coredns:1.2.2
        imagePullPolicy: IfNotPresent
        resources:
          limits:
            memory: 170Mi
          requests:
            cpu: 100m
            memory: 70Mi
        args: [ "-conf", "/etc/coredns/Corefile" ]
        volumeMounts:
        - name: config-volume
          mountPath: /etc/coredns
          readOnly: true
        ports:
        - containerPort: 53
          name: dns
          protocol: UDP
        - containerPort: 53
          name: dns-tcp
          protocol: TCP
        - containerPort: 9153
          name: metrics
          protocol: TCP
        livenessProbe:
          httpGet:
            path: /health
            port: 8080
            scheme: HTTP
          initialDelaySeconds: 60
          timeoutSeconds: 5
          successThreshold: 1
          failureThreshold: 5
        securityContext:
          allowPrivilegeEscalation: false
          capabilities:
            add:
            - NET_BIND_SERVICE
            drop:
            - all
          readOnlyRootFilesystem: true
      dnsPolicy: Default
      volumes:
        - name: config-volume
          configMap:
            name: coredns
            items:
            - key: Corefile
              path: Corefile
---
apiVersion: v1
kind: Service
metadata:
  name: kube-dns
  namespace: kube-system
  annotations:
    prometheus.io/port: "9153"
    prometheus.io/scrape: "true"
  labels:
    k8s-app: kube-dns
    kubernetes.io/cluster-service: "true"
    addonmanager.kubernetes.io/mode: Reconcile
    kubernetes.io/name: "CoreDNS"
spec:
  selector:
    k8s-app: kube-dns
  clusterIP: 169.169.0.11
  ports:
  - name: dns
    port: 53
    protocol: UDP
  - name: dns-tcp
    port: 53
    protocol: TCP
3. 配置coredns-cm.yaml
# 单列ConfigMap资源,方便后续设置上游dns服务器与自定义dns记录;
# coredns通过corefie控制dns记录,kubernetes中采用ConfigMap将corefile文件映射到pod中,可以发现coredns “Deployment”资源中挂载了相应的”ConfigMap”,必须设置;
# corefile格式如下:
# ZONE:[PORT] {
#            [PLUGIN] ...
# }
# ZONE:定义 server 负责的 zone,PORT 是可选项,默认为 53;
# PLUGIN:定义 server 所要加载的 plugin,如errors,health等均属于plugin,相关注解请见:https://kubernetes.io/docs/tasks/administer-cluster/dns-custom-nameservers/#coredns;
[root@kubenode1 coredns]# cat coredns-cm.yaml
apiVersion: v1
kind: ConfigMap
metadata:
  name: coredns
  namespace: kube-system
  labels:
      addonmanager.kubernetes.io/mode: EnsureExists
data:
  Corefile: |
    .:53 {
        errors
        health
        kubernetes cluster.local in-addr.arpa ip6.arpa {
            pods insecure
            # 用于解析外部主机主机(外部服务)
            upstream 114.114.114.114 223.5.5.5
            fallthrough in-addr.arpa ip6.arpa
        }
        prometheus :9153
        # 任何不在集群域内的查询将转发到预定义的解析器,默认:/etc/resolv.conf;
        # 在coredns “Deployment”资源中“dnsPolicy“设置为”Default”,即提供dns服务的pod从所在节点继承/etc/resolv.conf,如果节点的上游解析地址与”upstream”一致,则设置任意一个参数即可
        proxy . 114.114.114.114 223.5.5.5
        cache 30
        loop
        reload
        loadbalance
}
# 自定义dns记录,对应kube-dns中的stubdomains;
# 每条记录,单独设置1各zone
    out.kubernetes:53 {
        errors
        cache 30
        proxy . 172.30.200.15
    }
4. 启动coredns
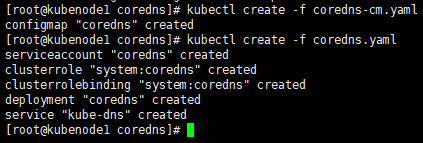
# 删除kube-dns相关资源
[root@kubenode1 coredns]# kubectl delete -f /usr/local/src/yaml/kubedns/kube-dns.yaml

# 启动coredns;
# coredns pod需要挂载”ConfigMap”资源,需要同时或提前下发相关资源
[root@kubenode1 coredns]# kubectl create -f coredns-cm.yaml
configmap "coredns" created
[root@kubenode1 coredns]# kubectl create -f coredns.yaml
三.验证
1. 自定义dns服务器
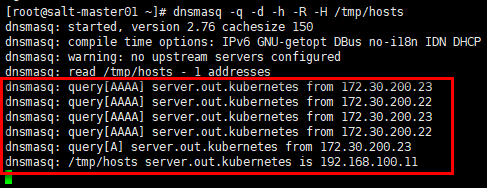
# ”ConfigMap” 中自定义的dns记录指向172.30.200.15,在其上安装dnsmasq服务
[root@salt-master01 ~]# yum install dnsmasq -y

# 生成自定义的DNS记录文件
[root@salt-master01 ~]# echo "192.168.100.11 server.out.kubernetes" > /tmp/hosts

# 启动DNS服务;
# -q:输出查询记录;
# -d:以debug模式启动,前台运行,观察输出日志;
# -h:不使用/etc/hosts;
# -R:不使用/etc/resolv.conf;
# -H:使用自定义的DNS记录文件;
# 启动输出日志中warning提示没有设置上游DNS服务器;同时读入自定义DNS记录文件
[root@salt-master01 ~]# dnsmasq -q -d -h -R -H /tmp/hosts

# iptables放行udp 53端口
[root@salt-master01 ~]# iptables -I INPUT -m state --state NEW -m udp -p udp --dport 53 -j ACCEPT
2. 启动验证Pod
# 下载镜像
[root@kubenode1 ~]# docker pull busybox

# 配置Pod yaml文件;
# dnsPolicy设置为ClusterFirst,默认也是ClusterFirst
[root@kubenode1 ~]# touch dnstest.yaml
[root@kubenode1 ~]# vim dnstest.yaml
apiVersion: v1
kind: Pod
metadata:
  name: dnstest
  namespace: default
spec:
  dnsPolicy: ClusterFirst
  containers:
  - name: busybox
    image: busybox
    command:
      - sleep
      - "3600"
    imagePullPolicy: IfNotPresent
  restartPolicy: Always

# 创建Pod
[root@kubenode1 ~]# kubectl create -f dnstest.yaml
3. 验证
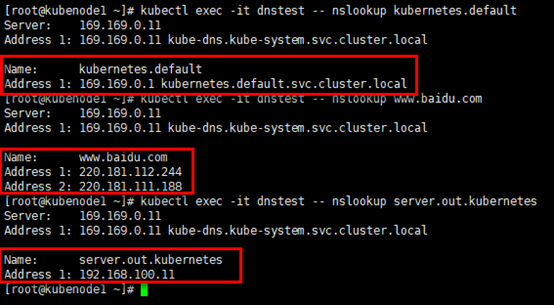
# 分别针对3各域名进行nslookup查询
[root@kubenode1 ~]# kubectl exec -it dnstest -- nslookup kubernetes.default
[root@kubenode1 ~]# kubectl exec -it dnstest -- nslookup www.baidu.com
[root@kubenode1 ~]# kubectl exec -it dnstest -- nslookup server.out.kubernetes
观察172.30.200.15上dnsmasq服务的输出:kube节点172.30.200.22与172.30.200.23(Pod所在的节点,flannel网络,snat出节点)对server.out.kubenetes的查询,dnsmasq返回预定义的主机地址。