Vue模板语法:
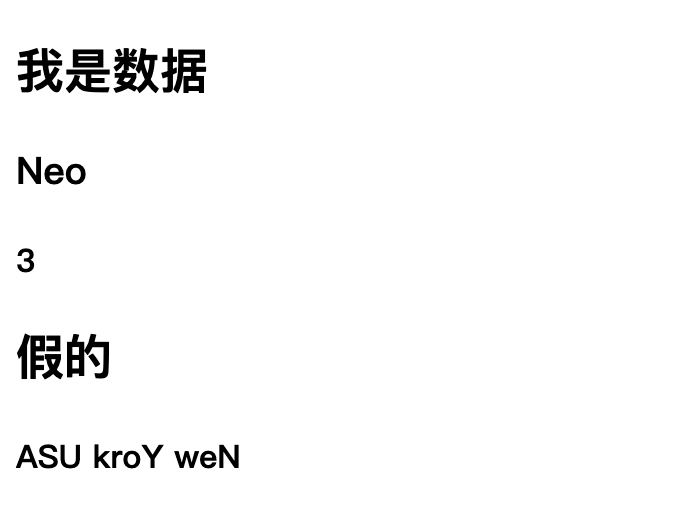
<!DOCTYPE html>
<html lang="en">
<head>
    <meta charset="UTF-8">
    <meta name="viewport" content="width=device-width, initial-scale=1.0">
    <title>Document</title>
</head>
<body>
    <div id="app">
        <!-- 模板语法: {{ 变量 }} 去 data 中找变量的值   -->
        <h2>{{ msg }}</h2>
        <h3>{{ person.name }}</h3>

        <!-- 也能进行运算 -->
        <h4>{{ 1+2  }}</h4>

        <!-- 三元运算符 -->
        <h2>{{ 1>2 ? '真的': '假的 ' }}</h2>

        <!-- split以 空字符串 作为分隔符(python中不能这样用 ) -->
        <h4>{{ addrs.split('').reverse().join('') }}</h4>

    </div>
</body>

<!-- 1、引入 vue.js 这个包 -->
<script src="./vue.js"></script>

<script>
    // 2、实例化对象; el 和 data 是必需的 , data 是对象
    new Vue({
        el: '#app', // el 表示 当前实例化对象绑定的根元素; #app 是id选择器
        data: {
            // 存在数据属性
            msg: "我是数据",
            person: {
                name: "Neo",
                age: 30
            },
            addrs: "New York USA"
        }
    })
</script>

</html>
页面如下:
指令系统:
v-text 和 v-html
v-text 相当于 JS 中的 innerText;
v-html 相当于 JS 中的 innerHTML
示例代码:
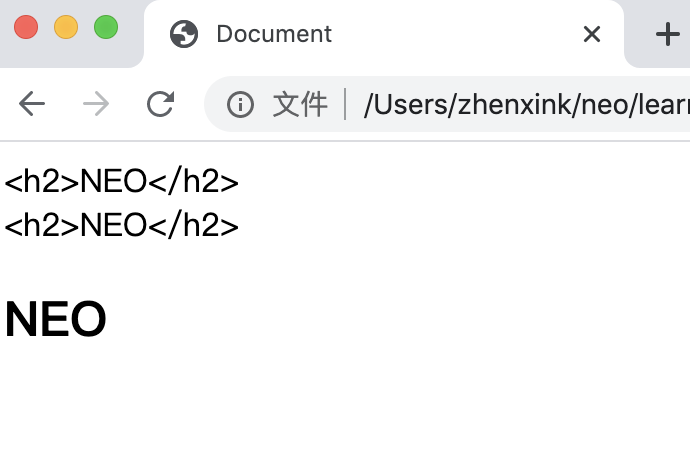
<!DOCTYPE html>
<html lang="en">
<head>
    <meta charset="UTF-8">
    <meta name="viewport" content="width=device-width, initial-scale=1.0">
    <title>Document</title>
</head>
<body>
    <div id="content">
        <!-- 模板语法时, 去 data 函数return 的对象中找 msg 的值 -->
        {{ msg }}
        <!-- v-text 就是渲染的标签文本;跟 模板语法 效果类似 -->
        <div v-text="msg"></div>

        <!-- v-html 既能渲染文本也能渲染标签 -->
        <div v-html="msg"></div>
    </div>
</body>
<script src="./vue.js"></script>
<script>
    new Vue({
        el:"#content",
        data: function(){   // data 对应的实际上是一个函数,而且这个函数必须要 return 一个对象(可以是空对象)
            return {
                msg: "<h2>NEO</h2>"
            }
        }
    })
</script>
</html>
浏览器效果:
v-show和v-if:
v-show 相当于 css 中的 style.display ;

v-if 的效果和 v-show 类似,但是 v-if 是真正的增添或删除元素块;

v-on 用于绑定事件;
v-if 和 v-show的区别:
v-if是“真正”的条件渲染,因为它会确保在切换过程中条件块内的事件监听器和子组件适当地被销毁和重建。
v-if也是惰性的:如果在初始渲染时条件为假,则什么也不做——直到条件第一次变为真时,才会开始渲染条件块。相比之下,
v-show就简单得多——不管初始条件是什么,元素总是会被渲染,并且只是简单地基于 CSS 进行切换。一般来说,
v-if有更高的切换开销,而v-show有更高的初始渲染开销。因此,如果需要非常频繁地切换,则使用v-show较好;如果在运行时条件很少改变,则使用v-if较好。
参考链接: https://cn.vuejs.org/v2/guide/conditional.html#v-if-vs-v-show
示例代码:
<!DOCTYPE html>
<html lang="en">
<head>
    <meta charset="UTF-8">
    <meta name="viewport" content="width=device-width, initial-scale=1.0">
    <title>Document</title>
    <style>
        .box{
            width: 200px;
            height: 200px;
            background-color: red;
        }
        .box2{
            width: 200px;
            height: 200px;
            background-color: green;
        }
    </style>
</head>
<body>
    <div id="content">
        <!-- 模板语法中既可以是属性也可以是方法; 方法是在 methods 中,methods 也是个对象 -->
        {{ add(2, 3 ) }}

        <!-- 使用指令系统的时候,后面一定是字符串,且该字符串是当前实例化对象中要么声明的数据属性,要么是声明的方法; {{  }} 只能用在标签里面-->
        <div class="box" v-show="isShow"></div>

        <!-- v-on 用于绑定事件,v-on: 事件名 = '函数名' -->
        <button v-on:click = "handleClick">隐藏</button>

        <!-- v-if 的效果和 v-show 类型,但是 v-show 只有控制 css display 的样式,v-if 是真正的增添或删除标签块 -->
        <div class="box2" v-if="isShow"></div>

    </div>

</body>
<script src="./vue.js"></script>
<script>
    new Vue({
        el: "#content",
        data () {
            return {
                isShow: true
            }
        },
        methods: {  // 模板语法中的方法是在 methods中,methods是一个对象
            add (x, y) {
                return x + y
            },
            handleClick(){
                console.log(this);

                // 数据驱动视图
                this.isShow = !this.isShow;     // ! 取反
            }
        }
    })
</script>
</html>
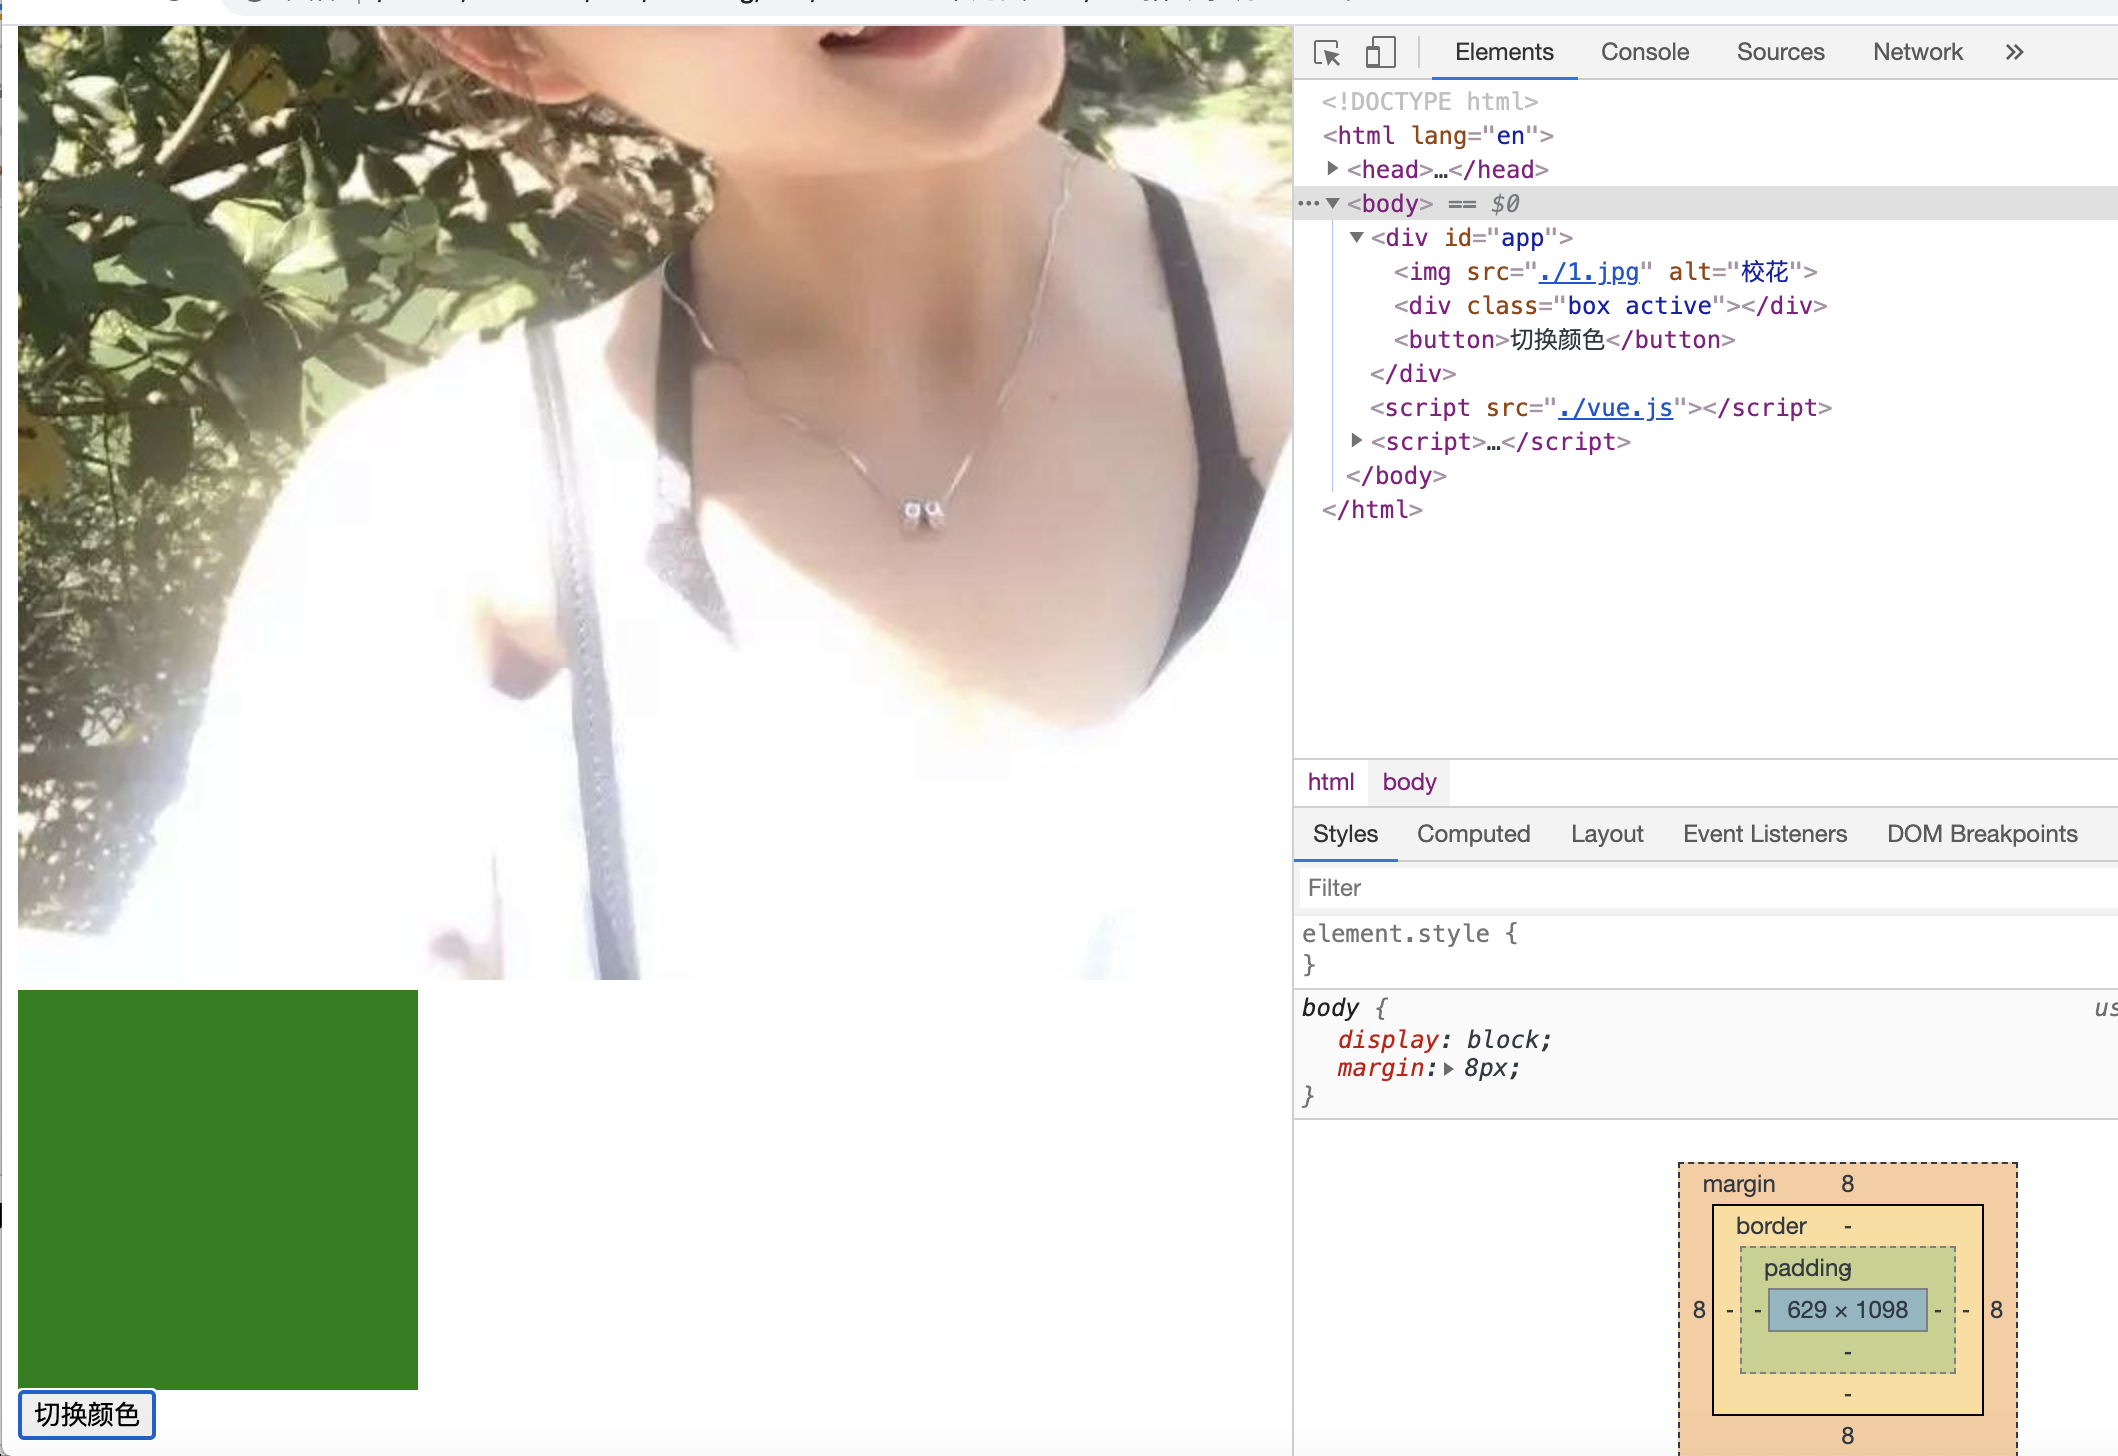
浏览器效果示例:

v-bind 和 v-on :
v-bind 能绑定标签中 所有的属性,如 img 标签的 src 、alt, a 标签的 href、class、id 等等;

v-on 能够监听js中的所有事件;
示例代码:
<!DOCTYPE html>
<html lang="en">
<head>
    <meta charset="UTF-8">
    <meta name="viewport" content="width=device-width, initial-scale=1.0">
    <title>Document</title>
    <style>
        .box{
            width: 200px;
            height: 200px;
            background-color: red;
        }
        .active{
            background-color: green;
        }
    </style>
</head>
<body>
    <div id="app">
        <!-- v-bind 用于绑定标签属性 -->
        <!-- 数据驱动;设计模式: MVVM, Model (Vue中的data), View (html标签) , ViewModel(Vue的指令系统、模板语法等) -->
        <img v-bind:src="imgSrc" v-bind:alt="msg">

        <!-- active是key,是class中显示的类名。如果 active 对应的值为 true, 则 active 则到 class="box"中;如果active为false,那么 class中就没有active -->
        <div class="box" v-bind:class = '{active: isActive}'></div>
        <button v-on:click="handlerChange">切换颜色</button>
    </div>
</body>
<script src="./vue.js"></script>
<script>
    new Vue({
        el: "#app",
        data () {
            return {
                imgSrc: "./1.jpg",
                msg: "校花",
                isActive: true
            }
        },
        methods:{
            handlerChange(){
                this.isActive = !this.isActive;
            }
        }
    })
</script>
</html>
浏览器效果示例:
v-bind 和 v-on的缩写:
v-bind 可以缩写为 冒号 :
v-on 可以缩写为 @
v-for 指令:
示例代码:
<!DOCTYPE html>
<html lang="en">
<head>
    <meta charset="UTF-8">
    <meta name="viewport" content="width=device-width, initial-scale=1.0">
    <title>Document</title>
</head>
<body>
    <div id="app">
        <ul v-if="rspData.status === 'ok'">

            <!-- 在用 v-for 的时候, key 一定要绑定;绑定key的时候,如果当前数据中有id,那就绑定id,如果没有id就绑定其index -->
            <!-- v-for 的优先级最高 -->
            <li v-for="(item, index) in rspData.users" :key="item.uid">
                {{ item.uid }} -- {{ item.name }} -- {{ item.age }}
            </li>
        </ul>

        <!-- v-for 也能遍历对象 -->
        <!-- v-for 遍历对象时,value在前面key在后面,如果只遍历一个元素,那么这个元素是 value -->
        <div v-for="(value, key) in person">
            {{ key }}:{{ value }}
        </div>
    </div>
</body>
<script src="./vue.js"></script>
<script>
    new Vue({
        el: "#app",
        data(){
            return {
                rspData: {
                    status: "ok",
                    users: [
                        {"uid": 1, "name": "neo01", age: 18},
                        {"uid": 2, "name": "neo02", age: 19},
                        {"uid": 3, "name": "neo03", age: 20}
                    ]
                },
                person:{
                    name: "NEO"
                }
            }
        }
    })
</script>
</html>
浏览器效果示例:

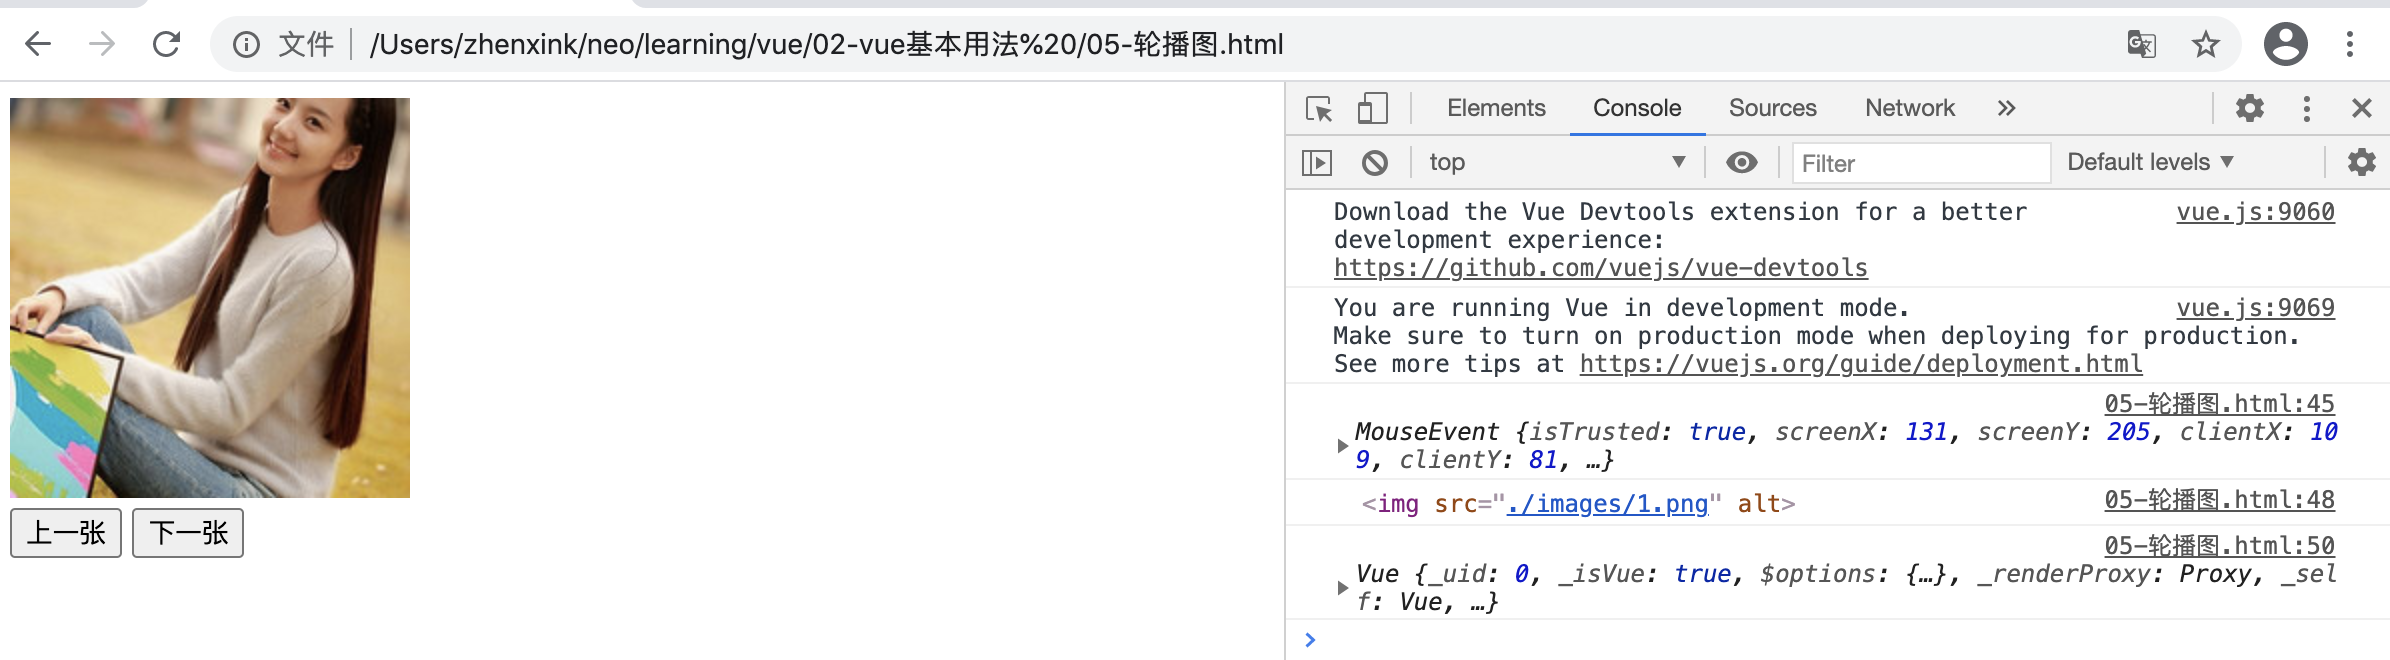
轮播图示例:
<!DOCTYPE html>
<html lang="en">
<head>
    <meta charset="UTF-8">
    <meta name="viewport" content="width=device-width, initial-scale=1.0">
    <title>Document</title>
</head>
<body>
    <div id="app">
        <img :src="imgs[currentIndex].imgSrc" alt="" @click="imgHandler">
        <br>
        <button @click="prevHandler">上一张</button>
        <button @click="nextHandler">下一张</button>
    </div>

</body>
<script src="./vue.js"></script>
<script>
    let vm = new Vue({
        el: "#app",
        data(){
            return {
                imgs:[
                    {id:1, imgSrc:"./images/1.png"},
                    {id:2, imgSrc:"./images/2.jpg"},
                    {id:3, imgSrc:"./images/3.jpg"},
                ],
                currentIndex: 0
            }
        },
        methods:{
            prevHandler(){
                this.currentIndex--;
                if (this.currentIndex < 0){
                    this.currentIndex = 2;
                }

            },
            nextHandler(){
                this.currentIndex = (this.currentIndex+1) % 3;
            },

            // 函数中有个参数是 event 事件对象(MouseEvent),可写可不写,不过通常要写上
            imgHandler(e){
                console.log(e)

                // e.target 是当前目标对象;
                console.log(e.target)   // <img src="./images/1.png" alt="">

                console.log(this)   // this 表示当前对象
            }
        }
    })
</script>
</html>
浏览器效果示例:
自动轮播图:
示例代码:
<!DOCTYPE html>
<html lang="en">
<head>
    <meta charset="UTF-8">
    <meta name="viewport" content="width=device-width, initial-scale=1.0">
    <title>Document</title>
</head>
<body>
    <div id="app">
        <img :src="imgs[currentIndex].imgSrc" alt="">
    </div>
</body>
<script src="./vue.js"></script>
<script src="https://code.jquery.com/jquery-3.5.1.min.js" integrity="sha256-9/aliU8dGd2tb6OSsuzixeV4y/faTqgFtohetphbbj0=" crossorigin="anonymous"></script>
<script>
    let vm = new Vue({
        el: "#app",
        data(){
            return {
                imgs:[
                    {id:1, imgSrc:"./images/1.png"},
                    {id:2, imgSrc:"./images/2.jpg"},
                    {id:3, imgSrc:"./images/3.jpg"},
                ],
                currentIndex: 0
            }
        },

        // 实例创建的时候开定时器
        created(){      // created 是 Vue 的 钩子函数;组件创建完成的时候;可用于 ajax
            console.log(this)   // this 指当前 Vue 对象

            /*
            setInterval(function(){     // 定时器
                // 这个 function 中的 this 指向当前这个对象,即 Window 对象
                console.log(this)
            }, 1000)    // 第二个参数是指 1秒
            */

            /*
            // 方式一:
            let _this = this
            setInterval(function(){
                console.log(_this)
            }, 1000)
            */

            // 方式二:
            setInterval(() => {
                // 箭头函数中的 this 是 定义当前定时器的 上下文 (即 Vue)
                console.log(this)
                this.currentIndex = (this.currentIndex+1) % 3;
            }, 2000)

            // this 指向问题: 能用箭头函数的,不要用匿名函数
        }
    })
</script>
</html>
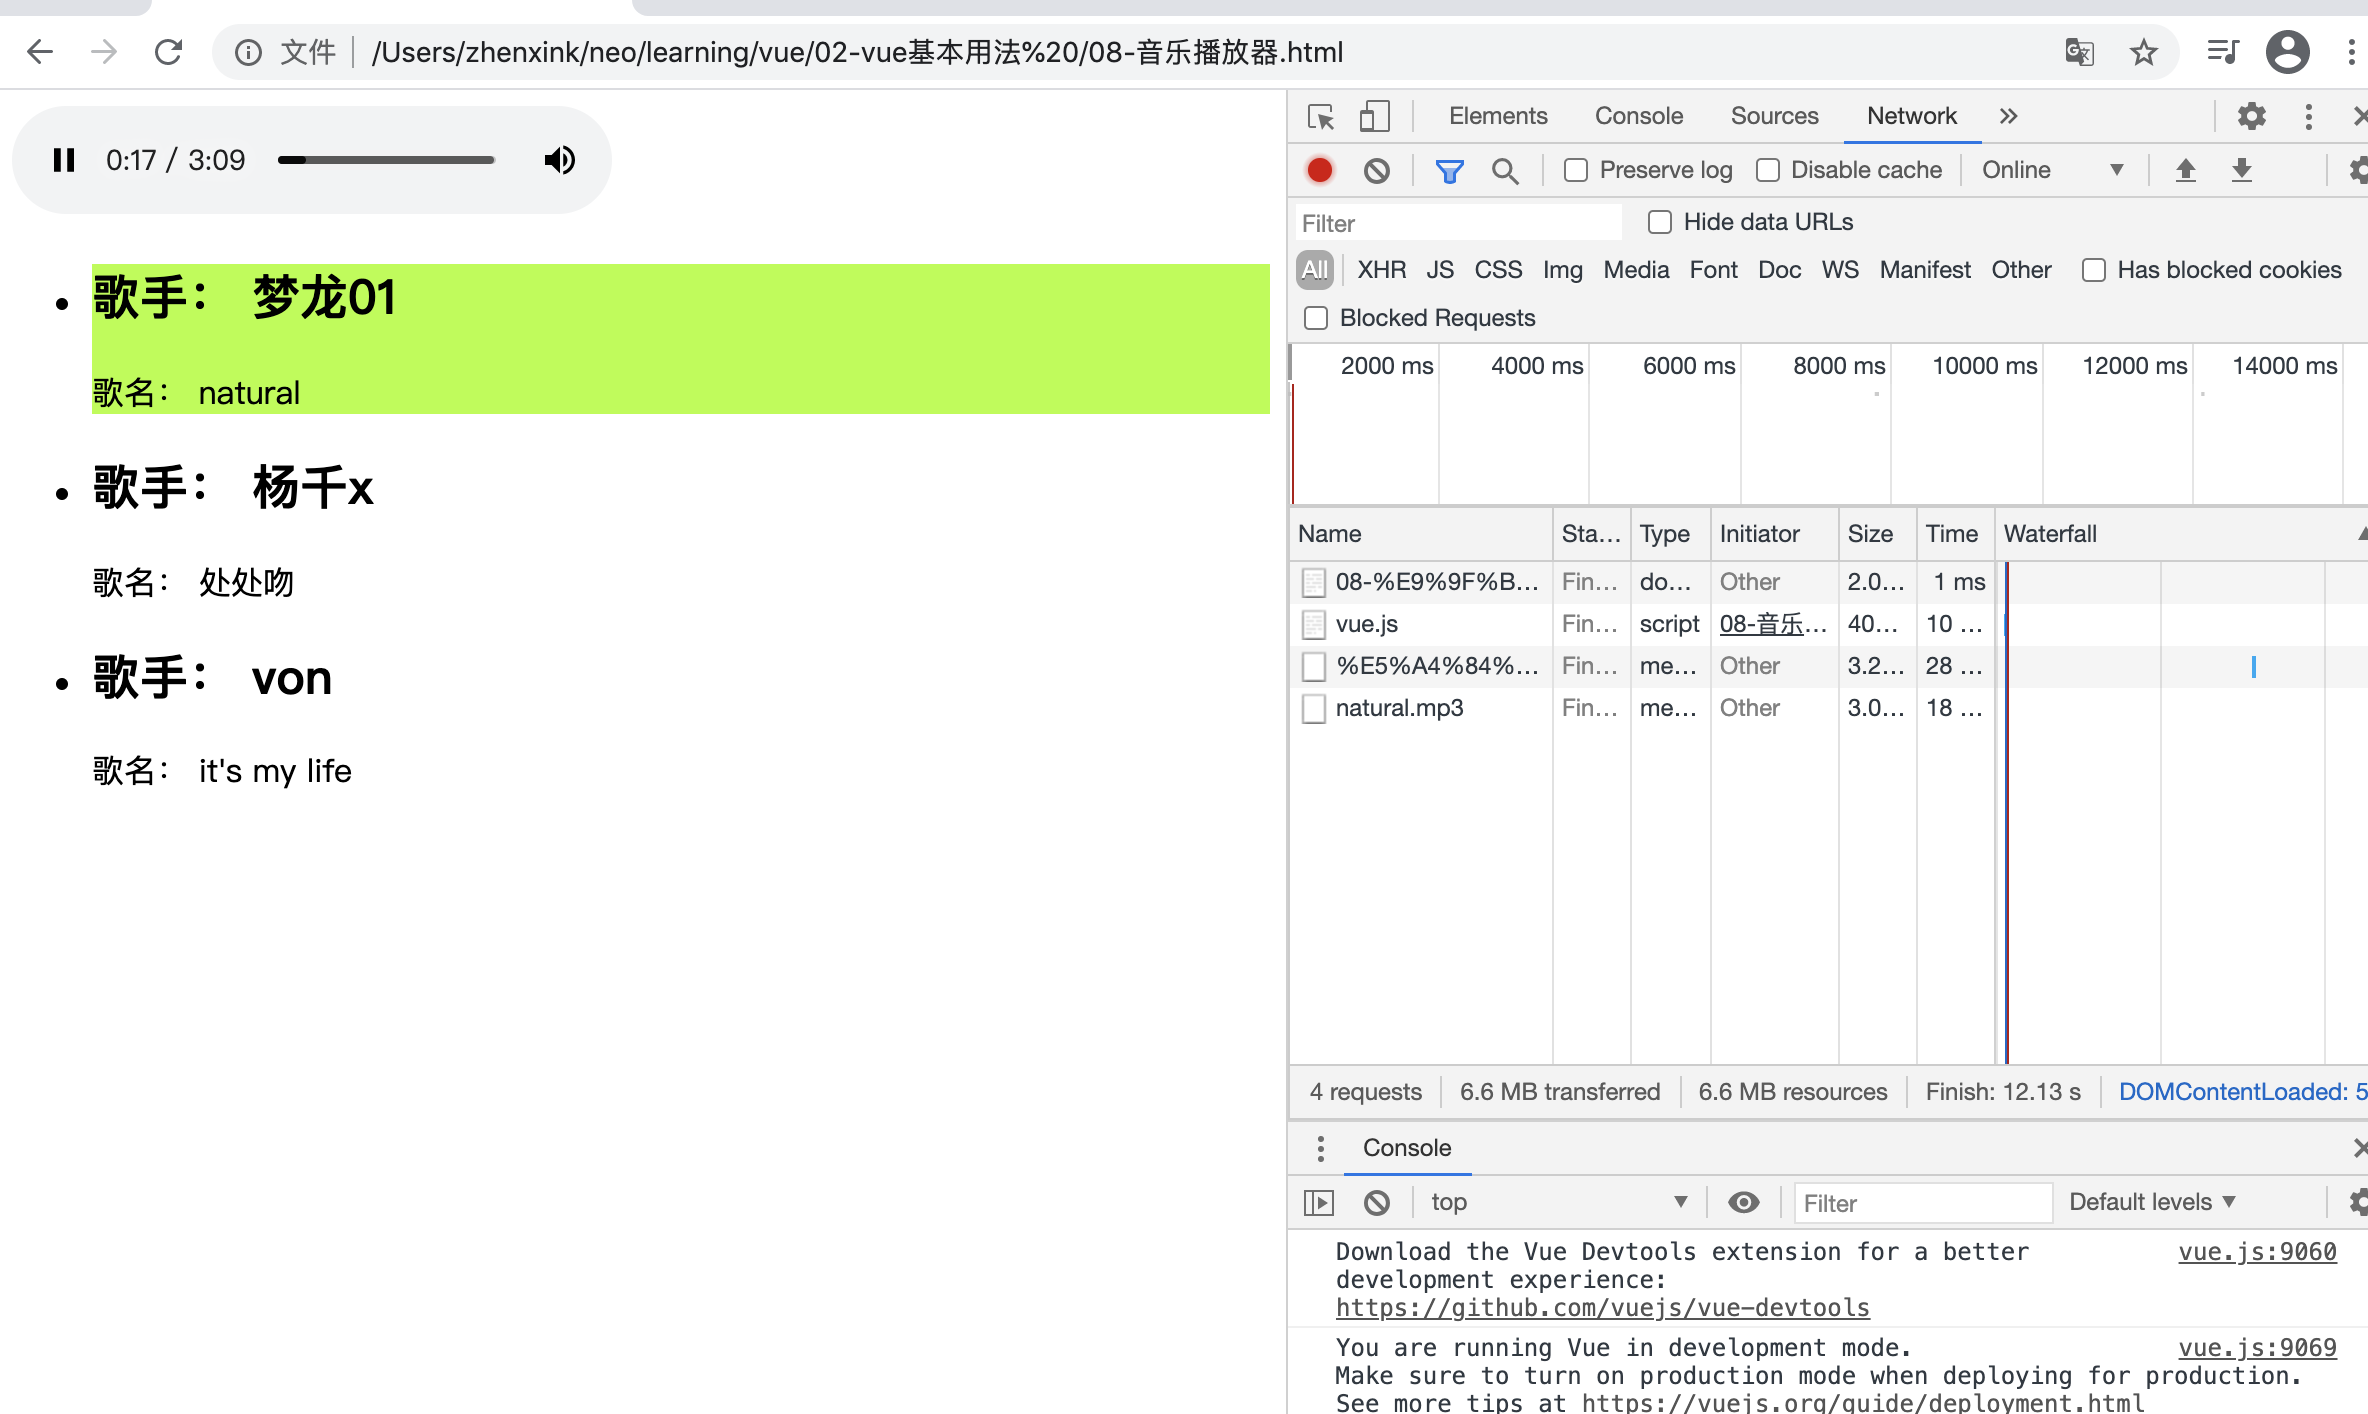
音乐播放器示例
示例代码:
<!DOCTYPE html>
<html lang="en">
<head>
    <meta charset="UTF-8">
    <meta name="viewport" content="width=device-width, initial-scale=1.0">
    <title>Document</title>
    <style>
        ul li.active{
            background-color: greenyellow;
        }
    </style>
</head>
<body>
    <div id="music">
        <!-- ended 事件会在播放完成后自动调用 -->
        <audio :src="musicList[currentIndex].songSrc" controls autoplay @ended="nextMusicHandler"></audio>
        <ul>
            <!-- methods 中是定义方法, @click 中是调用方法,所以可以传入参数 index -->
            <li @click="musicHandler(index)" v-for="(item, index) in musicList" :key="item.id" :class="{active: index === currentIndex}">
                <h2>歌手: {{ item.author }}</h2>
                <p>歌名: {{ item.name }}</p>
            </li>
        </ul>
    </div>
</body>
<script src="./vue.js"></script>
<script>
    var musicData = [
        {
            id: 1,
            name: "natural",
            author: "梦龙01",
            songSrc: "./musics/natural.mp3"
        },
        {
            id: 2,
            name: "处处吻",
            author: "杨千x",
            songSrc: "./musics/处处吻.mp3"
        },
        {
            id: 3,
            name: "it's my life",
            author: "von",
            songSrc: "./musics/itsmylife.mp3"
        },
    ]
    new Vue({
        el: "#music",
        data(){
            return {
                musicList: [],
                currentIndex :0
            }
        },

        methods: {
            musicHandler(i){
                this.currentIndex = i;

                // 体会 数据驱动
            },
            nextMusicHandler(){
                this.currentIndex = (this.currentIndex + 1) % 3
            }
        },

        created(){
            // 先定义一个变量 musicData,然后在钩子函数中把这个变量 musicData 赋值给 Vue中的 musicList
            this.musicList = musicData;
        }
    })
</script>
</html>
浏览器效果:
官网链接:
https://cn.vuejs.org/v2/guide/class-and-style.html#%E7%BB%91%E5%AE%9A-HTML-Class