一、主从复制架构图
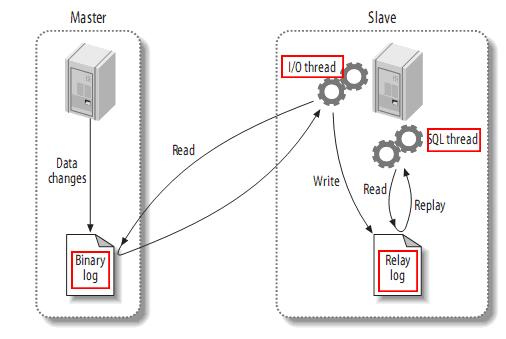
Master代表主实例,Slave代表从实例(备库)
1、Mater实例将数据库新产生数据写入到数据库中,同时还会将数据写入到binlog文件中,
2、Slave实例的IO线程读取Master实例的binlog日志写入到本地的Relay log(中断日志)中,
3、Slave实例的SQL线程负责读取/回放Relay log(中断日志)内容,写入到备库中。
binlog的日志格式有三种:
Statement:记录Master执行过的SQL语句,写入到binlog文件中。
ROW:不记录Master执行过的SQL语句,只记录哪些数据行发生了变化,将数据行发生的变化写入到binlog文件中。
MiXED:Statement和row格式混合记录。
Statement只记录SQL句,节省binlog空间,但有些时候无法保障主库数据一致性,比如SQL中有rand() 随机函数,这个函数在主备实例上返回的结果是不一样的。
ROW:如果一个SQL更新了100条记录,ROW格式会记录所有数据行发生的变化,所以会向binlog中记录100条记录,占用空间较大,但可以保障源端和目标端数据一致性。同时可以解析row格式binlog文件,生成逆向SQL(将delete转成insert into)。
一般生产环境上都是ROW格式。
二、主从环境搭建
环境:
服务器A:
Centos 7.6
192.168.10.101
服务器B:
Centos 7.6
192.168.10.102
分别在两台服务器安装MYSQL数据库,
安装方法参考(建议按照顺序全部执行一遍),尾部的my.cnf配置文件中,已经开启的binlog,binlog日志格式是row
https://www.cnblogs.com/nanxiang/p/12888222.html
新安装的两个数据库中是完全没有业务数据的,所以搭建主从/主主复制环境比较简单,以后会写如何在已经有数据的情况,搭建备库。
主备架构,A数据库中有新数据发生就同步到备库:
A------->B
1、在服务器A创建一个用于复制数据的用户,如果不想创建,配置数据库的root用户也可以,为了规范化,建议在主备实例上创建一个用于主备复制的账号,授予对应的权限。
mysql> create user replicator identified by '123456';
Query OK, 0 rows affected (0.00 sec)
mysql> grant replication slave on *.* to replicator;
Query OK, 0 rows affected (0.00 sec)
2、修改服务器B my.cnf配置文件中server-id=2,主实例和备实例中,server-id值不能相同。修改完成后,要重启数据库生效。
3、在服务器A执行show slave status;
获取目前的位点,File,Position的值,一会要用到,
mysql> show master statusG
*************************** 1. row ***************************
      File: mysql-bin.000003   #目前在写入到哪个binlog文件中
    Position: 154          #目前写入到了哪个位点
  Binlog_Do_DB:
  Binlog_Ignore_DB:
Executed_Gtid_Set:
1 row in set (0.00 sec)

mysql>
4、在服务器B执行
change master to master_user='replicator',         #主库上的复制用户
          master_password='123456',          #主库上的复制用户密码
          master_host='192.168.150.101',        #主库的IP地址
          master_port=3306;                #主库数据库端口号
          master_log_file='mysql-bin.000003',      #主库当binlog文件
          master_log_pos=154;                #主库当前日志位点
mysql> change master to master_user='replicator',
-> master_password='123456',
-> master_host='192.168.150.101',
-> master_port=3306,
-> master_log_file='mysql-bin.000003',
-> master_log_pos=154;
Query OK, 0 rows affected, 2 warnings (0.00 sec)
mysql> start slave;     #启动主从同步
Query OK, 0 rows affected (0.01 sec)

mysql> show slave statusG    #查看主从同步状态
*************************** 1. row ***************************
               Slave_IO_State: Waiting for master to send event   #当前状态,在等待主库发送日志
                  Master_Host: 192.168.150.101            #主库的IP地址
                  Master_User: replicator               #连接主库使用的用户名
                  Master_Port: 3306                   #主库的端口号
                Connect_Retry: 60                    #在主服务器宕机或连接丢失的情况下,从服务器线程重新尝试连接主服务器之前睡眠的秒数
              Master_Log_File: mysql-bin.000003            #当前IO线程正在读取主库的binlog文件
          Read_Master_Log_Pos: 154                    #当前IO线程正在读取主库binlog文件的位点
               Relay_Log_File: localhost-relay-bin.000002      #SQL线程当前读取的中继日志(relay log)文件
                Relay_Log_Pos: 320                    #SQL线程当前取的中断日志的位点
        Relay_Master_Log_File: mysql-bin.000003            #当前SQL线程回放的日志,对应对是主库的哪个binlog文件
             Slave_IO_Running: Yes      #IO线程状态是YES代表已经在正常运行
            Slave_SQL_Running: Yes      #SQL线程状态是YES,代表在正常运行
              Replicate_Do_DB:
          Replicate_Ignore_DB:
           Replicate_Do_Table:
       Replicate_Ignore_Table:
      Replicate_Wild_Do_Table:
  Replicate_Wild_Ignore_Table:
                   Last_Errno: 0
                   Last_Error:
                 Skip_Counter: 0
          Exec_Master_Log_Pos: 154                  #当前SQL线程执行的日志,对应着主库的binlog文件中的位点
              Relay_Log_Space: 531
              Until_Condition: None
               Until_Log_File:
                Until_Log_Pos: 0
           Master_SSL_Allowed: No
           Master_SSL_CA_File:
           Master_SSL_CA_Path:
              Master_SSL_Cert:
            Master_SSL_Cipher:
               Master_SSL_Key:
        Seconds_Behind_Master: 0                  #复制延迟,时间是秒。计算方法是当前时间减去SQL线程正在回放binlog日志中时间点。
Master_SSL_Verify_Server_Cert: No
                Last_IO_Errno: 0
                Last_IO_Error:
               Last_SQL_Errno: 0
               Last_SQL_Error:
  Replicate_Ignore_Server_Ids:
             Master_Server_Id: 1
                  Master_UUID: 9fef2262-97b1-11ea-92b5-000c29cd3ff3
             Master_Info_File: /usr/local/mysql-5.7.29-linux-glibc2.12-x86_64/data/master.info
                    SQL_Delay: 0
          SQL_Remaining_Delay: NULL
      Slave_SQL_Running_State: Slave has read all relay log; waiting for more updates
           Master_Retry_Count: 86400
                  Master_Bind:
      Last_IO_Error_Timestamp:
     Last_SQL_Error_Timestamp:
               Master_SSL_Crl:
           Master_SSL_Crlpath:
           Retrieved_Gtid_Set:
            Executed_Gtid_Set:
                Auto_Position: 0
         Replicate_Rewrite_DB:
                 Channel_Name:
           Master_TLS_Version:
1 row in set (0.00 sec)

mysql>
只备注了一些常用的值的说明,
官方文档中有详细说明,
https://dev.mysql.com/doc/refman/5.7/en/show-slave-status.html
至此,主从同步架构部署完成,
在服务器A执行
mysql> create database test;
Query OK, 1 row affected (0.00 sec)

mysql> use test;
Database changed

mysql> create table t1(id int);
Query OK, 0 rows affected (0.01 sec)


mysql> insert into t1 values(1);
Query OK, 1 row affected (0.03 sec)
在服务器B执行,已经可以看到t1表的内容了
mysql> show databases;
+--------------------+
| Database           |
+--------------------+
| information_schema |
| mysql              |
| performance_schema |
| sys                |
| test               |
+--------------------+
5 rows in set (0.00 sec)

mysql> use test;
Reading table information for completion of table and column names
You can turn off this feature to get a quicker startup with -A

Database changed
mysql> show  tables;
+----------------+
| Tables_in_test |
+----------------+
| t1             |
+----------------+
1 row in set (0.00 sec)

mysql> select * from t1;
+------+
| id   |
+------+
|    1 |
+------+
1 row in set (0.00 sec)

mysql>
目前架构是主从:
A----->B
也就是A有新数据产生,都会同步到B。
现在的生产环境都是主主复制架构,
A<------->B
也就是B实例写入数据也会同步到A实例,这样做的好处就是当A实例宕机后,应用程序会向B实例写入数据,将A实例修复好之后,也会收到B实例新产生的数据,从而A实例数据和B实例数据还是一样的。
因为现在B实例的数据库没有任何数据写入,现有的数据都是从A实例同步过去的,现在可以在A实例执行change master命令,将自己做为B实例的备库。
但在做主主复制架构的时候,建议修改A、B两个实例的my.cnf配置文件,
加入这两个参数
auto_increment_offset=2
auto_increment_increment=2
auto_increment_offset=2
最终的效果是A实例增自字段,初始值是1,每次递增量是2,所以写入的永远是奇数,1,3,5,7,9...
B实例增自字段,初始值是2,每次递增量是2,所以写入的永远是奇数,2,4,6,8...
后期会写Keepavled,主备自动做切换,而当脑裂情况发生时,两个实例写入的数据并不冲突。
修改参数配置文件后,重启数据库。
在B实例执行,
mysql>  create user replicator identified by '123456';
Query OK, 0 rows affected (0.00 sec)

mysql> grant replication slave on *.* to replicator;
Query OK, 0 rows affected (0.00 sec)

mysql>
mysql> show master statusG
*************************** 1. row ***************************
             File: mysql-bin.000003
         Position: 609
     Binlog_Do_DB:
 Binlog_Ignore_DB:
Executed_Gtid_Set:
1 row in set (0.00 sec)

mysql>
在B实例执行,
mysql> change master to master_user='replicator',
    -> master_password='123456',
    -> master_host='192.168.150.102',
    -> master_port=3306,
    -> master_log_file='mysql-bin.000003',
    -> master_log_pos=609;
Query OK, 0 rows affected, 2 warnings (0.01 sec)

mysql> start slave;
Query OK, 0 rows affected (0.00 sec)

mysql> show slave statusG
*************************** 1. row ***************************
               Slave_IO_State: Waiting for master to send event
                  Master_Host: 192.168.150.102
                  Master_User: replicator
                  Master_Port: 3306
                Connect_Retry: 60
              Master_Log_File: mysql-bin.000003
          Read_Master_Log_Pos: 609
               Relay_Log_File: localhost-relay-bin.000002
                Relay_Log_Pos: 320
        Relay_Master_Log_File: mysql-bin.000003
             Slave_IO_Running: Yes
            Slave_SQL_Running: Yes
              Replicate_Do_DB:
          Replicate_Ignore_DB:
           Replicate_Do_Table:
       Replicate_Ignore_Table:
      Replicate_Wild_Do_Table:
  Replicate_Wild_Ignore_Table:
                   Last_Errno: 0
                   Last_Error:
                 Skip_Counter: 0
          Exec_Master_Log_Pos: 609
              Relay_Log_Space: 531
              Until_Condition: None
               Until_Log_File:
                Until_Log_Pos: 0
           Master_SSL_Allowed: No
           Master_SSL_CA_File:
           Master_SSL_CA_Path:
              Master_SSL_Cert:
            Master_SSL_Cipher:
               Master_SSL_Key:
        Seconds_Behind_Master: 0
Master_SSL_Verify_Server_Cert: No
                Last_IO_Errno: 0
                Last_IO_Error:
               Last_SQL_Errno: 0
               Last_SQL_Error:
  Replicate_Ignore_Server_Ids:
             Master_Server_Id: 2
                  Master_UUID: adc4403d-97b2-11ea-b803-000c298076e0
             Master_Info_File: /usr/local/mysql/data/master.info
                    SQL_Delay: 0
          SQL_Remaining_Delay: NULL
      Slave_SQL_Running_State: Slave has read all relay log; waiting for more updates
           Master_Retry_Count: 86400
                  Master_Bind:
      Last_IO_Error_Timestamp:
     Last_SQL_Error_Timestamp:
               Master_SSL_Crl:
           Master_SSL_Crlpath:
           Retrieved_Gtid_Set:
            Executed_Gtid_Set:
                Auto_Position: 0
         Replicate_Rewrite_DB:
                 Channel_Name:
           Master_TLS_Version:
1 row in set (0.00 sec)
IO线SQL线程都是YES状态,主主架构搭建完成。