一、马赛克效果
马赛克的实现原理是把图像上某个像素点一定范围邻域内的所有点用邻域内随机选取的一个像素点的颜色代替,这样可以模糊细节,但是可以保留大体的轮廓。
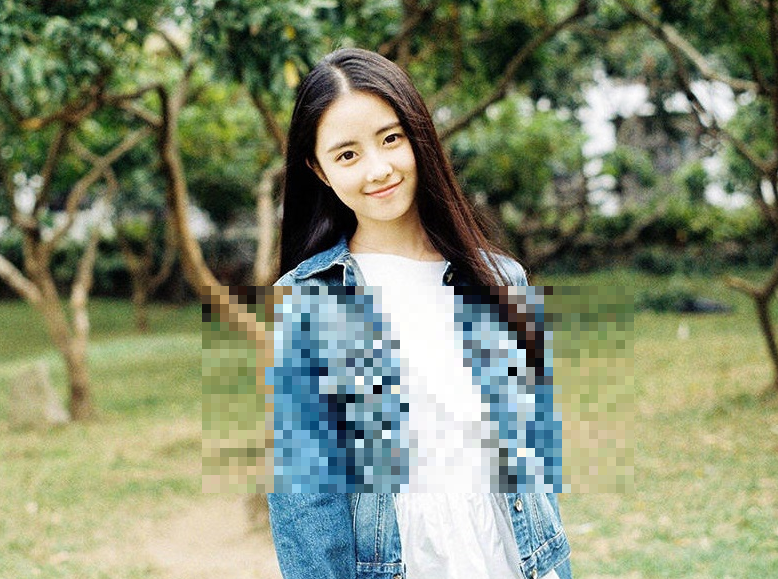
以下OpenCV程序实现马赛克效果,通过鼠标左键在图像上划定马赛克的矩形框。
#include <corecore.hpp>
#include <highguihighgui.hpp>

using namespace cv;

Mat imageSourceCopy; //原始图像
Mat imageSource; //原始图像拷贝
int neightbourHood = 9; //马赛克上每个方框的像素大小

RNG rng;
int randomNum; //邻域内随机值

Point ptL; //左键按下时坐标
Point ptR;  //右键按下时坐标

//鼠标回掉函数
void onMouse(int event, int x, int y, int flag, void *ustg);

int main()
{
	imageSourceCopy = imread("Test.jpg");
	imageSource = imageSourceCopy.clone();
	//imshow("马赛克", imageSourceCopy);
	namedWindow("马赛克");
	setMouseCallback("马赛克", onMouse);
	waitKey();
}

void onMouse(int event, int x, int y, int flag, void *ustg)
{
	if (event == CV_EVENT_LBUTTONDOWN)
	{
		ptL = Point(x, y);
	}
	if (event == CV_EVENT_LBUTTONUP)
	{
		//对鼠标画出的矩形框超出图像范围做处理,否则会越界崩溃
		x > imageSource.cols - 2 * neightbourHood ? x = imageSource.cols - 2 * neightbourHood : x = x;
		y > imageSource.rows - 2 * neightbourHood ? y = imageSource.rows - 2 * neightbourHood : y = y;

		//对鼠标从右下往右上画矩形框的情况做处理
		ptR = Point(x, y);
		Point pt = ptR;
		ptR.x < ptL.x ? ptR = ptL, ptL = pt : ptR = ptR;
		for (int i = 0; i < ptR.y - ptL.y; i += neightbourHood)
		{
			for (int j = 0; j < ptR.x - ptL.x; j += neightbourHood)
			{
				randomNum = rng.uniform(-neightbourHood / 2, neightbourHood / 2);
				Rect rect = Rect(j + neightbourHood + ptL.x, i + neightbourHood + ptL.y, neightbourHood, neightbourHood);
				Mat roi = imageSourceCopy(rect);
				Scalar sca = Scalar(
					imageSource.at<Vec3b>(i + randomNum + ptL.y, j + randomNum + ptL.x)[0],
					imageSource.at<Vec3b>(i + randomNum + ptL.y, j + randomNum + ptL.x)[1],
					imageSource.at<Vec3b>(i + randomNum + ptL.y, j + randomNum + ptL.x)[2]);
				Mat roiCopy = Mat(rect.size(), CV_8UC3, sca);
				roiCopy.copyTo(roi);
			}
		}
	}
	imshow("马赛克", imageSourceCopy);
	waitKey();
}可以通过改变程序中neightbourHood参数的大小调整小矩形快的大小,实现效果:
二、毛玻璃效果
毛玻璃效果的实现通过用像素点邻域内随机一个像素点的颜色替代当前像素点的颜色实现。
#include <corecore.hpp>
#include <highguihighgui.hpp>

using namespace cv;

int main()
{
	Mat imageSource = imread("Test.jpg");
	Mat imageResult = imageSource.clone();
	RNG rng;
	int randomNum;
	int Number = 5;

	for (int i = 0; i < imageSource.rows - Number; i++)
		for (int j = 0; j < imageSource.cols - Number; j++)
		{
			randomNum = rng.uniform(0, Number);
			imageResult.at<Vec3b>(i, j)[0] = imageSource.at<Vec3b>(i + randomNum, j + randomNum)[0];
			imageResult.at<Vec3b>(i, j)[1] = imageSource.at<Vec3b>(i + randomNum, j + randomNum)[1];
			imageResult.at<Vec3b>(i, j)[2] = imageSource.at<Vec3b>(i + randomNum, j + randomNum)[2];
		}
	imshow("毛玻璃效果", imageResult);
	waitKey();
}
实现效果:
