Android中经常用到列表,ListActivity是实现列表的一种好方法。
使用ListActivity的方法,首先定义布局文件:
<?xml version="1.0" encoding="utf-8"?>
<LinearLayout xmlns:android="http://schemas.android.com/apk/res/android"
    android:layout_width="match_parent"
    android:layout_height="match_parent"
    android:orientation="vertical" >

    <LinearLayout
        android:layout_width="fill_parent"
        android:layout_height="match_parent"
        android:layout_weight="5" >

        <TextView
            android:id="@+id/textView1"
            style="@style/my_style"
            android:layout_width="match_parent"
            android:layout_height="fill_parent"
            android:layout_weight="4" />

        <TextView
            android:id="@+id/textView2"
            style="@style/my_style"
            android:layout_width="match_parent"
            android:layout_height="fill_parent"
            android:layout_gravity="center_vertical|center_horizontal"
            android:layout_weight="1"
            android:gravity="center_vertical|center_horizontal"
            android:text="应用名称" />

        <TextView
            android:id="@+id/textView3"
            android:layout_width="match_parent"
            android:layout_height="fill_parent"
            android:layout_weight="4"
            android:gravity="center_vertical|center_horizontal"
            android:text="是否系统应用" />

    </LinearLayout>

    <ListView
        android:id="@id/android:list"
        android:layout_width="fill_parent"
        android:layout_height="match_parent"
        android:layout_weight="1" >

    </ListView>

    <Button
        android:id="@+id/btn_apk"
        style="@style/my_style"
        android:layout_width="fill_parent"
        android:layout_height="match_parent"
        android:layout_weight="5"
        android:text="卸载" />

</LinearLayout>
其中,最关键的就是ListView控件。
然后,再用一个布局文件定义列表中的每一行:
<?xml version="1.0" encoding="utf-8"?>
<LinearLayout xmlns:android="http://schemas.android.com/apk/res/android"
    android:layout_width="match_parent"
    android:layout_height="match_parent"
    android:orientation="horizontal" >

    <CheckBox
        android:id="@+id/chk_apk"
        android:layout_width="match_parent"
        android:layout_height="fill_parent"
        android:layout_weight="4" />

    <TextView
        android:id="@+id/txt_item_name"
        style="@style/my_style"
        android:layout_width="match_parent"
        android:layout_height="fill_parent"
        android:layout_weight="1"
        android:text="TextView" />

    <TextView
        android:id="@+id/txt_item_flag"
        style="@style/my_style"
        android:layout_width="match_parent"
        android:layout_height="fill_parent"
        android:layout_weight="4"
        android:text="TextView" />


</LinearLayout>
最后,在类文件中使用SimpleAdapter类把列表显示出来。
package com.hzhi.sysinfor;

import java.util.ArrayList;
import java.util.HashMap;
import java.util.List;
import java.util.Map;

import android.app.ListActivity;
import android.content.Context;
import android.content.pm.PackageInfo;
import android.content.pm.PackageItemInfo;
import android.content.pm.PackageManager;
import android.os.Bundle;
import android.widget.SimpleAdapter;

public class apk extends ListActivity{

	Context mCtx;
	SimpleAdapter my_adaptor;

	protected void onCreate(Bundle savedInstanceState){

        super.onCreate(savedInstanceState);
        setContentView(R.layout.activity_list_apk);
        my_adaptor = new SimpleAdapter(this,
                get_data(),
                R.layout.list_item_apk,
                new String[]{"name", "flag"},
                new int[]{R.id.txt_item_name, R.id.txt_item_flag});
            setListAdapter(my_adaptor);
            mCtx = MainActivity.mContext;

	}


}
其中get_data()返回一个List<Map<String,String>>,R.layout.activity_list_apk是定义整个列表的布局文件,R.layout.list_item_apk是定义列表中每一行的布局文件。
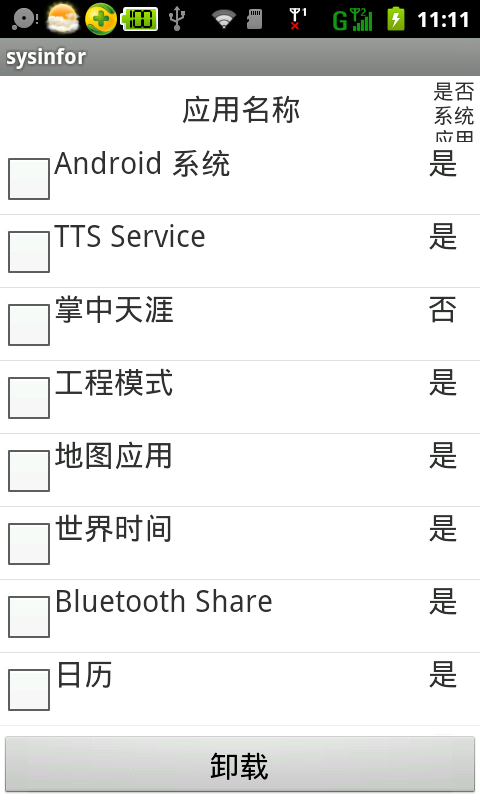
运行的结果: