项目模板使用dotnet core webapi,使用.netcore 3.1LTS编译。
1. add package Swashbuckle.AspNetCore
2. call AddSwaggerGen提供基本信息,
public void ConfigureServices(IServiceCollection services)
        {
            services.AddControllers();

            // Register the Swagger generator, defining 1 or more Swagger documents
            services.AddSwaggerGen(options =>
            {
                options.SwaggerDoc("v2", new OpenApiInfo
                {
                    Version = "v1",
                    Title = "ToDo API",
                    Description = "A simple example ASP.NET Core Web API",
                    TermsOfService = new Uri("https://example.com/terms"),
                    Contact = new OpenApiContact
                    {
                        Name = "Shayne Boyer",
                        Email = string.Empty,
                        Url = new Uri("https://twitter.com/spboyer"),
                    },
                    License = new OpenApiLicense
                    {
                        Name = "Use under LICX",
                        Url = new Uri("https://example.com/license"),
                    }
                });

// xml设置需要项目xml documentation file,因为需要通过xml读取api的<summary>等注释
                string xmlFile = $"{Assembly.GetExecutingAssembly().GetName().Name}.xml";
                string xmlPath = Path.Combine(AppContext.BaseDirectory, xmlFile);
                options.IncludeXmlComments(xmlPath);
            });
        }
3. 下面的代码要加入startup的Configure(IApplicationBuilder app, IWebHostEnvironment env)中,第二行是关于css的调整。
app.UseStaticFiles();
// Enable middleware to serve generated Swagger as a JSON endpoint.
            app.UseSwagger();
            // Enable middleware to serve swagger-ui (HTML, JS, CSS, etc.),
            // specifying the Swagger JSON endpoint.
            app.UseSwaggerUI(options =>
            {
                options.SwaggerEndpoint("/swagger/v2/swagger.json", "my api v2");
                options.InjectStylesheet("/swagger-ui/custom.css");  // 关于css的调整,需要调用app.UseStaticFiles();
            });
4. 加入<summary>注释以后,
/// <summary>
        /// get all items
        /// </summary>
        /// <returns></returns>
        [HttpGet]
        public IEnumerable<TodoItem> Get()
        {
            return AllItems;
        }
swaggerUI上可以显示注释内容

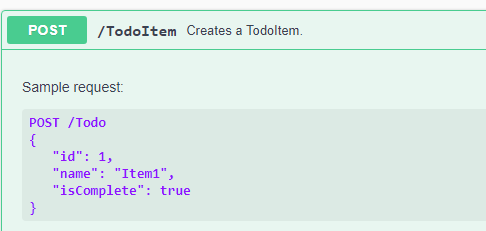
5. 加入<remarkds>注释,
/// <remarks>
        /// Sample request:
        ///
        ///     POST /Todo
        ///     {
        ///        "id": 1,
        ///        "name": "Item1",
        ///        "isComplete": true
        ///     }
        ///
        /// </remarks>
swaggerUI可以显示一个样例
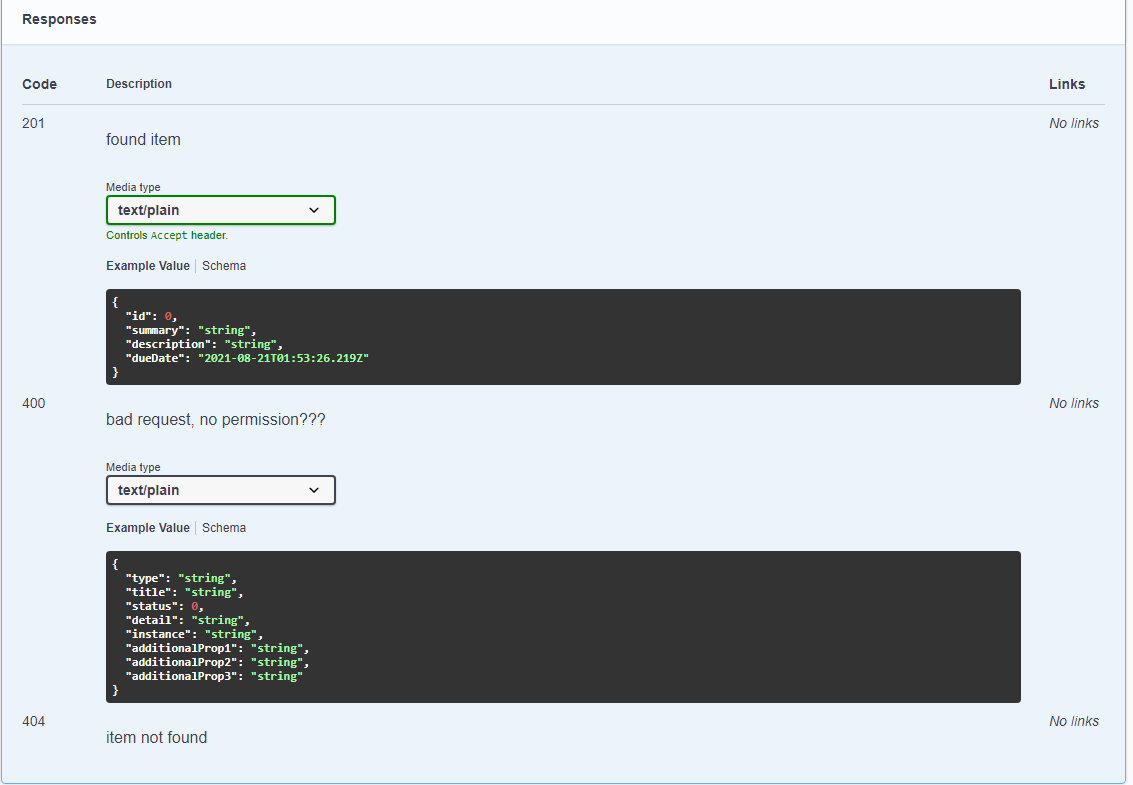
6. 测试一下ProducesResponseType
/// <response code="201">found item</response>
        /// <response code="400">bad request, no permission???</response>
        /// <response code="404">item not found</response>
        [HttpGet]
        [ProducesResponseType(StatusCodes.Status201Created)]
        [ProducesResponseType(StatusCodes.Status400BadRequest)]
        public TodoItem Get(int id)
        {
            return new TodoItem();
        }
ProducesResponseType可以生成包括Example Value的一整块描述。
而<response code="">就生成一行描述,不过可以覆盖ProducesResponseType的默认描述。
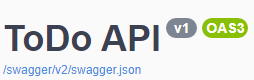
最后,生成的swagger.json可以通过/swagger/v2/swagger.json访问。
以上主要参考了微软的这个link
https://docs.microsoft.com/en-us/aspnet/core/tutorials/getting-started-with-swashbuckle?view=aspnetcore-5.0&tabs=visual-studio