我在学习微信小程序的过程当中,搜集了很多微信小程序自定义tabbar的资料,发现说的都是很复杂,看了很久才摸索出来,于是今天我整理一下我目前所使用的方法吧。
需求:我需要实现使用自定义tabbar跳转三个页面的方式,其中一个页面不显示tabbar
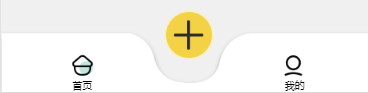
如图,三个按钮分别跳转到三个不同的页面,这里我的跳转路径分别为
首页:"/pages/shouye/shouye",
我的:"/pages/login/login"
添加:'/libs/home/index',(位于分包中)
我们需要在与pages文件夹平级下建立以下文件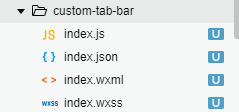 ,切记文件名必须是这个。
index.js:
Component({
  data: {
    selected: 0,
    "color": "#a9b7b7",
    "selectedColor": "#000000",
    "borderStyle": "white",
    "add":"add1",
    "list1": [{
      "selectedIconPath": "/images/tabbar/home1.png",  //选中后的icon标志
      "iconPath": "/images/tabbar/home.png",   //跳转页面的路径
      "pagePath": "/pages/shouye/shouye",
        "text": "首页",
      },
      {
        "selectedIconPath": "/images/tabbar/personal.png", //选中后的icon标志
        "pagePath": "/pages/login/login", //跳转页面的路径
        "iconPath": "/images/tabbar/personal2.png", //选中前的icon标志
        "text": "我的",
      },
    ],
    "icon1": "/images/tabbar/home1.png",
    "icon2": "/images/add2.png",
    "icon3": "/images/tabbar/personal2.png",
  },
  attached() {},
  methods: {
    switchTab(e) {
      const data = e.currentTarget.dataset
      const url = data.path
      this.setData({
        selected: data.index
      })
      if (data.index == "2") {
        this.setData({
          add:"add2"  //为了点击后改变中间+号的图标
        })
        wx.navigateTo({
          url: '/libs/home/index', //因为添加页面在分包中 因此只能使用wx.navigateTo跳转
        })
      } else if (data.index == "3"){
        wx.switchTab({
          url
        })
      } else {
        wx.switchTab({
          url
        })
      }
    },
  },
})
index.json:
{
  "component": true
}
index.html:
<view class="tbb" style="background-image: url('https://6831-h15-xc6sb-1300800299.tcb.qcloud.la/tabbar2.png?sign=1f5b8b9e4ef283d7003fc47ec5211819&t=1601437422'); background-size: 100% 100%;">
  <view class="tab-bar-item " data-path="/pages/shouye/shouye" data-index="1" bindtap="switchTab">  //这里的data-index=“1”这个1指定了跳转的首页为序号1 在index.js中通过这个序号来跳转对应的页面 下面的2 和 3 类同
    <image src=" {{icon1}}"></image>
    <view class="text">首页</view>
  </view>
  <view class=" {{add}} " data-path="/libs/home/index" data-index="2" bindtap="switchTab">
    <image src=" {{icon2}}"></image>
  </view>
  <view class="tab-bar-item " data-path="/pages/login/login" data-index="3" bindtap="switchTab">
    <image src=" {{icon3}}"></image>
    <view class="text">我的</view>
  </view>
</view>
index.css
.tbb2{
  position: fixed;
  bottom: 0;
  left: 0;
  right: 0;
   100vw;
  height: 30vh;
  display: flex;
  padding-bottom: env(safe-area-inset-bottom);
  z-index:900;
  background:rgb(255,247,251)
}
.tb1{
  100vw;
 background: firebrick;
 height: 10vh;
 margin-top: 7vh;
}
.img2{
   30rpx;
 height: 30rpx
}
.tbb{
  position: fixed;
  bottom: 0;
  left: 0;
  right: 0;
   100vw;
  height: 125rpx;
  display: flex;
  padding-bottom: env(safe-area-inset-bottom);
  z-index: 800;
}
.tab-bar-item view {
  margin-bottom: -3vh;
  z-index: 820;
}

.tab-bar-item {
  flex: 1;
  display: flex;
  justify-content: center;
  align-items: center;
  flex-direction: column;
    z-index: 820;
}
.tab-bar-item image {
    margin-top: 5rpx;
   50rpx;
  height: 50rpx;
    z-index: 820;
}
.text{
  font-size: 20rpx;
}

.add1{
  margin-top: -40rpx;
   z-index: 999;
}
 .add1 image{
   50px;
  height:50px;
  padding:2px;
  background-color: rgba(248, 242, 192, 0.733);
  border-radius:43px;
  z-index: 999;
}
.add2{
  margin-top: -40rpx;
   z-index: 999;
}
 .add2 image{
   50px;
  height:50px;
  padding:2px;
  background-color: rgba(248, 242, 192, 0.733);
  border-radius:43px;
  z-index: 999;
  transform:rotate(45deg); //旋转45°

}
具体的css 图片路径啥的自己修改即可。
然后我们需要在小程序的app.json中添加 首页 和 我的 这两个需要显示tabbar页面的路径。
"style": "v2",
  "tabBar": {
    "custom":true, //隐藏原生小程序的tabbar,这句必须加
    "color": "#cdcdcd",
    "selectedColor": "#79d0d2",
    "backgroundColor": "#f1f1f1",
    "list": [
      {
        "pagePath": "pages/shouye/shouye",
        "text": "首页",
        "iconPath": "/images/tabbar/home.png",
        "selectedIconPath": "/images/tabbar/home1.png"
      },
      {
        "pagePath": "pages/login/login",
        "text": "我的",
        "iconPath": "/images/tabbar/personal2.png",
        "selectedIconPath": "/images/tabbar/personal.png"
      }
    ]
  },
最后需要分别在 “首页”、 “我的” 两个页面的js中添加一下代码
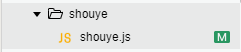

shouye.js中添加
  onShow: function() {
    if (typeof this.getTabBar === 'function' && this.getTabBar()) {
      this.getTabBar().setData({
        "icon3": "/images/tabbar/personal2.png",
        "icon1": "/images/tabbar/home1.png",
        "add": "add1"
      })
    }
login.js
onShow: function() {
if (typeof this.getTabBar === 'function' && this.getTabBar()) {
      this.getTabBar().setData({
        "icon3": "/images/tabbar/personal.png",
        "icon1": "/images/tabbar/home.png",
        "add": "add1"
      })
    }
备注:为了控制总包大小tabbar背景图片是上传到云开发数据库的 通过url获取的。url链接(https://6831-h15-xc6sb-1300800299.tcb.qcloud.la/tabbar2.png?sign=1f5b8b9e4ef283d7003fc47ec5211819&t=1601437422
)。
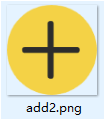
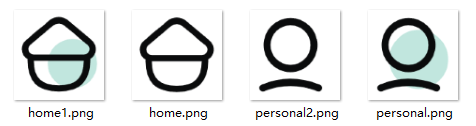
其他icon与对应名称如下:
中间加号的变化是通过改变css的旋转角度,在上文中的index.wxss中源码有写到。
因为是刚刚学习小程序,有些地方写的不好,还请大佬指教。