配置防火墙步骤: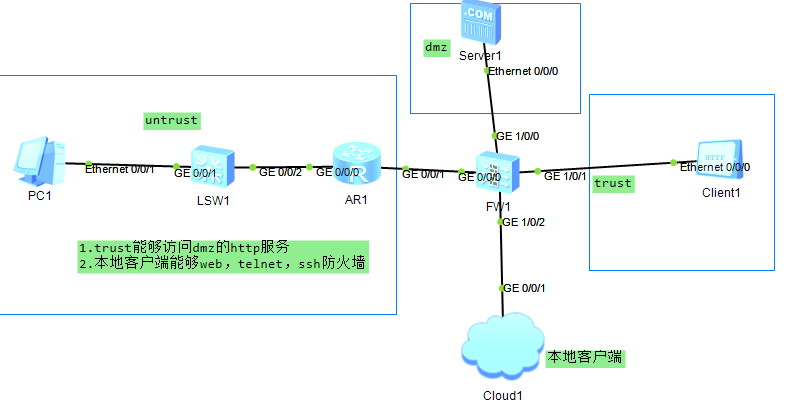
1.给接口配置ip,开 service-manage 服务
2.把接口画在zone区域
3.配置策略
4.服务器一定要开启服务
1.
interface GigabitEthernet1/0/0
undo shutdown
ip address 200.1.1.1 255.255.255.0
service-manage http permit
service-manage https permit
service-manage ping permit
service-manage ssh permit
service-manage snmp permit
service-manage telnet permit
#
interface GigabitEthernet1/0/1
undo shutdown
ip address 100.1.1.1 255.255.255.0
service-manage http permit
service-manage https permit
service-manage ping permit
service-manage ssh permit
service-manage snmp permit
service-manage telnet permit
firewall zone trust
set priority 85
add interface GigabitEthernet0/0/0
add interface GigabitEthernet1/0/1
firewall zone dmz
set priority 50
add interface GigabitEthernet1/0/0
security-policy
rule name permit_trust_dmz
source-zone trust
destination-zone dmz
source-address 100.1.1.0 mask 255.255.255.0
destination-address 200.1.1.0 mask 255.255.255.0
service http
service icmp
action permit
2.都在防火墙配置
通过Telnet方式管理
security-policy
rule name permit_trust_local
source-zone trust
destination-zone local
service icmp
service ssh
service telnet
action permit
[USG6000V1]user-interface vty 0 4              #配置vty,允许5个终端使用telnet功能
[USG6000V1-ui-vty0-4]authentication-mode aaa    #配置telnet使用AAA身份验证
[USG6000V1-ui-vty0-4]protocol inbound telnet         #允许AAA验证telnet
[USG6000V1-ui-vty0-4]quit             #保存退出
[USG6000V1]aaa                 #进入AAA验证
[USG6000V1-aaa]manager-user benet           #AAA验证账户是benet
[USG6000V1-aaa-manager-user-benet]password cipher pwd@1234  #AAA验证密码是pwd@1234
[USG6000V1-aaa-manager-user-benet]service-type telnet    #AAA给telnet提供验证功能
[USG6000V1-aaa-manager-user-benet]level 15    #设置telnet账户Benet为管理员权限
#“0”是参观级别,啥都做不了;“1”是监控级别,可以查看相关配置;“2”为配置级别,可以配置部分参数;“3-15”是管理级别,拥有最大的权限

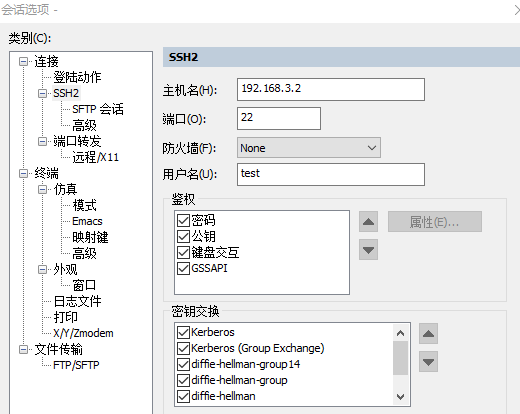
通过SSH方式管理
[USG6000V1]rsa local-key-pair create          #设置ssh密钥对,最长2048
The key name will be: USG6000V1_Host
The range of public key size is (512 ~ 2048).
NOTES: If the key modulus is greater than 512,
       it will take a few minutes.
Input the bits in the modulus[default = 2048]:2048       #输入
Generating keys...
..+++++
........................++
....++++
...........++
[USG6000V1]user-interface vty 0 4        #配置vty,允许5个终端
[USG6000V1-ui-vty0-4]authentication-mode aaa     #ssh使用AAA验证
[USG6000V1-ui-vty0-4]protocol inbound ssh            #允许ssh使用AAA验证
[USG6000V1-ui-vty0-4]quit
[USG6000V1]ssh user test              #创建验证账户test
[USG6000V1]ssh user test authentication-type password   #使用密码验证
[USG6000V1]ssh user test service-type stelnet         #配置验证服务类型为ssh
[USG6000V1]aaa              #进入AAA
[USG6000V1-aaa]manager-user test      #AAA验证用户名为test
[USG6000V1-aaa-manager-user-test]password cipher pwd@1234    #AAA验证test账户密码为pwd@1234
[USG6000V1-aaa-manager-user-test]service-type ssh     #AAA给ssh提供验证
[USG6000V1-aaa-manager-user-test]level 15       #设置ssh验证账户为管理员
[USG6000V1-aaa-manager-user-test]quit
[USG6000V1-aaa]quit
[USG6000V1]stelnet server enable                 #开启ssh

这个端口为22,用CRT测试:
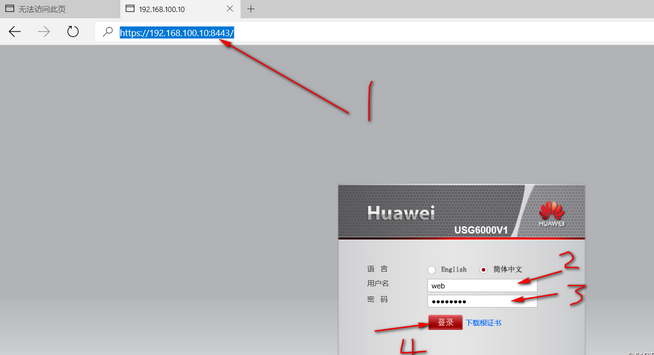
通过Web方式管理:
[USG6000V1]web-manager security enable        #开启web管理功能
[USG6000V1]aaa       #进入AAA配置
[USG6000V1-aaa]manager-user web       #配置验证账户名为web
[USG6000V1-aaa-manager-user-web]password  #设置AAA验证密码
Enter Password:         #输入密码
Confirm Password:         #重复输入
[USG6000V1-aaa-manager-user-web]service-type web   #允许使用web验证
[USG6000V1-aaa-manager-user-web]level 15         #设置为管理员权限
应使用 https://192.168.3.2:8443 进行访问(下面这个图是网上下载的)