写在前面的话:
一直想着手动配置webpack实现应用,正好最近这段时间比较空闲,就写了一个通过webpack打包实现todolist的简单应用。本文内容包括:通过webpack打包css,html,js文件处理,以及图片处理。以下是配置文件内容,如果你都能看懂,那本文对你可能收效甚微。如有不解之处,敬请细看。
const path = require('path')
const HtmlWebpackPlugin = require('html-webpack-plugin')
const miniCssExtractPlugin = require('mini-css-extract-plugin')

module.exports = {
    mode: 'development',
    entry: './src/js/main.js',
    output: {
        path: path.resolve(__dirname, 'dist'),
        filename: '[hash:8].js'
    },
    module: {
        rules: [{
                test: /(.jsx|.js)$/,
                use: {
                    loader: "babel-loader"
                },
                exclude: /node_modules/
            },
            {
                test: /.css$/,
                use: ['style-loader', {
                    loader: miniCssExtractPlugin.loader
                }, 'css-loader']
            },
            {
                test: /.html$/,
                use: [{
                    loader: 'html-withimg-loader'
                }]
            },
            {
                test: /.(png|jpe?g|gif|svg)(?.*)?$/,
                use: [{
                    loader: 'url-loader',
                    options: {
                        limit: 1,
                        outputPath: 'imgs/'
                    },
                }]
            },
        ]
    },
    devServer: {
        contentBase: path.join(__dirname, 'dist'),
        compress: false,
        port: 3000
    },
    plugins: [
        new HtmlWebpackPlugin({
            template: './index.html',
            filename: 'index.html',
        }),
        new miniCssExtractPlugin({
            filename: 'css/[name].css'
        })
    ]
}
一、什么是webpack?
这里引用webpack官网定义:webpack 是一个现代 JavaScript 应用程序的静态模块打包器(module bundler)。当 webpack 处理应用程序时,它会递归地构建一个依赖关系图(dependency graph),其中包含应用程序需要的每个模块,然后将所有这些模块打包成一个或多个 bundle。通俗讲就是将资源进行重新整合。
webpack有四个核心概念:
- entry (用于配置入口)
- output (用于配置输入文件)
- loader(用于对模块的源代码进行转换处理)
- plugins(插件,webpack功能扩展,使得webpack无比强悍)
二、本文主要内容
1. 首先创建项目目录
初始化: yarn init

//安装 webpack (尽量不要安装为全局依赖)
安装依赖: yarn add webpack wabpack-cli -D

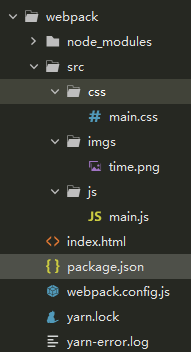
然后创建相应的项目目录结构。

例:

2. 接着在 webpack.config.js 中进行配置
在 package.json 文件中配置运行脚本
 "scripts": {
   "build": "webpack"
 },
 配置后直接执行 yarn build 即可  如果没有配置则执行 npx webpack 命令

1. 打包js文件
    const path = require('path')
    module.exports = {
        // 入口文件
        entry: './src/js/main.js',
        // 输出文件
    output: {
        path: path.resolve(__dirname, 'dist'),
        filename: '[hash:8].js'
    },
       // module: {},
       // plugins: [],
       // devServer: {}
      }

2.  如何打包 html文件
  我们需要安装一个插件
    yarn add html-webpack-plugin -D

    // 引入
    const HtmlWebpackPlugin = require('html-webpack-plugin')

    // 在配置中添加
    plugins: [
        new HtmlWebpackPlugin({
            template: './index.html',
            filename: 'index.html',
        })
    ]

即可在 dist 目录下生成相应的js 及html文件

3. 处理css文件
  (1)如果是在html文件中直接引入了css文件则只需要执行 yarn add css-loader style-loader -D 安装相应loader
   module: {
     rules: [
      {test: /.css$/, use: ['style-loader',  'css-loader']}
     ]
    }
 (2)如果在想实现自动引入css文件则需要要安装插件 yarn add mini-css-extract-plugin
   // 在plugins中添加如下代码
new miniCssExtractPlugin({
filename: 'css/[name].css'
})
// 将css中的loader 配置修改为
{test: /.css$/, use: ['style-loader', {loader: miniCssExtractPlugin.loader}, 'css-loader']}
4、js文件处理 (将es6、7、8转换为es5,解决浏览器兼容问题)
  安装babel-loader yarn add babel-loader @babel/core -D
 {
    test: /(.jsx|.js)$/,use: {loader: "babel-loader"},
     //排除node_modules文件夹中的js文件
     exclude: /node_modules/
 }
5、图片处理
   [1]在css文件中使用背景图片时不需要任何配置

   [2]在js中创建图片时 安装  file-loader 或者 url-loader
 {
    test: /.(png|jpe?g|gif|svg)(?.*)?$/,
use: [{
loader: 'url-loader',
options: {
limit: 1, // 图片小于多少时输出为base64格式
outputPath: 'imgs/' // 图片输出位置
},
}]}
[3] 在html 中使用img标签引入图片 则需要安装 html-withimg-loader
{
    test: /.html$/,
use: ['html-withimg-loader']
}
6、启动服务配置
安装 webpack-dev-server 并添加相应配置
devServer: {
contentBase: path.join(__dirname, 'dist'),
compress: false,
port: 3000
}
如上配置即可在 3000端口启动服务,可以通过localhost:3000访问
在package.json中添加运行脚本
"scripts": {
"dev": "webpack-dev-server",
"build": "webpack"
}
运行 yarn run dev 或执行 yarn run build 打包
三、附上完整代码
复制下面代码或点击该链接下载源码: https://github.com/moor-mupan/todoList.git
<-- index.html -->
<!DOCTYPE html>
<html>
    <head>
        <meta charset="utf-8">
        <title>webpack进阶</title>
    </head>
    <body>
        <div class="bigbox">
            <div class="out-box">
                <div class="item-tit">
                    <h1 class="title">TODOLIST 代办事项</h1>
                    <div class="flex">
                        <input id="addInput" class="input" type="text" placeholder="输入代办">
                        <button id="add" type="button" class="btn">添加代办</button>
                    </div>
                </div>
                <div class="item-box">
                    <h2>代办事项</h2>
                    <ul id="todo"></ul>
                </div>
                <div class="item-box">
                    <h2>已完成</h2>
                    <ul id="done"></ul>
                </div>
                <div class="img-box"></div>
            </div>
            <img src="./src/imgs/time.png" class="tipImg">
        </div>
        <div class="module" id="module">
            <div id="toNotDo">添加到待办</div>
            <div id="toDone">添加到已完成</div>
            <div id="del">删除</div>
            <div id="close">关闭</div>
        </div>
    </body>
</html>
// src/js/main.js
import '../css/main.css'

let $ = require('jquery')
$(() => {
    const $add = $('#add')
    const $addInput = $('#addInput')
    const $todo = $('#todo')
    const $done = $('#done')
    const $module = $('#module')
    const $close = $('#close')
    const $del = $('#del')
    const $toDone = $('#toDone')
    const $toNotDo = $('#toNotDo')
    let itemID = ''
    let cur = ''
    let nowID = ''

    $add.click(() => {
        let val = $addInput.val()
        if (val.trim() !== '') {
            itemID = guid()
            let dom = `<li id=${itemID}>${val}</li>`
            $todo.append(dom)
            $addInput.val('')
            todoHandle()
        } else {
            alert('输入代办内容')
        }
    })
    $toDone.click(() => {
        $done.append(cur)
        $('#todo>li').remove(`#${nowID}`)
        close()
    })
    $toNotDo.click(() => {
        $todo.append(cur)
        $('#done>li').remove(`#${nowID}`)
        close()
    })
    $del.click(() => {
        $('#done>li').remove(`#${nowID}`)
        $('#todo>li').remove(`#${nowID}`)
        close()
    })
    $close.click(() => {
        close()
    })

    function todoHandle() {
        let $li = $('li')
        let clientX = 0
        let clientY = 0

        $li.bind("contextmenu", function(e) {
            cur = e.currentTarget
            nowID = $(cur).attr('id')

            clientX = e.clientX
            clientY = e.clientY
            $module.css({
                display: 'inline-block',
                left: `${clientX}px`,
                top: `${clientY}px`
            })
            return false
        })
    }

    function close() {
        $module.css({
            display: 'none'
        })
    }

    function guid() {
        return 'xxxxxxxx-xxxx-4xxx-yxxx-xxxxxxxxxxxx'.replace(/[xy]/g, function(c) {
            let r = Math.random() * 16 | 0,
                v = c == 'x' ? r : (r & 0x3 | 0x8);
            return v.toString(16);
        });
    }
})
/* src/css/main.css */
body{
    background-color: #39CCCC;
}

*{
    box-sizing: border-box;
}

.bigbox{
    display: flex;
    align-items: flex-start;
    justify-content: center;
}

.out-box{
    display: inline-block;
    width: 640px;
    padding: 30px;
}

.flex{
    display: flex;
    align-items: center;
}

.input {
    height: 30px;
    line-height: 30px;
    line-height: 30px;
    border: 1px solid #EEEEEE;
    border-radius: 6px 0 0 6px;
    padding: 0 20px;
}

.btn{
    height: 30px;
    border: 1px solid #001F3F;
    background-color: #004444;
    color: #fff;
    border-radius: 0 6px 6px 0;
}

.item-box{
    line-height: 40px;
    margin-bottom: 10px;
}

.item-box li{
    width: 360px;
    background-color: #004444;
    color: #fff;
    list-style: none;
    padding: 0 20px;
    border-bottom: 1px solid #FFFF00;
}

.item-box li:last-of-type{
    border: none;
}

.item-box li:hover{
    color: #FFFF00;
    cursor: pointer;
}

.module{
    /* display: inline-block; */
    border-radius: 6px;
    background-color: #fff;
    line-height: 30px;
    position: absolute;
    display: none;
}

.module div{
    padding: 0 30px;
}

.module div:hover{
    background-color: #ddd;
    cursor: pointer;
}

.tipImg{
    border-radius: 6px;
}
最终效果图如下:
