nginx 负载均衡企业实践应用
01. 上文回顾:
上文链接:https://www.cnblogs.com/moox/p/12766225.html
LNMP架构常见问题
a 如何实现WEB服务器和存储服务器建立关系
    web+nfs
       1) 找到网站数据存储的本地目录
       2) 如果本地存储目录有数据,需要进行迁移备份
       3) 编写查看nfs服务配置参数(xxx_squash)
       4) 实现挂载操作(实现开机自动挂载)
    web+mysql
       1) 将本地数据数据进行备份 mysqldump --all-database
       2) 将备份数据进行迁移
       3) 将数据进行还原
       4) 修改代码文件,连接新的数据库服务
b 负载均衡概念说明
    什么是集群
    什么是负载
    什么是反向代理
c 负载均衡集群架构部署
    集群环境部署
    负载均衡部署
    upstream模块  实现负载均衡
    proxy_pass    实现反向代理
d 负载均衡相关模块详细说明
e 负载均衡异常排错思路
02. 负载均衡企业实践应用
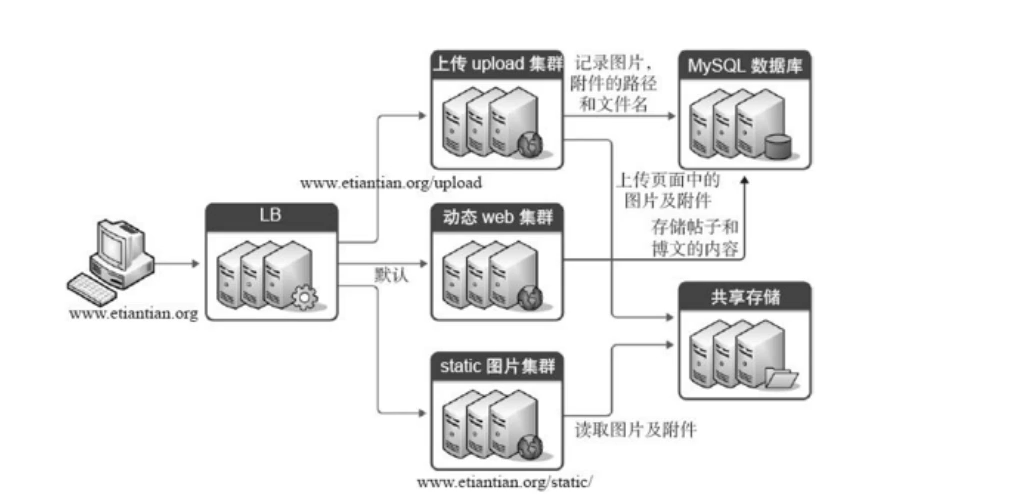
1)动静分离负载均衡
根据用户访问的uri信息进行负载均衡
根据uri的信息,将页面请求动静分离,分别部署不同的集群
-
第一个历程: 架构环境规划
/upload 集群-10.0.0.8:80 html/www/upload upload服务器集群
/static 集群-10.0.0.7:80 html/www/static static服务器集群
/ 集群-10.0.0.9:80 html/www default服务器集群(动态)- web02上进行环境部署:
[root@web02 ~]# mkdir /html/www/upload [root@web02 ~]# echo "upload-web集群_10.0.0.8" >/html/www/upload/oldboy.html- web01上进行环境部署:
[root@oldboy01 html]# mkdir /html/www/static [root@oldboy01 html]# echo static-web集群_10.0.0.7 >/html/www/static/oldboy.html- web03上进行环境部署:
echo "default-web集群_10.0.0.9" >/html/www/oldboy.html -
第二个历程: 编写负载均衡配置文件
- 负载均衡服务器172.16.1.5:/etc/nginx/conf.d/lb.conf
cp lb.conf{,bak01} [root@lb01 conf.d]# cat lb.conf ## 负载均衡集群部分 upstream upstream upload { server 10.0.0.8:80; } upstream static { server 10.0.0.7:80; } upstream default { server 10.0.0.9:80; } ## 各虚拟主机访问不同的集群 server { listen 80; server_name www.oldboy.com; location / { proxy_pass http://default; ## 注意web03中autoindex 关闭,并开放首页文件oldboy.html proxy_set_header Host $host; proxy_set_header X-Forwarded-For $remote_addr; proxy_next_upstream error timeout http_404 http_502 http_403; } location /upload { proxy_pass http://upload; proxy_set_header Host $host; proxy_set_header X-Forwarded-For $remote_addr; proxy_next_upstream error timeout http_404 http_502 http_403; } location /static { proxy_pass http://static; proxy_set_header Host $host; proxy_set_header X-Forwarded-For $remote_addr; proxy_next_upstream error timeout http_404 http_502 http_403; } } ## default情形的web3注意修改配置文件/etc/nginx/conf.d/www.conf location /{ root /html/www; index oldboy.html; --2 处设置站点目录首页文件,在站点目录下 #auth_basic "please input passwd"; #auth_basic_user_file password/htpasswd; #autoindex on; -- 1 处注释,表示目录方式打开 charset utf-8; }- 总结: 实现网站集群动静分离
- 提高网站服务安全性
- 管理操作工作简化
- 可以划分不同人员管理不同集群服务器
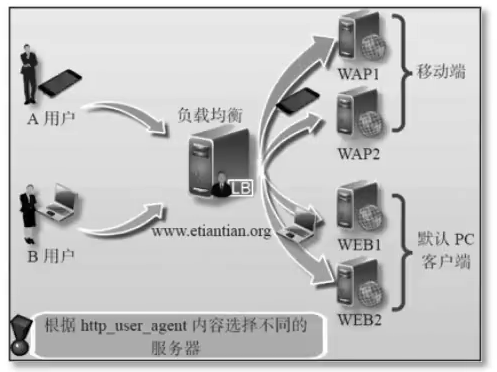
2) 不同终端负载均衡
根据用户访问的终端信息显示不同页面
-
第一个历程: 准备架构环境
- 环境规划
iphone www.oldboy.com --- iphone_access 10.0.0.7:80 mobile移动端集群 chrome www.oldboy.com --- google_access 10.0.0.8:80 web端集群 IE 360 www.oldboy.com --- default_access 10.0.0.9:80 default端集群- 测试文件
web01: echo "iphone_access 10.0.0.7" >/html/www/oldboy.html web02: echo "google_access 10.0.0.8" >/html/www/oldboy.html web03: echo "default_access 10.0.0.9" >/html/www/oldboy.html -
第二个历程: 编写负载均衡配置文件
[root@lb01 conf.d]# cat lb.conf
upstream web {
   server 10.0.0.8:80;
}
upstream mobile {
   server 10.0.0.7:80;
}
upstream default {
   server 10.0.0.9:80;
}
server {
    listen       80;
    server_name  www.moox.com;
    location / {
       if ($http_user_agent ~* iphone) {   ## 如果匹配到iPhone
          proxy_pass http://mobile;        ## 测试可在浏览器中选择手机
       }
       if ($http_user_agent ~* Chrome) {   ## 如果匹配 Chrome
         proxy_pass  http://web;
       }
       proxy_pass http://default;			## 其余为默认
       proxy_set_header Host $host;
       proxy_set_header X-Forwarded-For $remote_addr;
       proxy_next_upstream error timeout http_404 http_502 http_403;
    }
}
# 注意:agent可以在access.log中看到标准的写法,如Chrome而不是chrome
# 测试:用不同的浏览器输入www.moox.com或在浏览器中进入手机模式