命令总结
ansible-playbook test.yaml --syntax-check  ## 执行脚本语法检查
ansible-playbook test.yaml -C              ## 预执行脚本
ansible-playbook test.yaml                 ## 执行脚本
ansible-playbook test.yaml -v              ## 显示执行脚本
ansible-playbook test.yaml -vv             ## 显示执行脚本(更详细,最多四个v,ansible-playbook test.yaml -vvvv)
00. 介绍部分
- ansible批量管理服务概念
- ansible批量管理服务特点
- ansible批量管理服务部署
- ansible批量管理服务应用---模块应用
- ansible模块命令语法
- ansible常用模块
01. 知识回顾
-
远程管理服务介绍
ssh 数据加密 22
telnet 数据明文 23 -
SSH远程管理服务工作原理
私钥 公钥
用途1: 对数据进行加密处理
用途2: 对用户访问进行认证 -
SSH远程连接的方式
a 基于口令的方式进行连接
b 基于秘钥的方式进行连接
c 基于秘钥连接的工作原理3.1 基于秘钥的连接部署方式 第一个历程: 创建秘钥对(管理端服务器) ssh-keygen -t 秘钥的类型(dsa|rsa) 第二个历程: 将公钥进行分发(被管理端服务器) ssh-copy-id -i /root/.ssh/id_dsa.pub root@172.16.1.31 如何批量分发公钥: 01. 需要输入连接确认信息 yes/no ssh-copy-id -i /root/.ssh/id_dsa.pub root@172.16.1.31 "-o StrictHostKeyChecking=no" 02. 需要第一次连接输入密码 yum install -y sshpass sshpass -p123456 ssh-copy-id -i /root/.ssh/id_dsa.pub root@172.16.1.31 "-o StrictHostKeyChecking=no" 03. 远程服务器SSH服务端口号改动了 sshpass -p123456 ssh-copy-id -i /root/.ssh/id_dsa.pub root@172.16.1.31 -p 52113 "-o StrictHostKeyChecking=no" 3.2 基于秘钥连接排错思路: 01. 利用命令进行连接测试 02. 检查公钥在被管理主机上是否存在,并且与管理端公钥信息是否相同 03. 利用公钥分发命令重新分发公钥 04. 检查脚本的编写 05. 调试脚本功能 sh -x -
SSH远程服务防范入侵案例
-
SSH服务的配置文件编写
监听地址??? -
SSH服务的相关命令总结
02. ansible批量管理服务介绍
ansible批量管理服务意义
- 提高工作的效率
- 提高工作准确度
- 减少维护的成本
- 减少重复性工作
ansible批量管理服务功能
- 可以实现批量系统操作配置
- 可以实现批量软件服务部署
- 可以实现批量文件数据分发
- 可以实现批量系统信息收集
03. ansible批量管理服务部署
管理端服务器
第一个历程: 安装部署软件
yum install -y ansible --- 需要依赖epel的yum源
/etc/ansible/ansible.cfg --- ansible服务配置文件
/etc/ansible/hosts --- 主机清单文件 定义可以管理的主机信息
/etc/ansible/roles --- 角色目录???
第二个历程: 需要编写主机清单文件
vim /etc/ansible/hosts

## 定义可以管理的主机信息,主机必须是已经完成秘钥分发的,秘钥分发脚本/server/scripts/fenfa_key_pub.sh
172.16.1.41
172.16.1.31
172.16.1.7
第三个历程: 测试是否可以管理多个主机
脚本测试 hostname,注意需要先关闭selinux服务,负责会报错
ansible all -a "hostname"
[root@m01 scripts]# ansible all -a "hostname"
显示结果:
172.16.1.41 | CHANGED | rc=0 >>
backup172.16.1.7 | CHANGED | rc=0 >>
web01172.16.1.31 | CHANGED | rc=0 >>
nfs01---参数-a ,-active或action,表示执行的动作
---参数all,表示所有管理的主机,可以替换为ansible 172.16.1.41,172.16.1.31 -a "hostname"
04. ansible服务架构信息
ansible基本架构图示:

1) 主机清单配置
2) 软件模块信息         OK  ---每个模块只能完成一个功能
3) 基于秘钥连接主机     OK		---使用ansible批量管理之前需要先完成ssh秘钥分发认证
4) 主机需要关闭selinux  OK
5) 软件剧本功能				---将多个模块组合在一起即是剧本
05. ansible软件模块应用
ansible官方网站: https://docs.ansible.com/
模块的应用语法格式:
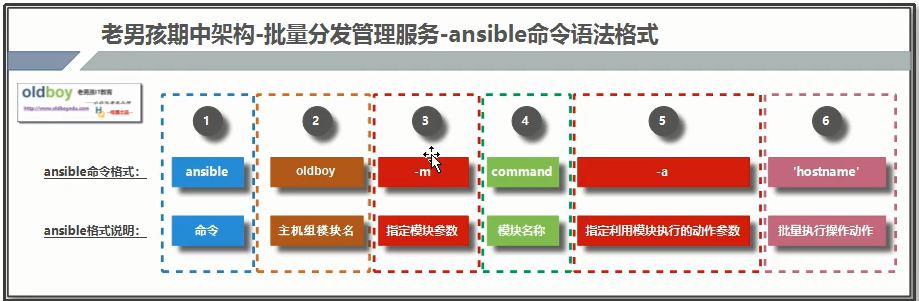
ansible 主机名称/主机组名称/主机地址信息/all -m(指定应用的模块信息) 模块名称 -a(指定动作信息) "执行什么动作"
命令类型模块:
掌握第一个模块: command (默认模块)
command – Executes a command on a remote node
在一个远程主机上执行一个命令
简单用法:
[root@m01 scripts]# ansible 172.16.1.31 -m command -a "hostname"
172.16.1.31 | CHANGED | rc=0 >>
nfs01
扩展应用:
- chdir Change into this directory before running the command.
在执行命令之前对目录进行切换ansible 172.16.1.31 -m command -a "chdir=/tmp touch oldboy.txt"
- creates If it already exists, this step won't be run.
如果文件存在了,不执行命令操作;也就是判断文件不存在时,执行后面的操作ansible 172.16.1.31 -m command -a "creates=/tmp/hosts touch oldboy.txt"
- removes If it already exists, this step will be run.
如果文件存在了, 这个步骤将执行ansible 172.16.1.31 -m command -a "removes=/tmp/hosts chdir=/tmp touch oldboy.txt"
- free_form(required)
The command module takes a free form command to run.
There is no parameter actually named 'free form'. See the examples!
使用command模块的时候,-a参数后面必须写上一个合法linux命令信息
注意事项:
有些符号信息无法识别: <", ">", "|", ";" and "&"
需要使用上述符号时,指定shell模块,如
ansible 172.16.1.31 -m shell -a "cd /data; ls /data"
掌握第二个模块: shell (万能模块)
在远端运行,相当于在远端的命令行
shell – Execute commands in nodes
在节点上执行操作
简单用法:
[root@m01 scripts]# ansible 172.16.1.31 -m command -a "hostname"
172.16.1.31 | CHANGED | rc=0 >>
nfs01
扩展应用
- chdir Change into this directory before running the command.
在执行命令之前对目录进行切换
ansible 172.16.1.31 -m shell -a "chdir=/tmp touch oldboy.txt"
- creates If it already exists, this step won't be run.
如果文件存在了,不执行命令操作
ansible 172.16.1.31 -m shell -a "creates=/tmp/hosts touch oldboy.txt"
- removes If it already exists, this step will be run.
如果文件存在了, 这个步骤将执行
ansible 172.16.1.31 -m shell -a "removes=/tmp/hosts chdir=/tmp touch oldboy.txt"
- free_form(required)
The shell module takes a free form command to run.
There is no parameter actually named 'free form'. See the examples!
使用command模块的时候,-a参数后面必须写上一个合法linux命令信息
实践应用: 利用shell执行脚本
第一个步骤: 编写一个脚本
[root@m01 scripts]# cat yum.sh
#!/bin/bash
yum install -y htop
第二个步骤: 将脚本发送到远程主机
[root@m01 scripts]# scp -rp yum.sh 172.16.1.31:/server/scripts
yum.sh
[root@m01 scripts]# ansible 172.16.1.31 -m command -a "ls /server/scripts/"
172.16.1.31 | CHANGED | rc=0 >>
backup.sh
yum.sh
第三个步骤: 将脚本权限进行修改(添加执行权限)
[root@m01 scripts]# ansible 172.16.1.31 -m shell -a "/server/scripts/yum.sh"
172.16.1.31 | FAILED | rc=126 >>
/bin/sh: /server/scripts/yum.sh: Permission deniednon-zero return code
[root@m01 scripts]# ansible 172.16.1.31 -m shell -a "chmod +x /server/scripts/yum.sh"

注意:[root@m01 scripts]# ansible 172.16.1.31 -m shell -a "sh /server/scripts/yum.sh"
不加权限也是可以可以执行的
第四个步骤: 运行ansible命令执行脚本
[root@m01 scripts]# ansible 172.16.1.31 -m shell -a "sh /server/scripts/yum.sh"
掌握第三个模块: script (万能模块)
在远端节点上运行本地脚本,再将结果传回本地
第一个步骤: 编写一个脚本
[root@m01 scripts]# cat yum.sh
#!/bin/bash
yum install -y htop
第二个步骤: 运行ansible命令执行脚本
[root@m01 scripts]# ansible 172.16.1.31 -m script -a "/server/scripts/yum.sh"
172.16.1.31 | CHANGED => {
 "changed": true,
 "rc": 0,
 "stderr": "Shared connection to 172.16.1.31 closed.
",
 "stderr_lines": [
     "Shared connection to 172.16.1.31 closed."
 ], ...
注意:使用脚本模块时需要直接执行脚本,不能用以下命令
[root@m01 scripts]# ansible 172.16.1.31 -m script -a "sh /server/scripts/yum.sh"
172.16.1.31 | FAILED! => {
 "changed": false,
 "msg": "Could not find or access 'sh'
Searched in:
	/server/scripts/files/sh
	/server/scripts/sh
	./files/sh
	./sh on the Ansible Controller.
If you are using a module and expect the file to exist on the remote, see the remote_src option"
}
PS: scripts模块参数功能和command模块类似
文件类型模块:
copy模块
copy – Copies files to remote locations
将数据信息进行批量分发给远程的多台主机
基本用法:
[root@m01 scripts]# ansible 172.16.1.31 -m copy -a "src=/etc/hosts dest=/etc"
172.16.1.31 | CHANGED => {       --- 对哪台主机进行操作
"changed": true,             --- 是否对主机信息进行改变
"checksum": "6ed7f68a1d6b4b36c1418338b2001e421eeba270",---生成一个文件校验码=MD5数值
"dest": "/etc/hosts",        --- 显示目标路径信息
"gid": 0,                    --- 显示复制后文件gid信息
"group": "root",             --- 显示复制后文件属组信息
"md5sum": "7afd7b74854f0aaab646b3e932f427c0",           ---生成一个文件校验码=MD5数值
"mode": "0644",              --- 显示复制后文件权限信息
"owner": "root",             --- 显示复制后文件属主信息
"size": 401,                 --- 显示文件的大小信息
"src": "/root/.ansible/tmp/ansible-tmp-1557804498.23-26487341925325/source",
"state": "file",             --- 显示文件的类型信息
"uid": 0                     --- 显示复制后文件uid信息
}
补充说明: ansible软件输出颜色说明:
1. 绿色信息:  查看主机信息/对主机未做改动
2. 黄色信息:  对主机数据信息做了修改
3. 红色信息:  命令执行出错了
4. 粉色信息:  忠告信息
5. 蓝色信息:  显示ansible命令执行的过程???
扩展用法:
- 在传输文件时修改文件的属主和属组信息
[root@m01 rsync]# ansible 172.16.1.31 -m copy -a "src=/etc/ansible/file/rsync/rsync.password dest=/etc/ owner=oldboy group=oldboy" - 在传输文件时修改文件的权限信息
[root@m01 rsync]# ansible 172.16.1.31 -m copy -a "src=/etc/ansible/file/rsync/rsync.password dest=/etc/ mode=1777" - 在传输数据文件信息时对远程主机源文件进行备份
[root@m01 rsync]# ansible 172.16.1.31 -m copy -a "src=/etc/ansible/file/rsync/rsync.password dest=/etc/ backup=yes" - 创建一个文件并直接编辑文件的信息,不需要在管理端主机创建出文件
[root@m01 rsync]# ansible 172.16.1.31 -m copy -a "content='oldboy123' dest=/etc/rsync.password"
PS:参数: remote_src directory_mode local_follow
参数: remote_src

1、If no, it will search for src at originating/master machine.
src参数指定文件信息,会在本地管理端服务进行查找,默认remote_src=no[root@m01 rsync]# ansible 172.16.1.31 -m copy -a "src=/etc/rsync.password dest=/data remote_src=yes"2、If yes it will go to the remote/target machine for the src. Default is no.
src参数指定文件信息,会从远程主机上进行查找[root@m01 rsync]# ansible 172.16.1.31 -m copy -a "src=/etc/rsync.password dest=/data remote_src=yes" 172.16.1.31 | CHANGED => { ...输出信息省略... }
PS: ansible软件copy模块复制目录信息
ansible 172.16.1.31 -m copy -a "src=/oldboy dest=/oldboy"
src后面目录没有/: 将目录本身以及目录下面的内容都进行远程传输复制[root@m01 ~]# ansible 172.16.1.31 -m copy -a "src=/oldboy dest=/oldboy" 172.16.1.31 | CHANGED => { "changed": true, "dest": "/oldboy/", "src": "/oldboy" } [root@nfs01 ~]# tree /oldboy/ /oldboy/ └── oldboy └── oldboy01 ├── 01.txt ├── 02.txt ├── 03.txt └── oldboy02 3 directories, 3 filesansible 172.16.1.31 -m copy -a "src=/oldboy/ dest=/oldboy"
src后面目录有/: 只将目录下面的内容都进行远程传输复制[root@m01 ~]# ansible 172.16.1.31 -m copy -a "src=/oldboy/ dest=/oldboy" 172.16.1.31 | CHANGED => { "changed": true, "dest": "/oldboy/", "src": "/oldboy/" } [root@nfs01 ~]# tree /oldboy/ /oldboy/ └── oldboy01 ├── 01.txt ├── 02.txt ├── 03.txt └── oldboy02 2 directories, 3 files
file 模块
– Sets attributes of files
设置文件属性信息
基本用法:
ansible 172.16.1.31 -m file -a "dest=/etc/hosts owner=oldboy group=oldboy mode=666"
执行命令前:
[root@nfs01 ~]# ll /etc/hosts
-rw-r--r-- 1 root root 397 Mar  4 09:20 /etc/hosts
执行命令:
[root@m01 ~]# ansible 172.16.1.31 -m file -a "dest=/etc/hosts owner=oldboy group=oldboy mode=644"
172.16.1.31 | CHANGED => {
...输出信息省略...
}
执行命令后:
[root@nfs01 ~]# ll /etc/hosts
-rw-r--r-- 1 oldboy oldboy 397 Mar  4 09:20 /etc/hosts
[root@nfs01 ~]#
扩展用法:
- 可以利用模块创建数据信息 (文件 目录 链接文件)
state 参数
=absent --- 缺席/删除数据信息
=directory --- 创建一个目录信息
=file --- 检查创建的数据信息是否存在 绿色存在 红色不存在
=hard --- 创建一个硬链接文件
=link --- 创建一个软链接文件
=touch --- 创建一个文件信息
创建目录信息:
ansible 172.16.1.31 -m file -a "dest=/oldboy/ state=directory"
ansible 172.16.1.31 -m file -a "dest=/oldboy/oldboy01/oldboy02/ state=directory"
[root@m01 ~]# ansible 172.16.1.31 -m file -a "dest=/oldboy/oldboy01/oldboy02 state=directory"
172.16.1.31 | CHANGED => {
...输出信息省略...
}
[root@nfs01 ~]# tree /oldboy/
/oldboy/
└── oldboy01
    └── oldboy02

2 directories, 0 files
创建文件信息:
ansible 172.16.1.31 -m file -a "dest=/oldboy/oldboy.txt state=touch"
[root@m01 ~]# ansible 172.16.1.31 -m file -a "dest=/oldboy/oldboy01/ansible.txt state=touch"
172.16.1.31 | CHANGED => {
...输出信息省略...
}
[root@nfs01 ~]# tree /oldboy/
/oldboy/
└── oldboy01
    ├── ansible.txt
    └── oldboy02

2 directories, 1 file
创建链接文件信息:
ansible 172.16.1.31 -m file -a "src=/oldboy/oldboy.txt dest=/oldboy/oldboy_hard.txt state=hard"
ansible 172.16.1.31 -m file -a "src=/oldboy/oldboy.txt dest=/oldboy/oldboy_link.txt state=link"[root@m01 ~]# ansible 172.16.1.31 -m file -a "src=/oldboy/oldboy01/ansible.txt dest=/oldboy/ansible_hard.txt state=hard" [root@m01 ~]# ansible 172.16.1.31 -m file -a "src=/oldboy/oldboy01/ansible.txt dest=/oldboy/ansible_soft.txt state=link" 172.16.1.31 | CHANGED => { ...输出信息省略... } ---hard---看iNode是否一致 [root@nfs01 oldboy]# find . -name "*txt" |xargs ls -li 101838199 -rw-r--r-- 2 root root 0 Mar 4 15:11 ./ansible_hard.txt 101838199 -rw-r--r-- 2 root root 0 Mar 4 15:11 ./oldboy01/ansible.txt ---soft---直接就能看出 [root@nfs01 oldboy]# ll lrwxrwxrwx 1 root root 28 Mar 4 15:25 ansible_soft.txt -> /oldboy/oldboy01/ansible.txt
- 可以利用模块删除数据信息
ansible 172.16.1.31 -m file -a "dest=/oldboy/oldboy.txt state=absent"
ansible 172.16.1.31 -m file -a "dest=/oldboy/ state=absent"
自行研究: recurse --- 相当于参数-R,递归,如递归修改文件目录及目录下所有文件的权限
默认resurse=no
预习:
-
预习几个新的模块:
yum service cron mount user group unarchive archive -
预习剧本的编写格式