模型建立完成后,便需要对模型进行训练。模型建立详见:https://www.cnblogs.com/monologuesmw/p/12793758.html
代码解析
下载的源码集中包含两个训练相关的文件:train.py和train_bottleneck.py。train.py 和 train_bottleneck.py确实会有不少的区别
- train.py
1 model = create_model(input_shape, anchors, len(class_names) ) train(model, annotation_path, input_shape, anchors, len(class_names), log_dir)
- train_bottleneck.py
1 model, bottleneck_model, last_layer_model = create_model(input_shape, anchors, num_classes, freeze_body=2, weights_path='model_data/yolo.h5')
从两个.py文件函数的参数以及输出来看,train_bottleneck.py中包含模型冻结的部分,即预训练和微调,更符合YOLOv3训练的过程。
_main()函数中,设置了一些信息后,直接create_model
1 model, bottleneck_model, last_layer_model = create_model(input_shape, anchors, num_classes,
2         freeze_body=2, weights_path='model_data/yolo.h5')  # make sure you know what you freeze
其中,可以看出freeze_body会有设置,也就是后续冻结哪一部分进行训练。返回的参数除了model以外,还有bottleneck_model和last_layer_model。
该create_model中,除了上述设置的参数,还有一个默认参数load_pretrained=True, 是否导入预训练模型的参数。
1 def create_model(input_shape, anchors, num_classes, load_pretrained=True, freeze_body=2, weights_path='model_data/yolo.h5'):
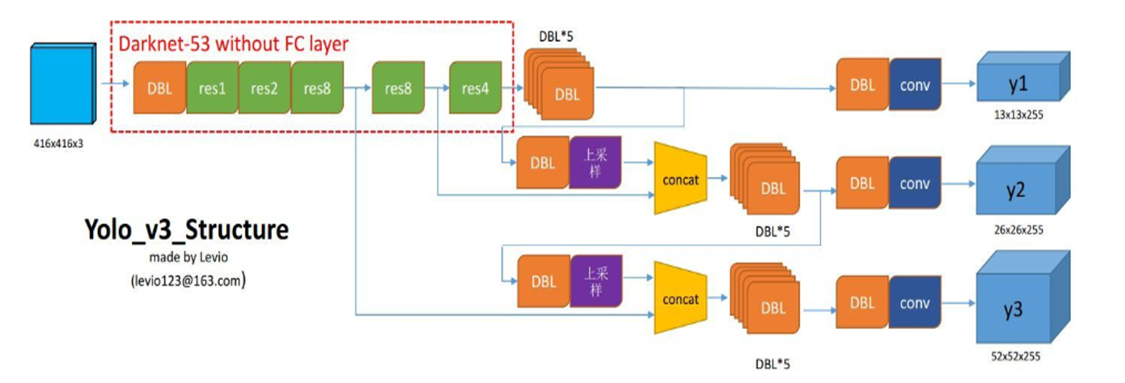
然后,会像网络结构介绍的一样,通过yolo_body生成一个model_body。即生成整个模型的框架。
1 model_body = yolo_body(image_input, num_anchors//3, num_classes)
然后,要开始训练喽!
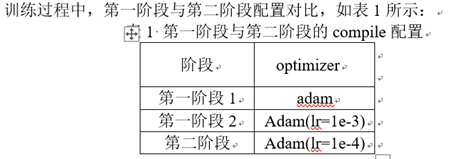
据了解,训练一共分为两个阶段:
- 第一阶段,冻结部分网络,只训练底层权重。
- 优化器使用常见的Adam;
- 损失函数,直接使用模型的输出y_pred,忽略真值y_true;
-
第二阶段,使用第1阶段已训练完成的网络权重,继续训练
- 将全部的权重都设置为可训练,而在第1阶段中,则是冻结部分权重;
- 优化器,仍是Adam,只是学习率有所下降,从1e-3减少至1e-4;
- 损失函数,仍是只使用y_pred,忽略y_true。
先知道训练分两个阶段,第一个阶段有一些不参与训练,第二阶段全部都参与训练就可以了。
准备工作:
1 model, bottleneck_model, last_layer_model = create_model(input_shape, anchors, num_classes,
2         freeze_body=2, weights_path='model_data/yolo.h5')
- 封冻模型
- 建立了三种模型:model, bottleneck_model, last_layer_model
1. 冻结网络
- 先导入默认的那个模型参数
- 模型的层数-3(输出的y1,y2,y3),由于freeze_body设置的是2,所以此处的num = 252-3 = 249层,即除了输出的3层外,共有249层。
- 让这249层不参与训练,trainable = Flase.【下述代码第7行】
1 if load_pretrained:
2     model_body.load_weights(weights_path, by_name=True, skip_mismatch=True)
3     print('Load weights {}.'.format(weights_path))
4     if freeze_body in [1, 2]:
5         # Freeze darknet53 body or freeze all but 3 output layers.冻结darknet53或者冻结除3个输出层外的所有输出层
6         num = (185, len(model_body.layers)-3)[freeze_body-1]  # 这里减了3个输出层
7         for i in range(num): model_body.layers[i].trainable = False   # 此时的num为252-3=249,将这些层的权重不参与训练
8         print('Freeze the first {} layers of total {} layers.'.format(num, len(model_body.layers)))
2. 取除输出的y1,y2,y3三层的另外三层。即246、247、248层的输出。(249,250,251是y1,y2,y3三层)。用这些层建立了一个bottleneck_mode
1 out1=model_body.layers[246].output
2 out2=model_body.layers[247].output
3 out3=model_body.layers[248].output
4
5 bottleneck_model = Model([model_body.input, *y_true], [out1, out2, out3])
揣测一下,其含义就是除y1,y2, y3输出层以外其余的模型,即冻结部分的模型。
P.S. A. y_true的是三个尺度的输出层:
1 y_true = [Input(shape=(h//{0:32, 1:16, 2:8}[l], w//{0:32, 1:16, 2:8}[l], num_anchors//3, num_classes+5)) for l in range(3)]
单独将246,247,248层的输出 和 249,250,251的层的输出拿出来,一个作为in, 一个作为out
1 in0 = Input(shape=bottleneck_model.output[0].shape[1:].as_list())
2 in1 = Input(shape=bottleneck_model.output[1].shape[1:].as_list())
3 in2 = Input(shape=bottleneck_model.output[2].shape[1:].as_list())
4
5 last_out0=model_body.layers[249](in0)
6 last_out1=model_body.layers[250](in1)
7 last_out2=model_body.layers[251](in2)
构建了一个246,247,248层为输入,249,250,251层为输出的Model,它这里称之为model_last:
1 model_last=Model(inputs=[in0, in1, in2], outputs=[last_out0, last_out1, last_out2])
揣测一下,model_last就是倒数第二层到倒数第一层的模型
自定义Lambda(这个大Lambda 是Keras.layers里的) 模型损失函数层 ,将任意表达式封装为layers对象
yolo_loss在损失函数loss篇介绍。详见:https://www.cnblogs.com/monologuesmw/p/12794584.html
1 model_loss_last =Lambda(yolo_loss, output_shape=(1,), name='yolo_loss',
2     arguments={'anchors': anchors, 'num_classes': num_classes, 'ignore_thresh': 0.5})(
3     [*model_last.output, *y_true])      # 后面是输入,前面是输出
这里的model_loss_last是最后一层之间的损失层
1 last_layer_model = Model([in0,in1,in2, *y_true], model_loss_last)
last_layer_last是带损失层的最后一层
1 model_loss = Lambda(yolo_loss, output_shape=(1,), name='yolo_loss', arguments={'anchors': anchors, 'num_classes': num_classes, 'ignore_thresh': 0.5})( [*model_body.output, *y_true])
这里是模型整体的损失层
1 model = Model([model_body.input, *y_true], model_loss)
这里是带损失层的整体模型
该create_model中,返回的参数有 model, bottleneck_model, last_layer_model
其实,建模的过程中,所有的loss层都是为了给模型添加损失函数。也就是说,过程中生成的各种都是为了三模型model, bottleneck_model, last_layer_model服务的。 只不过这里给model 和last_layer_model添加了其对应的损失层而已。
直接将loss的计算作为一个层绑定在模型上。
1 return model, bottleneck_model, last_layer_model
模型保存设置
- 监视验证的损失
- 只保存权重
- 只保存最好的
- 每迭代三次检测一次
1 checkpoint = ModelCheckpoint(log_dir + 'ep{epoch:03d}-loss{loss:.3f}-val_loss{val_loss:.3f}.h5',
2     monitor='val_loss', save_weights_only=True, save_best_only=True, period=3)
模型训练设置
- 可视化的展示器
- 当检测值不发生变化时,停止训练
1 reduce_lr = ReduceLROnPlateau(monitor='val_loss', factor=0.1, patience=3, verbose=1)
2 early_stopping = EarlyStopping(monitor='val_loss', min_delta=0, patience=10, verbose=1)
划分训练集和验证集
1 val_split = 0.1
2 with open(annotation_path) as f:
3     lines = f.readlines()
4 np.random.seed(10101)
5 np.random.shuffle(lines)
6 np.random.seed(None)
7 num_val = int(len(lines)*val_split)
8 num_train = len(lines) - num_val
第一阶段1:
第一阶段的训练是只训练最后一层,最后一层的训练需要有前面层的输出,因此,此处使用predict_ generator方法获取前面各层的输出。
- 输入通过data_generator_wrapper函数生成 ---- 详见真值篇https://www.cnblogs.com/monologuesmw/p/12794278.html
1 batch_size=8
2 bottlenecks=bottleneck_model.predict_generator(data_generator_wrapper(lines, batch_size, input_shape, anchors, num_classes, random=False, verbose=True),
3  steps=(len(lines)//batch_size)+1, max_queue_size=1)
4 np.savez("bottlenecks.npz", bot0=bottlenecks[0], bot1=bottlenecks[1], bot2=bottlenecks[2])
由于后续训练的过程中,需要有训练集和验证集,所以此处也需要对训练集和测试集两种进行预测,获得输出。
对bottleneck.npz进行保存。
然后再将其导入进来,获得了训练集和验证集。 将预测后的倒数第二层的输出作为最后一层训练的输入。
1 # load bottleneck features from file
2 dict_bot=np.load("bottlenecks.npz")
3 bottlenecks_train=[dict_bot["bot0"][:num_train], dict_bot["bot1"][:num_train], dict_bot["bot2"][:num_train]]
4 bottlenecks_val=[dict_bot["bot0"][num_train:], dict_bot["bot1"][num_train:], dict_bot["bot2"][num_train:]]
******************"Training last layers with bottleneck features"***************************************
有了输出以后,便可以训练最后一层。
通过compile配置训练的过程,通过fit_generator 进行训练。
 1 # train last layers with fixed bottleneck features   训练最后一层在bottleneck层固定的基础上
 2 batch_size=8
 3 print("Training last layers with bottleneck features")
 4 print('with {} samples, val on {} samples and batch size {}.'.format(num_train, num_val, batch_size))
 5 last_layer_model.compile(optimizer='adam', loss={'yolo_loss': lambda y_true, y_pred: y_pred})  # 配置学习过程
 6 last_layer_model.fit_generator(bottleneck_generator(lines[:num_train], batch_size, input_shape, anchors, num_classes, bottlenecks_train),
 7         steps_per_epoch=max(1, num_train//batch_size),
 8         validation_data=bottleneck_generator(lines[num_train:], batch_size, input_shape, anchors, num_classes, bottlenecks_val),
 9         validation_steps=max(1, num_val//batch_size),
10         epochs=30,
11         initial_epoch=0, max_queue_size=1)
12 model.save_weights(log_dir + 'trained_weights_stage_0.h5')
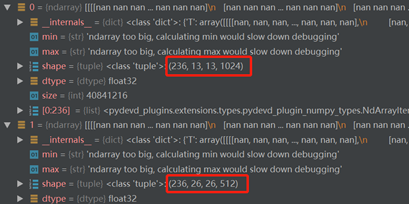
从这里可以看出去,bottleneck的输出确实是模型倒数第二层的输出(即13*13*1024,26*26*512, 52*52*256)。
此部分中bottleneck_generator生成数据(其实是一个生成器),也会进入get_random_data和preprocess_true_boxes中进行数据的生成。不同的是标志位的设置不同。
1.get_random_data
1 _, box = get_random_data(annotation_lines[i], input_shape, random=False, proc_img=False)
random和proc_image都置位False。
- random置位False:不随机生成图片,即仅是等比缩放,所做的dx和dy肯定是在416*416的中部。
- proc_image置位False: 在等比缩放后并没有将其放在标定的灰片上, 也没有对数据进行归一化。
因为其并不需要返回图片的信息,只需要返回边框,用于后续真值的生成。这个时候box的信息只是将原标定的框缩放到416*416中。
2. preprocess_true_boxes
1 y_true = preprocess_true_boxes(box_data, input_shape, anchors, num_classes)
y_true的生成并不会有什么区别
这部分训练的是last_layer_model, 输入是等比缩放下的图片和框。下面训练的是model,虽然249层全部冻结。但输入的是非等比缩放,并通过数据增强的数据。 个人感觉在训练不同的模型时,各模型权重应该是一个浅拷贝的关系。即互相之间是有影响的。
第一阶段2:
 1 model.compile(optimizer=Adam(lr=1e-3), loss={
 2     # use custom yolo_loss Lambda layer.
 3     'yolo_loss': lambda y_true, y_pred: y_pred})
 4 batch_size = 16
 5 print('Train on {} samples, val on {} samples, with batch size {}.'.format(num_train, num_val, batch_size))
 6 model.fit_generator(data_generator_wrapper(lines[:num_train], batch_size, input_shape, anchors, num_classes),
 7         steps_per_epoch=max(1, num_train//batch_size),
 8         validation_data=data_generator_wrapper(lines[num_train:], batch_size, input_shape, anchors, num_classes),
 9         validation_steps=max(1, num_val//batch_size),
10         epochs=50,
11         initial_epoch=0,
12         callbacks=[logging, checkpoint])
13 model.save_weights(log_dir + 'trained_weights_stage_1.h5')
第二阶段:
此阶段将会打开所有层,全部参与训练过程。
如果训练结果不够好,可以训练的代数长一些。
 1 # Unfreeze and continue training, to fine-tune.   这里是第二阶段
 2 # Train longer if the result is not good.
 3 if True:
 4     for i in range(len(model.layers)):
 5         model.layers[i].trainable = True     # 训练开关都打开了  这里是第二阶段的学习参数
 6     model.compile(optimizer=Adam(lr=1e-4), loss={'yolo_loss': lambda y_true, y_pred: y_pred}) # recompile to apply the change
 7     print('Unfreeze all of the layers.')
 8
 9     batch_size = 4  # note that more GPU memory is required after unfreezing the body
10     print('Train on {} samples, val on {} samples, with batch size {}.'.format(num_train, num_val, batch_size))
11     model.fit_generator(data_generator_wrapper(lines[:num_train], batch_size, input_shape, anchors, num_classes),
12         steps_per_epoch=max(1, num_train//batch_size),
13         validation_data=data_generator_wrapper(lines[num_train:], batch_size, input_shape, anchors, num_classes),
14         validation_steps=max(1, num_val//batch_size),
15         epochs=100,
16         initial_epoch=50,
17         callbacks=[logging, checkpoint, reduce_lr, early_stopping])
18     model.save_weights(log_dir + 'trained_weights_final.h5')
过程太多,对每一次的设置进行总结,以便区分: