Mybatis自动化
作用:反向生成实体类,接口,mapper.xml
步骤:
1.mybatis.xml全局配置文件中,添加依赖包:
<dependency>
    <groupId>org.mybatis.generator</groupId>
    <artifactId>mybatis-generator-core</artifactId>
    <version>1.3.5</version>
</dependency>
2.mybatis.xml文件中,加载插件:
    <build>
        <plugins>
            <plugin>
                <groupId>org.mybatis.generator</groupId>
                <artifactId>mybatis-generator-maven-plugin</artifactId>
                <version>1.3.5</version>
                <configuration> <!--配置文件的路径-->
                    <configurationFile>
                        src/main/resources/generatorConfig.xml
                    </configurationFile>
                    <overwrite>true</overwrite>
                </configuration>
                <dependencies>
                    <dependency>
                        <groupId>org.mybatis.generator</groupId>
                        <artifactId>mybatis-generator-core</artifactId>
                        <version>1.3.5</version>
                    </dependency>
                </dependencies>
            </plugin>
        </plugins>
    </build>
在resources文件夹下,创建generatorConfig.xml,修改配置文件:
<?xml version="1.0" encoding="UTF-8"?>
<!DOCTYPE generatorConfiguration PUBLIC "-//mybatis.org//DTD MyBatis Generator Configuration 1.0//EN"
        "http://mybatis.org/dtd/mybatis-generator-config_1_0.dtd">
<!-- 配置生成器 -->
<generatorConfiguration>
    <!--数据库驱动jar -->
    <classPathEntry location="D:core-codemavenmaven_repositorymysqlmysql-connector-java5.1.40mysql-connector-java-5.1.40.jar" />
    <context id="MyBatis" targetRuntime="MyBatis3">
    <!--去除注释 -->
        <commentGenerator>
            <property name="suppressAllComments" value="true" />
        </commentGenerator>
        <!--数据库连接 -->
        <jdbcConnection driverClass="com.mysql.jdbc.Driver"
                        connectionURL="jdbc:mysql://localhost:3306/e?useSSL=false"
                        userId="root"
                        password="">
        </jdbcConnection>
        <!--生成实体类 指定包名 以及生成的地址 (可以自定义地址,但是路径不存在不会自动创建 使用Maven生成在target目录下,会自动创建) -->
        <javaModelGenerator targetPackage="com.java.bean"
                            targetProject="D:codeidea_workspacesmavenmybatis3srcmainjava">
            <property name="trimStrings" value="true" />
        </javaModelGenerator>
        <!--生成SQLmapper文件 -->
        <sqlMapGenerator targetPackage="mapper"
                         targetProject="D:codeidea_workspacesmavenmybatis3srcmain
esources">
        </sqlMapGenerator>
        <!--生成Dao文件,生成接口 -->
        <javaClientGenerator type="XMLMAPPER" targetPackage="com.java.dao"
                             targetProject="D:codeidea_workspacesmavenmybatis3srcmainjava">
        </javaClientGenerator>
        <table tableName="user" enableCountByExample="false"
               enableUpdateByExample="false" enableDeleteByExample="false"
               enableSelectByExample="false" selectByExampleQueryId="false">
        </table>
        <table tableName="courier" enableCountByExample="false"
               enableUpdateByExample="false" enableDeleteByExample="false"
               enableSelectByExample="false" selectByExampleQueryId="false">
        </table>
        <table tableName="express" enableCountByExample="false"
                        enableUpdateByExample="false" enableDeleteByExample="false"
                        enableSelectByExample="false" selectByExampleQueryId="false">
        </table>
        <table tableName="eadmin" enableCountByExample="false"
               enableUpdateByExample="false" enableDeleteByExample="false"
               enableSelectByExample="false" selectByExampleQueryId="false">
        </table>
    </context>
</generatorConfiguration>
运行:maven Project选项卡->plugins->找到mybatis-generator-core,双击运行就会自动生成
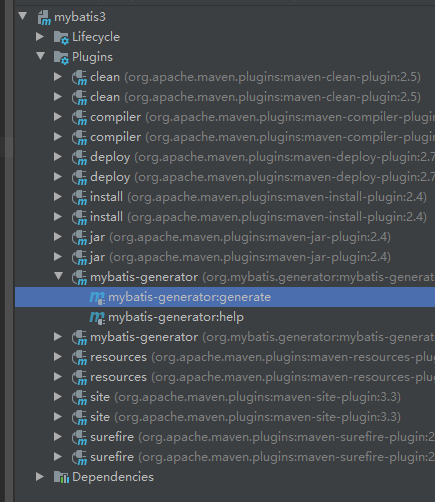
此时项目文件源码中啥都没

运行命令后
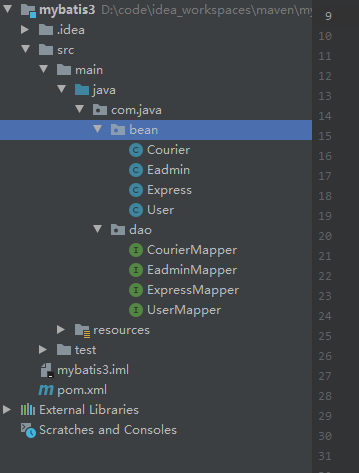
轻松生成对应的实体类和mapper/dao接口,真的省了很多编码步骤!