本配置实现Nginx认证登录以免重要信息暴露在公网
日志收集ELK展示工具kibana免费版不支持密码验证,需要设置Nginx反向代理然后关闭kibana默认端口5601使用Nginx端口登录进行用户名及密码认证
首先设置nginx反向代理kibana
nginx.conf
worker_processes  1;
events {
    worker_connections  1024;
}
http {
    include       mime.types;
    default_type  application/octet-stream;
    log_format access_log_json '{"user_ip":"$http_x_forwarded_for","lan_ip":"$remote_addr","log_time":"$time_iso8601","user_rqp":"$request","http_code":"$status","body_bytes_sent":"$body_bytes_sent","req_time":"$request_time","user_ua":"$http_user_agent"}';
    sendfile        on;
    keepalive_timeout  65;
    include conf.d/*.conf;
}
在文件夹conf.d下面新建两个配置文件http-www.conf
server {
        listen       81;
        server_name  localhost;
        auth_basic "User Authentication";
        auth_basic_user_file /opt/nginx/conf/conf.d/kibana.passwd;
        access_log  /data/logs/nginx/http-access.log  access_log_json;
        location / {
           proxy_set_header Host $host;
           proxy_set_header x-for $remote_addr;
           proxy_set_header x-server $host;
           proxy_set_header x-agent $http_user_agent;
           proxy_pass http://kibana;
        }
    }
upstream.conf
upstream kibana {
    server 127.0.0.1:5601;
}
使用密码工具生产密码文件
htpasswd -c kibana.passwd admin
用户名为admin需要连续输入两遍密码
如果没有htpasswd命令使用以下命令安装
yum install httpd-tools
生成的密码文件用户名是明文,密码为加密格式

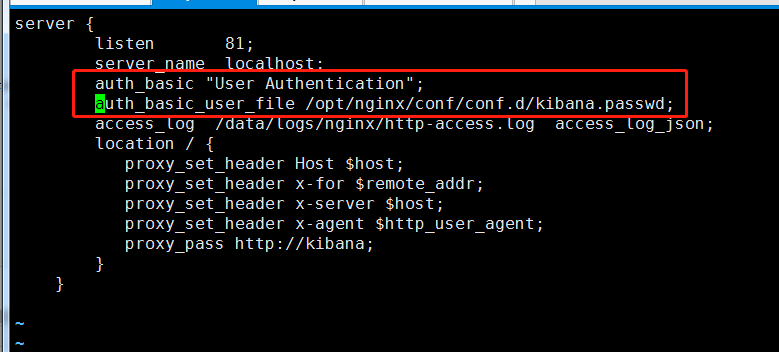
修改配置文件http-www.conf添加认证
server {
        listen       81;
        server_name  localhost;
        auth_basic "User Authentication";
        auth_basic_user_file /opt/nginx/conf/conf.d/kibana.passwd;
        access_log  /data/logs/nginx/http-access.log  access_log_json;
        location / {
           proxy_set_header Host $host;
           proxy_set_header x-for $remote_addr;
           proxy_set_header x-server $host;
           proxy_set_header x-agent $http_user_agent;
           proxy_pass http://kibana;
        }
    }
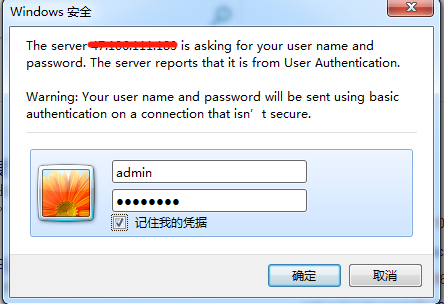
在web界面登录需要输入用户名和密码