参考:https://www.jianshu.com/p/fd8d8d51741e
https://kubernetes.io/zh/docs/concepts/workloads/controllers/replicaset/
说到ReplicaSet对象,得先说说ReplicationController(简称为RC)。在旧版本的Kubernetes中,只有ReplicationController对象。它的主要作用是确保Pod以你指定的副本数运行,即如果有容器异常退出,会自动创建新的 Pod 来替代;而异常多出来的容器也会自动回收。可以说,通过ReplicationController,Kubernetes实现了集群的高可用性。
在新版本的 Kubernetes 中建议使用 ReplicaSet(简称为RS )来取代 ReplicationController。ReplicaSet 跟 ReplicationController 没有本质的不同,只是名字不一样,并且 ReplicaSet 支持集合式的 selector(ReplicationController 仅支持等式)。
1.ReplicationController的创建
ReplicationController和Pod一样,都是Kubernetes中的对象。通过yaml或json描述文件创建一个ReplicationController。一个简单的ReplicationController如下
# cat ReplicationController.yaml
apiVersion: v1
kind: ReplicationController
metadata:
  name: nginx
spec:
  replicas: 3
  selector:
    app: nginx
  template:
    metadata:
      name: nginx
      labels:
        app: nginx
    spec:
      containers:
      - name: nginx
        image: nginx
        ports:
        - containerPort: 80
下面简要解释一下上述ReplicationController描述文件中的关键点:
- kind字段代表你要新建的对象类型。此处指定为ReplicationController。
- spec.selector对指定为你需要管理的Pod的label(label的意义体现在此处)。这里将spec.selector设置为app:nginx,意味着所有包含label:app:nginx的Pod都将被这个RC管理。
- spec.replicas字段代表了受此RC管理的Pod需要运行的副本数本次设置为3。
- template模块用于定义Pod,包括Pod名字本次是nginx,Podlabel以及Pod中运行的应用
上面的RC通过kubectl apply命令创建成功后,Kubernetes会在所有可用的Node上,新建三个Pod。每个Pod都有一个app: nginx的label,并且每个Pod中都运行一个nginx容器。一旦其中某个Pod发生故障停止运行了,Controller Manager都能够及时发现,然后根据当前RC定义,创建出一个新的Pod,从而使包含label:app: nginx的Pod的运行副本数始终为3。
创建ReplicationController
kubectl apply -f ReplicationController.yaml
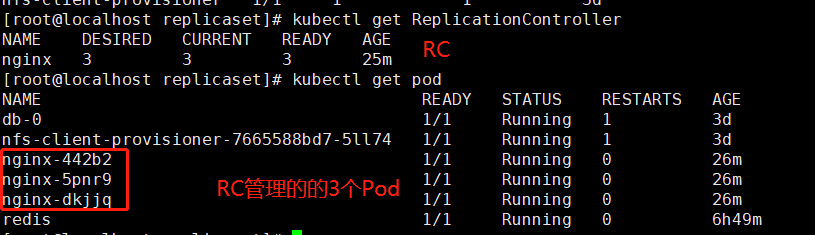
查看创建的RC和Pod
# kubectl get ReplicationController
NAME    DESIRED   CURRENT   READY   AGE
nginx   3         3         3       25m
[root@localhost replicaset]# kubectl get pod
NAME                                      READY   STATUS    RESTARTS   AGE
db-0                                      1/1     Running   1          3d
nfs-client-provisioner-7665588bd7-5ll74   1/1     Running   1          3d
nginx-442b2                               1/1     Running   0          26m
nginx-5pnr9                               1/1     Running   0          26m
nginx-dkjjq                               1/1     Running   0          26m
redis                                     1/1     Running   0          6h49m
为该RC创建svc
# cat svc.yaml
apiVersion: v1
kind: Service
metadata:
  name: nginx
  labels:
    app: nginx
spec:
  ports:
  - port: 80
    protocol: TCP
    targetPort: 80
  selector:
    app: nginx
  type: NodePort
解释
- kind对应Kubernetes对象此次创建的是Service
- metadata.name是此Service的名字可以自定义kubectl expose创建yaml文件是加参数--name= 如未自定义则默认的名称为RC名即本次的nginx
- metadata.labels对应标签选择器对应的是labels: app:nginx
- spec.ports.port指定后端容器的端口,本次为nginx即80端口
- spec.port.targetPort为本Service访问入口通过该入口负载均衡之后端的3个Pod,集群内部可以通过该Service生成的IP加端口访问
- spec.type指定外部访问模式为NodePort即随机生成外部访问端口
可以使用命名生成此yaml文件
kubectl expose rc nginx --port=80 --target-port=80 --type=NodePort --dry-run -o yaml>svc.yaml
应用
kubectl apply -f svc.yaml
查看

可以在web页面通过nodeIP加端口访问nginx
2.ReplicaSet的创建
Kubernetes官方强烈建议避免直接使用replicaSet,而应该通过Deployment来创建RS和Pod
由于ReplicaSet是ReplicationController的代替物,因此用法基本相同,唯一的区别在于ReplicaSet支持集合式的selector。一个典型的RS描述文件如下:
从官方下载的示例无法下载镜像,本次修改了镜像源,可以使用docker search 搜索镜像
# cat frontend.yaml
apiVersion: apps/v1
kind: ReplicaSet
metadata:
  name: frontend
  labels:
    app: guestbook
    tier: frontend
spec:
  # modify replicas according to your case
  replicas: 3
  selector:
    matchLabels:
      tier: frontend
    matchExpressions:
      - {key: tier, operator: In, values: [frontend]}
  template:
    metadata:
      labels:
        app: guestbook
        tier: frontend
    spec:
      containers:
      - name: php-redis
        image: dolphinzb/gb-frontend
        resources:
          requests:
            cpu: 100m
            memory: 100Mi
        env:
        - name: GET_HOSTS_FROM
          value: dns
          # If your cluster config does not include a dns service, then to
          # instead access environment variables to find service host
          # info, comment out the 'value: dns' line above, and uncomment the
          # line below.
          # value: env
        ports:
        - containerPort: 80
以上RS描述文件中,selector除了可以使用matchLabels,还支持集合式的操作:
matchExpressions:
      - {key: tier, operator: In, values: [frontend]}
PS:没看到这个集合式操作
创建
kubectl apply -f frontend.yaml
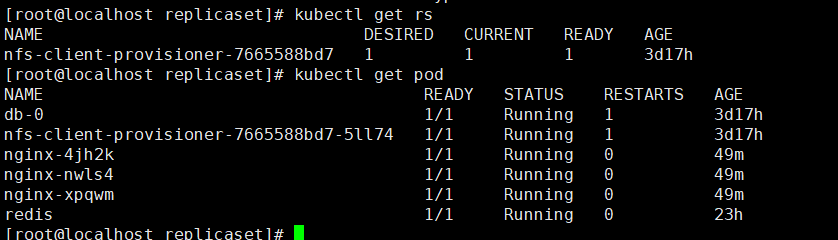
查看yaml 文件所定义的 ReplicaSet 及其管理的 Pod。
# kubectl describe rs frontend
Name:         frontend
Namespace:    default
Selector:     tier=frontend,tier in (frontend)
Labels:       app=guestbook
              tier=frontend
Annotations:  kubectl.kubernetes.io/last-applied-configuration:
                {"apiVersion":"apps/v1","kind":"ReplicaSet","metadata":{"annotations":{},"labels":{"app":"guestbook","tier":"frontend"},"name":"frontend",...
Replicas:     3 current / 3 desired
Pods Status:  3 Running / 0 Waiting / 0 Succeeded / 0 Failed
Pod Template:
  Labels:  app=guestbook
           tier=frontend
  Containers:
   php-redis:
    Image:      dolphinzb/gb-frontend
    Port:       80/TCP
    Host Port:  0/TCP
    Requests:
      cpu:     100m
      memory:  100Mi
    Environment:
      GET_HOSTS_FROM:  dns
    Mounts:            <none>
  Volumes:             <none>
Events:
  Type    Reason            Age   From                   Message
  ----    ------            ----  ----                   -------
  Normal  SuccessfulCreate  24m   replicaset-controller  Created pod: frontend-44xh9
  Normal  SuccessfulCreate  24m   replicaset-controller  Created pod: frontend-lvg86
  Normal  SuccessfulCreate  24m   replicaset-controller  Created pod: frontend-4v4pc
3.ReplicSet的使用
3.1ReplicaSet的删除
使用kubelet delete命令会删除此RS以及它管理的Pod。在Kubernetes删除RS前,会将RS的replica调整为0,等待所有的Pod被删除后,再执行RS对象的删除。
如果希望仅仅删除RS对象(保留Pod),使用kubelet delete命令时添加--cascade=false选项。
kubectl delete rs frontend
查看已经删除的RS和对应的Pod
删除RS保留Pod
kubectl delete rs frontend --cascade=false
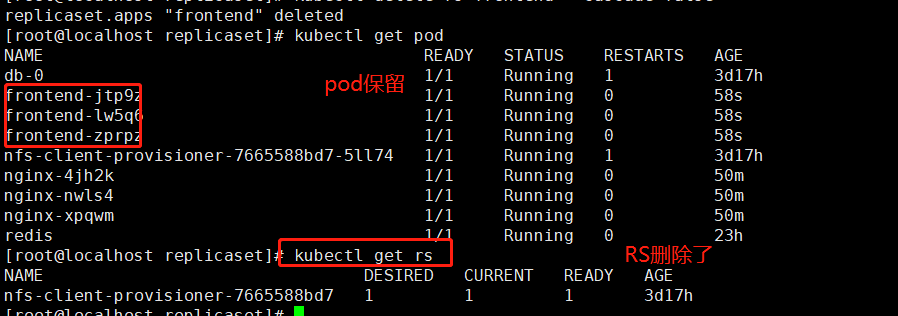
PS:使用以上方式删除RS以后保留的Pod需要一个个手动删除
kubectl delete pod frontend-jtp9z
kubectl delete pod frontend-lw5q6
kubectl delete pod frontend-zprpz
3.2.ReplicaSet伸缩
通过修改.spec.replicas的值可以实时修改RS运行的Pod数量。
3.3 Horizontal Pod Autoscaler(HPA)
# cat hpa-rs.yaml
apiVersion: autoscaling/v1
kind: HorizontalPodAutoscaler
metadata:
  name: frontend-scaler
spec:
  scaleTargetRef:
    kind: ReplicaSet
    name: frontend
  minReplicas: 3
  maxReplicas: 10
  targetCPUUtilizationPercentage: 50
将这个列表保存到 hpa-rs.yaml 并提交到 Kubernetes 集群,就能创建它所定义的 HPA,进而就能根据复制的 Pod 的 CPU 利用率对目标 ReplicaSet进行自动缩放。
kubectl create -f hpa-rs.yaml
或者,可以使用 kubectl autoscale 命令完成相同的操作。 (而且它更简单!)
kubectl autoscale rs frontend