第二十课LNMP(一)
目录
一、LNMP架构介绍
二、MySQL安装
三、PHP安装
四、Nginx介绍
五、Nginx安装
六、扩展
一、LNMP架构介绍
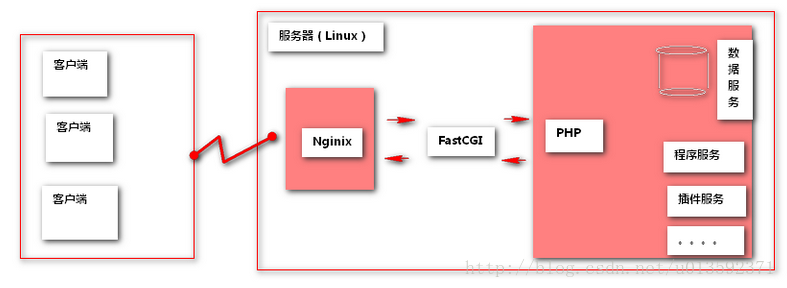
之前已经学习过LAMP架构,与LAMP相比,LNMP用nginx替代apache来提供web服务。php也不再是作为模块形式存在,而是作为一个叫php-fpm的独立进程来提供服务。
Nginx直接处理静态请求,动态请求会转发给php-fpm处理。
LNMP结构图
二、MySQL安装
Mysql的安装方式有多种,yum安装,二进制免编译安装,源码包编译安装等。
yum安装缺乏定制性,如果不是性能要求特别高的场合,也可以使用。安装比较方便。
二进制包免编译和源码包编译安装类似,只是免去了编译过程,节省了时间 ,而且定制性和性能也基本没有损失。如果没有特殊需求,推荐二进制免编译安装。
这里以源代码的编译安装为例,掌握了源代码的编译安装,二进制免编译安装也没有什么难度。过程类似,只是省去了编译的过程。
1.环境
[root@localhost ~]# cat /etc/redhat-release
CentOS Linux release 7.4.1708 (Core)
[root@localhost ~]# uname -i
x86_64
2.依赖包安装
[root@localhost ~]# yum -y install gcc gcc-c++ ncurses-devel perl cmake autoconf
Loaded plugins: fastestmirror
base                                                                                                     | 3.6 kB  00:00:00
epel/x86_64/metalink                                                                                     | 7.2 kB  00:00:00
epel                                                                                                     | 3.2 kB  00:00:00
extras                                                                                                   | 3.4 kB  00:00:00
updates                                                                                                  | 3.4 kB  00:00:00
...中间略...
Dependency Updated:
  cpp.x86_64 0:4.8.5-28.el7_5.1                                  gcc-gfortran.x86_64 0:4.8.5-28.el7_5.1
  libgcc.x86_64 0:4.8.5-28.el7_5.1                               libgfortran.x86_64 0:4.8.5-28.el7_5.1
  libgomp.x86_64 0:4.8.5-28.el7_5.1                              libquadmath.x86_64 0:4.8.5-28.el7_5.1
  libquadmath-devel.x86_64 0:4.8.5-28.el7_5.1                    libstdc++.x86_64 0:4.8.5-28.el7_5.1
  libstdc++-devel.x86_64 0:4.8.5-28.el7_5.1                      ncurses.x86_64 0:5.9-14.20130511.el7_4
  ncurses-base.noarch 0:5.9-14.20130511.el7_4                    ncurses-libs.x86_64 0:5.9-14.20130511.el7_4

Complete!
3.创建mysql的数据库存放目录
[root@localhost ~]# mkdir -p /data/mysql
[root@localhost ~]# ls -ld !$
ls -ld /data/mysql
drwxr-xr-x. 2 root root 6 Jun 30 22:15 /data/mysql
4.创建mysql用户及用户组
[root@localhost ~]# useradd -r mysql -s /sbin/nologin
[root@localhost ~]# id mysql
uid=997(mysql) gid=995(mysql) groups=995(mysql)
5.设置mysql的数据库存放目录权限
[root@localhost ~]# chown -R mysql:mysql /data/mysql
[root@localhost ~]# ls -ld !$
ls -ld /data/mysql
drwxr-xr-x. 2 mysql mysql 6 Jun 30 22:15 /data/mysql
6.编译安装MySQL
//进入/usr/local/src目录
[root@localhost ~]# cd /usr/local/src
//下载源码包
[root@localhost src]# wget http://mirrors.sohu.com/mysql/MySQL-5.6/mysql-5.6.36.tar.gz
--2018-06-30 22:19:30--  http://mirrors.sohu.com/mysql/MySQL-5.6/mysql-5.6.36.tar.gz
Resolving mirrors.sohu.com (mirrors.sohu.com)... 221.236.12.140
Connecting to mirrors.sohu.com (mirrors.sohu.com)|221.236.12.140|:80... connected.
HTTP request sent, awaiting response... 200 OK
Length: 32192348 (31M) [application/octet-stream]
Saving to: ‘mysql-5.6.36.tar.gz’

100%[======================================================================================>] 32,192,348  1.33MB/s   in 23s

2018-06-30 22:19:54 (1.33 MB/s) - ‘mysql-5.6.36.tar.gz’ saved [32192348/32192348]
//解压mysql-5.6.36.tar.gz
[root@localhost src]# tar -zxvf mysql-5.6.36.tar.gz
...
mysql-5.6.36/zlib/trees.c
mysql-5.6.36/zlib/trees.h
mysql-5.6.36/zlib/uncompr.c
mysql-5.6.36/zlib/zconf.h
mysql-5.6.36/zlib/zlib.3
mysql-5.6.36/zlib/zlib.h
mysql-5.6.36/zlib/zutil.c
mysql-5.6.36/zlib/zutil.h
//进入mysql-5.6.36目录
[root@localhost src]# cd mysql-5.6.36
[root@localhost mysql-5.6.36]# pwd
/usr/local/src/mysql-5.6.36
//mysql比较特殊,用的cmake编译
[root@localhost mysql-5.6.36]# cmake -DCMAKE_INSTALL_PREFIX=/usr/local/mysql -DMYSQL_UNIX_ADDR=/tmp/mysql.sock -DSYSCONFDIR=/etc -DDEFAULT_CHARSET=utf8 -DDEFAULT_COLLATION=utf8_general_ci -DWITH_INNOBASE_STORAGE_ENGINE=1 -DWITH_ARCHIVE_STORAGE_ENGINE=1 -DWITH_BLACKHOLE_STORAGE_ENGINE=1 -DMYSQL_DATADIR=/data/mysql -DMYSQL_TCP_PORT=3306 -DENABLE_DOWNLOADS=1
-- Running cmake version 2.8.12.2
-- Found Git: /usr/bin/git (found version "1.8.3.1")
-- The C compiler identification is GNU 4.8.5
-- The CXX compiler identification is GNU 4.8.5
...中间略...
-- CMAKE_C_FLAGS:  -Wall -Wextra -Wformat-security -Wvla -Wwrite-strings -Wdeclaration-after-statement
-- CMAKE_CXX_FLAGS:  -Wall -Wextra -Wformat-security -Wvla -Woverloaded-virtual -Wno-unused-parameter
-- CMAKE_C_FLAGS_RELWITHDEBINFO: -O3 -g -fabi-version=2 -fno-omit-frame-pointer -fno-strict-aliasing -DDBUG_OFF
-- CMAKE_CXX_FLAGS_RELWITHDEBINFO: -O3 -g -fabi-version=2 -fno-omit-frame-pointer -fno-strict-aliasing -DDBUG_OFF
-- Configuring done
-- Generating done
-- Build files have been written to: /usr/local/src/mysql-5.6.36
//验证
[root@localhost mysql-5.6.36]# echo $?
0
//编译安装
[root@localhost mysql-5.6.36]# make && make install
Scanning dependencies of target INFO_BIN
[  0%] Built target INFO_BIN
Scanning dependencies of target INFO_SRC
[  0%] Built target INFO_SRC
Scanning dependencies of target abi_check
...中间略...
-- Installing: /usr/local/mysql/sql-bench/test-alter-table
-- Installing: /usr/local/mysql/sql-bench/test-big-tables
-- Installing: /usr/local/mysql/sql-bench/test-connect
-- Installing: /usr/local/mysql/sql-bench/test-create
-- Installing: /usr/local/mysql/sql-bench/test-insert
-- Installing: /usr/local/mysql/sql-bench/test-select
-- Installing: /usr/local/mysql/sql-bench/test-transactions
-- Installing: /usr/local/mysql/sql-bench/test-wisconsin
//验证
[root@localhost mysql-5.6.36]# echo $?
0
7.配置mysql
7.1初始化mysql
//进入/usr/local/mysql目录
[root@localhost mysql-5.6.36]# cd /usr/local/mysql
[root@localhost mysql]# pwd
/usr/local/mysql
//执行初始化配置脚本,创建数据库和表
[root@localhost mysql]# scripts/mysql_install_db --basedir=/usr/local/mysql --datadir=/data/mysql --user=mysql
Installing MySQL system tables...2018-06-30 23:04:59 0 [Warning] TIMESTAMP with implicit DEFAULT value is deprecated. Please use --explicit_defaults_for_timestamp server option (see documentation for more details).
2018-06-30 23:04:59 0 [Note] Ignoring --secure-file-priv value as server is running with --bootstrap.
...中间略...
WARNING: Default config file /etc/my.cnf exists on the system
This file will be read by default by the MySQL server
If you do not want to use this, either remove it, or use the
--defaults-file argument to mysqld_safe when starting the server

//验证
[root@localhost mysql]# echo $?
0
7.2设置配置文件
//复制模板配置文件为/etc/my.cnf
[root@localhost mysql]# \cp ./support-files/my-default.cnf /etc/my.cnf
[root@localhost mysql]# ls -l /etc/my.cnf
-rw-r--r--. 1 root root 1126 Jun 30 23:06 /etc/my.cnf
//修改/etc/my.cnf
[root@localhost mysql]# vim /etc/my.cnf
//修改basedir和datadir为以下内容
basedir = /usr/local/mysql
datadir = /data/mysql
7.3设置启动脚本
//复制启动脚本到/etc/init.d/下
[root@localhost mysql]# cp support-files/mysql.server /etc/init.d/mysqld
//将mysqld设为开机启动
[root@localhost mysql]# chkconfig mysqld on
[root@localhost mysql]# chkconfig --list

Note: This output shows SysV services only and does not include native
      systemd services. SysV configuration data might be overridden by native
      systemd configuration.

      If you want to list systemd services use 'systemctl list-unit-files'.
      To see services enabled on particular target use
      'systemctl list-dependencies [target]'.

mysqld         	0:off	1:off	2:on	3:on	4:on	5:on	6:off
netconsole     	0:off	1:off	2:off	3:off	4:off	5:off	6:off
network        	0:off	1:off	2:on	3:on	4:on	5:on	6:off
//启动mysql服务
[root@localhost mysql]# /etc/init.d/mysqld start
Starting MySQL.Logging to '/data/mysql/localhost.localdomain.err'.
 SUCCESS!

//验证mysql服务已经正常启动
[root@localhost mysql]# lsof -i :3306
COMMAND   PID  USER   FD   TYPE DEVICE SIZE/OFF NODE NAME
mysqld  16771 mysql   10u  IPv6  36043      0t0  TCP *:mysql (LISTEN)

[root@localhost mysql]# ss -nat | grep 3306
LISTEN     0      80          :::3306                    :::*

[root@localhost mysql]# netstat -nltup | grep :3306
tcp6       0      0 :::3306                 :::*                    LISTEN      16771/mysqld
8、设置PATH,否则不能直接调用mysql
//修改/etc/profile文件,在文件末尾添加
[root@localhost mysql]# vim /etc/profile
//文件末尾添加下行内容
export PATH=/usr/local/mysql/bin:$PATH
//使配置文件生效
[root@localhost mysql]# source !$
source /etc/profile
//验证
[root@localhost mysql]# mysql
Welcome to the MySQL monitor.  Commands end with ; or \g.
Your MySQL connection id is 1
Server version: 5.6.36 Source distribution

Copyright (c) 2000, 2017, Oracle and/or its affiliates. All rights reserved.

Oracle is a registered trademark of Oracle Corporation and/or its
affiliates. Other names may be trademarks of their respective
owners.

Type 'help;' or '\h' for help. Type '\c' to clear the current input statement.

mysql>
三、PHP安装
在LAMP架构中,php是做为apache的一个模块存在的,而在LNMP架构中,php是作为一个单独的服务存在,所以安装方式及参数有些许差别。
1.环境
[root@localhost ~]# cat /etc/redhat-release
CentOS Linux release 7.4.1708 (Core)
[root@localhost ~]# uname -i
x86_64
2.依赖包的安装
yum -y install libxml2-devel libpng-devel openssl openssl-devel bzip2 bzip2-devel libjpeg-devel freetype-devel libmcrypt.x86_64 libmcrypt-devel.x86_64 curl curl-devel
3.新建php-fpm用户
[root@localhost php-5.6.30]# useradd -r -s /sbin/nologin php-fpm
[root@localhost php-5.6.30]# id php-fpm
uid=996(php-fpm) gid=994(php-fpm) groups=994(php-fpm)
4.编译安装php-fpm
//进入/usr/local/src目录
[root@localhost local]# cd /usr/local/src
[root@localhost src]# pwd
/usr/local/src
//下载软件包
[root@localhost src]# wget http://cn2.php.net/distributions/php-5.6.30.tar.gz
--2018-06-30 23:25:17--  http://cn2.php.net/distributions/php-5.6.30.tar.gz
Resolving cn2.php.net (cn2.php.net)... 36.51.255.144
Connecting to cn2.php.net (cn2.php.net)|36.51.255.144|:80... connected.
HTTP request sent, awaiting response... 200 OK
Length: 19274631 (18M) [application/x-gzip]
Saving to: ‘php-5.6.30.tar.gz’

100%[======================================================================================>] 19,274,631  72.1KB/s   in 6m 5s

2018-06-30 23:31:22 (51.6 KB/s) - ‘php-5.6.30.tar.gz’ saved [19274631/19274631]
//解压软件包
[root@localhost src]# tar -zxvf php-5.6.30.tar.gz
php-5.6.30/
php-5.6.30/php.ini-production
php-5.6.30/.gdbinit
php-5.6.30/Makefile.gcov
php-5.6.30/acinclude.m4
php-5.6.30/.editorconfig
...中间略...
php-5.6.30/pear/fetch.php
php-5.6.30/pear/Makefile.frag
php-5.6.30/README.SUBMITTING_PATCH
//进入php-5.6.30目录
[root@localhost src]# cd php-5.6.30
//配置
[root@localhost src]# ./configure --prefix=/usr/local/php-fpm --with-config-file-path=/usr/local/php-fpm/etc --enable-fpm --with-fpm-user=php-fpm --with-fpm-group=php-fpm --with-mysql=/usr/local/mysql --with-mysqli=/usr/local/mysql/bin/mysql_config --with-pdo-mysql=/usr/local/mysql --with-mysql-sock=/tmp/mysql.sock --with-libxml-dir --with-gd --with-jpeg-dir --with-png-dir --with-freetype-dir --with-iconv-dir --with-zlib-dir --with-mcrypt --enable-soap --enable-gd-native-ttf --enable-ftp --enable-mbstring --enable-exif --with-pear --with-curl  --with-openssl
checking for grep that handles long lines and -e... /usr/bin/grep
checking for egrep... /usr/bin/grep -E
checking for a sed that does not truncate output... /usr/bin/sed
checking build system type... x86_64-unknown-linux-gnu
checking host system type... x86_64-unknown-linux-gnu
checking target system type... x86_64-unknown-linux-gnu
...中间略...
config.status: creating ext/phar/phar.phar.1
config.status: creating main/php_config.h
config.status: executing default commands
//验证
[root@localhost php-5.6.30]# echo $?
0
//编译、安装
[root@localhost php-5.6.30]# make && make install
/bin/sh /usr/local/src/php-5.6.30/libtool --silent --preserve-dup-deps --mode=compile cc  -Iext/opcache/ -I/usr/local/src/php-5.6.30/ext/opcache/ -DPHP_ATOM_INC -I/usr/local/src/php-5.6.30/include -I/usr/local/src/php-5.6.30/main -I/usr/local/src/php-5.6.30 -I/usr/local/src/php-5.6.30/ext/date/lib -I/usr/local/src/php-5.6.30/ext/ereg/regex -I/usr/include/libxml2 -I/usr/include/freetype2 -I/usr/local/src/php-5.6.30/ext/mbstring/oniguruma -I/usr/local/src/php-5.6.30/ext/mbstring/libmbfl -I/usr/local/src/php-5.6.30/ext/mbstring/libmbfl/mbfl -I/usr/local/mysql/include -I/usr/local/src/php-5.6.30/ext/sqlite3/libsqlite -I/usr/local/src/php-5.6.30/TSRM -I/usr/local/src/php-5.6.30/Zend    -I/usr/include -g -O2 -fvisibility=hidden   -c /usr/local/src/php-5.6.30/ext/opcache/ZendAccelerator.c -o ext/opcache/ZendAccelerator.lo
/usr/local/src/php-5.6.30/ext/opcache/ZendAccelerator.c: In function ‘accel_use_shm_interned_strings’:
...中间略...
Wrote PEAR system config file at: /usr/local/php-fpm/etc/pear.conf
You may want to add: /usr/local/php-fpm/lib/php to your php.ini include_path
/usr/local/src/php-5.6.30/build/shtool install -c ext/phar/phar.phar /usr/local/php-fpm/bin
ln -s -f phar.phar /usr/local/php-fpm/bin/phar
Installing PDO headers:           /usr/local/php-fpm/include/php/ext/pdo/
//验证
[root@localhost php-5.6.30]# echo $?
0
5.配置php-fpm
//复制模版配置文件到/usr/local/php-fpm/etc/下
[root@localhost php-5.6.30]# cp php.ini-production /usr/local/php-fpm/etc/php.ini
[root@localhost php-5.6.30]# ls -l /usr/local/php-fpm/etc/php.ini
-rw-r--r--. 1 root root 73685 Jul  1 02:23 /usr/local/php-fpm/etc/php.ini
//在/usr/local/php-fpm/etc/下创建php-fpm.conf 文件,内容参考https://coding.net/u/aminglinux/p/aminglinux-book/git/blob/master/D15Z/php-fpm.conf
[root@localhost php-5.6.30]# cd /usr/local/php-fpm/etc/
[root@localhost etc]# vim php-fpm.conf
//文件内容如下:
[global]
//进程id所在的位置
pid = /usr/local/php-fpm/var/run/php-fpm.pid
//错误日志的保存位置
error_log = /usr/local/php-fpm/var/log/php-fpm.log
//模块名
[www]
//监听方式
listen = /tmp/php-fcgi.sock
//也可写成下面的形式,相应的php和nginx结合时语法也有差异
//listen =127.0.0.1:9000
listen.mode = 666
user = php-fpm
group = php-fpm
pm = dynamic
pm.max_children = 50
pm.start_servers = 20
pm.min_spare_servers = 5
pm.max_spare_servers = 35
pm.max_requests = 500
rlimit_files = 1024
//将启动脚本复制到/etc/init.d目录下
[root@localhost etc]# cp /usr/local/src/php-5.6.30/sapi/fpm/init.d.php-fpm  /etc/init.d/php-fpm
[root@localhost etc]# ls -l /etc/init.d/php-fpm
-rw-r--r--. 1 root root 2358 Jul  1 02:29 /etc/init.d/php-fpm
//赋予启动脚本执行权限
[root@localhost etc]# chmod a+x /etc/init.d/php-fpm
[root@localhost etc]# ls -l /etc/init.d/php-fpm
-rwxr-xr-x. 1 root root 2358 Jul  1 02:29 /etc/init.d/php-fpm
[root@localhost etc]# cd /etc/init.d/
//设置php-fpm开机启动
[root@localhost init.d]# chkconfig --add php-fpm
[root@localhost init.d]# chkconfig --list

Note: This output shows SysV services only and does not include native
      systemd services. SysV configuration data might be overridden by native
      systemd configuration.

      If you want to list systemd services use 'systemctl list-unit-files'.
      To see services enabled on particular target use
      'systemctl list-dependencies [target]'.

mysqld         	0:off	1:off	2:on	3:on	4:on	5:on	6:off
netconsole     	0:off	1:off	2:off	3:off	4:off	5:off	6:off
network        	0:off	1:off	2:on	3:on	4:on	5:on	6:off
php-fpm        	0:off	1:off	2:on	3:on	4:on	5:on	6:off
//启动php-fpm
[root@localhost init.d]# /etc/init.d/php-fpm start
Starting php-fpm  done
//验证php-fpm是否启动
[root@localhost init.d]# ps aux | grep php-fpm
root      41088  0.1  0.4 227248  4944 ?        Ss   02:30   0:00 php-fpm: master process (/usr/local/php-fpm/etc/php-fpm.conf)
php-fpm   41089  0.0  0.4 227248  4732 ?        S    02:30   0:00 php-fpm: pool www
php-fpm   41090  0.0  0.4 227248  4732 ?        S    02:30   0:00 php-fpm: pool www
php-fpm   41091  0.0  0.4 227248  4732 ?        S    02:30   0:00 php-fpm: pool www
php-fpm   41092  0.0  0.4 227248  4732 ?        S    02:30   0:00 php-fpm: pool www
php-fpm   41093  0.0  0.4 227248  4736 ?        S    02:30   0:00 php-fpm: pool www
php-fpm   41094  0.0  0.4 227248  4736 ?        S    02:30   0:00 php-fpm: pool www
php-fpm   41095  0.0  0.4 227248  4736 ?        S    02:30   0:00 php-fpm: pool www
php-fpm   41096  0.0  0.4 227248  4736 ?        S    02:30   0:00 php-fpm: pool www
php-fpm   41097  0.0  0.4 227248  4736 ?        S    02:30   0:00 php-fpm: pool www
php-fpm   41098  0.0  0.4 227248  4736 ?        S    02:30   0:00 php-fpm: pool www
php-fpm   41099  0.0  0.4 227248  4736 ?        S    02:30   0:00 php-fpm: pool www
php-fpm   41100  0.0  0.4 227248  4740 ?        S    02:30   0:00 php-fpm: pool www
php-fpm   41101  0.0  0.4 227248  4740 ?        S    02:30   0:00 php-fpm: pool www
php-fpm   41102  0.0  0.4 227248  4740 ?        S    02:30   0:00 php-fpm: pool www
php-fpm   41103  0.0  0.4 227248  4740 ?        S    02:30   0:00 php-fpm: pool www
php-fpm   41104  0.0  0.4 227248  4740 ?        S    02:30   0:00 php-fpm: pool www
php-fpm   41105  0.0  0.4 227248  4740 ?        S    02:30   0:00 php-fpm: pool www
php-fpm   41106  0.0  0.4 227248  4740 ?        S    02:30   0:00 php-fpm: pool www
php-fpm   41107  0.0  0.4 227248  4740 ?        S    02:30   0:00 php-fpm: pool www
php-fpm   41108  0.0  0.4 227248  4740 ?        S    02:30   0:00 php-fpm: pool www
root      41110  0.0  0.0 112660   976 pts/0    S+   02:30   0:00 grep --color=auto php-fpm
Error
1.configure: error: xml2-config not found. Please check your libxml2 installation.
[root@localhost php-5.6.30]# yum -y install libxml2-devel
2.configure: error: Cannot find OpenSSL's <evp.h>
[root@localhost php-5.6.30]# yum -y install openssl openssl-devel
3.configure: error: Please reinstall the libcurl distribution -easy.h should be in
[root@localhost php-5.6.30]#yum -y install curl curl-devel
4.configure: error: jpeglib.h not found.
[root@localhost php-5.6.30]# yum -y install libjpeg-devel
5.configure: error: png.h not found.
[root@localhost php-5.6.30]# yum -y install libpng-devel
6.configure: error: freetype-config not found.
[root@localhost php-5.6.30]# yum -y install freetype-devel
四、Nginx介绍
Nginx("engine x")是一个高性能的HTTP和反向代理服务器,也是一个IMAP/POP3/SMTP代理服务器。Nginx是由Igor Sysoev为俄罗斯访问量第二的Rambler.ru站点开发的,第一个公开版本0.1.0发布于2004年10月4日。其将源代码以类BSD许可证的形式发布,因它的稳定性、丰富的功能集、示例配置文件和低系统资源的消耗而闻名。 它已经在众多流量很大的俄罗斯网站上使用了很长时间,这些网站包括Yandex、Mail.Ru、VKontakte,以及Rambler。目前中国互联网企业70%以上公司都在使用nginx作为自己的web服务器。包括目前互联网主流公司百度、腾讯、阿里等。Nginx 特点是占有内存少,并发能力强,事实上nginx的并发能力确实在同类型的网页服务器中表现较好。
Nginx由内核和模块组成,其中内核的设计非常微小和简洁,完成的工作也非常简单,仅仅通过查找配置文件将客户端请求映射到一个location block(location是Nginx配置中的一个指令,用于URL匹配),而在这个location 中所配置的每个指令将会启动不同的模块去完成相应的工作。Nginx相对于Apache优点:
- 高并发响应性能非常好,官方测试Nginx处理静态文件并发5w/s
- 反向代理性能非常强。(可用于负载均衡)
- 内存和 cpu 占用率低。(为 Apache 的 1/5-1/10)
- 对后端服务有健康检查功能。
- 支持 PHP cgi 方式和 fastcgi 方式。
- 配置代码简洁且容易上手。
Nginx 工作原理
Nginx由内核和模块组成,其中,内核的设计非常微小和简洁,完成的工作也非常简单,仅仅通过查找配置文件将客户端请求映射到 一个location block(location是Nginx 配置中的一个指令,用于URL匹配),而在这个location中配置的每个指令将会启动不同的模块去完成相应的工作。Nginx的模块从结构上分为核心模块、基础模块和第三方模块:
核心模块:HTTP模块、EVENT 模块和 MAIL 模块
基础模块:HTTP Access 模块、HTTP FastCGI 模块、HTTP Proxy模块和 HTTP Rewrite 模块,
第三方模块:HTTP Upstream Request Hash 模块、Notice 模块和HTTP Access Key 模块。
Nginx 的高并发得益于其采用了epoll模型,与传统的服务器程序架构不同,epoll 是 linux 内核 2.6 以后才出现的。Nginx 采用epoll模型,异步非阻塞,而apache 采用的是 select模型:Select特点:select选择句柄的时候,是遍历所有句柄,也就是说句柄有事件响应时,select 需要遍历所有句柄才能获取到哪些句柄有事件通知,因此效率是非常低。epoll 的特点:epoll 对于句柄事件的选择不是遍历的,是事件响应的,就是句柄上事件来就马上选择出来,不需要遍历整个句柄链表,因此效率非常高。
nginx官网:http://nginx.org/,最新版本1.15,最新稳定版:1.14。(2018年7月)
Nginx著名分支:Tengine, 是淘宝基于Nginx开发的,使用上和Nginx一致,服务名,配置文件名都一样,和Nginx的最大区别在于Tenging增加了一些定制化模块,在安全限速方面表现突出,另外它支持对js,css合并。
另外,Nginx核心+lua相关的组件和模块组成了一个支持lua的高性能web容器openresty,使用Lua编写脚本,然后部署到Nginx Web容器中运行。从而非常轻松就能开发出高性能的Web服务。
五、Nginx安装
当前最新稳定版1.14.0
安装过程如下
1.环境
[root@localhost ~]# cat /etc/redhat-release
CentOS Linux release 7.4.1708 (Core)
[root@localhost ~]# uname -i
x86_64
2.依赖包安装
[root@localhost src]# yum -y install pcre.x86_64 pcre-devel.x86_64 openssl openssl-devel
3.新建nginx服务用户
[root@localhost src]# useradd nginx -r -s /sbin/nologin
[root@localhost src]# id nginx
uid=995(nginx) gid=993(nginx) groups=993(nginx)
4.编译安装nginx
//官网下载最新稳定版源代码包
[root@localhost init.d]# wget http://nginx.org/download/nginx-1.14.0.tar.gz -O /usr/local/src/nginx-1.14.0.tar.gz
--2018-07-01 03:44:41--  http://nginx.org/download/nginx-1.14.0.tar.gz
Resolving nginx.org (nginx.org)... 206.251.255.63, 95.211.80.227, 2001:1af8:4060:a004:21::e3, ...
Connecting to nginx.org (nginx.org)|206.251.255.63|:80... connected.
HTTP request sent, awaiting response... 200 OK
Length: 1016272 (992K) [application/octet-stream]
Saving to: ‘/usr/local/src/nginx-1.14.0.tar.gz’

100%[======================================================================================>] 1,016,272    486KB/s   in 2.0s

2018-07-01 03:44:44 (486 KB/s) - ‘/usr/local/src/nginx-1.14.0.tar.gz’ saved [1016272/1016272]

[root@localhost init.d]# cd /usr/local/src/ && ls
mysql-5.6.36  mysql-5.6.36.tar.gz  nginx-1.14.0.tar.gz  php-5.6.30  php-5.6.30.tar.gz
//解压nginx
[root@localhost src]# tar -zxvf nginx-1.14.0.tar.gz
nginx-1.14.0/
nginx-1.14.0/auto/
nginx-1.14.0/conf/
nginx-1.14.0/contrib/
...中间略...
nginx-1.14.0/auto/cc/msvc
nginx-1.14.0/auto/cc/name
nginx-1.14.0/auto/cc/owc
nginx-1.14.0/auto/cc/sunc
//进入nginx软件包目录
[root@localhost src]# cd nginx-1.14.0
[root@localhost nginx-1.14.0]# pwd
/usr/local/src/nginx-1.14.0
//配置
[root@localhost nginx-1.14.0]# ./configure --user=nginx --group=nginx --prefix=/usr/local/nginx --with-http_stub_status_module --with-http_ssl_module
checking for OS
 + Linux 3.10.0-693.el7.x86_64 x86_64
checking for C compiler ... found
 + using GNU C compiler
 + gcc version: 4.8.5 20150623 (Red Hat 4.8.5-28) (GCC)
...中间略...
  nginx http proxy temporary files: "proxy_temp"
  nginx http fastcgi temporary files: "fastcgi_temp"
  nginx http uwsgi temporary files: "uwsgi_temp"
  nginx http scgi temporary files: "scgi_temp"
//编译和安装
[root@localhost nginx-1.14.0]# make && make install
make -f objs/Makefile
make[1]: Entering directory `/usr/local/src/nginx-1.14.0'
cc -c -pipe  -O -W -Wall -Wpointer-arith -Wno-unused-parameter -Werror -g  -I src/core -I src/event -I src/event/modules -I src/os/unix -I objs \
...中间略...
test -d '/usr/local/nginx/html' \
	|| cp -R html '/usr/local/nginx'
test -d '/usr/local/nginx/logs' \
	|| mkdir -p '/usr/local/nginx/logs'
make[1]: Leaving directory `/usr/local/src/nginx-1.14.0'
//验证
[root@localhost nginx-1.14.0]# echo $?
0
5.初始配置
//添加启动脚本
[root@localhost nginx-1.14.0]# vim /etc/init.d/nginx
//内容如下
#!/bin/bash
# chkconfig: - 30 21
# description: http service.
# Source Function Library
. /etc/init.d/functions
# Nginx Settings
NGINX_SBIN="/usr/local/nginx/sbin/nginx"
NGINX_CONF="/usr/local/nginx/conf/nginx.conf"
NGINX_PID="/usr/local/nginx/logs/nginx.pid"
RETVAL=0
prog="Nginx"
start()
{
    echo -n $"Starting $prog: "
    mkdir -p /dev/shm/nginx_temp
    daemon $NGINX_SBIN -c $NGINX_CONF
    RETVAL=$?
    echo
    return $RETVAL
}
stop()
{
    echo -n $"Stopping $prog: "
    killproc -p $NGINX_PID $NGINX_SBIN -TERM
    rm -rf /dev/shm/nginx_temp
    RETVAL=$?
    echo
    return $RETVAL
}
reload()
{
    echo -n $"Reloading $prog: "
    killproc -p $NGINX_PID $NGINX_SBIN -HUP
    RETVAL=$?
    echo
    return $RETVAL
}
restart()
{
    stop
    start
}
configtest()
{
    $NGINX_SBIN -c $NGINX_CONF -t
    return 0
}
case "$1" in
  start)
        start
        ;;
  stop)
        stop
        ;;
  reload)
        reload
        ;;
  restart)
        restart
        ;;
  configtest)
        configtest
        ;;
  *)
        echo $"Usage: $0 {start|stop|reload|restart|configtest}"
        RETVAL=1
esac
exit $RETVAL
//赋予脚本执行权限
[root@localhost nginx-1.14.0]# chmod 755 /etc/init.d/nginx
[root@localhost nginx-1.14.0]# ls -l !$
ls -l /etc/init.d/nginx
-rwxr-xr-x. 1 root root 1133 Jul  1 04:16 /etc/init.d/nginx
//将nginx设为开机启动
[root@localhost nginx-1.14.0]# cd /etc/init.d/
[root@localhost init.d]# chkconfig --add nginx
[root@localhost init.d]# chkconfig --list

Note: This output shows SysV services only and does not include native
      systemd services. SysV configuration data might be overridden by native
      systemd configuration.

      If you want to list systemd services use 'systemctl list-unit-files'.
      To see services enabled on particular target use
      'systemctl list-dependencies [target]'.

mysqld         	0:off	1:off	2:on	3:on	4:on	5:on	6:off
netconsole     	0:off	1:off	2:off	3:off	4:off	5:off	6:off
network        	0:off	1:off	2:on	3:on	4:on	5:on	6:off
nginx          	0:off	1:off	2:off	3:off	4:off	5:off	6:off
php-fpm        	0:off	1:off	2:on	3:on	4:on	5:on	6:off
//新建nginx配置文件,原有的备份一下,
[root@localhost init.d]# cd /usr/local/nginx/conf/
[root@localhost conf]# cp nginx.conf nginx.conf.bak
[root@localhost conf]# vim nginx.conf
//内容参考https://coding.net/u/aminglinux/p/aminglinux-book/git/blob/master/D15Z/nginx.conf
user nginx nginx;
worker_processes 2;
error_log /usr/local/nginx/logs/nginx_error.log crit;
pid /usr/local/nginx/logs/nginx.pid;
worker_rlimit_nofile 51200;
events
{
    use epoll;
    worker_connections 6000;
}
http
{
    include mime.types;
    default_type application/octet-stream;
    server_names_hash_bucket_size 3526;
    server_names_hash_max_size 4096;
    log_format combined_realip '$remote_addr $http_x_forwarded_for [$time_local]'
    ' $host "$request_uri" $status'
    ' "$http_referer" "$http_user_agent"';
    sendfile on;
    tcp_nopush on;
    keepalive_timeout 30;
    client_header_timeout 3m;
    client_body_timeout 3m;
    send_timeout 3m;
    connection_pool_size 256;
    client_header_buffer_size 1k;
    large_client_header_buffers 8 4k;
    request_pool_size 4k;
    output_buffers 4 32k;
    postpone_output 1460;
    client_max_body_size 10m;
    client_body_buffer_size 256k;
    client_body_temp_path /usr/local/nginx/client_body_temp;
    proxy_temp_path /usr/local/nginx/proxy_temp;
    fastcgi_temp_path /usr/local/nginx/fastcgi_temp;
    fastcgi_intercept_errors on;
    tcp_nodelay on;
    gzip on;
    gzip_min_length 1k;
    gzip_buffers 4 8k;
    gzip_comp_level 5;
    gzip_http_version 1.1;
    gzip_types text/plain application/x-javascript text/css text/htm
    application/xml;
    server
    {
        listen 80;
        server_name localhost;
        index index.html index.htm index.php;
        root /usr/local/nginx/html;
        location ~ \.php$
        {
            include fastcgi_params;
            fastcgi_pass unix:/tmp/php-fcgi.sock;
            fastcgi_index index.php;
            fastcgi_param SCRIPT_FILENAME /usr/local/nginx/html$fastcgi_script_name;
        }
    }
}
//测试配置
[root@localhost conf]# /etc/init.d/nginx configtest
nginx: the configuration file /usr/local/nginx/conf/nginx.conf syntax is ok
nginx: configuration file /usr/local/nginx/conf/nginx.conf test is successful
//或者
[root@localhost conf]# /usr/local/nginx/sbin/nginx -t
nginx: the configuration file /usr/local/nginx/conf/nginx.conf syntax is ok
nginx: configuration file /usr/local/nginx/conf/nginx.conf test is successful
//启动nginx
[root@localhost conf]# /etc/init.d/nginx start
Starting nginx (via systemctl):                            [  OK  ]
[root@localhost conf]#
//验证
[root@localhost conf]# lsof -i :80
COMMAND   PID  USER   FD   TYPE DEVICE SIZE/OFF NODE NAME
nginx   50119  root    6u  IPv4 129891      0t0  TCP *:http (LISTEN)
nginx   50120 nginx    6u  IPv4 129891      0t0  TCP *:http (LISTEN)
nginx   50121 nginx    6u  IPv4 129891      0t0  TCP *:http (LISTEN)
//或者
[root@localhost conf]# ss -nat  |grep :80
LISTEN     0      128          *:80                       *:*
//或者
[root@localhost conf]# netstat -nltup  |grep :80
tcp        0      0 0.0.0.0:80              0.0.0.0:*               LISTEN      50119/nginx: master

[root@localhost conf]# curl 127.0.0.1
<!DOCTYPE html>
<html>
<head>
<title>Welcome to nginx!</title>
<style>
    body {
         35em;
        margin: 0 auto;
        font-family: Tahoma, Verdana, Arial, sans-serif;
    }
</style>
</head>
<body>
<h1>Welcome to nginx!</h1>
<p>If you see this page, the nginx web server is successfully installed and
working. Further configuration is required.</p>

<p>For online documentation and support please refer to
<a href="http://nginx.org/">nginx.org</a>.<br/>
Commercial support is available at
<a href="http://nginx.com/">nginx.com</a>.</p>

<p><em>Thank you for using nginx.</em></p>
</body>
</html>
//注意,远程访问需要在防火墙设定相应的规则,否则无法访问。
//本机
//[root@localhost conf]# firewall-cmd --get-default-zone
//public
//[root@localhost conf]# firewall-cmd --zone=public --add-service=http
//success
//[root@localhost conf]# firewall-cmd --zone=public --list-service
//ssh dhcpv6-client http

//php解析测试
[root@localhost conf]# vim /usr/local/nginx/html/1.php
[root@localhost conf]# cat /usr/local/nginx/html/1.php
<?php
echo "That's OK";
?>

[root@localhost conf]# curl 127.0.0.1/1.php
That's OK
六、扩展
Nginx为什么比Httpd高效:原理篇
http://www.toxingwang.com/linux-unix/linux-basic/1712.html
mod_php 和 mod_fastcgi以及php-fpm的比较
概念了解:CGI,FastCGI,PHP-CGI与PHP-FPM
http://www.nowamagic.net/librarys/veda/detail/1319/ https://www.awaimai.com/371.html