Looper
Looper是线程用来运行消息循环(message loop)的类。默认情况下,线程并没有与之关联的Looper,可以通过在线程中调用Looper.prepare() 方法来获取,并通过Looper.loop() 无限循环地获取并分发MessageQueue中的消息,直到所有消息全部处理。典型用法如下:
 1 public class LooperThread extends Thread {
 2     @Override
 3     public void run() {
 4         // 将当前线程初始化为Looper线程
 5         Looper.prepare();
 6
 7         // ...其他处理,如实例化handler
 8
 9         // 开始循环处理消息队列
10         Looper.loop();
11     }
12 }
通过上面两行核心代码,你的线程就升级为Looper线程了
1)Looper.prepare()
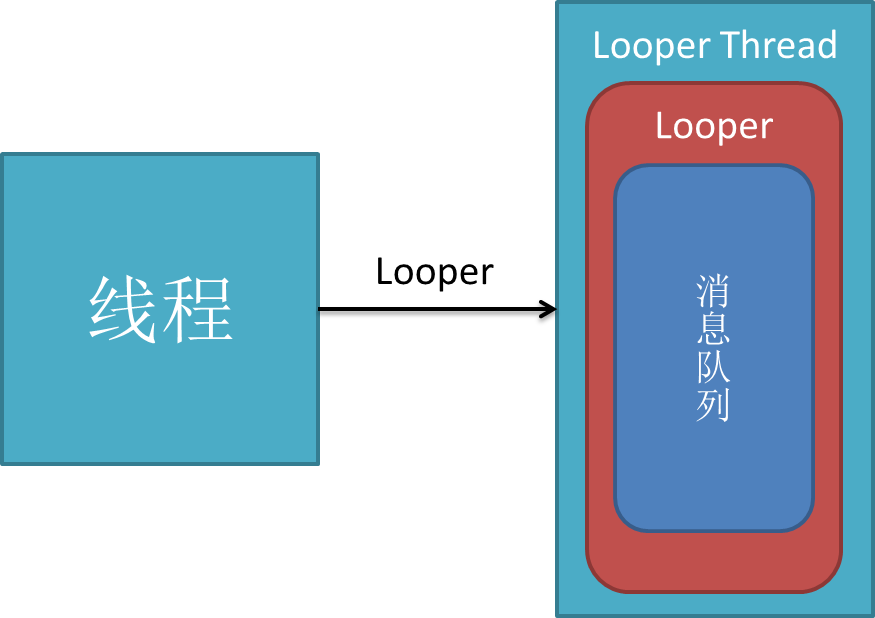
通过上图可以看到,现在你的线程中有一个Looper对象,它的内部维护了一个消息队列MessageQueue。一个Thread只能有一个Looper对象
 1 public class Looper {
 2     // 每个线程中的Looper对象其实是一个ThreadLocal,即线程本地存储(TLS)对象
 3     private static final ThreadLocal sThreadLocal = new ThreadLocal();
 4     // Looper内的消息队列
 5     final MessageQueue mQueue;
 6     // 当前线程
 7     Thread mThread;
 8     // 。。。其他属性
 9
10     // 每个Looper对象中有它的消息队列,和它所属的线程
11     private Looper() {
12         mQueue = new MessageQueue();
13         mRun = true;
14         mThread = Thread.currentThread();
15     }
16
17     // 我们调用该方法会在调用线程的TLS中创建Looper对象
18     public static final void prepare() {
19         if (sThreadLocal.get() != null) {
20             // 试图在有Looper的线程中再次创建Looper将抛出异常
21             throw new RuntimeException("Only one Looper may be created per thread");
22         }
23         sThreadLocal.set(new Looper());
24     }
25     // 其他方法
通过源码,prepare()背后的工作方式一目了然,其核心就是将looper对象定义为ThreadLocal。如果你还不清楚什么是ThreadLocal,请参考《理解ThreadLocal》
2)Looper.loop()

调用loop方法后,Looper线程就开始真正工作了,它不断从自己的MQ中取出队头的消息(也叫任务)执行。其源码分析如下:
 1 public static final void loop() {
 2         Looper me = myLooper();  //得到当前线程Looper
 3         MessageQueue queue = me.mQueue;  //得到当前looper的MQ
 4
 5         // 这两行没看懂= = 不过不影响理解
 6         Binder.clearCallingIdentity();
 7         final long ident = Binder.clearCallingIdentity();
 8         // 开始循环
 9         while (true) {
10             Message msg = queue.next(); // 取出message
11             if (msg != null) {
12                 if (msg.target == null) {
13                     // message没有target为结束信号,退出循环
14                     return;
15                 }
16                 // 日志。。。
17                 if (me.mLogging!= null) me.mLogging.println(
18                         ">>>>> Dispatching to " + msg.target + " "
19                         + msg.callback + ": " + msg.what
20                         );
21                 // 非常重要!将真正的处理工作交给message的target,即后面要讲的handler
22                 msg.target.dispatchMessage(msg);
23                 // 还是日志。。。
24                 if (me.mLogging!= null) me.mLogging.println(
25                         "<<<<< Finished to    " + msg.target + " "
26                         + msg.callback);
27
28                 // 下面没看懂,同样不影响理解
29                 final long newIdent = Binder.clearCallingIdentity();
30                 if (ident != newIdent) {
31                     Log.wtf("Looper", "Thread identity changed from 0x"
32                             + Long.toHexString(ident) + " to 0x"
33                             + Long.toHexString(newIdent) + " while dispatching to "
34                             + msg.target.getClass().getName() + " "
35                             + msg.callback + " what=" + msg.what);
36                 }
37                 // 回收message资源
38                 msg.recycle();
39             }
40         }
41     }
除了prepare()和loop()方法,Looper类还提供了一些有用的方法,比如
Looper.myLooper()得到当前线程looper对象:
1 public static final Looper myLooper() {
2         // 在任意线程调用Looper.myLooper()返回的都是那个线程的looper
3         return (Looper)sThreadLocal.get();
4     }
getThread()得到looper对象所属线程:
1  public Thread getThread() {
2         return mThread;
3     }
Handler 避免内存泄漏
- handler.removeCallbacksAndMessages(null);
- handler.getLooper().quit();
Looper的quit()方法结束looper循环:
public final class Looper {// sThreadLocal.get() will return null unless you've called prepare().
    static final ThreadLocal<Looper> sThreadLocal = new ThreadLocal<Looper>();
    private static Looper sMainLooper;  // guarded by Looper.class

    final MessageQueue mQueue;

   public void quit() {
        mQueue.quit(false);//调用MessageQueue退出
   }
 }
MessageQueue 的quit()方法
public final class MessageQueue {
    //...
    void quit(boolean safe) {
        if (!mQuitAllowed) {
            throw new IllegalStateException("Main thread not allowed to quit.");
        }

        synchronized (this) {
            if (mQuitting) {
                return;
            }
            mQuitting = true;

            if (safe) {
               removeAllFutureMessagesLocked();
            } else {
                removeAllMessagesLocked();
            }

            // We can assume mPtr != 0 because mQuitting was previously false.
            nativeWake(mPtr);
        }
    }


    private void removeAllMessagesLocked() {
        Message p = mMessages;
        while (p != null) {
            Message n = p.next;
            p.recycleUnchecked();
            p = n;
        }
        mMessages = null;
    }

    private void removeAllFutureMessagesLocked() {
        final long now = SystemClock.uptimeMillis();
        Message p = mMessages;
        if (p != null) {
            if (p.when > now) {
                removeAllMessagesLocked();
            } else {
                Message n;
                for (;;) {
                    n = p.next;
                    if (n == null) {
                        return;
                    }
                    if (n.when > now) {
                        break;
                    }
                    p = n;
                }
                p.next = null;
                do {
                    p = n;
                    n = p.next;
                    p.recycleUnchecked();
                } while (n != null);
            }
        }
    }

    //...
}
通过观察以上源码我们可以发现:
当我们调用Looper的quit方法时,实际上执行了MessageQueue中的removeAllMessagesLocked方法,该方法的作用是把MessageQueue消息池中所有的消息全部清空,无论是延迟消息(延迟消息是指通过sendMessageDelayed或通过postDelayed等方法发送的需要延迟执行的消息)还是非延迟消息。
当我们调用Looper的quitSafely方法时,实际上执行了MessageQueue中的removeAllFutureMessagesLocked方法,通过名字就可以看出,该方法只会清空MessageQueue消息池中所有的延迟消息,并将消息池中所有的非延迟消息派发出去让Handler去处理,quitSafely相比于quit方法安全之处在于清空消息之前会派发所有的非延迟消息。
无论是调用了quit方法还是quitSafely方法只会,Looper就不再接收新的消息。即在调用了Looper的quit或quitSafely方法之后,消息循环就终结了,这时候再通过Handler调用sendMessage或post等方法发送消息时均返回false,表示消息没有成功放入消息队列MessageQueue中,因为消息队列已经退出了
到此为止,你应该对Looper有了基本的了解,总结几点:
1.每个线程有且最多只能有一个Looper对象,它是一个ThreadLocal
2.Looper内部有一个消息队列,loop()方法调用后线程开始不断从队列中取出消息执行
3.Looper使一个线程变成Looper线程。
handler
什么是handler?handler扮演了往MQ上添加消息和处理消息的角色(只处理由自己发出的消息),即通知MQ它要执行一个任务(sendMessage),并在loop到自己的时候执行该任务(handleMessage),整个过程是异步的。handler创建时会关联一个looper,默认的构造方法将关联当前线程的looper,不过这也是可以set的。默认的构造方法:
public class handler {

    final MessageQueue mQueue;  // 关联的MQ
    final Looper mLooper;  // 关联的looper
    final Callback mCallback;
    // 其他属性

    public Handler() {
        // 没看懂,直接略过,,,
        if (FIND_POTENTIAL_LEAKS) {
            final Class extends Handler> klass = getClass();
            if ((klass.isAnonymousClass() || klass.isMemberClass() || klass.isLocalClass()) &&
                    (klass.getModifiers() & Modifier.STATIC) == 0) {
                Log.w(TAG, "The following Handler class should be static or leaks might occur: " +
                    klass.getCanonicalName());
            }
        }
        // 默认将关联当前线程的looper
        mLooper = Looper.myLooper();
        // looper不能为空,即该默认的构造方法只能在looper线程中使用
        if (mLooper == null) {
            throw new RuntimeException(
                "Can't create handler inside thread that has not called Looper.prepare()");
        }
        // 重要!!!直接把关联looper的MQ作为自己的MQ,因此它的消息将发送到关联looper的MQ上
        mQueue = mLooper.mQueue;
        mCallback = null;
    }

    // 其他方法
}
这里有一个疑问,如果handler在主线程的死循环一直运行是不是特别消耗CPU资源呢?
这里就涉及到Linux pipe/epoll机制,简单说就是在主线程的MessageQueue没有消息时,便阻塞在loop的queue.next()中的nativePollOnce()方法里,此时主线程会释放CPU资源进入休眠状态,直到下个消息到达或者有事务发生,通过往pipe管道写端写入数据来唤醒主线程工作。这里采用的epoll机制,是一种IO多路复用机制,可以同时监控多个描述符,当某个描述符就绪(读或写就绪),则立刻通知相应程序进行读或写操作,本质同步I/O,即读写是阻塞的。 所以说,主线程大多数时候都是处于休眠状态,并不会消耗大量CPU资源。
下面我们就可以为之前的LooperThread类加入Handler:
 1 public class LooperThread extends Thread {
 2     private Handler handler1;
 3     private Handler handler2;
 4
 5     @Override
 6     public void run() {
 7         // 将当前线程初始化为Looper线程
 8         Looper.prepare();
 9
10         // 实例化两个handler
11         handler1 = new Handler();
12         handler2 = new Handler();
13
14         // 开始循环处理消息队列
15         Looper.loop();
16     }
17 }

可以看到,一个线程可以有多个Handler,但是只能有一个Looper!