我们已经将代码获取至我们 Jenkins 服务器上,由于我们的项目是使用 html 编写的,不需要编译,直接可以打包发布(实际工作中,可能需要更换配置文件)。
安装nginx服务
我们在 ci-node1 机子上安装 nginx 服务,并配置服务端口为 8090。
/usr/local/nginx/sbin/nginx -t
/etc/init.d/nginx start
netstat -tunlp | grep nginx
[root@ci-node1 conf]# netstat -tnpl|grep 8090
tcp        0      0 0.0.0.0:8090            0.0.0.0:*               LISTEN      43141/nginx: master
通过浏览器访问 http://192.168.31.11:8090,可以看到如下页面

nginx 服务的默认网站放在/usr/local/nginx/html 目录下
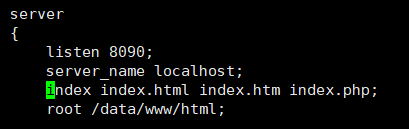
我们把默认的网站目录 改成 /data/www/html 修改nginx配置 重启nginx
[root@ci-node1 conf]# mkdir -p /data/www/html
把ci-node2 HTML代码部署到ci-node1
配置 ssh 免密登录
因为我们要使用脚本将 ci-node2 上的程序代码推送到 ci-node1 上,所以需要配置ci-node2 到 ci-node1 的 ssh 免密码登录。
输入ci-node1密码
[root@ci-node2 scripts]# ssh-copy-id -i /root/.ssh/id_rsa.pub  192.168.31.11
/usr/bin/ssh-copy-id: INFO: Source of key(s) to be installed: "/root/.ssh/id_rsa.pub"
/usr/bin/ssh-copy-id: INFO: attempting to log in with the new key(s), to filter out any that are already installed
/usr/bin/ssh-copy-id: INFO: 1 key(s) remain to be installed -- if you are prompted now it is to install the new keys
root@192.168.31.11's password:
root@192.168.31.11's password:

Number of key(s) added: 1

Now try logging into the machine, with:   "ssh '192.168.31.11'"
and check to make sure that only the key(s) you wanted were added.
添加了密码
下次ssh 192.168.31.11 不用再输入密码
编写部署脚本(deploy.sh)
[root@ci-node2 My-freestyle-job]# mkdir -p /server/scripts
[root@ci-node2 My-freestyle-job]# cd /server/scripts/

[root@ci-node2 scripts]# vim deploy.sh
#!/bin/bash

# 目标服务器 IP 地址
host=$1

# job 名称
job_name=$2

 # 包名
name=web-$(date +%F)-$(($RANDOM+10000))
# 打包
cd /var/lib/jenkins/workspace/${job_name} && tar -czf /opt/${name}.tar.gz ./*

 # 发送包到目标服务器
ssh ${host} "cd /data/www/ && mkdir ${name}"
scp /opt/${name}.tar.gz $host:/data/www/${name}
 # 解包
ssh ${host} "cd /data/www/${name} && tar xf ${name}.tar.gz && rm -f ${name}.tar.gz"

# 使用软链接方式部署服务
ssh ${host} "cd /data/www/ && rm -rf html && ln -s /data/www/${name} /data/www/html"
给脚本加上权限 chmod +x deploy.sh
执行脚本
sh deploy.sh 远程ip job名称
[root@ci-node2 scripts]# sh deploy.sh 192.168.31.11 My-freestyle-job
部署上来了

[root@ci-node1 html]# cd /data/www/
[root@ci-node1 www]# ll
total 4
lrwxrwxrwx 1 root root   30 Apr 13 00:39 html -> /data/www/web-2020-04-13-35660
drwxr-xr-x 8 root root 4096 Apr 13 00:39 web-2020-04-13-35660
Jenkins 配置构建
jenkins配置调用脚本
接下来我们在 Jenkins 上配置构建执行我们编写的部署脚本,回到 My-freestyle-job配置页面,配置构建,
执行调用脚本 参数job名称调用jenkins全局变量
调的${JOB_NAME} 的值就是 job名称
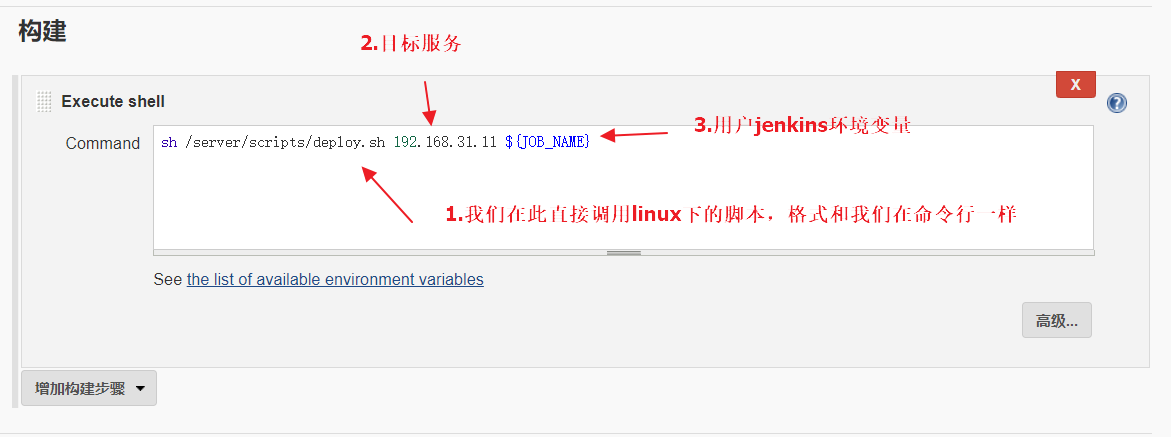
点击页面上的链接可以查看所有可用的 jenkins 环境变量
保存配置,
注意:
把jenkins启动用户改成root 修改jenkins配置文件,然后重启jenkins服务
这里jenkins启动用户必须是root
[root@ci-node2 ~]# cat /etc/sysconfig/jenkins |grep -v ^#|grep -v ^$
JENKINS_HOME="/var/lib/jenkins"
JENKINS_JAVA_CMD=""
JENKINS_USER="root"
JENKINS_JAVA_OPTIONS="-Djava.awt.headless=true"
JENKINS_PORT="8080"
JENKINS_LISTEN_ADDRESS=""
JENKINS_HTTPS_PORT=""
JENKINS_HTTPS_KEYSTORE=""
JENKINS_HTTPS_KEYSTORE_PASSWORD=""
JENKINS_HTTPS_LISTEN_ADDRESS=""
JENKINS_DEBUG_LEVEL="5"
JENKINS_ENABLE_ACCESS_LOG="no"
JENKINS_HANDLER_MAX="100"
JENKINS_HANDLER_IDLE="20"
JENKINS_ARGS=""
[root@ci-node2 ~]# systemctl restart jenkins
[root@ci-node2 ~]# ps aux |grep jenkins
root       8116 98.8 41.4 2306716 276800 ?      Ssl  01:27   0:15 /etc/alternatives/java -Dcom.sun.akuma.Daemon=daemonized -Djava.awt.headless=true -DJENKINS_HOME=/var/lib/jenkins -jar /usr/lib/jenkins/jenkins.war --logfile=/var/log/jenkins/jenkins.log --webroot=/var/cache/jenkins/war --daemon --httpPort=8080 --debug=5 --handlerCountMax=100 --handlerCountMaxIdle=20
root       8208  0.0  0.1 112712   968 pts/1    R+   01:27   0:00 grep --color=auto jenkins
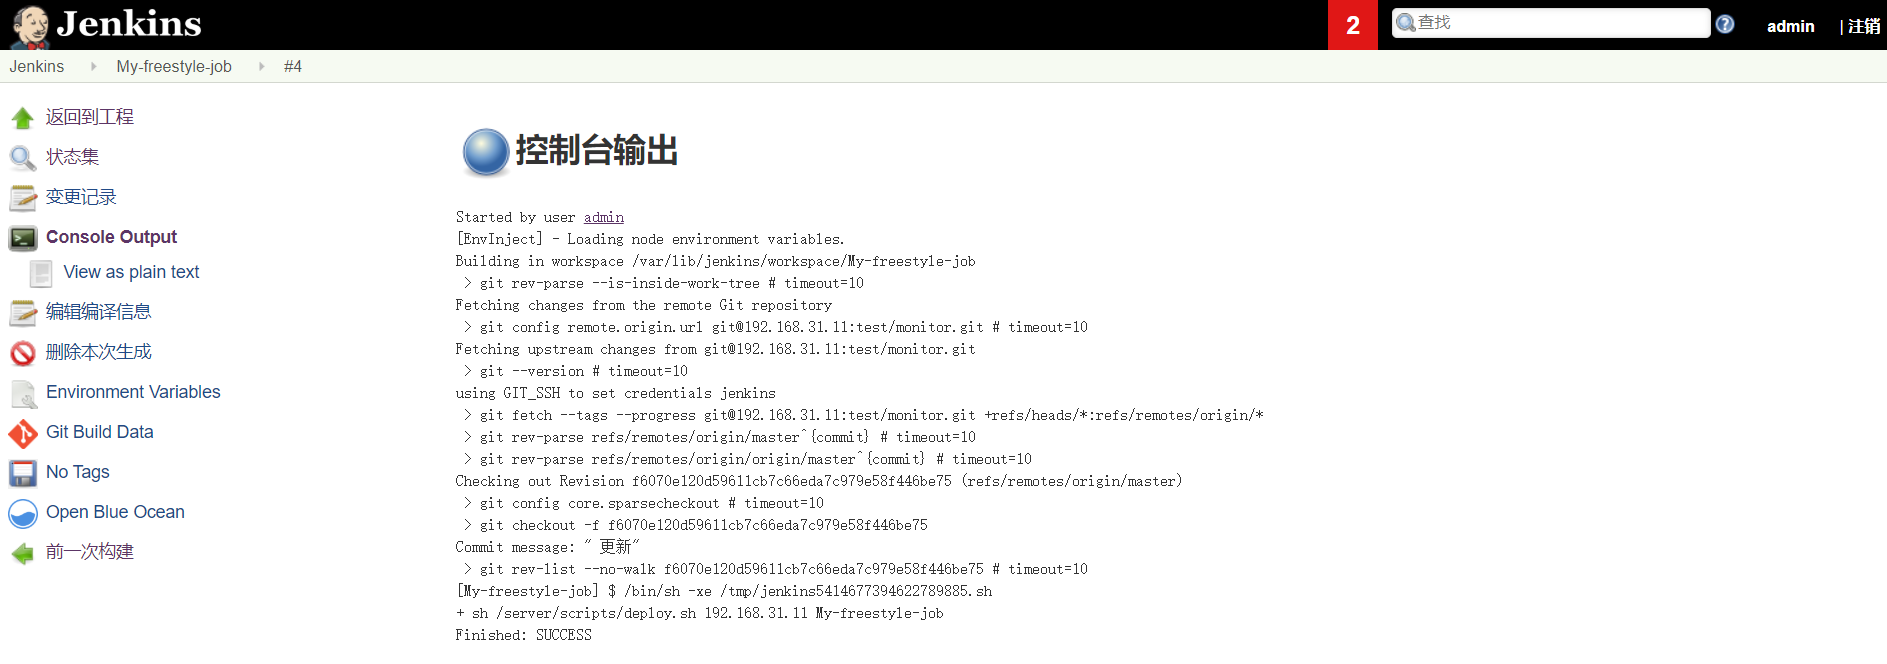
回到 job 主页面,点击“立即构建”后,访问 nginx服务的主页面,我们发现服务已经部署成功

看输出 脚本执行成功

通过jenkins 实现 gitlab仓库代码拉过来,然后发布到服务器上部署