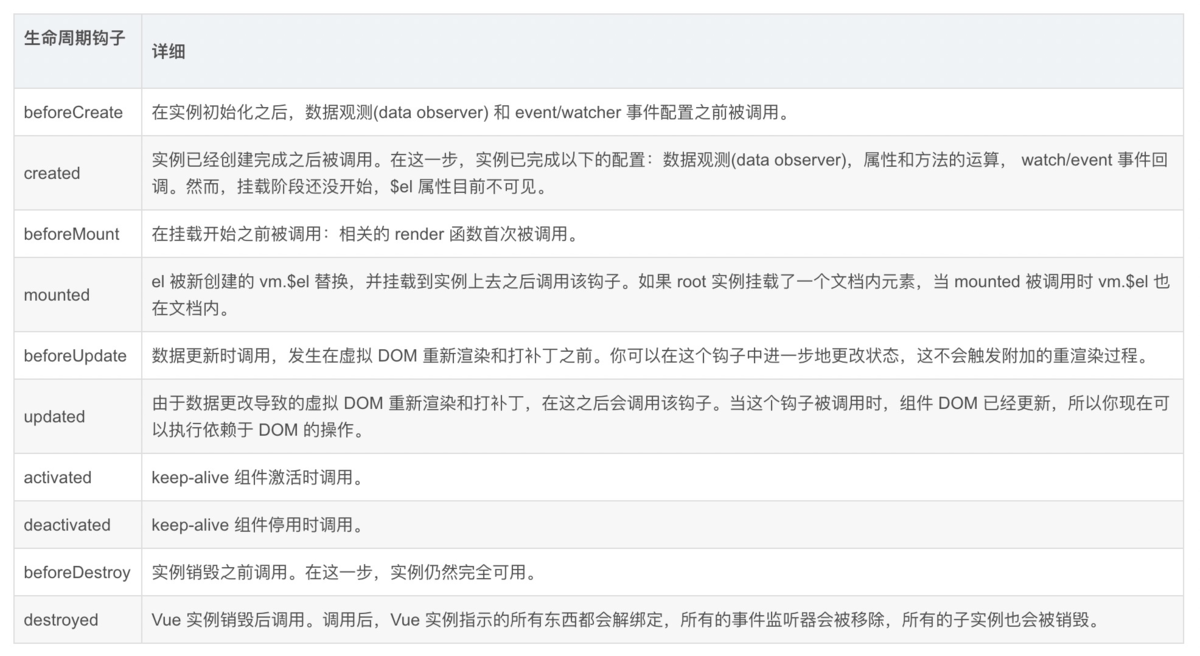
1、vue的生命周期

2、实际操作
下面我们在实际的代码执行过程中理解父子组件生命周期创建过程以及钩子函数执行的实时状态变化。
测试基于下面的代码,引入vue.js文件后即可执行。(打开页面后,再按一次刷新会自动进入debugger状态)
  1 <!DOCTYPE html>
  2 <html lang="en">
  3 <head>
  4     <meta charset="UTF-8">
  5     <meta name="viewport" content="width=device-width, initial-scale=1.0">
  6     <meta http-equiv="X-UA-Compatible" content="ie=edge">
  7     <title>Document</title>
  8     <style>
  9
 10     </style>
 11 </head>
 12 <body>
 13 <div id="app">
 14     <p>{{message}}</p>
 15     <keep-alive>
 16         <my-components :msg="msg1" v-if="show"></my-components>
 17     </keep-alive>
 18 </div>
 19 </body>
 20 <script src="../../node_modules/vue/dist/vue.js"></script>
 21 <script>
 22     var child = {
 23         template: '<div>from child: {{childMsg}}</div>',
 24         props: ['msg'],
 25         data: function() {
 26             return {
 27                 childMsg: 'child'
 28             }
 29         },
 30         beforeCreate: function () {
 31             debugger;
 32         },
 33         created: function () {
 34             debugger;
 35         },
 36         beforeMount: function () {
 37             debugger;
 38         },
 39         mounted: function () {
 40             debugger;
 41         },
 42         deactivated: function(){
 43             alert("keepAlive停用");
 44         },
 45         activated: function () {
 46             console.log('component activated');
 47         },
 48         beforeDestroy: function () {
 49             console.group('beforeDestroy 销毁前状态===============》');
 50             var state = {
 51                 'el': this.$el,
 52                 'data': this.$data,
 53                 'message': this.message
 54             }
 55             console.log(this.$el);
 56             console.log(state);
 57         },
 58         destroyed: function () {
 59             console.group('destroyed 销毁完成状态===============》');
 60             var state = {
 61                 'el': this.$el,
 62                 'data': this.$data,
 63                 'message': this.message
 64             }
 65             console.log(this.$el);
 66             console.log(state);
 67         },
 68     };
 69     var vm = new Vue({
 70         el: '#app',
 71         data: {
 72                 message: 'father',
 73                 msg1: "hello",
 74                 show: true
 75             },
 76         beforeCreate: function () {
 77             debugger;
 78         },
 79         created: function () {
 80             debugger;
 81         },
 82         beforeMount: function () {
 83             debugger;
 84         },
 85         mounted: function () {
 86             debugger;
 87         },
 88         beforeUpdate: function () {
 89             alert("页面视图更新前");
 90
 91         },
 92         updated: function () {
 93             alert("页面视图更新后");
 94         },
 95         beforeDestroy: function () {
 96             console.group('beforeDestroy 销毁前状态===============》');
 97             var state = {
 98                 'el': this.$el,
 99                 'data': this.$data,
100                 'message': this.message
101             }
102             console.log(this.$el);
103             console.log(state);
104         },
105         destroyed: function () {
106             console.group('destroyed 销毁完成状态===============》');
107             var state = {
108                 'el': this.$el,
109                 'data': this.$data,
110                 'message': this.message
111             }
112             console.log(this.$el);
113             console.log(state);
114         },
115         components: {
116             'my-components': child
117         }
118     });
119 </script>
120 </html>
3.1、生命周期调试
首先我们创建了一个Vue实例vm,将其挂载到页面中id为“app”的元素上。
3.1.1、根组件的beforeCreate阶段
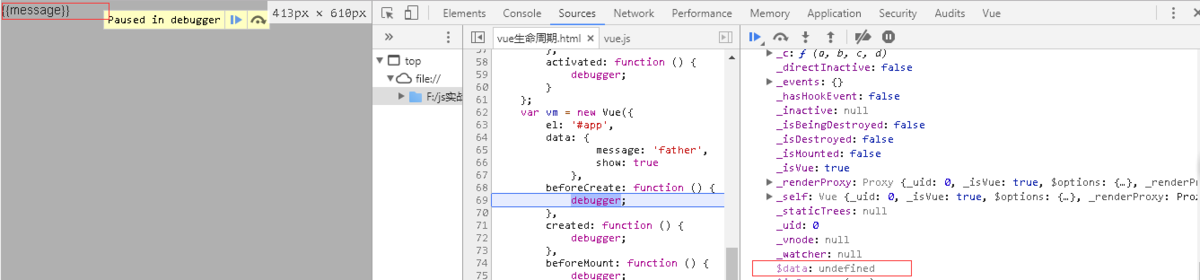

可以看出,在调用beforeCreate()函数时,只进行了一些必要的初始化操作(例如一些全局的配置和根实例的一些属性初始化),此时data属性为undefined,没有可供操作的数据。
3.1.2、根组件的Created阶段
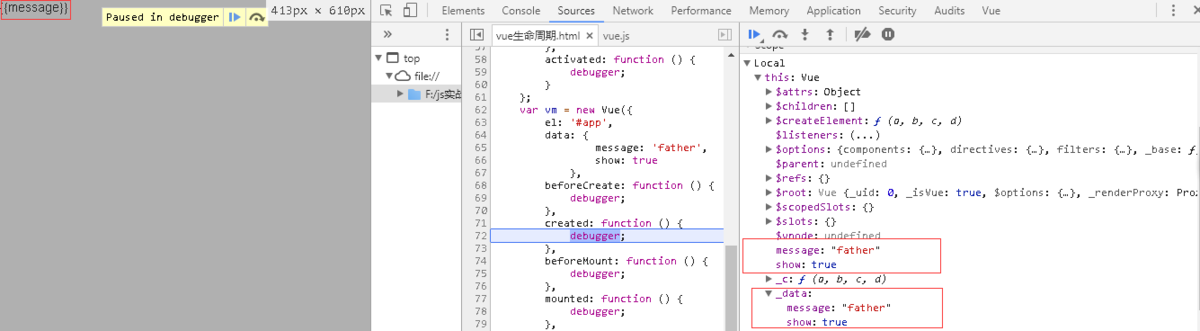

调用Created()函数,在这一步,实例已完成以下的配置:数据代理和动态数据绑定(data observer),属性和方法的运算, watch/event 事件回调。然而,挂载阶段还没开始,$el 属性目前不可见。
3.1.3、根组件的beforeMount阶段

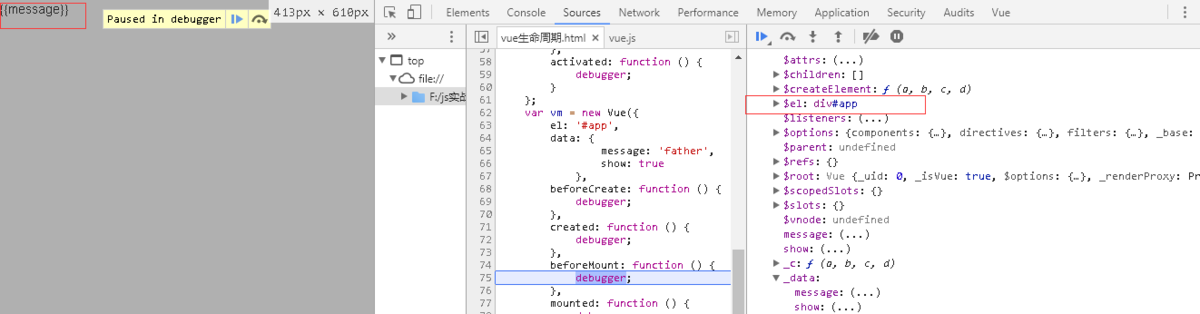


在调用boforeMount()函数前首先会判断对象是否有el选项。如果有的话就继续向下编译,如果没有el选项,则停止编译,也就意味着停止了生命周期,直到在该vue实例上调用vm.$mount(el)
在这个例子中,我们有el元素,因此会调用boforeMount()函数,此时已经开始执行模板解析函数,但还没有将$el元素挂载页面,页面视图因此也未更新。在标红处,还是 {{message}},这里就是应用的 Virtual DOM(虚拟Dom)技术,先把坑占住了。到后面mounted挂载的时候再把值渲染进去。
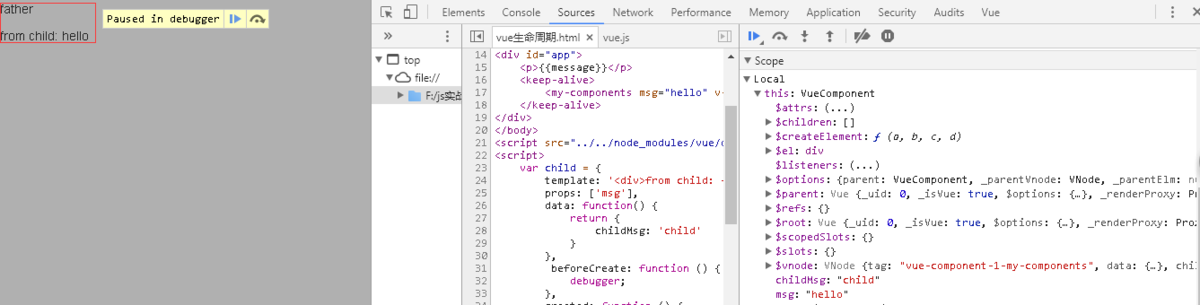
3.1.4、子组件的beforeCreate、Created、beforeMount、Mounted阶段
在父组件执行beforeMount阶段后,进入子组件的beforeCreate、Created、beforeMount阶段,这些阶段和父组件类似,按下不表。beforeMount阶段后,执行的是Mounted阶段,该阶段时子组件已经挂载到父组件上,并且父组件随之挂载到页面中。
由下图可以知道,在beforeMount阶段之后、Mounted阶段之前,数据已经被加载到视图上了,即$el元素被挂载到页面时触发了视图的更新。

3.1.5、子组件的activated阶段
我们发现在子父组件全部挂载到页面之后被触发。这是因为子组件my-components被<keep-alive> 包裹,随$el的挂载被触发。如果子组件没有被<keep-alive>包裹,那么该阶段将不会被触发。


3.1.6、父组件的mounted阶段
mounted执行时:此时el已经渲染完成并挂载到实例上。
至此,从Vue实例的初始化到将新的模板挂载到页面上的阶段已经完成,退出debugger。下面我们来看一下deactivated、beforeUpdate、updated、beforeDestroy、destroyed钩子函数。
3.2、deactivated、beforeUpdate、updated阶段
由生命周期函数可知:当数据变化后、虚拟DOM渲染重新渲染页面前会触发beforeUpdate()函数,此时视图还未改变。当虚拟DOM渲染页面视图更新后会触发updated()函数。
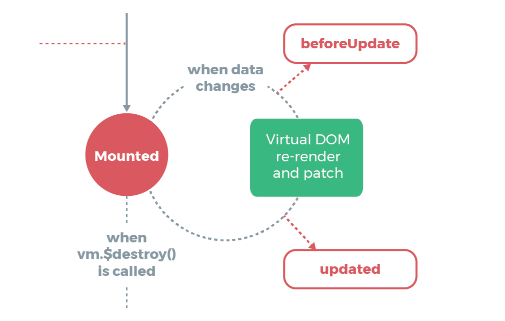

我们不妨改变vm.show = false,当修改这个属性时,不仅会触发beforeUpdate、updated函数,还会触发deactivated函数(因为keep-alive 组件停用时调用)。我们不妨想一下deactivated函数会在beforeUpdate后还是updated后调用。
我们在控制台输入vm.show = false。得到三者的调用顺序分别为beforeUpdate、deactivated、updated。我们可以知道的是deactivated函数的触发时间是在视图更新时触发。因为当视图更新时才能知道keep-alive组件被停用了。


3.3、beforeDestroy和destroyed钩子函数间的生命周期
现在我们对Vue实例进行销毁,调用app.$destroy()方法即可将其销毁,控制台测试如下:
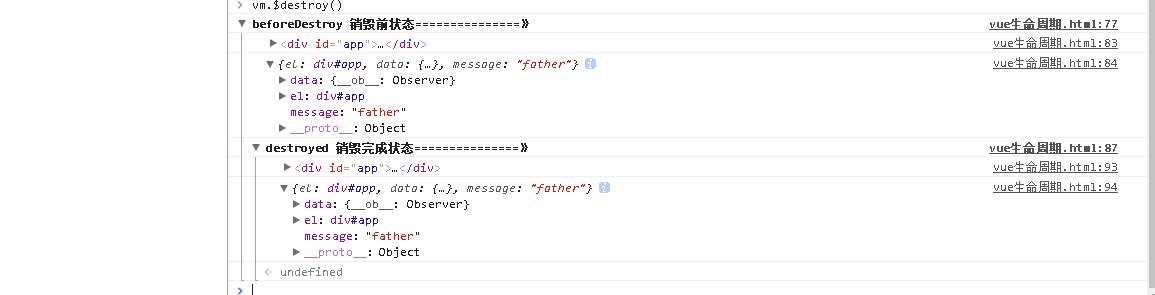

我们发现实例依然存在,但是此时变化已经发生在了其他地方。
beforeDestroy钩子函数在实例销毁之前调用。在这一步,实例仍然完全可用。
destroyed钩子函数在Vue 实例销毁后调用。调用后,Vue 实例指示的所有东西都会解绑定,所有的事件监听器会被移除,所有的子实例也会被销毁(也就是说子组件也会触发相应的函数)。这里的销毁并不指代'抹去',而是表示'解绑'。
销毁时beforeDestory函数的传递顺序为由父到子,destory的传递顺序为由子到父。
4、一些应用钩子函数的想法
-
在created钩子中可以对data数据进行操作,这个时候可以进行ajax请求将返回的数据赋给data。
-
虽然updated函数会在数据变化时被触发,但却不能准确的判断是那个属性值被改变,所以在实际情况中用computed或match函数来监听属性的变化,并做一些其他的操作。
-
在mounted钩子对挂载的dom进行操作,此时,DOM已经被渲染到页面上。
-
在使用vue-router时有时需要使用<keep-alive></keep-alive>来缓存组件状态,这个时候created钩子就不会被重复调用了,如果我们的子组件需要在每次加载或切换状态的时候进行某些操作,可以使用activated钩子触发。
-
所有的生命周期钩子自动绑定 this 上下文到实例中,所以不能使用箭头函数来定义一个生命周期方法 (例如 created: () => this.fetchTodos())。这是导致this指向父级。
5、 小结
- 加载渲染过程
父beforeCreate->父created->父beforeMount->子beforeCreate->子created->子beforeMount->子mounted->父mounted
- 子组件更新过程
父beforeUpdate->子beforeUpdate->子updated->父updated
- 父组件更新过程
父beforeUpdate->父updated
- 销毁过程
父beforeDestroy->子beforeDestroy->子destroyed->父destroyed