转自http://dblab.xmu.edu.cn
这里主要记录配置文件。
案例一:flume推送消息给Spark Streaming,Spark Streaming收到消息后进行处理。
把Flume Source设置为netcat类型,从终端上不断给Flume Source发送各种消息,Flume把消息汇集到Sink,这里把Sink类型设置为avro,由Sink把消息推送给Spark Streaming,由我们编写的Spark Streaming应用程序对消息进行处理。
cd /usr/local/flume
cd conf
vim flume-to-spark.conf
在flume-to-spark.conf文件中写入如下内容:
        # Name the components on this agent
        a1.sources = r1
        a1.sinks = k1
        a1.channels = c1

        # Describe/configure the source
        a1.sources.r1.type = netcat
        a1.sources.r1.bind = localhost
        a1.sources.r1.port = 33333

        # Describe the sink
        a1.sinks.k1.type = avro
        a1.sinks.k1.hostname = localhost
        a1.sinks.k1.port =44444

        # Use a channel which buffers events in memory
        a1.channels.c1.type = memory
        a1.channels.c1.capacity = 1000000
        a1.channels.c1.transactionCapacity = 1000000

        # Bind the source and sink to the channel
        a1.sources.r1.channels = c1
        a1.sinks.k1.channel = c1
在上面的配置文件中,我们把Flume Source类别设置为netcat,绑定到localhost的33333端口,这样,我们后面就可以通过“telnet localhost 33333”命令向Flume Source发送消息。
同时,我们把Flume Sink类别设置为avro,绑定到localhost的44444端口,这样,Flume Source把采集到的消息汇集到Flume Sink以后,Sink会把消息推送给localhost的44444端口,而我们编写的Spark Streaming程序一直在监听localhost的44444端口,一旦有消息到达,就会被Spark Streaming应用程序取走进行处理。
特别要强调的是,上述配置文件完成以后,暂时“不要”启动Flume Agent,如果这个时候使用“flume-ng agent”命令启动agent,就会出现错误提示“localhost:44444拒绝连接”,也就是Flume Sink要发送消息给localhost的44444端口,但是,无法连接上localhost的44444端口。为什么会出现这个错误呢?因为,这个时候我们还没有启动Spark Streaming应用程序,也就没有启动localhost的44444端口,所以,Sink是无法向这个端口发送消息的。
spark的准备工作
Kafka和Flume等高级输入源,需要依赖独立的库(jar文件)。
现在我们就需要下载spark-streaming-flume_2.11-2.1.0.jar,其中2.11表示对应的Scala版本号,2.1.0表示Spark版本号。
cd /usr/local/spark/jars
mkdir flume
cd ~
cd 下载
cp ./spark-streaming-flume_2.11-2.1.0.jar /usr/local/spark/jars/flume
下面我们还要修改spark目录下conf/spark-env.sh文件中的SPARK_DIST_CLASSPATH变量.把flume的相关jar包添加到此文件中
export SPARK_DIST_CLASSPATH=$(/usr/local/hadoop/bin/hadoop classpath):$(/usr/local/hbase/bin/hbase classpath):/usr/local/spark/examples/jars/*:/usr/local/spark/jars/kafka/*:/usr/local/kafka/libs/*:/usr/local/spark/jars/flume/*:/usr/local/flume/lib/*
这样,我们就已经准备好了Spark环境,它可以支持Flume相关编程了。
编写Spark程序使用Flume数据源
cd /usr/local/spark/mycode
mkdir flume
cd flume
vim FlumeEventCount.py
请在FlumeEventCount.py代码文件中输入以下代码:
from __future__ import print_function

import sys

from pyspark import SparkContext
from pyspark.streaming import StreamingContext
from pyspark.streaming.flume import FlumeUtils
import pyspark
if __name__ == "__main__":
    if len(sys.argv) != 3:
        print("Usage: flume_wordcount.py <hostname> <port>", file=sys.stderr)
        exit(-1)

    sc = SparkContext(appName="FlumeEventCount")
    ssc = StreamingContext(sc, 2)

    hostname= sys.argv[1]
    port = int(sys.argv[2])
    stream = FlumeUtils.createStream(ssc, hostname, port,pyspark.StorageLevel.MEMORY_AND_DISK_SER_2)
    stream.count().map(lambda cnt : "Recieve " + str(cnt) +" Flume events!!!!").pprint()

    ssc.start()
    ssc.awaitTermination()
测试程序效果
首先,请新建第1个Linux终端,启动Spark Streaming应用程序,命令如下:
cd /usr/local/spark
./bin/spark-submit --driver-class-path /usr/local/spark/jars/*:/usr/local/spark/jars/flume/* ./mycode/flume/FlumeEventCount.py localhost 44444
通过上面命令,我们为应用程序提供host和port两个参数的值分别为localhost和44444,程序会对localhost的44444端口进行监听,Milliseconds(2000)设置了时间间隔为2秒,所以,该程序每隔2秒就会从指定的端口中获取由Flume Sink发给该端口的消息,然后进行处理,对消息进行统计,打印出“Received 0 flume events.”这样的信息。
现在,我们可以再另外新建第2个终端,在这个新的终端中启动Flume Agent,命令如下:
cd /usr/local/flume
bin/flume-ng agent --conf ./conf --conf-file ./conf/flume-to-spark.conf --name a1 -Dflume.root.logger=INFO,console
注意以上几个参数:
--conf: 配置文件目录
--conf-file: 配置文件位置
--name: agent的名字
启动agent以后,该agent就会一直监听localhost的33333端口,这样,我们下面就可以通过“telnet localhost 33333”命令向Flume Source发送消息。
请另外新建第3个终端,执行如下命令:
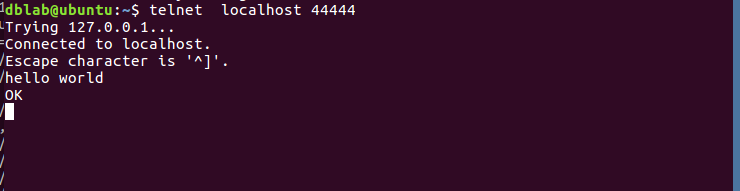
telnet localhost 33333
执行该命令以后,就可以在这个窗口里面随便敲入若干个字符和若干个回车,这些消息都会被Flume监听到,Flume把消息采集到以后汇集到Sink,然后由Sink发送给Spark的FlumeEventCount程序进行处理。然后,你就可以在运行FlumeEventCount的前面那个终端窗口内看到类似如下的统计结果:
-------------------------------------------
Time: 1488029430000 ms
-------------------------------------------
Received 0 flume events.
#这里省略了其他屏幕信息
-------------------------------------------
Time: 1488029432000 ms
-------------------------------------------
Received 8 flume events.
#这里省略了其他屏幕信息
-------------------------------------------
Time: 1488029434000 ms
-------------------------------------------
Received 21 flume events.
案例二:Avro source
Avro可以发送一个给定的文件给Flume,Avro 源使用AVRO RPC机制。
a) 创建agent配置文件
  cd /usr/local/flume
  sudo vim ./conf/avro.conf #在conf目录下编辑一个avro.conf空文件
然后,我们在avro.conf写入以下内容
  a1.sources = r1
  a1.sinks = k1
  a1.channels = c1

# Describe/configure the source
  a1.sources.r1.type = avro
  a1.sources.r1.channels = c1
  a1.sources.r1.bind = 0.0.0.0
  a1.sources.r1.port = 4141
    #注意这个端口名,在后面的教程中会用得到

# Describe the sink
  a1.sinks.k1.type = logger

# Use a channel which buffers events in memory
  a1.channels.c1.type = memory
  a1.channels.c1.capacity = 1000
  a1.channels.c1.transactionCapacity = 100

# Bind the source and sink to the channel
  a1.sources.r1.channels = c1
  a1.sinks.k1.channel = c1
参数说明:
a1.sources.r1.type = avro,表示数据源的类型是avro。
bind绑定的ip地址或主机名,使用0.0.0.0表示绑定机器所有的接口。
port表示绑定的端口。
a1.sinks.k1.type = logger,表示sinks的类型是logger。
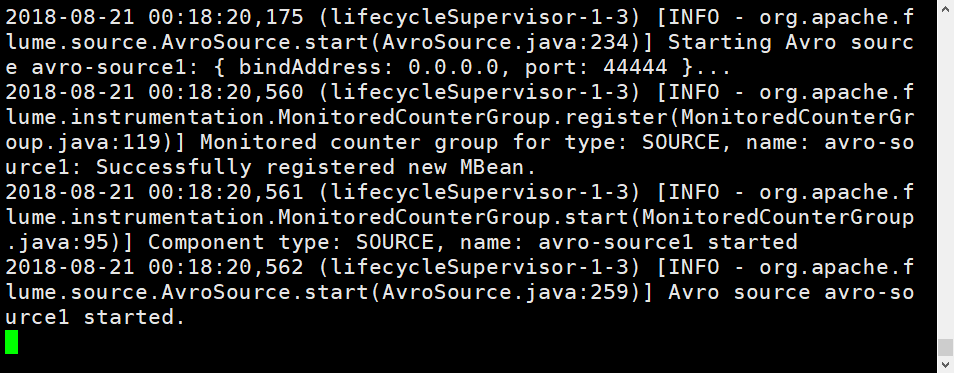
b) 启动flume agent a1
/usr/local/flume/bin/flume-ng agent -c . -f /usr/local/flume/conf/avro.conf -n a1 -Dflume.root.logger=INFO,console #启动日志控制台
参数说明:
-c同--conf.
-f同--conf-file.
-n同--name
agent启动成功会显示类似:INFO source.AvroSource: Avro source r1 started.
c) 创建指定文件
先打开另外一个终端,在/usr/local/flume下写入一个文件log.00,内容为hello,world:
  cd /usr/local/flume
  sudo sh -c 'echo "hello world" > /usr/local/flume/log.00'
我们再打开另外一个终端,执行:
  cd /usr/local/flume
  bin/flume-ng avro-client --conf conf -H localhost -p 4141 -F /usr/local/flume/log.00 #4141是avro.conf文件里的端口名
此时我们可以看到第一个终端(agent窗口)下的显示,也就是在日志控制台,就会把log.00文件的内容打印出来.
案例三:netcatsource
a) 创建agent配置文件
  cd /usr/local/flume
  sudo vim ./conf/example.conf #在conf目录创建example.conf
在example.conf里写入以下内容:
    # Name the components on this agent
    a1.sources = r1
    a1.sinks = k1
    a1.channels = c1

    # Describe/configure the source
    a1.sources.r1.type = netcat
    a1.sources.r1.bind = localhost
    a1.sources.r1.port = 44444
        #同上,记住该端口名

    # Describe the sink
    a1.sinks.k1.type = logger

    # Use a channel which buffers events in memory
    a1.channels.c1.type = memory
    a1.channels.c1.capacity = 1000
    a1.channels.c1.transactionCapacity = 100

    # Bind the source and sink to the channel
    a1.sources.r1.channels = c1
    a1.sinks.k1.channel = c1
b)启动flume agent (即打开日志控制台):
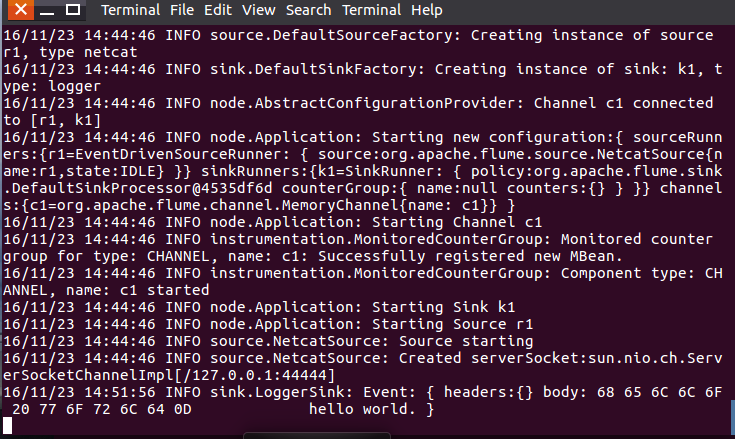
/usr/local/flume/bin/flume-ng agent --conf ./conf --conf-file ./conf/example.conf --name a1 -Dflume.root.logger=INFO,console
再打开一个终端,输入命令:telnet localhost 44444
然后我们可以在终端下输入任何字符,第一个终端的日志控制台也会有相应的显示,如我们输入”hello,world”,得出
这里补充一点,flume只能传递英文和字符,不能用中文。
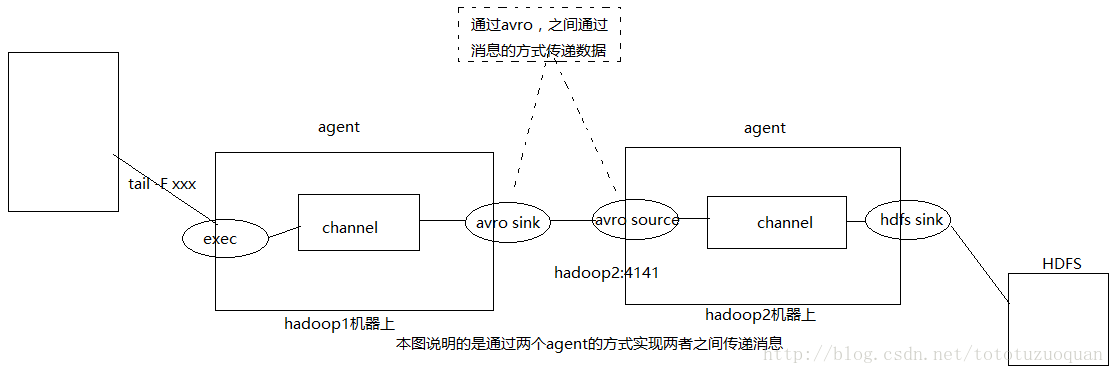
案例四:模拟两个agent之间传递消息的场景
说明:
1.在hadoop1机器上有一个flume agent,通过exec监听tail命令输出的结果。
2.新增的结果通过avro sink的方式下沉到hadoop2:4141的avro source端。
3.在hadoop2机器上有一个flume agent,通过avro source来接收下沉过来的数据。
编写hadoop1上的通信配置文件
在hadoop1上的flume通信控制的文件agent1.conf的内容如下:
agent1.channels.ch1.type = memory
agent1.channels.ch1.capacity = 1000
agent1.channels.ch1.transactionCapacity = 100

agent1.sources.exec-source1.channels = ch1
agent1.sources.exec-source1.type = exec
agent1.sources.exec-source1.command = tail -F /opt/classiclaw/nginx/logs/access.log

agent1.sinks.avro-sink1.channel = ch1
agent1.sinks.avro-sink1.type = avro
agent1.sinks.avro-sink1.hostname = ubuntu
agent1.sinks.avro-sink1.port = 44444

agent1.channels = ch1
agent1.sources = exec-source1
agent1.sinks = avro-sink1
编写hadoop2上的通信配置文件
在hadoop2上的flume通信控制的文件agent2.conf的内容如下:
agent2.channels.ch2.type = memory
agent2.channels.ch2.capacity = 1000
agent2.channels.ch2.transactionCapacity = 100

agent2.sources.avro-source1.channels = ch2
agent2.sources.avro-source1.type = avro
agent2.sources.avro-source1.bind = 0.0.0.0
agent2.sources.avro-source1.port = 44444

agent2.sinks.log-sink1.channel = ch2
agent2.sinks.log-sink1.type = logger

agent2.channels = ch2
agent2.sources = avro-source1
agent2.sinks = log-sink1
执行命令,开始测试
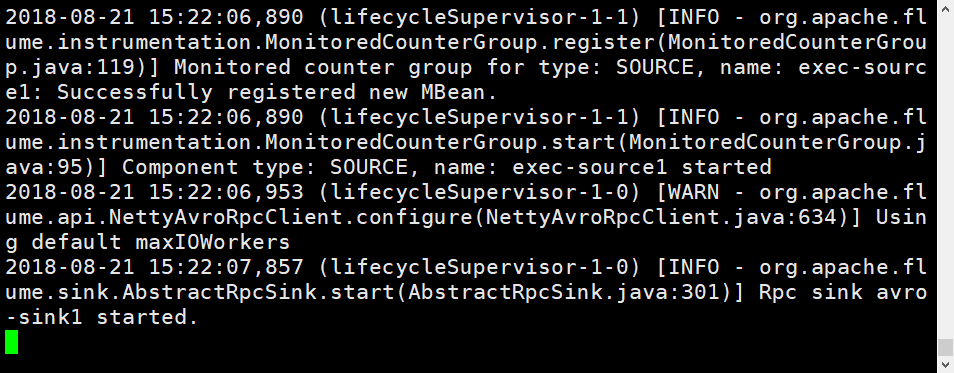
启动hadoop2上的flume agent
由于hadoop1上的agent配置文件中配置下沉的位置是hadoop2:4141,所以需要先启动hadoop2上的flume agent
启动命令是:
cd /usr/local/flume
./bin/flume-ng agent -c conf -f conf/agent2.conf -n agent2 -Dflume.root.logger=INFO,console
启动效果图如下:
启动hadoop1上的flume agent
cd /usr/local/flume
./bin/flume-ng agent -c conf -f conf/agent1.conf -n agent1 -Dflume.root.logger=INFO,console
启动信息:
查看hadoop2上的运行效果
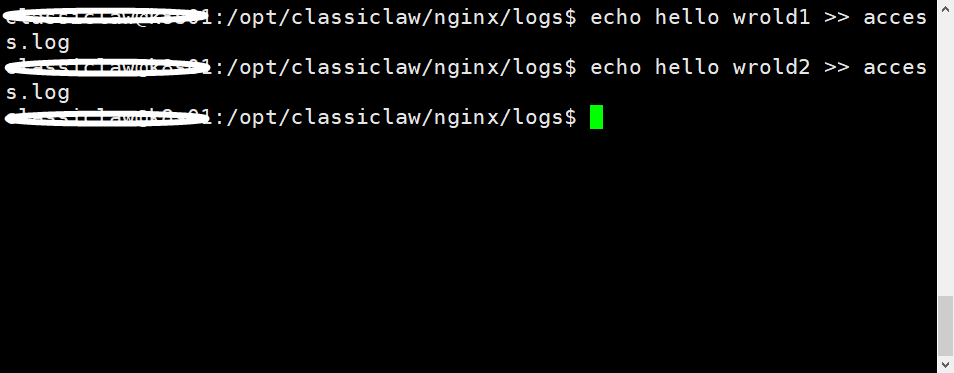
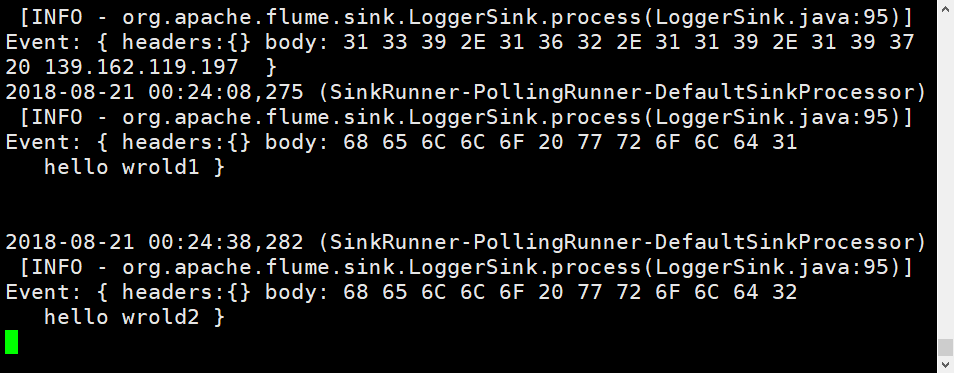
通过上图发现只要access.log中有日志文件变化,在hadoop2上的agent就会有响应结果。
案例五: flume搜集日志:如何解决实时不断追加的日志文件及不断增加的文件个数问题
背景:
在搜集日志的过程中,日志文件的个数及日志文件需要不断的追加。flume1.6中,可以使用tail -f可以解决不断追加的文件,但是由于日志文件的个数是变化的,不可能只产生一个文件。所以tail -f就已经不能解决这个搜集日志的问题。
需求:
需要能够监控文件,并且追加文件,同时文件个数也是不断变化的。
解决办法:
这时候flume1.7就产生了,很好的通过 TAILDIR解决了这个问题。TAILDIR可以监控一个目录下的文件。
1. 单节点的agent
1) 增加配置文件
cd $FLUME_HOME/conf
vim single_agent.conf
编写single_agent.conf
# agent的名称为a1
a1.sources = source1
a1.channels = channel1
a1.sinks = sink1

# set source
a1.sources.source1.type = TAILDIR
a1.sources.source1.positionFile = /opt/classiclaw/nginx/logs/taildir_position.json
a1.sources.source1.filegroups = f1
a1.sources.source1.filegroups.f1 = /opt/classiclaw/nginx/logs/access.log.*
a1.sources.source1.headers.f1.headerKey1 = value1
a1.sources.source1.fileHeader = true

# set sink
a1.sinks.sink1.type = org.apache.flume.sink.kafka.KafkaSink
a1.sinks.sink1.brokerList = k8s01:9092
a1.sinks.sink1.topic = abouttaildir
a1.sinks.sink1.kafka.flumeBatchSize = 20
a1.sinks.sink1.kafka.producer.acks = 1
a1.sinks.sink1.kafka.producer.linger.ms = 1
a1.sinks.sink1.kafka.producer.compression.type = snappy

# set channel
a1.channels.channel1.type = file
a1.channels.channel1.checkpointDir = /opt/classiclaw/nginx/logs/flume_data/checkpoint
a1.channels.channel1.dataDirs = /opt/classiclaw/nginx/logs/flume_data/data

# bind
a1.sources.source1.channels = channel1
a1.sinks.sink1.channel = channel1
2. 查看kafka现有的topic
cd /usr/local/kafka
./bin/kafka-topics.sh --zookeeper k8s01:2181 --list
3. 在kafka上创建名为abouttaildir的topic
cd /usr/local/kafka
./bin/kafka-topics.sh --zookeeper k8s01:2181 --create --topic abouttaildir --replication-factor 1 --partitions 3
4. 启动flume
cd /usr/local/flume
./bin/flume-ng agent --conf conf/ --conf-file conf/single_agent.conf --name a1 -Dflume.root.logger=INFO,console

5. 创建一个kafka的consumer
当然,前提是已开启zookeeper和kafka.
cd /usr/local/kafka
./bin/kafka-console-consumer.sh --zookeeper k8s01:2181 --topic abouttaildir --from-beginning
6. 添加文件到flume source目录
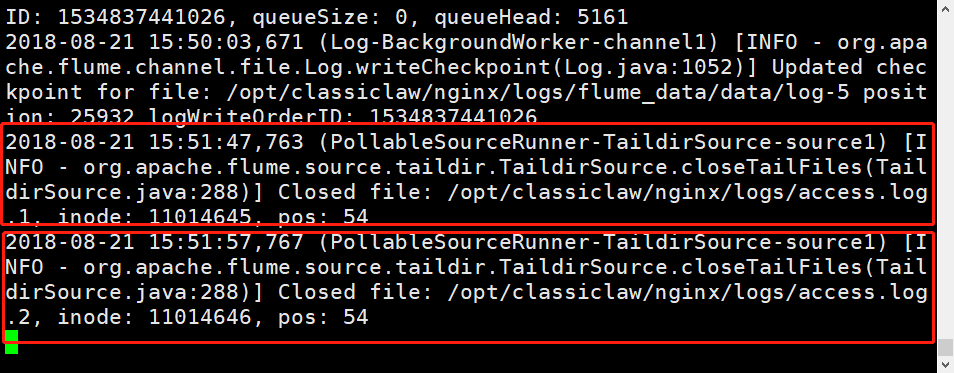
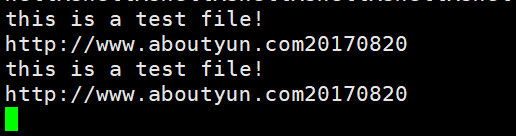
cd /opt/classiclaw/nginx/logs
echo -e "this is a test file!
http://www.aboutyun.com20170820">access.log.1
7. 再次查看kafka consumer
切换到创建kafka consumer的shell界面,会看到我们access.log.1access.log.2中文件的内容被打印在屏幕上。
agent: