查询安装包:rpm -qa | grep mysql
有mysql包显示:
停止服务:systemctl stop mysqld
卸载:
rpm -e mysql-server
rpm -e --nodeps mysql-libs
查看防火墙状态:systemctl status firewalld
停止防火墙:systemctl stop firewalld
设置开机不启用防火墙:systemctldisable firewalld
主从节点安装
yum -y install mariadb mariadb-server
cp /usr/share/mysql/my-huge.cnf  /etc/my.cnf
systemctl start mariadb
systemctl enable mariadb
Mariadb数据库, 执行脚本:/usr/bin/mysql_secure_installation
NOTE:RUNNING ALL PARTS OF THIS SCRIPT IS RECOMMENDED FOR ALL MariaDB
SERVERS IN PRODUCTIONUSE!  PLEASE READ EACH STEP CAREFULLY!
In order to log intoMariaDB to secure it, we'll need the current
password for the rootuser.  If you've just installed MariaDB,and
you haven't set the rootpassword yet, the password will be blank,
so you should just pressenter here.

Enter current passwordfor root (enter for none): 安装后默认没有root密码,直接回车

OK, successfully usedpassword, moving on...
Setting the rootpassword ensures that nobody can log into the MariaDB
root user without theproper authorisation.

Set root password? [Y/n]Y

New password: 输入root的新密码

Re-enter new password: 新密码确认

Password updatedsuccessfully!
Reloading privilegetables..
 ... Success!
By default, a MariaDBinstallation has an anonymous user, allowing anyone
to log into MariaDBwithout having to have a user account created for
them.  This is intended only for testing, and tomake the installation
go a bit smoother.  You should remove them before moving into a
production environment.

Remove anonymous users?[Y/n] 删除匿名用户 Y

 ... Success!
Normally, root shouldonly be allowed to connect from 'localhost'. This
ensures that someonecannot guess at the root password from the network.

Disallow root loginremotely? [Y/n] 关闭root远程登录 Y

 ... Success!
By default, MariaDBcomes with a database named 'test' that anyone can
access.  This is also intended only for testing, andshould be removed
before moving into aproduction environment.

Remove test database andaccess to it? [Y/n] 删除test数据库 Y

 - Dropping test database...
 ... Success!
 - Removing privileges on test database...
 ... Success!
Reloading the privilegetables will ensure that all changes made so far
will take effectimmediately.

Reload privilege tablesnow? [Y/n] 确定以上所有操作 Y

 ... Success!
Cleaning up...
All done!  If you've completed all of the above steps,your MariaDB
installation should nowbe secure.
Thanks for usingMariaDB!
从节点修改vim /etc/my.cnf配置文件:
server-id = 2
进行重启从节点(slave):systemctl restart mariadb
在master节点上执行:
登录MariaDB数据库:mysql -uroot –proot
GRANT REPLICATION SLAVE,REPLICATION CLIENT ON *.* TO 'root'@'192.168.45.%' identified by 'root';
flush privileges;
查询SQL(Master的状态)命令:SHOW MASTER STATUS;

配置从节点SLAVE:(注意在从节点上执行)
登录从服务器:mysql -uroot –proot进行配置:
CHANGE MASTER TO MASTER_HOST='192.168.45.211', MASTER_USER='root', MASTER_PASSWORD='root',MASTER_LOG_FILE='mysql-bin.000001',MASTER_LOG_POS=600;
start slave;
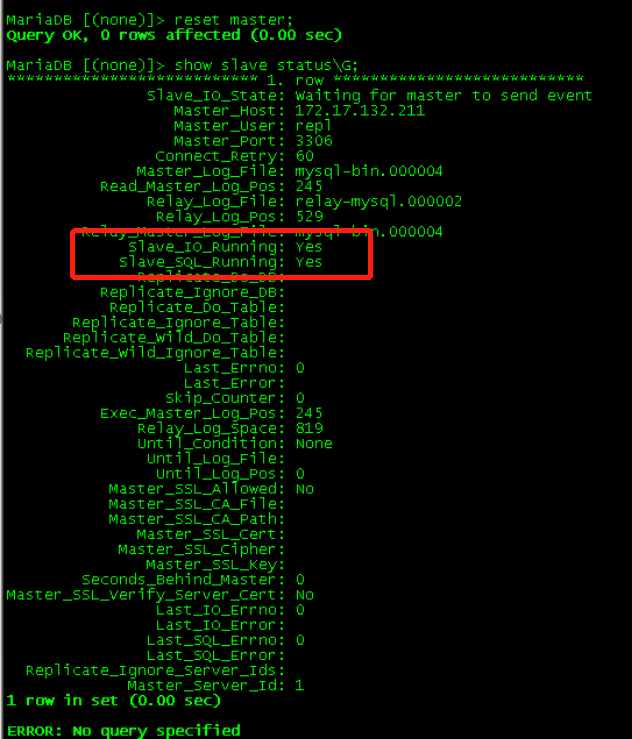
reset master;
show slave statusG;
确保 Slave_IO_Running和 Slave_SQL_Running 的值为Yes
在slave节点上执行:
登录MariaDB数据库:mysql -uroot –proot
GRANT REPLICATION SLAVE,REPLICATION CLIENT ON *.* TO 'root'@'192.168.45.%' identified by 'root';
flush privileges;
查询SQL(Master的状态)命令:SHOW MASTER STATUS;
配置主节点Master:(注意在主节点上执行)
登录从服务器:mysql -uroot –proot进行配置:
CHANGE MASTER TO MASTER_HOST='192.168.45.211', MASTER_USER='root', MASTER_PASSWORD='root',MASTER_LOG_FILE='mysql-bin.000003',MASTER_LOG_POS=1655;
start slave;
show slave statusG;
确保 Slave_IO_Running和 Slave_SQL_Running 的值为Yes
主从节点的show slave statusG;结果Slave_IO_Running和 Slave_SQL_Running 的值为Yes及成功。