一 什么是web框架?
框架,即framework,特指为解决一个开放性问题而设计的具有一定约束性的支撑结构,使用框架可以帮你快速开发特定的系统,简单地说,就是你用别人搭建好的舞台来做表演。
对于所有的Web应用,本质上其实就是一个socket服务端,用户的浏览器其实就是一个socket客户端。


import socket

def handle_request(client):

    buf = client.recv(1024)
    client.send("HTTP/1.1 200 OK

".encode("utf8"))
    client.send("<h1 style='color:red'>Hello, yuan</h1>".encode("utf8"))

def main():

    sock = socket.socket(socket.AF_INET, socket.SOCK_STREAM)
    sock.bind(('localhost',8001))
    sock.listen(5)

    while True:
        connection, address = sock.accept()
        handle_request(connection)
        connection.close()

if __name__ == '__main__':

    main()
最简单的Web应用就是先把HTML用文件保存好,用一个现成的HTTP服务器软件,接收用户请求,从文件中读取HTML,返回。
如果要动态生成HTML,就需要把上述步骤自己来实现。不过,接受HTTP请求、解析HTTP请求、发送HTTP响应都是苦力活,如果我们自己来写这些底层代码,还没开始写动态HTML呢,就得花个把月去读HTTP规范。
正确的做法是底层代码由专门的服务器软件实现,我们用Python专注于生成HTML文档。因为我们不希望接触到TCP连接、HTTP原始请求和响应格式,所以,需要一个统一的接口,让我们专心用Python编写Web业务。
这个接口就是WSGI:Web Server Gateway Interface。
-----------------------------Do a web framework ourselves---------------------------
step 1:
from wsgiref.simple_server import make_server


def application(environ, start_response):
    start_response('200 OK', [('Content-Type', 'text/html')])
    return [b'<h1>Hello, web!</h1>']


httpd = make_server('', 8080, application)

print('Serving HTTP on port 8000...')
# 开始监听HTTP请求:
httpd.serve_forever()
注意:
整个application()函数本身没有涉及到任何解析HTTP的部分,也就是说,底层代码不需要我们自己编写,
我们只负责在更高层次上考虑如何响应请求就可以了。

application()函数必须由WSGI服务器来调用。有很多符合WSGI规范的服务器,我们可以挑选一个来用。

Python内置了一个WSGI服务器,这个模块叫wsgiref


application()函数就是符合WSGI标准的一个HTTP处理函数,它接收两个参数:

        //environ:一个包含所有HTTP请求信息的dict对象;

        //start_response:一个发送HTTP响应的函数。

在application()函数中,调用:

start_response('200 OK', [('Content-Type', 'text/html')])

就发送了HTTP响应的Header,注意Header只能发送一次,也就是只能调用一次start_response()函数。
start_response()函数接收两个参数,一个是HTTP响应码,一个是一组list表示的HTTP Header,每
个Header用一个包含两个str的tuple表示。

通常情况下,都应该把Content-Type头发送给浏览器。其他很多常用的HTTP Header也应该发送。

然后,函数的返回值b'<h1>Hello, web!</h1>'将作为HTTP响应的Body发送给浏览器。

有了WSGI,我们关心的就是如何从environ这个dict对象拿到HTTP请求信息,然后构造HTML,
通过start_response()发送Header,最后返回Body。
step 2
print(environ['PATH_INFO'])
    path=environ['PATH_INFO']
    start_response('200 OK', [('Content-Type', 'text/html')])
    f1=open("index1.html","rb")
    data1=f1.read()
    f2=open("index2.html","rb")
    data2=f2.read()

    if path=="/yuan":
        return [data1]
    elif path=="/alex":
        return [data2]
    else:
        return ["<h1>404</h1>".encode('utf8')]
step3
from wsgiref.simple_server import make_server

def f1():
    f1=open("index1.html","rb")
    data1=f1.read()
    return [data1]

def f2():
    f2=open("index2.html","rb")
    data2=f2.read()
    return [data2]

def application(environ, start_response):

    print(environ['PATH_INFO'])
    path=environ['PATH_INFO']
    start_response('200 OK', [('Content-Type', 'text/html')])


    if path=="/yuan":
        return f1()

    elif path=="/alex":
        return f2()

    else:
        return ["<h1>404</h1>".encode("utf8")]


httpd = make_server('', 8502, application)

print('Serving HTTP on port 8084...')

# 开始监听HTTP请求:
httpd.serve_forever()
step4
from wsgiref.simple_server import make_server


def f1(req):
    print(req)
    print(req["QUERY_STRING"])

    f1=open("index1.html","rb")
    data1=f1.read()
    return [data1]

def f2(req):

    f2=open("index2.html","rb")
    data2=f2.read()
    return [data2]

import time

def f3(req):        #模版以及数据库

    f3=open("index3.html","rb")
    data3=f3.read()
    times=time.strftime("%Y-%m-%d %X", time.localtime())
    data3=str(data3,"utf8").replace("!time!",str(times))


    return [data3.encode("utf8")]


def routers():

    urlpatterns = (
        ('/yuan',f1),
        ('/alex',f2),
        ("/cur_time",f3)
    )
    return urlpatterns


def application(environ, start_response):

    print(environ['PATH_INFO'])
    path=environ['PATH_INFO']
    start_response('200 OK', [('Content-Type', 'text/html')])


    urlpatterns = routers()
    func = None
    for item in urlpatterns:
        if item[0] == path:
            func = item[1]
            break
    if func:
        return func(environ)
    else:
        return ["<h1>404</h1>".encode("utf8")]

httpd = make_server('', 8518, application)

print('Serving HTTP on port 8084...')

# 开始监听HTTP请求:

httpd.serve_forever()
不知不觉我们自己已经写出一个web框架啦!
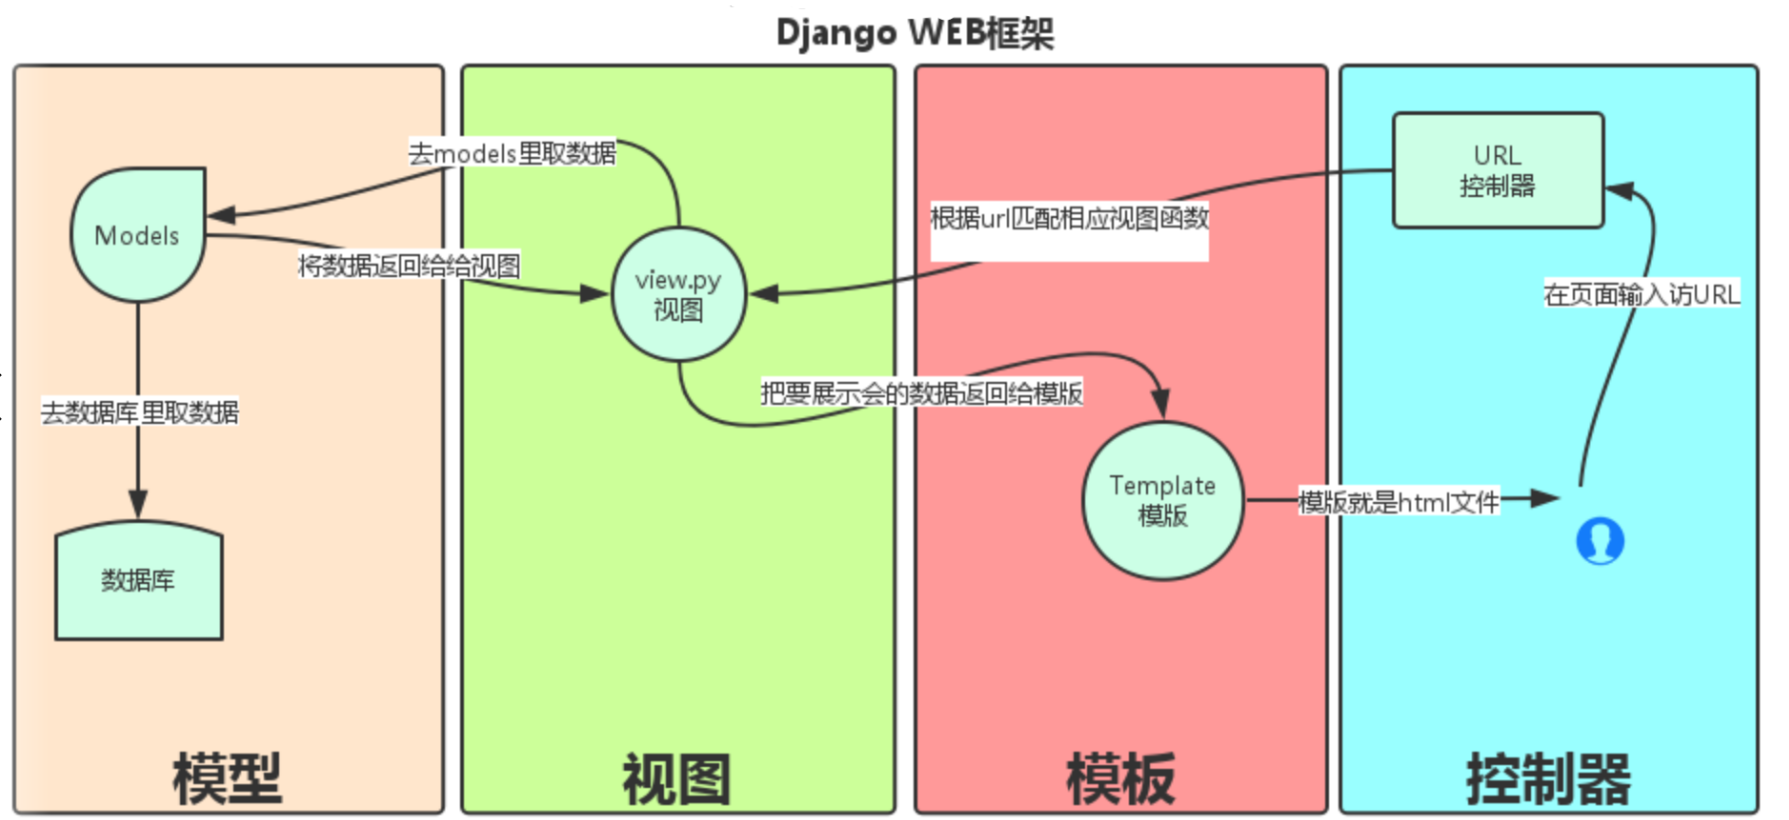
二 MVC和MTV模式
Django的MTV模式本质是各组件之间为了保持松耦合关系,Django的MTV分别代表:
Model(模型):负责业务对象与数据库的对象(ORM)
Template(模版):负责如何把页面展示给用户
View(视图):负责业务逻辑,并在适当的时候调用Model和Template
此外,Django还有一个url分发器,它的作用是将一个个URL的页面请求分发给不同的view处理,view再调用相应的Model和Template
Django基本命令
1、创建一个django project
django-admin.py startproject mysite
当前目录下会生成mysite的工程,目录结构如下:
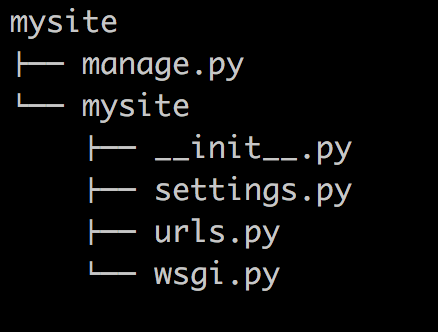
manage.py ----- Django项目里面的工具,通过它可以调用django shell和数据库等。
settings.py ---- 包含了项目的默认设置,包括数据库信息,调试标志以及其他一些工作的变量。
urls.py ----- 负责把URL模式映射到应用程序。
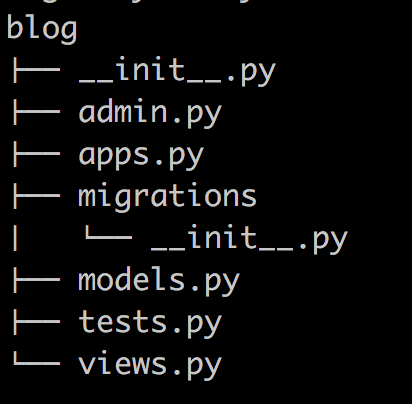
2、在mysite目录下创建应用,比如blog:
python manage.py startapp blog
3、启动django项目
python manage.py runserver 8080
这样我们的django就启动起来了!当我们访问:http://127.0.0.1:8080/时就可以看到:

4、同步更改数据库表或字段
'''
    python manage.py syncdb

    注意:Django 1.7.1 及以上的版本需要用以下命令
    python manage.py makemigrations
    python manage.py migrate

'''
这种方法可以创建表,当你在models.py中新增了类时,运行它就可以自动在数据库中创建表了,不用手动创建。
5、清空数据库
python manage.py flush
此命令会询问是 yes 还是 no, 选择 yes 会把数据全部清空掉,只留下空表。
6、创建超级管理员
'''
    python manage.py createsuperuser

    # 按照提示输入用户名和对应的密码就好了邮箱可以留空,用户名和密码必填

    # 修改 用户密码可以用:
    python manage.py changepassword username

'''
7、Django 项目环境终端
python manage.py shell
这个命令和 直接运行 python 进入 shell 的区别是:你可以在这个 shell 里面调用当前项目的 models.py 中的 API,对于操作数据的测试非常方便。
8、Django 项目环境终端
ython manage.py dbshell
Django 会自动进入在settings.py中设置的数据库,如果是 MySQL 或 postgreSQL,会要求输入数据库用户密码。
在这个终端可以执行数据库的SQL语句。如果您对SQL比较熟悉,可能喜欢这种方式。
9、更多命令
python manage.py
查看所有的命令,忘记子名称的时候特别有用。
10 static配置
#3、STATIC文件还可以配置STATICFILES_DIRS,指定额外的静态文件存储位置。
    #  STATIC_URL的含义与MEDIA_URL类似。

    # ----------------------------------------------------------------------------
    #注意1:
        #为了后端的更改不会影响前端的引入,避免造成前端大量修改

        STATIC_URL = '/static/'               #引用名
        STATICFILES_DIRS = (
            os.path.join(BASE_DIR,"statics")  #实际名 ,即实际文件夹的名字
        )

        #django对引用名和实际名进行映射,引用时,只能按照引用名来,不能按实际名去找
        #<script src="/statics/jquery-3.1.1.js"></script>
        #------error-----不能直接用,必须用STATIC_URL = '/static/':
        #<script src="/static/jquery-3.1.1.js"></script>

    #注意2(statics文件夹写在不同的app下,静态文件的调用):

        STATIC_URL = '/static/'

        STATICFILES_DIRS=(
            ('hello',os.path.join(BASE_DIR,"app01","statics")) ,
        )

        #<script src="/static/hello/jquery-1.8.2.min.js"></script>

    #注意3:
        STATIC_URL = '/static/'
        {% load staticfiles %}
       # <script src={% static "jquery-1.8.2.min.js" %}></script>
二 路由配置系统(URLconf)
URL配置(URLconf)就像Django 所支撑网站的目录。它的本质是URL与要为该URL调用的视图函数之间的映射表;你就是以这种方式告诉Django,对于这个URL调用这段代码,对于那个URL调用那段代码。
 '''

    urlpatterns = [
         url(正则表达式, views视图函数,参数,别名),
]


参数说明:

    一个正则表达式字符串
    一个可调用对象,通常为一个视图函数或一个指定视图函数路径的字符串
    可选的要传递给视图函数的默认参数(字典形式)
    一个可选的name参数

    '''
2.1 URLconf的正则字符串参数
2.1.1 简单配置
from django.conf.urls import url

from . import views

urlpatterns = [
    url(r'^articles/2003/$', views.special_case_2003),
    url(r'^articles/([0-9]{4})/$', views.year_archive),
    url(r'^articles/([0-9]{4})/([0-9]{2})/$', views.month_archive),
    url(r'^articles/([0-9]{4})/([0-9]{2})/([0-9]+)/$', views.article_detail),
]
   '''
    NOTE:
    1 一旦匹配成功则不再继续
    2 若要从URL 中捕获一个值,只需要在它周围放置一对圆括号。
    3 不需要添加一个前导的反斜杠,因为每个URL 都有。例如,应该是^articles 而不是 ^/articles。
    4 每个正则表达式前面的'r' 是可选的但是建议加上。

一些请求的例子:

    /articles/2005/3/ 不匹配任何URL 模式,因为列表中的第三个模式要求月份应该是两个数字。
    /articles/2003/ 将匹配列表中的第一个模式不是第二个,因为模式按顺序匹配,第一个会首先测试是否匹配。
    /articles/2005/03/ 请求将匹配列表中的第三个模式。Django 将调用函数
                       views.month_archive(request, '2005', '03')。
    '''
#设置项是否开启URL访问地址后面不为/跳转至带有/的路径
APPEND_SLASH=True
2.1.2 有名分组(named group)
上面的示例使用简单的、没有命名的正则表达式组(通过圆括号)来捕获URL 中的值并以位置 参数传递给视图。在更高级的用法中,可以使用命名的正则表达式组来捕获URL 中的值并以关键字 参数传递给视图。
在Python 正则表达式中,命名正则表达式组的语法是(?P<name>pattern),其中name 是组的名称,pattern 是要匹配的模式。
下面是以上URLconf 使用命名组的重写:
from django.conf.urls import url

from . import views

urlpatterns = [
    url(r'^articles/2003/$', views.special_case_2003),
    url(r'^articles/(?P<year>[0-9]{4})/$', views.year_archive),
    url(r'^articles/(?P<year>[0-9]{4})/(?P<month>[0-9]{2})/$', views.month_archive),
    url(r'^articles/(?P<year>[0-9]{4})/(?P<month>[0-9]{2})/(?P<day>[0-9]{2})/$', views.article_detail),
]
这个实现与前面的示例完全相同,只有一个细微的差别:捕获的值作为关键字参数而不是位置参数传递给视图函数。例如:
    /articles/2005/03/
    请求将调用views.month_archive(request, year='2005', month='03')函数
    /articles/2003/03/03/
    请求将调用函数views.article_detail(request, year='2003', month='03', day='03')。
在实际应用中,这意味你的URLconf 会更加明晰且不容易产生参数顺序问题的错误 —— 你可以在你的视图函数定义中重新安排参数的顺序。当然,这些好处是以简洁为代价;有些开发人员认为命名组语法丑陋而繁琐。
2.1.3 URLconf 在什么上查找
URLconf 在请求的URL 上查找,将它当做一个普通的Python 字符串。不包括GET和POST参数以及域名。
例如,http://www.example.com/myapp/ 请求中,URLconf 将查找myapp/。
在http://www.example.com/myapp/?page=3 请求中,URLconf 仍将查找myapp/。
URLconf 不检查请求的方法。换句话讲,所有的请求方法 —— 同一个URL的POST、GET、HEAD等等 —— 都将路由到相同的函数。
2.1.4 捕获的参数永远是字符串
每个捕获的参数都作为一个普通的Python 字符串传递给视图,无论正则表达式使用的是什么匹配方式。例如,下面这行URLconf 中:
url(r'^articles/(?P<year>[0-9]{4})/$', views.year_archive),
views.year_archive() 的year 参数将是一个字符串
2.1.5 指定视图参数的默认值
有一个方便的小技巧是指定视图参数的默认值。 下面是一个URLconf 和视图的示例:
# URLconf
from django.conf.urls import url

from . import views

urlpatterns = [
    url(r'^blog/$', views.page),
    url(r'^blog/page(?P<num>[0-9]+)/$', views.page),
]

# View (in blog/views.py)
def page(request, num="1"):

    ...
在上面的例子中,两个URL模式指向同一个视图views.page —— 但是第一个模式不会从URL 中捕获任何值。如果第一个模式匹配,page() 函数将使用num参数的默认值"1"。如果第二个模式匹配,page() 将使用正则表达式捕获的num 值。
2.1.6 Including other URLconfs
#At any point, your urlpatterns can “include” other URLconf modules. This
#essentially “roots” a set of URLs below other ones.

#For example, here’s an excerpt of the URLconf for the Django website itself.
#It includes a number of other URLconfs:


from django.conf.urls import include, url

urlpatterns = [
   url(r'^admin/', admin.site.urls),
   url(r'^blog/', include('blog.urls')),
]
2.2 传递额外的选项给视图函数(了解)
URLconfs 具有一个钩子,让你传递一个Python 字典作为额外的参数传递给视图函数。
django.conf.urls.url() 函数可以接收一个可选的第三个参数,它是一个字典,表示想要传递给视图函数的额外关键字参数。
例如:
from django.conf.urls import url
from . import views

urlpatterns = [
    url(r'^blog/(?P<year>[0-9]{4})/$', views.year_archive, {'foo': 'bar'}),
]
在这个例子中,对于/blog/2005/请求,Django 将调用views.year_archive(request, year='2005', foo='bar')。
这个技术在Syndication 框架中使用,来传递元数据和选项给视图。
2.3 name参数
'''

urlpatterns = [
    url(r'^index',views.index,name='INDEX'),

]
###################

def index(req):
    if req.method=='POST':
        username=req.POST.get('username')
        password=req.POST.get('password')
        if username=='alex' and password=='123':
            return HttpResponse("登陆成功")

    return render(req,'index.html')

#####################

<!DOCTYPE html>
<html lang="en">
<head>
    <meta charset="UTF-8">
    <title>Title</title>
</head>
<body>
{#     <form action="/index/" method="post">#}
     <form action="{% url 'INDEX' %}" method="post">
         用户名:<input type="text" name="username">
         密码:<input type="password" name="password">
         <input type="submit" value="submit">
     </form>
</body>
</html>


#######################

'''
三 编写视图
一个视图函数,或者简短来说叫做视图,是一个简单的Python函数,它接受web请求,并且返回web响应。响应可以是一张网页的HTML内容,一个重定向,一个404错误,一个XML文档,或者一张图片. . . 是任何东西都可以。无论视图本身包含什么逻辑,都要返回响应。代码写在哪里也无所谓,只要它在你的Python目录下面。除此之外没有更多的要求了——可以说“没有什么神奇的地方”。为了能够把代码放在某个地方,惯例是把视图放在叫做views.py的文件中,然后把它放到你的项目或者应用目录里。
3.1 一个简单的视图
下面是一个返回当前日期和时间作为HTML文档的视图:
from django.http import HttpResponse
import datetime

def current_datetime(request):
    now = datetime.datetime.now()
    html = "<html><body>It is now %s.</body></html>" % now
    return HttpResponse(html)
让我们逐行阅读上面的代码:
首先,我们从 django.http模块导入了HttpResponse类,以及Python的datetime库。
接着,我们定义了current_datetime函数。它是一个视图函数。每个视图函数都应接收HttpRequest对象作为第一个参数,一般叫做request。
注意视图函数的名称并不重要;不需要用一个统一的命名方式来命名,以便让Django识别它。我们将其命名为current_datetime,是因为这个名称能够精确地反映出它的功能。
这个视图会返回一个HttpResponse对象,其中包含生成的响应。每个视图函数都要返回HttpResponse对象
'''
http请求-响应过程中有两个核心对象:

        http请求对象:HttpRequest

        http响应响应:HttpResponse

所在位置:django.http

'''
3.2 快捷函数
3.2.1 render函数
---------------render(request, template_name[, context])

结合一个给定的模板和一个给定的上下文字典,并返回一个渲染后的 HttpResponse 对象。

参数:
     request: 用于生成响应的请求对象。

     template_name:要使用的模板的完整名称,可选的参数

     context:添加到模板上下文的一个字典。默认是一个空字典。如果字典中的某个值是可调用的,视图将在渲染模板之前调用它。

     content_type:生成的文档要使用的MIME类型。默认为DEFAULT_CONTENT_TYPE 设置的值。

     status:响应的状态码。默认为200。
3.2.2 redirect函数
-----------------------------------url.py

 url(r"login",   views.login),
 url(r"yuan_back",   views.yuan_back),

-----------------------------------views.py
def login(req):
    if req.method=="POST":
        if 1:
            # return redirect("/yuan_back/")
            name="yuanhao"

            return render(req,"my backend.html",locals())

    return render(req,"login.html",locals())


def yuan_back(req):

    name="苑昊"

    return render(req,"my backend.html",locals())

-----------------------------------login.html

<form action="/login/" method="post">
    <p>姓名<input type="text" name="username"></p>
    <p>性别<input type="text" name="sex"></p>
    <p>邮箱<input type="text" name="email"></p>
    <p><input type="submit" value="submit"></p>
</form>
-----------------------------------my backend.html
<h1>用户{{ name }}你好</h1>

#总结: render和redirect的区别:
#   1 if render的页面需要模板语言渲染,需要的将数据库的数据加载到html,那么所有的这一部分
#     除了写在yuan_back的视图函数中,必须还要写在login中,代码重复,没有解耦.

#   2 the most important: url没有跳转到/yuan_back/,而是还在/login/,所以当刷新后
#     又得重新登录.
四 Template
4.1 模板系统的介绍
你可能已经注意到我们在例子视图中返回文本的方式有点特别。 也就是说,HTML被直接硬编码在 Python代码之中。
def current_datetime(request):
    now = datetime.datetime.now()
    html = "<html><body>It is now %s.</body></html>" % now
    return HttpResponse(html)
尽管这种技术便于解释视图是如何工作的,但直接将HTML硬编码到你的视图里却并不是一个好主意。 让我们来看一下为什么:
-
对页面设计进行的任何改变都必须对 Python 代码进行相应的修改。 站点设计的修改往往比底层 Python 代码的修改要频繁得多,因此如果可以在不进行 Python 代码修改的情况下变更设计,那将会方便得多。
-
Python 代码编写和 HTML 设计是两项不同的工作,大多数专业的网站开发环境都将他们分配给不同的人员(甚至不同部门)来完成。 设计者和HTML/CSS的编码人员不应该被要求去编辑Python的代码来完成他们的工作。
-
程序员编写 Python代码和设计人员制作模板两项工作同时进行的效率是最高的,远胜于让一个人等待另一个人完成对某个既包含 Python又包含 HTML 的文件的编辑工作。
基于这些原因,将页面的设计和Python的代码分离开会更干净简洁更容易维护。 我们可以使用 Django的 模板系统 (Template System)来实现这种模式,这就是本章要具体讨论的问题。
python的模板:HTML代码+逻辑控制代码
4.2 模板支持的语法
4.2.1 变量(使用双大括号来引用变量)
语法格式: {{var_name}}
----------------------------------Template和Context对象
>>> python manange.py shell  (进入该django项目的环境)
>>> from django.template import Context, Template
>>> t = Template('My name is {{ name }}.')
>>> c = Context({'name': 'Stephane'})
>>> t.render(c)
'My name is Stephane.'


# 同一模板,多个上下文,一旦有了模板对象,你就可以通过它渲染多个context,无论何时我们都可以
# 像这样使用同一模板源渲染多个context,只进行 一次模板创建然后多次调用render()方法渲染会
# 更为高效:
# Low
for name in ('John', 'Julie', 'Pat'):
    t = Template('Hello, {{ name }}')
    print t.render(Context({'name': name}))

# Good
t = Template('Hello, {{ name }}')
for name in ('John', 'Julie', 'Pat'):
    print t.render(Context({'name': name}))
Django 模板解析非常快捷。 大部分的解析工作都是在后台通过对简短正则表达式一次性调用来完成。 这和基于 XML 的模板引擎形成鲜明对比,那些引擎承担了 XML 解析器的开销,且往往比 Django 模板渲染引擎要慢上几个数量级。
from django.shortcuts import render,HttpResponse
from django.template.loader import get_template #记得导入
# Create your views here.


import datetime
from django.template import Template,Context

# def current_time(req):
    #原始的视图函数
    # now=datetime.datetime.now()
    # html="<html><body>现在时刻:<h1>%s.</h1></body></html>" %now
    # return HttpResponse(html)


# def current_time(req):

      #django模板修改的视图函数
#     now=datetime.datetime.now()
#     t=Template('<html><body>现在时刻是:<h1 style="color:red">{{current_date}}</h1></body></html>')
      #t=get_template('current_datetime.html')
#     c=Context({'current_date':now})
#     html=t.render(c)
#     return HttpResponse(html)

#另一种写法(推荐)

def current_time(req):

    now=datetime.datetime.now()

    return render(req, 'current_datetime.html', {'current_date':now})
4.2.2 深度变量的查找(万能的句点号)
在到目前为止的例子中,我们通过 context 传递的简单参数值主要是字符串,然而,模板系统能够非常简洁地处理更加复杂的数据结构,例如list、dictionary和自定义的对象。在 Django 模板中遍历复杂数据结构的关键是句点字符 (.)。
#最好是用几个例子来说明一下。
# 首先,句点可用于访问列表索引,例如:

>>> from django.template import Template, Context
>>> t = Template('Item 2 is {{ items.2 }}.')
>>> c = Context({'items': ['apples', 'bananas', 'carrots']})
>>> t.render(c)
'Item 2 is carrots.'

#假设你要向模板传递一个 Python 字典。 要通过字典键访问该字典的值,可使用一个句点:
>>> from django.template import Template, Context
>>> person = {'name': 'Sally', 'age': '43'}
>>> t = Template('{{ person.name }} is {{ person.age }} years old.')
>>> c = Context({'person': person})
>>> t.render(c)
'Sally is 43 years old.'

#同样,也可以通过句点来访问对象的属性。 比方说, Python 的 datetime.date 对象有
#year 、 month 和 day 几个属性,你同样可以在模板中使用句点来访问这些属性:

>>> from django.template import Template, Context
>>> import datetime
>>> d = datetime.date(1993, 5, 2)
>>> d.year
1993
>>> d.month
5
>>> d.day
2
>>> t = Template('The month is {{ date.month }} and the year is {{ date.year }}.')
>>> c = Context({'date': d})
>>> t.render(c)
'The month is 5 and the year is 1993.'

# 这个例子使用了一个自定义的类,演示了通过实例变量加一点(dots)来访问它的属性,这个方法适
# 用于任意的对象。
>>> from django.template import Template, Context
>>> class Person(object):
...     def __init__(self, first_name, last_name):
...         self.first_name, self.last_name = first_name, last_name
>>> t = Template('Hello, {{ person.first_name }} {{ person.last_name }}.')
>>> c = Context({'person': Person('John', 'Smith')})
>>> t.render(c)
'Hello, John Smith.'

# 点语法也可以用来引用对象的方法。 例如,每个 Python 字符串都有 upper() 和 isdigit()
# 方法,你在模板中可以使用同样的句点语法来调用它们:
>>> from django.template import Template, Context
>>> t = Template('{{ var }} -- {{ var.upper }} -- {{ var.isdigit }}')
>>> t.render(Context({'var': 'hello'}))
'hello -- HELLO -- False'
>>> t.render(Context({'var': '123'}))
'123 -- 123 -- True'

# 注意这里调用方法时并* 没有* 使用圆括号 而且也无法给该方法传递参数;你只能调用不需参数的
# 方法。
4.2.3 变量的过滤器(filter)的使用
语法格式: {{obj|filter:param}}
 # 1  add          :   给变量加上相应的值
   #
   # 2  addslashes   :    给变量中的引号前加上斜线
   #
   # 3  capfirst     :    首字母大写
   #
   # 4  cut          :   从字符串中移除指定的字符
   #
   # 5  date         :   格式化日期字符串
   #
   # 6  default      :   如果值是False,就替换成设置的默认值,否则就是用本来的值
   #
   # 7  default_if_none:  如果值是None,就替换成设置的默认值,否则就使用本来的值


#实例:

#value1="aBcDe"
{{ value1|upper }}<br>

#value2=5
{{ value2|add:3 }}<br>

#value3='he  llo wo r ld'
{{ value3|cut:' ' }}<br>

#import datetime
#value4=datetime.datetime.now()
{{ value4|date:'Y-m-d' }}<br>

#value5=[]
{{ value5|default:'空的' }}<br>

#value6='<a href="#">跳转</a>'

{{ value6 }}

{% autoescape off %}
  {{ value6 }}
{% endautoescape %}

{{ value6|safe }}<br>

{{ value6|striptags }}

#value7='1234'
{{ value7|filesizeformat }}<br>
{{ value7|first }}<br>
{{ value7|length }}<br>
{{ value7|slice:":-1" }}<br>

#value8='http://www.baidu.com/?a=1&b=3'
{{ value8|urlencode }}<br>
    value9='hello I am yuan'
4.2.4 标签(tag)的使用(使用大括号和百分比的组合来表示使用tag)
语法格式: {% tags %}
{% if %} 的使用
{% if %}标签计算一个变量值,如果是“true”,即它存在、不为空并且不是false的boolean值,系统则会显示{% if %}和{% endif %}间的所有内容
{% if num >= 100 and 8 %}

    {% if num > 200 %}
        <p>num大于200</p>
    {% else %}
        <p>num大于100小于200</p>
    {% endif %}

{% elif num < 100%}
    <p>num小于100</p>

{% else %}
    <p>num等于100</p>

{% endif %}


{% if %} 标签接受and,or或者not来测试多个变量值或者否定一个给定的变量
{% if %} 标签不允许同一标签里同时出现and和or,否则逻辑容易产生歧义,例如下面的标签是不合法的:

{% if obj1 and obj2 or obj3 %}
{% for %}的使用
{% for %}标签允许你按顺序遍历一个序列中的各个元素,每次循环模板系统都会渲染{% for %}和{% endfor %}之间的所有内容
<ul>
{% for obj in list %}
    <li>{{ obj.name }}</li>
{% endfor %}
</ul>


#在标签里添加reversed来反序循环列表:

    {% for obj in list reversed %}
    ...
    {% endfor %}

#{% for %}标签可以嵌套:

    {% for country in countries %}
        <h1>{{ country.name }}</h1>
        <ul>
         {% for city in country.city_list %}
            <li>{{ city }}</li>
         {% endfor %}
        </ul>
    {% endfor %}


#系统不支持中断循环,系统也不支持continue语句,{% for %}标签内置了一个forloop模板变量,
#这个变量含有一些属性可以提供给你一些关于循环的信息

1,forloop.counter表示循环的次数,它从1开始计数,第一次循环设为1:

    {% for item in todo_list %}
        <p>{{ forloop.counter }}: {{ item }}</p>
    {% endfor %}
2,forloop.counter0 类似于forloop.counter,但它是从0开始计数,第一次循环设为0
3,forloop.revcounter
4,forloop.revcounter0
5,forloop.first当第一次循环时值为True,在特别情况下很有用:


    {% for object in objects %}
         {% if forloop.first %}<li class="first">{% else %}<li>{% endif %}
         {{ object }}
        </li>
    {% endfor %}

# 富有魔力的forloop变量只能在循环中得到,当模板解析器到达{% endfor %}时forloop就消失了
# 如果你的模板context已经包含一个叫forloop的变量,Django会用{% for %}标签替代它
# Django会在for标签的块中覆盖你定义的forloop变量的值
# 在其他非循环的地方,你的forloop变量仍然可用


#{% empty %}

{{li }}
      {%  for i in li %}
          <li>{{ forloop.counter0 }}----{{ i }}</li>
      {% empty %}
          <li>this is empty!</li>
      {% endfor %}

#         [11, 22, 33, 44, 55]
#            0----11
#            1----22
#            2----33
#            3----44
#            4----55
csrf_token标签
用于生成csrf_token的标签,用于防治跨站攻击验证。 其实,这里是会生成一个input标签,和其他表单标签一起提交给后台的。
{% url %}
引用路由配置的地址
<form action="{% url "bieming"%}" >
          <input type="text">
          <input type="submit"value="提交">
          {%csrf_token%}
</form>
{% with %}
用更简单的变量名替代复杂的变量名
{% with total=fhjsaldfhjsdfhlasdfhljsdal %} {{ total }} {% endwith %}
{% verbatim %}
禁止render
{% verbatim %}
         {{ hello }}
{% endverbatim %}
加载标签库:自定义filter和simple_tag
a、在app中创建templatetags模块(必须的)
b、创建任意 .py 文件,如:my_tags.py
from django import template
from django.utils.safestring import mark_safe

register = template.Library()   #register的名字是固定的,不可改变


@register.filter
def filter_multi(v1,v2):
    return  v1 * v2


@register.simple_tag
def simple_tag_multi(v1,v2):
    return  v1 * v2


@register.simple_tag
def my_input(id,arg):
    result = "<input type='text' id='%s' class='%s' />" %(id,arg,)
    return mark_safe(result)
c、在使用自定义simple_tag和filter的html文件中导入之前创建的 my_tags.py :{% load my_tags %}
d、使用simple_tag和filter(如何调用)
-------------------------------.html
{% load xxx %}   #首行


 # num=12
{{ num|filter_multi:2 }} #24

{{ num|filter_multi:"[22,333,4444]" }}


{% simple_tag_multi 2 5 %}  参数不限,但不能放在if for语句中
{% simple_tag_multi num 5 %}
e、在settings中的INSTALLED_APPS配置当前app,不然django无法找到自定义的simple_tag.
注意:
filter可以用在if等语句后,simple_tag不可以
{% if num|filter_multi:30 > 100 %}
    {{ num|filter_multi:30 }}
{% endif %}