一、什么是MyBatis
简介
MyBatis 是一款优秀的持久层框架,它支持定制化 SQL、存储过程以及高级映射。MyBatis 避免了几乎所有的 JDBC 代码和手动设置参数以及获取结果集。MyBatis 可以使用简单的 XML 或注解来配置和映射原生信息,将接口和 Java 的 POJOs(Plain Old Java Objects,普通的 Java对象)映射成数据库中的记录。
个人认为其核心是resultMap
入门
1、添加依赖包(我使用Maven管理项目,当然也可以直接下载jar包)
<!-- MyBaits -->
<dependency>
    <groupId>org.mybatis</groupId>
    <artifactId>mybatis</artifactId>
    <version>3.4.6</version>
</dependency>
<!-- MySQL -->
<dependency>
    <groupId>mysql</groupId>
    <artifactId>mysql-connector-java</artifactId>
    <scope>runtime</scope>
</dependency>
我使用的是mysql,你也可以换成其他的数据库
2、创建工程,并创建相应的文件
创建Maven工程,并在source文件夹下创建mybatis-config.xml

3、填写内容
在mybatis-config.xml内添加以下内容
<?xml version="1.0" encoding="UTF-8"?>
<!DOCTYPE configuration PUBLIC "-//mybatis.org//DTD Config 3.0//EN" "http://mybatis.org/dtd/mybatis-3-config.dtd">
<configuration>
    <!-- mybatis的打印,可以打印出sql -->
    <settings>
        <setting name="logImpl" value="STDOUT_LOGGING"/>        <!-- log4j -->
    </settings>
    <!-- 配置数据库环境/数据 -->
    <environments default="development">
        <environment id="development">
            <!-- 事务管理 -->
            <transactionManager type="jdbc"></transactionManager>
            <dataSource type="POOLED">
                <property name="driver" value="${driver}" />
                <property name="url" value="${url}" />
                <property name="username" value="${username}" />
                <property name="password" value="${password}" />
            </dataSource>
        </environment>
    </environments>

    <mappers>
        <mapper resource="com/demo/map/example/StudentMapper.xml" />
    </mappers>
</configuration>
到这里我们就搭建完了基础的配置,接下来是搭建映射文件,也就是将数据库和pojo一一对应的文件/配置
4、创建映射文件
StudentMapper.java(接口)/StudentMapper.xml两个文件需要放在同一个包内,使mybatis可以直接找到,我是放在*.*.*mapper包内
public interface StudentMapper {
    public Student selectStudntById(int id);
}
.xml
<?xml version="1.0" encoding="UTF-8"?>
<!DOCTYPE mapper
  PUBLIC "-//mybatis.org//DTD Mapper 3.0//EN"
  "http://mybatis.org/dtd/mybatis-3-mapper.dtd">
<mapper namespace="com.mei.demo.entity.map.example.StudentMapper">
  <!-- 表与对象映射 -->
    <resultMap id="studentmapper"
        type="com.mei.demo.entity.map.example.Student">
        <constructor>
            <idArg column="std_id" javaType="int" />
        </constructor>
        <result property="name" column="std_name" />
        <result property="picture" column="std_pic" />
        <result property="sex" column="std_sex" />
    </resultMap>

<!-- 查询语句 -->
    <select id="selectStudntById" resultMap="studentmapper-one">
        select * from student where id=#{id}
    </select>

</mapper>
5、测试
SqlSessionFactory sqlSF = new SqlSessionFactoryBuilder().build(inputS);
// 获取sqlSession
sqlS = sqlSF.openSession();
Student s = sqlS.selectOne("com.mei.demo.entity.map.example.StudentMapper.selectStudntById", 1);
二、如何使用MyBatis
上面的简单例子中已经将流程展示出来了,下面是对相关配置的简单解释
第一步:配置mybatis-config.xml
<?xml version="1.0" encoding="UTF-8"?>
<!DOCTYPE mapper
  PUBLIC "-//mybatis.org//DTD Mapper 3.0//EN"
  "http://mybatis.org/dtd/mybatis-3-mapper.dtd">
<configuration>
    <!-- properties -->
    <!-- 有三种配置方式 -->
    <!-- 直接使用property 最先加载 -->
    <properties>
        <property name="driver" value="com.mysql.jdbc.Driver" />
        <property name="url"
            value="jdbc:mysql://localhost:3306/mybatis_db?charset='utf-8'&useSSL=true" />
        <property name="username" value="root" />
        <property name="password" value="123456" />
    </properties>

    <!-- 使用properties文件 其次被加载 -->
    <properties resource="some.properties" />

    <!-- 程序参数传递 最后被加载 -->
    <!-- 1、使用Reader流读取配置文件信息 2、将参数根据参数名set到新的properties 3、使用SessionFactoryBuilder构建工厂 -->
    <!-- 如果同时存在三种方式,那么程序参数的优先级最高,其次是文件加载,元素体内的property的优先级是最低的 -->


    <!-- setting -->
    <settings>
        <!-- 缓存 -->
        <setting name="cacheEnabled" value="true"/>
        <!-- 各种其他配置... -->
    </settings>


    <!-- 别名 typeAliases 自定义别名 -->
    <typeAliases>
        <typeAliase alias="student" type="com.mei.demo.entity.Student"/>
        <package name="com.mei.demo.entity"/>
    </typeAliases>


    <!-- 类型处理器typeHandlers -->
    <typeHandlers>
        <!-- 利用typeHandler转换枚举值
        1、在config.xml指定typeHandler
        2、在Mapper中对应的属性上添加typeHandler
        3、在执行语句中用到该属性的地方也需要指定typeHandler

        EnumTypeHandler:使用枚举名称去处理Java
        EnumOrdinalTypeHandler:使用整数下标作参数传递
        -->
        <typeHandler></typeHandler>
    </typeHandlers>

    <!-- 对象工厂 objectFactory -->

    <!-- plugins 插件 -->
    <plugins></plugins>

    <!-- 环境 environments -->
    <environments default="development">
        <enviroment id="development">
            <transactionManager type="JDBC" />
            <!-- 配置数据库的基本信息 -->
            <dataSource type="POOLED">
                <property name="driver" value="com.mysql.jdbc.Driver" />
                <property name="url"
                    value="jdbc:mysql://localhost:3306/mybatis_db" />
                <property name="username" value="root" />
                <property name="password" value="123456" />
            </dataSource>
        </enviroment>
    </environments>

    <!-- databaseIdProvider 数据库厂商标识 -->


    <!-- 映射文件 -->
    <mappers>
        <mapper resource="com/mei/demo/entity/StudentMapper.xml" />
    </mappers>
</configuration>
在Eclipse中需要按照顺序排列,否则会报错,不要问我为什么知道,都是痛
第二步:创建Mapper和Mapper.xml
<?xml version="1.0" encoding="UTF-8"?>
<!DOCTYPE mapper PUBLIC "-//mybatis.org//DTD Mapper 3.0//EN"
        "http://mybatis.org/dtd/mybatis-3-mapper.dtd">
<mapper namespace="com.mei.demo.entity.StudentMapper">

    <!-- resultMap -->
    <resultMap></resultMap>


    <!-- update/delete -->


    <!-- insert -->


    <!-- parameterMap -->


    <!-- sql -->


    <!-- cache -->


    <!-- cache-ref -->


    <!-- select -->
    <!-- 对于映射,只要表对应的字段和bean属性的名字一致就很少需要配置了 -->
    <select id="findStudentById" parameterType="int" resultType="com.mei.demo.entity.Student">
        select * from STUDENT where id=#{id};
    </select>
</mapper>
第三步:创建SqlSessionFactory
InputStream inputS = Resources.getResourceAsStream("mybatis-config-test.xml");
// 获取factory
SqlSessionFactory sqlSF = new SqlSessionFactoryBuilder().build(inputS);
第四步:使用SqlSession执行sql操作
// 获取sqlSession
sqlS = sqlSF.openSession();
Student s = sqlS.selectOne("com.mei.demo.entity.map.example.StudentMapper.selectStudntById", 1);
在SpringBoot中使用mybatis
SpringBoot是不需要自己去创建sessionFactory的,使用自动配置,但需要添加依赖库 mybatis-spring-boot-starter
<dependency>
    <groupId>org.mybatis.spring.boot</groupId>
    <artifactId>mybatis-spring-boot-starter</artifactId>
    <version>1.3.2</version>
</dependency>
添加完成后,在 application.properties 添加数据库的配置
# database info
spring.datasource.driver-class-name=com.mysql.jdbc.Driver
spring.datasource.url=jdbc:mysql://localhost:3306/diary_springboot
spring.datasource.username=root
spring.datasource.password=123456

# database setting
spring.datasource.max-active=20
spring.datasource.max-idle=8
spring.datasource.min-idle=4
spring.datasource.initial-size=10
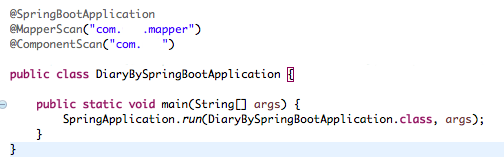
走到这一步基本上就配置完了,只需要我们创建相关的mapper文件,然后在添加Mapper扫描 @MapperScan("com.test.mapper") ,一般是放在配置文件里,也可以放在启动文件内,如:
应用会自动加载相关的配置
三、总结
在使用MyBatis之后,觉得resultMap是这个框架的核心,或者说对象间的关系处理是复杂的。
简单来说对象间的关系分为:一对一,一对多,多对多,可以是逆过程,不过在测试过程中印证了很多大牛说的,相互关联会导致效率极低,所以建议避免使用相互包含。
其实mybatis的文档写的非常详细,点击这里查看。
参考:
http://www.mybatis.org/mybatis-3/zh/index.html