一、分析fork系统调用
fork系统调用简介
fork 系统调用将创建一个与父进程几乎一样的新进程,之后继续执行下面的指令。程序可以根据 fork的返回值,确定当前处于父进程中,还是子进程中——在父进程中,返回值为新创建子进程的进程 ID,在子进程中,返回值是 0。
首先以一个例子来展示fork系统调用的效果,其代码如下:
#include <stdio.h>
#include <unistd.h>

int main(int argc, char * argv[])
{
    int pid,number=0;
    /* fork another process */
    printf("Start!
");
    printf("----------------------
");
    pid = fork();
    if (pid < 0)
    {
    /* error occurred */
    }
    else if (pid == 0)
    {
        /* child process */
        printf("fork pid=%d
",pid);
        printf("[%04d]I am child!
", getpid());
        printf("Number = %d
",number);
        number++;
    }
    else
    {
        /* parent process */
        printf("fork pid=%d
",pid);
        printf("[%04d]I am parent!
", getpid());
        printf("Number = %d
",number);
        number++;
    }

    printf("Number = %d
",number);
    printf("Process finished.

");
}
将代码静态编译后放入根文件系统的home目录,打包好后启动虚拟机运行,结果如下:

发现if判断语句中,有两个分支都被执行了,这与我们通常的认知不符。观察输出数据,发现两个分支中的pid不同,说明这两部分是被不同的进程执行的。下面就来具体分析fork系统调用的执行过程,以此来说明进程上下文的切换过程。
fork系统调用的执行过程
通过查询系统调用表可知,fork系统调用最终执行的是__x64_sys_clone、__x64_sys_fork、 __x64_sys_vfork三者之一,而这三个函数最终都会调用_do_fork函数,只是传入的参数不同。因此主要来分析_do_fork函数。
long _do_fork(struct kernel_clone_args *args)
{
	u64 clone_flags = args->flags;
	struct completion vfork;
	struct pid *pid;
	struct task_struct *p;
	int trace = 0;
	long nr;

	/*
	 * Determine whether and which event to report to ptracer.  When
	 * called from kernel_thread or CLONE_UNTRACED is explicitly
	 * requested, no event is reported; otherwise, report if the event
	 * for the type of forking is enabled.
	 */
	if (!(clone_flags & CLONE_UNTRACED)) {
		if (clone_flags & CLONE_VFORK)
			trace = PTRACE_EVENT_VFORK;
		else if (args->exit_signal != SIGCHLD)
			trace = PTRACE_EVENT_CLONE;
		else
			trace = PTRACE_EVENT_FORK;

		if (likely(!ptrace_event_enabled(current, trace)))
			trace = 0;
	}

	p = copy_process(NULL, trace, NUMA_NO_NODE, args);
	add_latent_entropy();

	if (IS_ERR(p))
		return PTR_ERR(p);

	/*
	 * Do this prior waking up the new thread - the thread pointer
	 * might get invalid after that point, if the thread exits quickly.
	 */
	trace_sched_process_fork(current, p);

	pid = get_task_pid(p, PIDTYPE_PID);
	nr = pid_vnr(pid);

	if (clone_flags & CLONE_PARENT_SETTID)
		put_user(nr, args->parent_tid);

	if (clone_flags & CLONE_VFORK) {
		p->vfork_done = &vfork;
		init_completion(&vfork);
		get_task_struct(p);
	}

	wake_up_new_task(p);

	/* forking complete and child started to run, tell ptracer */
	if (unlikely(trace))
		ptrace_event_pid(trace, pid);

	if (clone_flags & CLONE_VFORK) {
		if (!wait_for_vfork_done(p, &vfork))
			ptrace_event_pid(PTRACE_EVENT_VFORK_DONE, pid);
	}

	put_pid(pid);
	return nr;
}
将_do_fork函数简化一下,其主要做了如下三件事情:
- 通过
copy_process复制进程所需的信息 - 通过
wake_up_new_task使创建的子进程加入到就绪队列 - 返回子进程的pid
copy_process函数很长,下面是其精简后的主要代码:
static __latent_entropy struct task_struct *copy_process(
                    struct pid *pid,
                    int trace,
                    int node,
                    struct kernel_clone_args *args)
{
    //复制进程描述符task_struct、创建内核堆栈等
    p = dup_task_struct(current, node);
    /* copy all the process information */
    shm_init_task(p);
    // …
    // 初始化⼦进程内核栈和thread
    retval = copy_thread_tls(clone_flags, args->stack, args->stack_size, p, args->tls);
    // …
    return p;//返回被创建的⼦进程描述符指针
}
至此,子进程的pcb、堆栈等都已创建完毕,只需等待系统调度后即可执行子程序。
但是还有几个疑问没有说明:
- 子进程从什么地方开始执行
- fork函数如何针对父和子进程返回不同的返回值。
以上两个问题的答案都在copy_thread_tls函数中。通过frame->ret_addr = (unsigned long) ret_from_fork; ,将子进程开始执行的地址放入堆栈中,子进程会从ret_from_fork开始执行。
另外,通过childregs->ax = 0;将子进程中rax寄存器对应的栈中的值设定为0,这样相当于是将fork函数的返回值设置为0。对于子进程来说,它是从ret_from_fork开始执行的,其实并没有完整地执行fork函数。而父进程是完整执行fork函数的,在其调用的_do_fork函数中,返回值为nr=pid_vnr(pid);,也就是子进程的pid。
fork子进程启动执行时进程上下文的特殊之处
上文提到fork子进程是从ret_from_fork开始执行的,那么它又是如何从系统调用返回到用户态的呢。解读fork子进程的启动过程就可以找到答案。
在之前的实验中,分析了一般的系统调用执行的过程。在执行具体的系统调用函数之前,我们会将寄存器压入栈中以保存当前被中断进程的上下文,便于系统调用返回后,进程可以继续执行。而对于fork子进程来说,在fork创建之前,它是不存在的,也就根本没有保存在栈中的进程上下文,这就要求程序员来手动在栈中构造进程上下文。
栈的构造是在copy_thread_tls函数中完成的。其结构由struct fork_frame定义如下:
struct fork_frame {
	struct inactive_task_frame frame;
	struct pt_regs regs;
};
与普通的系通调用堆栈相比,多了一个struct inactive_task_frame frame,它就是构造出来用于进行进程切换的。
struct inactive_task_frame {
#ifdef CONFIG_X86_64
	unsigned long r15;
	unsigned long r14;
	unsigned long r13;
	unsigned long r12;
#else
	unsigned long flags;
	unsigned long si;
	unsigned long di;
#endif
	unsigned long bx;

	/*
	 * These two fields must be together.  They form a stack frame header,
	 * needed by get_frame_pointer().
	 */
	unsigned long bp;
	unsigned long ret_addr;
};
ENTRY(__switch_to_asm)
	UNWIND_HINT_FUNC
	/*
	 * Save callee-saved registers
	 * This must match the order in inactive_task_frame
	 */
	pushq	%rbp
	pushq	%rbx
	pushq	%r12
	pushq	%r13
	pushq	%r14
	pushq	%r15

	/* switch stack */
	movq	%rsp, TASK_threadsp(%rdi)
	movq	TASK_threadsp(%rsi), %rsp

#ifdef CONFIG_STACKPROTECTOR
	movq	TASK_stack_canary(%rsi), %rbx
	movq	%rbx, PER_CPU_VAR(fixed_percpu_data) + stack_canary_offset
#endif

#ifdef CONFIG_RETPOLINE
	/*
	 * When switching from a shallower to a deeper call stack
	 * the RSB may either underflow or use entries populated
	 * with userspace addresses. On CPUs where those concerns
	 * exist, overwrite the RSB with entries which capture
	 * speculative execution to prevent attack.
	 */
	FILL_RETURN_BUFFER %r12, RSB_CLEAR_LOOPS, X86_FEATURE_RSB_CTXSW
#endif

	/* restore callee-saved registers */
	popq	%r15
	popq	%r14
	popq	%r13
	popq	%r12
	popq	%rbx
	popq	%rbp

	jmp	__switch_to
END(__switch_to_asm)
上面的是进程切换前的汇编代码,最后出栈的寄存器与inactive_task_frame 结构体内的寄存器数据是相对应的。
最终,fork子进程的内核堆栈结构如下图所示:
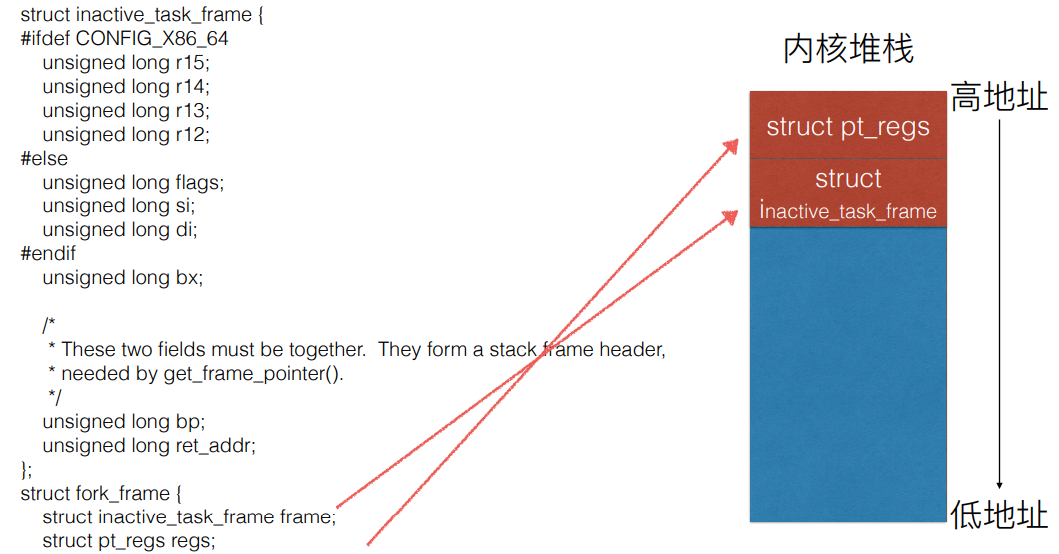
当操作系统的调度程序调度到该子进程时,进程切换程序首先将堆栈顶部的inactive_task_frame 部分出栈,其中的ret_addr就被放入到rip寄存器中,等到进程切换的程序执行完毕,fork子进程就会从ret_from_fork处开始执行。
二、分析execve系统调用
execve系统调用简介
execve在父进程中fork一个子进程,在子进程中调用exec函数启动新的程序。exec函数一共有六个,其中execve为内核级系统调用,其他(execl,execle,execlp,execv,execvp)都是调用execve的库函数。execve系统调用对应的内核处理函数为sys_execve或者__x64_sys_execve,最终都是调用的do_execve。
下面用一个简单的例子来展示execve系统调用的作用,这里以启动ls程序为例。
#include <stdio.h>
#include <unistd.h>

int main(){
    printf("Call execve!
");
    execlp("/bin/ls", "ls", NULL);
    printf("Execve return!
");
}
程序输出结果如下图所示:

该程序正确调用了ls程序以输出当前目录中的内容,但是仔细观察发现main函数最后一行的提示语句没有被输出,这说明执行execve系统调用以后,似乎并没有返回到原来的进程。这就是execev系统调用的特殊之处,该系统调用返回的不再是原来的程序,而是新的可执行程序。
execve系统调用的执行过程
通过gdb调试,发现execve系统调用的顺序如下:
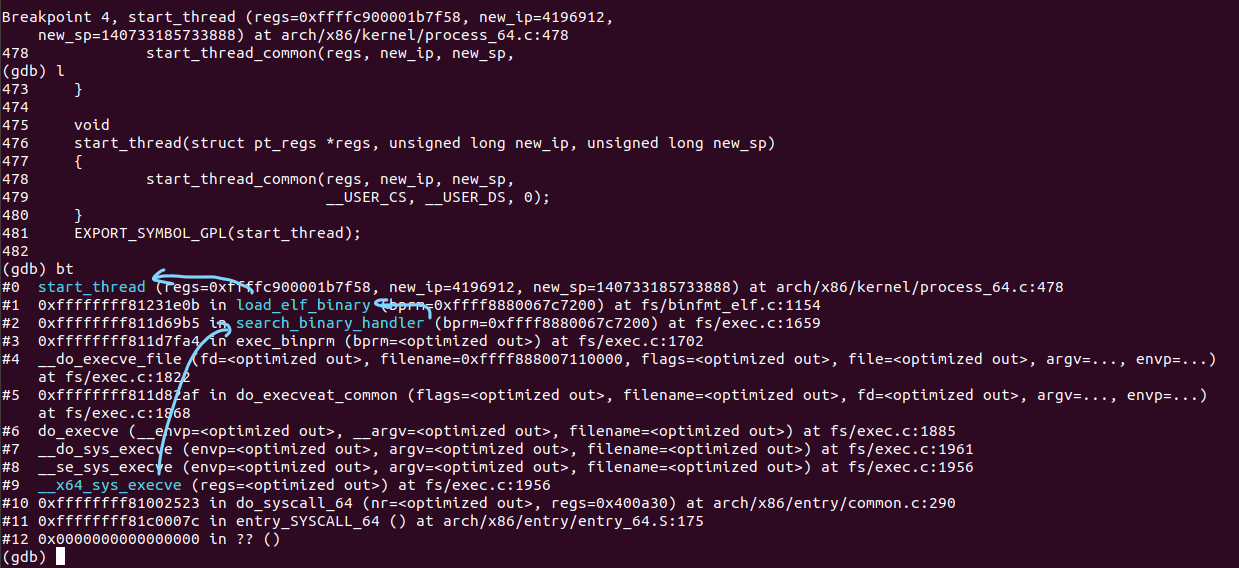
对于 do_execve函数,经过几次参数转换,其最终调用了__do_execve_file函数,在这里面完成了execve系统调用的主要部分。查看__do_execve_file函数,代码很长,前面主要是在进行参数检查及一些程序加载的准备工作,最关键的是retval = exec_binprm(bprm);这句话来加载可执行程序。下面来看下exec_binprm的代码:
static int exec_binprm(struct linux_binprm *bprm)
{
	pid_t old_pid, old_vpid;
	int ret;

	/* Need to fetch pid before load_binary changes it */
	old_pid = current->pid;
	rcu_read_lock();
	old_vpid = task_pid_nr_ns(current, task_active_pid_ns(current->parent));
	rcu_read_unlock();

	ret = search_binary_handler(bprm);
	if (ret >= 0) {
		audit_bprm(bprm);
		trace_sched_process_exec(current, old_pid, bprm);
		ptrace_event(PTRACE_EVENT_EXEC, old_vpid);
		proc_exec_connector(current);
	}

	return ret;
}
关键部分是12行的ret = search_binary_handler(bprm);它会使用各个可以访问二进制的文件的解析模块来尝试加载传入的可执行文件,知道找到合适的解析模块进行解析和执行。search_binary_handler关键部分的代码如下:
list_for_each_entry(fmt, &formats, lh) {
	if (!try_module_get(fmt->module))
		continue;
	read_unlock(&binfmt_lock);
	bprm->recursion_depth++;
	retval = fmt->load_binary(bprm);
	bprm->recursion_depth--;
	read_lock(&binfmt_lock);
	put_binfmt(fmt);
	if (retval < 0 && !bprm->mm) {
		/* we got to flush_old_exec() and failed after it */
		read_unlock(&binfmt_lock);
		force_sigsegv(SIGSEGV);
		return retval;
	}
	if (retval != -ENOEXEC || !bprm->file) {
		read_unlock(&binfmt_lock);
		return retval;
	}
}
在本例中,需要解析的是elf文件,那么第6行的retval = fmt->load_binary(bprm);实际执行的是该解析模块中定义好的加载函数。在linux-5.4.34/fs/binfmt_elf.c文件中,找到了该解析模块定义的各种操作调用的具体函数:
static struct linux_binfmt elf_format = {
	.module		= THIS_MODULE,
	.load_binary	= load_elf_binary,
	.load_shlib	= load_elf_library,
	.core_dump	= elf_core_dump,
	.min_coredump	= ELF_EXEC_PAGESIZE,
};
发现load_binary实际调用的是load_elf_binary函数,这个函数比较长,主要做了以下几件事:
- 检查文件头是否是elf的文件头
- 读取各个部分的内容
- 检查是否需要进行动态链接
- 确定
elf_entry程序入口地址 - 调用
start_thread修改进程上下文
其中,最为关键的就是start_thread函数,它实际调用的是start_thread_common函数,具体代码如下:
static void
start_thread_common(struct pt_regs *regs, unsigned long new_ip,
		    unsigned long new_sp,
		    unsigned int _cs, unsigned int _ss, unsigned int _ds)
{
	WARN_ON_ONCE(regs != current_pt_regs());

	if (static_cpu_has(X86_BUG_NULL_SEG)) {
		/* Loading zero below won't clear the base. */
		loadsegment(fs, __USER_DS);
		load_gs_index(__USER_DS);
	}

	loadsegment(fs, 0);
	loadsegment(es, _ds);
	loadsegment(ds, _ds);
	load_gs_index(0);

	regs->ip		= new_ip;
	regs->sp		= new_sp;
	regs->cs		= _cs;
	regs->ss		= _ss;
	regs->flags		= X86_EFLAGS_IF;
	force_iret();
}
可以看到,内核堆栈中的ip和sp已经被修改掉了,所以也就无法再返回到触发execve系统调用的进程了。
execve系统调用中断上下文的特殊之处
从上面分析的execve系统调用的执行过程可以发现,与一般的系统调用不同,execve系统调用最终并不会返回到触发该系统调用的进程,而是去执行新的进程。与fork系统调用类似,实现这一特性就是要认为修改系统堆栈的内容。通过修改sp和ip这两个cpu关键上下文,实现堆栈和cpu指令的切换,从而运行新的可执行程序。
三、Linux系统的一般执行过程
在操作系统运行过程中,最常见的一个场景就是用户态进程X切换到进程Y,其过程大体如下:
- X进程正在运行
- 发生中断(包括异常、系统调用等),cpu通过msr寄存器保存的入口地址快速跳转到中断处理程序入口
- 中断上下文切换
swapgs指令保存现场- 加载当前进程内核堆栈栈顶地址到rsp寄存器
- cpu关键上下文压栈
- 至此,中断上下文切换完成
- 中断处理过程中或中断返回前调用了schedule函数,其中完成了进程调度算法选择next进程、进程地址空间切换、以及switch_to关键的进程上下文切换
- switch_to调用了__switch_to_asm汇编代码做了关键的进程上下文切换。将当前进程X的内核堆栈切换到进程调度算法选出来的next进程(本例假定为进程Y)的内核堆栈,并完成了进程上下文所需的指令指针寄存器状态切换。之后开始运行进程Y(这里进程Y曾经通过以上步骤被切换出去,因此可以从switch_to下⼀行代码继续执行)
- 中断上下文恢复,与3.中断上下文切换相对应。注意这里是进程Y的中断处理过程中,而3.中断上下文切换是在进程X的中断处理过程中,因为内核堆栈从进程X 切换到进程Y了。
- 为了对应起见,中断上下文恢复的最后⼀步单独拿出来(6.的最后⼀步即是7.)通过
iret从Y进程的内核堆栈中弹出3.中对应的压栈内容。此时完成了中断上下文的切换,即从进程Y的内核态返回到进程Y的用户态。注意快速系统调用返回sysret与iret的处理略有不同。 - Y进程继续运行。